
Unity3D学习笔记(二十九):AssetBundle
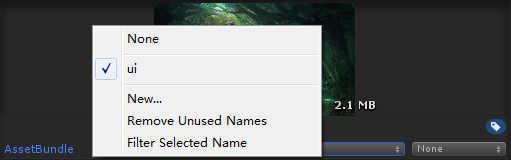
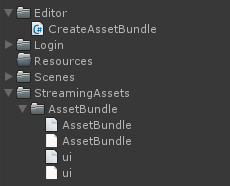
using System.Collections;

using System.Collections.Generic;

using UnityEngine;

using UnityEditor;

public class CreateAssetBundle : MonoBehaviour {

    [MenuItem("AssetBundle/CreateAB")]

    static void CreateAB()

    {

        //第一个参数:AB包的输出路径

        //第二个参数:打包的参数设置,我们设置的是强制性的重新打包

        //第三个参数:AB包的适用平台,不同的平台使用的AB包是不一样的

        BuildPipeline.BuildAssetBundles(

            Application.streamingAssetsPath + "/AssetBundle/",

            BuildAssetBundleOptions.ForceRebuildAssetBundle,

            BuildTarget.StandaloneWindows64

            );

    }

}
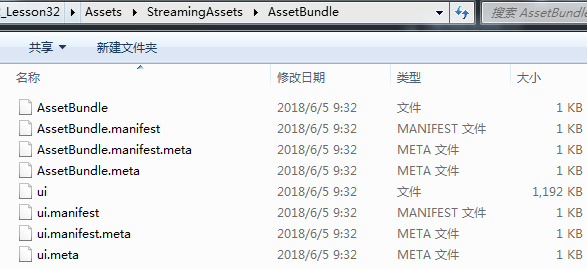
using System.Collections;

using System.Collections.Generic;

using UnityEngine;

using UnityEngine.UI;

public class LoadABTexture : MonoBehaviour {

    private Image image;

    private void Awake()

    {

        image = GetComponent<Image>();

    }

    // Use this for initialization

    void Start () {

        //要是AB包中的资源文件

        //第一种方式:先加载AB包

        //AssetBundle ab = AssetBundle.LoadFromFile(Application.streamingAssetsPath + "/AssetBundle/ui");

        //第二种方式:

        WWW www = new WWW("file://" + Application.streamingAssetsPath + "/AssetBundle/ui");

        AssetBundle ab = www.assetBundle;

        Sprite sp = ab.LoadAsset<Sprite>("beijing_02.jpg");

        image.sprite = sp;

        image.SetNativeSize();

    }

}
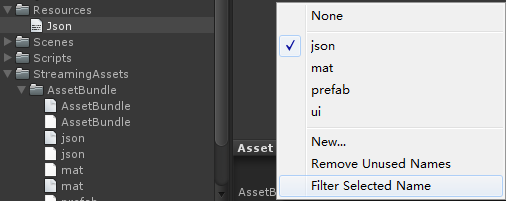
AssetBundle jsonAB = AssetBundle.LoadFromFile(Application.streamingAssetsPath + "/AssetBundle/json");

TextAsset json = jsonAB.LoadAsset<TextAsset>("Json");

Debug.Log(json);
//从AB包中加载预制体,把预制体实例到界面

//加载AB包

AssetBundle uiAB = AssetBundle.LoadFromFile(Application.streamingAssetsPath + "/AssetBundle/ui");

AssetBundle matAB = AssetBundle.LoadFromFile(Application.streamingAssetsPath + "/AssetBundle/mat");

AssetBundle prefabAB = AssetBundle.LoadFromFile(Application.streamingAssetsPath + "/AssetBundle/prefab");

//从AB包中加载预制体

GameObject prefab = prefabAB.LoadAsset<GameObject>("Cube");

//实例化预制体

Instantiate(prefab, transform);
每一个AB包都对应一个.manifest文件(资源清单),包含如下信息
ManifestFileVersion: //版本号

CRC: //CRC循环冗余码

Hashes://资源文件的哈希码,用于检查增量的构建AB包

  AssetFileHash:

    serializedVersion:

    Hash: 82edae0095f36a303261e62246d831ae

  TypeTreeHash:

    serializedVersion:

    Hash: 81fd706e1561f1cfc1872b1168421ee0

HashAppended:

ClassTypes://该AB包中所有资源使用到的类类型,一般情况下对应的都是地址

- Class:

  Script: {instanceID: }

- Class:

  Script: {fileID: , guid: d533bd1959b71b4459e871de8a9975af, type: }

- Class:

  Script: {instanceID: }

Assets://对应该AB包中的所有资源

- Assets/Prefabs/Cube.prefab

Dependencies://该AB包的直接依赖

- "D:/Unity3D\u6E38\u620F\u5F00\u53D1\u5DE5\u7A0B\u5E08\u73ED1803\u671F-\u706B\u661F\u65F6\u4EE3/Unity3D/Unity_Projects/m3w3d2_Lesson32/Assets/StreamingAssets/AssetBundle/ui"//路径里的中文用16进制显示
ManifestFileVersion:

CRC:

AssetBundleManifest:

  AssetBundleInfos:

    Info_0:

      Name: ui

      Dependencies: {}

    Info_1:

      Name: mat

      Dependencies: {}

    Info_2:

      Name: prefab

      Dependencies:

        Dependency_0: ui
//使用AB包的步骤

//1、加载总的构建的AB包

AssetBundle singleAB = AssetBundle.LoadFromFile(Application.streamingAssetsPath + "/AssetBundle/AssetBundle");

//2、从单一的AB包中去加载构建清单

AssetBundleManifest singleManifest = singleAB.LoadAsset<AssetBundleManifest>("AssetBundleManifest");

//3、从构建清单中获取指定的AB包的所有的依赖项,并加载所有的依赖项

//singleManifest.GetAllDependencies("prefab");获取所有的依赖,不管直接还是间接

//singleManifest.GetDirectDependencies("prefab");获取所有的直接依赖

string[] deps = singleManifest.GetAllDependencies("prefab");

for (int i = ; i < deps.Length; i++)

{

    //Debug.Log(deps[i]);

    AssetBundle depAB = AssetBundle.LoadFromFile(Application.streamingAssetsPath + "/AssetBundle/" + deps[i]);

}

//4、加载资源所在的AB包

AssetBundle prefabAB = AssetBundle.LoadFromFile(Application.streamingAssetsPath + "/AssetBundle/prefab");

//5、从AB包中加载资源

GameObject prefab = prefabAB.LoadAsset<GameObject>("Cube");

Instantiate<GameObject>(prefab, transform);
public string[] GetAllDependencies(string assetBundleName);//获取所有依赖(老版本没有)

public string[] GetDirectDependencies(string assetBundleName);//获取直接依赖
using System.Collections;

using System.Collections.Generic;

using UnityEngine;

public class UnloadAB : MonoBehaviour {

    public AssetBundle uiAB;

    public AssetBundle matAB;

    public AssetBundle prefabAB;

    public GameObject prefab;

    // Use this for initialization

    void Start () {

        uiAB = AssetBundle.LoadFromFile(Application.streamingAssetsPath + "/AssetBundle/ui");

        matAB = AssetBundle.LoadFromFile(Application.streamingAssetsPath + "/AssetBundle/mat");

        prefabAB = AssetBundle.LoadFromFile(Application.streamingAssetsPath + "/AssetBundle/prefab");

        prefab = prefabAB.LoadAsset<GameObject>("Cube");

        Instantiate<GameObject>(prefab, transform);

    }

       // Update is called once per frame

       void Update () {

        if (Input.GetKeyDown(KeyCode.Space))//按空格键卸载

        {

            uiAB.Unload(false);

            matAB.Unload(false);

            prefabAB.Unload(false);

        }

    }

}
using System.Collections;

using System.Collections.Generic;

using UnityEngine;

public class LessonDictionary : MonoBehaviour {

    //动态数组的申请方式

    List<string> list = new List<string>();

    //定义一个键是string类型,值是string类型的字典

    Dictionary<string, string> dic1 = new Dictionary<string, string>();

    //定义一个键是string类型,值是GameObject类型的字典

    Dictionary<string, GameObject> dic2 = new Dictionary<string, GameObject>();

    // Use this for initialization

    void Start () {

        //对list进行添加元素

        list.Add("nihao");

        //字典的添加元素,添加的是键值对,第一个参数键,第二个参数值

        dic1.Add("a", "A");

        //这种方式也能添加元素

        dic1["b"] = "C";

        //list改变值的方式

        list[] = "";

        //字典改变这个键对应的值的方式

        dic1["a"] = "B";

        //list通过索引访问元素

        Debug.Log(list[]);

        //字典通过键去访问这个键对应的值

        Debug.Log(dic1["a"]);

        Debug.Log(dic1["b"]);

        //list删除元素

        list.Remove("");

        //字典删除元素,通过键去删除这个键值对

        dic1.Remove("a");

        //list的遍历

        for (int i = ; i < list.Count; i++)

        {

            Debug.Log(list[i]);

        }

        foreach (var item in list)//不能改值,且效率低,产生内存碎片

        {

            Debug.Log(item);

        }

        //字典的遍历

        //遍历字典的键

        foreach (var item in dic1.Keys)

        {

            Debug.Log(item);//打印的键

            Debug.Log(dic1[item]);//打印的值

        }

        //遍历字典的值

        foreach (var item in dic1.Values)

        {

            Debug.Log(item);//打印字典的值

        }

        //遍历字典的键值对

        foreach (KeyValuePair<string,string> item in dic1)

        {

            Debug.Log(item.Key);//打印字典的键

            Debug.Log(item.Value);//打印字典的值

        }

        //list里是否有“1”这个元素

        if (list.Contains(""))

        {

        }

        //判断字典里是否有“a”这个键

        if (dic1.ContainsKey("a"))

        {

        }

        string value = "";

        //这个方法的返回值,这个字典里有没有第一个参数的这个键

        //如果有,那么把这个键所对应的值放在out参数的value里

        if (dic1.TryGetValue("a", out value))

        {

        }

        //删除list的所有元素

        list.Clear();

        //删除字典的所有元素

        dic1.Clear();

    }

}
专门负责加载AB包的管理器
using System.Collections;

using System.Collections.Generic;

using UnityEngine;

public class LoadManager

{

    #region 单例

    private static LoadManager instance;

    public static LoadManager Instance

    {

        get

        {

            if (instance == null)

            {

                instance = new LoadManager();

            }

            return instance;

        }

    }

    private LoadManager()

    {

        abDic = new Dictionary<string, AssetBundle>();

        abPath = Application.streamingAssetsPath + "/AssetBundle/";

        singleABName = "AssetBundle";

    }

    #endregion

    /// <summary>

    /// 用来存储已经加载的AB包,键是AB包的名字,值就是AB包。

    /// </summary>

    public Dictionary<string, AssetBundle> abDic;

    //用来存储单一的ab包

    public AssetBundle singleAB;

    //单一的构建清单,所有的ab包的依赖全部从这获取

    public AssetBundleManifest singleManifest;

    //存储ab包的路径

    public string abPath;

    //单一的ab包的名字

    public string singleABName;

    /// <summary>

    /// 加载单一的ab包,和单一的构建清单

    /// </summary>

    private void LoadSingleAssetBundle()

    {

        //每次加载单一的ab包需要判断是否加载果过。

        //singleAB为null没加载过,不为null就是加载过

        if (singleAB == null)

        {

            singleAB = AssetBundle.LoadFromFile(abPath + singleABName);

        }

        //从单一的ab包中加载单一的构建清单

        if (singleManifest == null)

        {

            singleManifest = singleAB.LoadAsset<AssetBundleManifest>("AssetBundleManifest");

        }

    }

    /// <summary>

    /// 加载指定ab包的所有的依赖项

    /// </summary>

    /// <param name="abName"></param>

    private void LoadAllDependencies(string abName)

    {

        LoadSingleAssetBundle();

        //首先先获取指定的这个ab包的所有的依赖项

        //从单一的构建清单中获取

        string[] deps = singleManifest.GetAllDependencies(abName);

        //遍历去加载依赖项

        for (int i = ; i < deps.Length; i++)

        {

            //加载该依赖项前,先判断之前加载没加载过该依赖项

            //就是判断存储ab包的字典里有没有这个ab包

            if (!abDic.ContainsKey(deps[i]) )

            {

                //如果未加载过,需要加载

                AssetBundle ab = AssetBundle.LoadFromFile(abPath + deps[i]);

                //ab包加载完之后,把加载来的ab包存储在字典里

                abDic[deps[i]] = ab;

            }

        }

    }

    /// <summary>

    /// 加载指定的ab包,并且返回该ab包

    /// </summary>

    /// <param name="abName"></param>

    /// <returns></returns>

    public AssetBundle LoadAssetBundle(string abName)

    {

        LoadAllDependencies(abName);

        //加载指定的ab包

        //加载前先判断是否已经加载过,如果加载过,把加载过的ab包给你

        //如果未加载过,就加载该ab包

        //方法一:

        //if (abDic.ContainsKey(abName))//证明该ab包已经加载过

        //{

        //    return abDic[abName];

        //}

        //AssetBundle ab = ab = AssetBundle.LoadFromFile(abPath + abName);

        //abDic[abName] = ab;

        //return ab;

        //方法二:优化重构

        AssetBundle ab = null;

        if (!abDic.TryGetValue(abName, out ab))

        {

            //如果进入到这,证明该键没有指定的值,那么证明该ab包未加载,需要加载

            ab = AssetBundle.LoadFromFile(abPath + abName);

            //把加载进来的ab包添加到字典中

            abDic[abName] = ab;

        }

        return ab;

    }

    /// <summary>

    /// 加载指定的ab包中的指定名字的指定类型的资源

    /// </summary>

    /// <typeparam name="T">指定资源的类型</typeparam>

    /// <param name="abName">ab包的名字</param>

    /// <param name="assetName">资源的名字</param>

    /// <returns></returns>

    public T LoadAssetByAB<T>(string abName, string assetName) where T : Object

    {

        //先获取指定的ab包

        AssetBundle ab = LoadAssetBundle(abName);

        if (ab != null)

        {

            return ab.LoadAsset<T>(assetName);

        }

        else

        {

            Debug.LogError("指定的ab包的名字有误!");

        }

        return null;

    }

    /// <summary>

    /// 卸载指定的ab包

    /// </summary>

    /// <param name="abName"></param>

    /// <param name="unloadAllloadedObjects"></param>

    public void UnloadAssetBundle(string abName, bool unloadAllloadedObjects)

    {

        //方法一:

        //if (abDic.ContainsKey(abName))

        //{

        //    abDic[abName].Unload(unloadAllloadedObjects);

        //    abDic.Remove(abName);

        //}

        //方法二:优化重构

        //先判断有没有这个ab包

        AssetBundle ab = null;

        if (abDic.TryGetValue(abName, out ab))

        {

            //卸载ab包

            ab.Unload(unloadAllloadedObjects);

            //从容器中删除该ab包

            abDic.Remove(abName);

        }

    }

    /// <summary>

    /// 卸载全部的ab包

    /// </summary>

    /// <param name="unloadAllloadedObjects"></param>

    public void UnloadAllAssetBundle(bool unloadAllloadedObjects)

    {

        //遍历每一个ab包,调用ab包的卸载的方法

        //遍历键,通过键去获取值进行卸载

        foreach (var item in abDic.Keys)

        {

            abDic[item].Unload(unloadAllloadedObjects);

        }

        //直接遍历值去卸载

        foreach (var item in abDic.Values)

        {

            item.Unload(unloadAllloadedObjects);

        }

        abDic.Clear();

    }

}
测试管理器
using System.Collections;

using System.Collections.Generic;

using UnityEngine;

public class TestManager : MonoBehaviour {

    public UnityEngine.UI.Image image;

       // Use this for initialization

       void Start () {

        //先加载指定ab包,再加载包中的指定名字的指定类型的资源

        //AssetBundle ab = LoadManager.Instance.LoadAssetBundle("prefab");

        //GameObject prefab = ab.LoadAsset<GameObject>("Cube");

        //直接加载指定的ab包中的指定名字的指定类型的资源

        GameObject prefab = LoadManager.Instance.LoadAssetByAB<GameObject>("prefab", "Cube");

        Instantiate(prefab, transform);

        //AssetBundle ab1 = LoadManager.Instance.LoadAssetBundle("prefab");//重复加载也不会报错

        //AssetBundle ui = LoadManager.Instance.LoadAssetBundle("ui");

        //Sprite sp = ui.LoadAsset<Sprite>("beijing_02");

        Sprite sp = LoadManager.Instance.LoadAssetByAB<Sprite>("ui", "beijing_02");

        image.sprite = sp;

    }

       // Update is called once per frame

       void Update () {

       }

}
Unity3D学习笔记(二十九):AssetBundle的更多相关文章
- Java学习笔记二十九:一个Java面向对象的小练习
一个Java面向对象的小练习 一:项目需求与解决思路: 学习了这么长时间的面向对象,我们只是对面向对象有了一个简单的认识,我们现在来做一个小练习,这个例子可以使大家更好的掌握面向对象的特性: 1.人类 ...
- angular学习笔记(二十九)-$q服务
angular中的$q是用来处理异步的(主要当然是http交互啦~). $q采用的是promise式的异步编程.什么是promise异步编程呢? 异步编程最重要的核心就是回调,因为有回调函数,所以才构 ...
- unity3d学习笔记(十九)--ngui制作3d人物头顶的头像和血条
原地址:http://blog.csdn.net/lzhq1982/article/details/18793479 本系列文章由Aimar_Johnny编写,欢迎转载,转载请标明出处,谢谢. htt ...
- PHP学习笔记二十九【接口】
<?php //定义接口 //接口可以定义属性,但必须是常量而且是public //接口的所有方法必须是public interface Iusb{ public function start( ...
- Unity3D学习笔记(十九):UGUI、Image、Text、Button
UGUI:Unity官方最新,与NGUI同源 UI:User Interface(用户的操作界面),图片+文字 UGUI的组件: 1.创建UGUI组件时,会默认创建Canvas(画布)和EventSy ...
- python3.4学习笔记(二十六) Python 输出json到文件,让json.dumps输出中文 实例代码
python3.4学习笔记(二十六) Python 输出json到文件,让json.dumps输出中文 实例代码 python的json.dumps方法默认会输出成这种格式"\u535a\u ...
- python3.4学习笔记(二十五) Python 调用mysql redis实例代码
python3.4学习笔记(二十五) Python 调用mysql redis实例代码 #coding: utf-8 __author__ = 'zdz8207' #python2.7 import ...
- python3.4学习笔记(二十四) Python pycharm window安装redis MySQL-python相关方法
python3.4学习笔记(二十四) Python pycharm window安装redis MySQL-python相关方法window安装redis,下载Redis的压缩包https://git ...
- python3.4学习笔记(二十二) python 在字符串里面插入指定分割符,将list中的字符转为数字
python3.4学习笔记(二十二) python 在字符串里面插入指定分割符,将list中的字符转为数字在字符串里面插入指定分割符的方法,先把字符串变成list然后用join方法变成字符串str=' ...
- python3.4学习笔记(二十) python strip()函数 去空格\n\r\t函数的用法
python3.4学习笔记(二十) python strip()函数 去空格\n\r\t函数的用法 在Python中字符串处理函数里有三个去空格(包括'\n', '\r', '\t', ' ')的函数 ...
随机推荐
- jQuery文档操作--append()、prepend()、after()和before()
append(content|fn) 概述 向每个匹配的元素内部追加内容,这个操作与对指定的元素执行appendChild方法,将它们添加到文档中的情况类似 参数 content 要追 ...
- kalinux 换源
1.系统使用第一步建议先换源,否则将出现很多未知问题 #以下两个2选1,打开要编辑的源 sudo leafpad /etc/apt/sources.list sudo gedit /etc/apt/s ...
- Python: 字典dict: 相同点
问题:怎么样在两个字典中找相同点 answer: eg1: 下面2个字典 a={'x':1,'y':2,'z':3}, b={'w':10,'x':11,'y':2}, 1)找相同点: a.ke ...
- 5、CentOS 6.5系统安装配置Nginx-1.2.7+PHP-5.3.22环境
一,操作系统 以最小服务器形式安装系统,并添加开发工具库,便于后期编译使用. 此处基本都是下一步,下一步,不再废话. 安装完成,进入系统,调通网络,关闭防火墙或打开相应的WEB端口. 以下安装操作默认 ...
- [转载]Oracle左连接、右连接、全外连接以及(+)号用法
Oracle 外连接(OUTER JOIN) 左外连接(左边的表不加限制) 右外连接(右边的表不加限制) 全外连接(左右两表都不加限制) 对应SQL:LEFT/RIGHT/FULL OUTER JO ...
- TensorFlow for distributed
TensorFlow for distributed 本目录包括了运行时分布式TensorFlow的实现,其底层使用了gRPC 作为进程内通信的支持库. Quick start 首先,需要构建一个Te ...
- String小案例(**)、包装类型和普通数据类型的转换(拆装箱)
###String用法: package StringTest; /**功能: * 判断Java文件名是否正确,判断邮箱格式是否正确 * 其中:合法的文件名应该以.java结尾 * 合法的邮箱名至少包 ...
- ElasticSearch(二)CentOs6.4下安装ElasticSearch
一.准备工作 Elastic 需要 Java 8 环境.如果你的机器还没安装 Java,先需要安装java环境,同时还注意要保证环境变量JAVA_HOME正确设置. 链接:https://pan.ba ...
- 安装虚拟环境virtualenvwrapper和django
以下操作在windows平台进行 1.安装虚拟环境virtualenvwrapper 首先需要安装python管理工具pip,安装完python3.7之后自带了pip,可通过where pip查看管理 ...
- golang中tcp socket粘包问题和处理
转自:http://www.01happy.com/golang-tcp-socket-adhere/ 在用golang开发人工客服系统的时候碰到了粘包问题,那么什么是粘包呢?例如我们和客户端约定数据 ...