
SpringMVC学习--springmvc和mybatis整合
- 简介
springMVC是表现层,service充当业务层,mybatis作为持久层,通过spring将这三层整合起来。如下图:
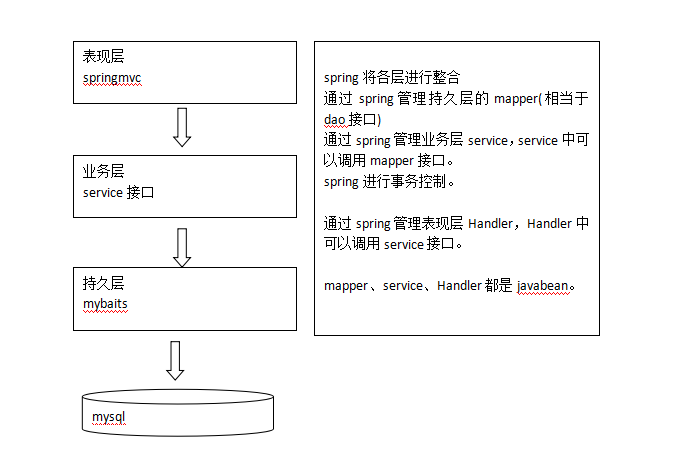
第一步:整合dao层
mybatis和spring整合,通过spring管理mapper接口。使用mapper的扫描器自动扫描mapper接口在spring中进行注册。
第二步:整合service层
通过spring管理 service接口,使用配置方式将service接口配置在spring配置文件中,实现事务控制。
第三步:整合springmvc
由于springmvc是spring的模块,不需要整合。
- 整合Dao层
也就是Spring与MyBatis的整合
1、MyBatis的配置:SqlMapConfig.xml
 <configuration>

     <typeAliases>

         <!-- 批量别名定义,扫描整个包下的类,别名为类名(首字母大写或小写都可以) -->

         <package name="com.luchao.pojo" />

     </typeAliases>

 </configuration>
2、Dao的配置:applicationContext-dao.xml
配置数据源、SqlSessionFactory、Mapper扫描器
 <beans xmlns="http://www.springframework.org/schema/beans"

     xmlns:xsi="http://www.w3.org/2001/XMLSchema-instance" xmlns:mvc="http://www.springframework.org/schema/mvc"

     xmlns:context="http://www.springframework.org/schema/context"

     xmlns:aop="http://www.springframework.org/schema/aop" xmlns:tx="http://www.springframework.org/schema/tx"

     xsi:schemaLocation="http://www.springframework.org/schema/beans

         http://www.springframework.org/schema/beans/spring-beans-3.2.xsd

         http://www.springframework.org/schema/mvc

         http://www.springframework.org/schema/mvc/spring-mvc-3.2.xsd

         http://www.springframework.org/schema/context

         http://www.springframework.org/schema/context/spring-context-3.2.xsd

         http://www.springframework.org/schema/aop

         http://www.springframework.org/schema/aop/spring-aop-3.2.xsd

         http://www.springframework.org/schema/tx

         http://www.springframework.org/schema/tx/spring-tx-3.2.xsd ">

     <!-- 加载配置文件 -->

     <context:property-placeholder location="classpath:db.properties" />

     <!-- 数据源,使用dbcp -->

     <bean id="dataSource" class="org.apache.commons.dbcp.BasicDataSource"

         destroy-method="close">

         <property name="driverClassName" value="${jdbc.driver}" />

         <property name="url" value="${jdbc.url}" />

         <property name="username" value="${jdbc.username}" />

         <property name="password" value="${jdbc.password}" />

         <property name="maxActive" value="10" />

         <property name="maxIdle" value="5" />

     </bean>

     <!-- sqlSessinFactory -->

     <bean id="sqlSessionFactory" class="org.mybatis.spring.SqlSessionFactoryBean">

         <!-- 加载mybatis的配置文件 -->

         <property name="configLocation" value="classpath:mybatis/SqlMapConfig.xml" />

         <!-- 数据源 -->

         <property name="dataSource" ref="dataSource" />

     </bean>

     <!-- 配置mapper扫描器 -->

     <bean class="org.mybatis.spring.mapper.MapperScannerConfigurer">

         <property name="basePackage" value="com.luchao.mapper"></property>

         <property name="sqlSessionFactoryBeanName" value="sqlSessionFactory"></property>

     </bean>

 </beans>
3、定于Po、Mapper接口和Mapper映射文件。
- 整合Service
让spring管理service
定于service接口:
 public interface ItemsService {

     // 获取商品列表

     public List<ItemsCustom> findItemsList(ItemsQueryVo itemsQueryVo)

             throws Exception;

 }
service实现类:
 public class ItemsServiceImpl implements ItemsService {

     @Autowired

     private ItemsMapperCustom itemsMapperCustom;

     @Override

     public List<ItemsCustom> findItemsList(ItemsQueryVo itemsQueryVo)

             throws Exception {

         // 通过itemsMapperCustom查询数据库

         return itemsMapperCustom.findItemsList(itemsQueryVo);

     }

 }
在spring容器中中配置service:applicationContext-service.xml
<bean id="itemsService" class="com.luchao.service.ItemsServiceImpl"></bean>
事务控制:applicationContext-transaction.xml
 <beans xmlns="http://www.springframework.org/schema/beans"

     xmlns:xsi="http://www.w3.org/2001/XMLSchema-instance" xmlns:mvc="http://www.springframework.org/schema/mvc"

     xmlns:context="http://www.springframework.org/schema/context"

     xmlns:aop="http://www.springframework.org/schema/aop" xmlns:tx="http://www.springframework.org/schema/tx"

     xsi:schemaLocation="http://www.springframework.org/schema/beans

         http://www.springframework.org/schema/beans/spring-beans-3.2.xsd

         http://www.springframework.org/schema/mvc

         http://www.springframework.org/schema/mvc/spring-mvc-3.2.xsd

         http://www.springframework.org/schema/context

         http://www.springframework.org/schema/context/spring-context-3.2.xsd

         http://www.springframework.org/schema/aop

         http://www.springframework.org/schema/aop/spring-aop-3.2.xsd

         http://www.springframework.org/schema/tx

         http://www.springframework.org/schema/tx/spring-tx-3.2.xsd ">

     <!-- 事务管理器 对mybatis操作数据库事务控制,spring使用jdbc的事务控制类 -->

     <bean id="transactionManager"

         class="org.springframework.jdbc.datasource.DataSourceTransactionManager">

         <!-- 数据源 dataSource在applicationContext-dao.xml中配置了 -->

         <property name="dataSource" ref="dataSource" />

     </bean>

     <!-- 通知 -->

     <tx:advice id="txAdvice" transaction-manager="transactionManager">

         <tx:attributes>

             <tx:method name="save*" propagation="REQUIRED"/>

             <tx:method name="delete*" propagation="REQUIRED"/>

             <tx:method name="insert*" propagation="REQUIRED"/>

             <tx:method name="update*" propagation="REQUIRED"/>

             <tx:method name="find*" propagation="REQUIRED" read-only="true"/>

             <tx:method name="get*" propagation="REQUIRED" read-only="true"/>

             <tx:method name="select*" propagation="REQUIRED" read-only="true"/>

         </tx:attributes>

     </tx:advice>

     <!-- aop -->

     <aop:config>

         <aop:advisor advice-ref="txAdvice" pointcut="execution(* com.luchao.service.*.*(..))"/>

     </aop:config>

 </beans>
通过AOP将事务织入了符合一定条件的方法上面。
- 整合springMVC
配置处理器映射器、适配器、视图解析器:springmvc.xml
 <beans xmlns="http://www.springframework.org/schema/beans"

     xmlns:xsi="http://www.w3.org/2001/XMLSchema-instance" xmlns:mvc="http://www.springframework.org/schema/mvc"

     xmlns:context="http://www.springframework.org/schema/context"

     xmlns:aop="http://www.springframework.org/schema/aop" xmlns:tx="http://www.springframework.org/schema/tx"

     xsi:schemaLocation="http://www.springframework.org/schema/beans

         http://www.springframework.org/schema/beans/spring-beans-3.2.xsd

         http://www.springframework.org/schema/mvc

         http://www.springframework.org/schema/mvc/spring-mvc-3.2.xsd

         http://www.springframework.org/schema/context

         http://www.springframework.org/schema/context/spring-context-3.2.xsd

         http://www.springframework.org/schema/aop

         http://www.springframework.org/schema/aop/spring-aop-3.2.xsd

         http://www.springframework.org/schema/tx

         http://www.springframework.org/schema/tx/spring-tx-3.2.xsd ">

     <!-- 扫描controller注解,多个包中间使用半角逗号分隔 -->

     <context:component-scan base-package="com.luchao.controller"/>

     <mvc:annotation-driven/>

     <!-- 视图解析器 -->

     <bean class="org.springframework.web.servlet.view.InternalResourceViewResolver">

         <property name="viewClass" value="org.springframework.web.servlet.view.JstlView"/>

         <property name="prefix" value="/WEB-INF/jsp/"/>

         <property name="suffix" value=".jsp"/>

     </bean>

 </beans>
配置前端控制器:web.xml中加入:
 <servlet>

         <servlet-name>springmvc</servlet-name>

         <servlet-class>org.springframework.web.servlet.DispatcherServlet</servlet-class>

         <init-param>

             <param-name>contextConfigLocation</param-name>

             <param-value>classpath:spring/springmvc.xml</param-value>

         </init-param>

         <load-on-startup>1</load-on-startup>

     </servlet>

     <servlet-mapping>

         <servlet-name>springmvc</servlet-name>

         <url-pattern>/</url-pattern>

     </servlet-mapping>
编写控制器:
 @Controller

 @RequestMapping("/items")

 public class ItemController {

     @Autowired

     private ItemsService itemsService;

     // 商品查询

     @RequestMapping("/queryItems")

     public ModelAndView queryItems() throws Exception {

         // 调用service查找 数据库,查询商品列表

         List<ItemsCustom> itemsList = itemsService.findItemsList(null);

         // 返回ModelAndView

         ModelAndView modelAndView = new ModelAndView();

         // 相当 于request的setAttribut,在jsp页面中通过itemsList取数据

         modelAndView.addObject("itemsList", itemsList);

         // 指定视图

         // 下边的路径,如果在视图解析器中配置jsp路径的前缀和jsp路径的后缀,修改为

         // modelAndView.setViewName("/WEB-INF/jsp/items/itemsList.jsp");

         // 上边的路径配置可以不在程序中指定jsp路径的前缀和jsp路径的后缀

         modelAndView.setViewName("items/itemsList");

         return modelAndView;

     }

 }
加载spring容器:
将mapper、service、controller加载到spring容器中。在web.xml中,添加spring容器监听器,加载spring容器。
 <!-- 加载spring容器 -->

     <context-param>

         <param-name>contextConfigLocation</param-name>

         <param-value>/WEB-INF/classes/spring/applicationContext-*.xml</param-value>

     </context-param>

     <listener>

         <listener-class>org.springframework.web.context.ContextLoaderListener</listener-class>

     </listener>
SpringMVC学习--springmvc和mybatis整合的更多相关文章
- SpringMVC学习笔记之一(SpringMVC架构及与Mybatis整合)
一.SpringMVC入门 1.1Springmvc是什么 Spring web mvc和Struts2都属于表现层的框架,它是Spring框架的一部分,我们可以从Spring的整体结构中看得出来,如 ...
- SpringMVC由浅入深day01_8springmvc和mybatis整合
8 springmvc和mybatis整合 为了更好的学习 springmvc和mybatis整合开发的方法,需要将springmvc和mybatis进行整合. 整合目标:控制层采用springmvc ...
- Mybatis学习--spring和Mybatis整合
简介 在前面写测试代码的时候,不管是基于原始dao还是Mapper接口开发都有许多的重复代码,将spring和mybatis整合可以减少这个重复代码,通过spring的模板方法模式,将这些重复的代码进 ...
- SpringMVC学习(三)整合SpringMVC和MyBatis
工程结构 导入jar包 配置文件 applicationContext-dao.xml---配置数据源.SqlSessionFactory.mapper扫描器 applicationContext-s ...
- 菜鸟级springmvc+spring+mybatis整合开发用户登录功能(上)
由于本人愚钝,整合ssm框架真是费劲了全身的力气,所以打算写下这篇文章,一来是对整个过程进行一个回顾,二来是方便有像我一样的笨鸟看过这篇文章后对其有所帮助,如果本文中有不对的地方,也请大神们指教. 一 ...
- 菜鸟级springmvc+spring+mybatis整合开发用户登录功能(下)
昨天介绍了mybatis与spring的整合,今天我们完成剩下的springmvc的整合工作. 要整合springmvc首先得在web.xml中配置springmvc的前端控制器DispatcherS ...
- SpringMVC、Spring、MyBatis整合(IDEA版)
1 环境准备 1.1 软件架构 JDK 1.8 Spring 4.x Mybatis 3.x Maven 3.x MySQL 5.7 1.2 创建数据库 创建数据库,数据库名ssm-demo,字符集u ...
- springmvc学习笔记三:整合JDBC,简单案例==数据库事务配置(切面)
package cn.itcast.bean; import org.springframework.jdbc.core.PreparedStatementSetter; public class U ...
- SpringMVC学习--springmvc原理
简介 springmvc是spring框架的一个模块,springmvc和spring无需通过中间整合层进行整合.springmvc是一个基于mvc的web框架. spring的结构图: mvc在b/ ...
随机推荐
- Redhat下如何搭建NFS
环境: OS:Red Hat Linux As 5 服务器ip:192.168.50.199客户端ip:192.168.50.200 1.服务器上创建共享目录同时修改权限mkdir /bak1/nfs ...
- stanford coursera 机器学习编程作业 exercise 6(支持向量机-support vector machines)
在本练习中,先介绍了SVM的一些基本知识,再使用SVM(支持向量机 )实现一个垃圾邮件分类器. 在开始之前,先简单介绍一下SVM ①从逻辑回归的 cost function 到SVM 的 cost f ...
- 基于jquery的tips悬浮消息提示插件tipso
<a href="javascript:;" class="disabled" data-tipso="Tips" id=" ...
- HTML 学习笔记 CSS3 (2D Matrix)
Matrix 矩阵 那么什么是矩阵呢? 矩阵可以理解为方阵,只不过 平时方阵里面站着人 矩阵中是数值: CSS3中的矩阵: css3中的矩阵指的是一个方法,书写为matrix() 和 matrix3d ...
- document.readyState等属性
document.readyState:判断文档是否加载完成.firefox不支持. 这个属性是只读的,传回值有以下的可能: 0-UNINITIALIZED:XML 对象被产生,但没有任何文件被加载. ...
- CentOS 6.6 安装redmine
Redmine是一个开源的.基于Web的项目管理和缺陷跟踪工具.它用日历和甘特图辅助项目及进度可视化显示.同时它又支持多项目管理.Redmine是一个自由开放源码软件解决方案,它提供集成的项目管理功能 ...
- 阴影效果css
http://www.cssreflex.com/css-generators/ http://blog.csdn.net/freshlover/article/details/7610269 css ...
- Activity 与 Service 之间的消息传递
BgService代码 public class BgService extends Service { public static final String TAG = "BgServic ...
- Java 集合系列17之 TreeSet详细介绍(源码解析)和使用示例
概要 这一章,我们对TreeSet进行学习.我们先对TreeSet有个整体认识,然后再学习它的源码,最后再通过实例来学会使用TreeSet.内容包括:第1部分 TreeSet介绍第2部分 TreeSe ...
- iOS SDWebImage使用详解
这个类库提供一个UIImageView类别以支持加载来自网络的远程图片.具有缓存管理.异步下载.同一个URL下载次数控制和优化等特征. 使用示范的代码:UITableView使用UIImageView ...