TensorFlow.js入门(一)一维向量的学习
TensorFlow的介绍
TensorFlow是谷歌基于DistBelief进行研发的第二代人工智能学习系统,其命名来源于本身的运行原理。Tensor(张量)意味着N维数组,Flow(流)意味着基于数据流图的计算,TensorFlow为张量从流图的一端流动到另一端计算过程。TensorFlow是将复杂的数据结构传输至人工智能神经网中进行分析和处理过程的系统。
TensorFlow是一个著名的开源的人工智能系统,被广泛应用于语音识别或图像识别等多项机器学习和深度学习领域。它目前支持的程序语言有: Java, Python, Go, Lua, R, JavaScript, 其中2018年3 月 31 日 ,TensorFlow 宣布增加支持 JavaScript,并推出开源库 TensorFlow.js 。
我们将会介绍在前端开发中TensorFlow的相关内容,即TensorFlow.js的学习与应用。
Tensorflow中的一维向量及其运算
tensor 是 TensorFlow.js 的数据中心单元:由一组数值组成的一维或多维数组。在 TensorFlow.js中,一维向量的构造函数主要为:tf.tensor()和tf.tensor1d(),具体的API文档可以参考:https://js.tensorflow.org/api/0.12.0/ 。
可以用set()和get()函数分别获取和设置向量中的元素值。
一维向量的运算函数有很多,说明如下:
- tf.add() 两个向量的对应元素的和
- tf.sub() 两个向量的对应元素的差
- tf.mul() 两个向量的对应元素的乘积
- tf.div() 两个向量的对应元素的商
- tf.maximum() 两个向量的对应元素的最大值
- tf.minimum() 两个向量的对应元素的最小值
- tf.pow() 两个向量的对应元素的幂
以上只是一部分,还有更多的函数如: tf.abs(), tf.sin(), tf.cos(), tf.tan(), tf.tan()等。
简单例子
在网页中引入TensorFlow.js需要添加"script"标签,如下:
<script src="https://cdn.jsdelivr.net/npm/@tensorflow/tfjs@0.12.0"> </script>
我们通过一个小小的例子,来说明在TensorFlow.js中一维向量的使用方法,其完整的HTML代码如下:
<html>
<head>
<!-- Load TensorFlow.js -->
<script src="https://cdn.jsdelivr.net/npm/@tensorflow/tfjs@0.12.0"> </script>
<!-- Place your code in the script tag below.-->
<script>
function show(){
var a = [1,2,3,4,5];
var b = [2,3,4,5,6];
const vector1 = tf.tensor(a);
const vector2 = tf.tensor(b);
const res = vector2.add(vector1);
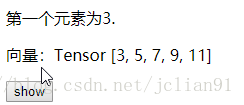
document.getElementById("first_element").innerHTML = "第一个元素为" + res.get(0)+ ".";
document.getElementById("whole_array").innerHTML = "向量:"+res;
}
</script>
</head>
<body>
<p id="first_element"></p>
<p id="whole_array"></p>
<button onclick="show()" id="show" value="show">show</button>
</body>
</html>
显示的网页如下图:
实战
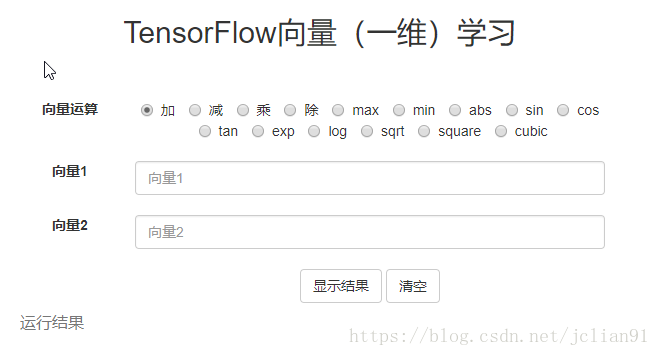
在刚才的例子中,我们仅仅只给出了一个简单的例子,那么,如果要实现稍微复杂一点的功能呢,比如下面的网页:
我们可以用TensorFlow.js来实现这些向量运算。该网页的完整的HTML代码如下:
<html>

  <head>

    <!-- Load TensorFlow.js -->

    <script src="https://cdn.jsdelivr.net/npm/@tensorflow/tfjs@0.12.0"> </script>

	<link href="https://maxcdn.bootstrapcdn.com/bootstrap/3.3.7/css/bootstrap.min.css" rel="stylesheet">

	<script src="https://cdn.bootcss.com/jquery/3.3.1/jquery.min.js"></script>

	<script src="tf_result.js"></script>

  </head>

<body>

	<center>

	<h2>TensorFlow向量(一维)学习</h2>

	<br><br>

	<div style="width:600px">

		<div>

			<label class="col-sm-2 control-label">向量运算</label>

			<div class="col-sm-10">

				<label class="radio-inline">

				<input type="radio" name="optionsRadiosinline" value="add" checked="checked"> 加

				</label>

				<label class="radio-inline">

				<input type="radio" name="optionsRadiosinline"  value="sub"> 减

				</label>

				<label class="radio-inline">

				<input type="radio" name="optionsRadiosinline" value="mul"> 乘

				</label>

				<label class="radio-inline">

				<input type="radio" name="optionsRadiosinline" value="div"> 除

				</label>

				<label class="radio-inline">

				<input type="radio" name="optionsRadiosinline" value="max"> max

				</label>

				<label class="radio-inline">

				<input type="radio" name="optionsRadiosinline" value="min"> min

				</label>

				<label class="radio-inline">

				<input type="radio" name="optionsRadiosinline" value="abs"> abs

				</label>

				<label class="radio-inline">

				<input type="radio" name="optionsRadiosinline" value="sin"> sin

				</label>

				<label class="radio-inline">

				<input type="radio" name="optionsRadiosinline" value="cos"> cos

				</label>

				<label class="radio-inline">

				<input type="radio" name="optionsRadiosinline" value="tan"> tan

				</label>

				<label class="radio-inline">

				<input type="radio" name="optionsRadiosinline" value="exp"> exp

				</label>

				<label class="radio-inline">

				<input type="radio" name="optionsRadiosinline" value="log"> log

				</label>

				<label class="radio-inline">

				<input type="radio" name="optionsRadiosinline" value="sqrt"> sqrt

				</label>

				<label class="radio-inline">

				<input type="radio" name="optionsRadiosinline" value="square"> square

				</label>

				<label class="radio-inline">

				<input type="radio" name="optionsRadiosinline" value="cubic"> cubic

				</label>

				<br><br>

			</div>

		</div>

		<div>

			<label for="vector1" class="col-sm-2 control-label">向量1</label>

			<div class="col-sm-10">

			<input type="text" class="form-control" id="vector1" placeholder="向量1">

			<br>

			</div>

		</div>

		<div>

			<label for="vector2" class="col-sm-2 control-label">向量2</label>

			<div class="col-sm-10">

			<input type="text" class="form-control" id="vector2" placeholder="向量2">

			<br>

			</div>

		</div>

		<div >

			<div class="col-sm-offset-2 col-sm-10">

			<button class="btn btn-default" id="result">显示结果</button>

			<button class="btn btn-default" id="clc">清空</button>

			</div>

		</div>

	</div>

	<table class="table" style="width:600px">

		<caption id="tf">运行结果</caption>

		<tbody>

			<tr class="success" id="table">

			</tr>

		</tbody>

    </table>

	</center>

</body>

</html>
在其中我们用到了tf_result.js,其完整的JavaScript代码如下:
$(document).ready(function(){
var flag;
/*
flag = 1表示一元运算
flag = 2表示二元运算
*/
// 清空两个输入框的输入
$("#clc").click(function(){
$("#vector1").val("");
$("#vector2").val("");
});
// 是否允许"向量2"输入框有输入
$("#vector1").click(function(){
var op = $("input[name='optionsRadiosinline']:checked").val();
var ops = ["add", "sub", "mul", "div", "max", "min"];
if (ops.indexOf(op) == -1)
flag = 1;
else
flag = 2;
//文本框"向量2"禁用
if(flag == 1){
$("#vector2").val("");
$("input[type='text']").each(function () {
$("#vector2").attr("disabled", true);
});
}
//文本框"向量2"启用
if(flag == 2){
$("input[type='text']").each(function () {
$("#vector2").attr("disabled", false);
});
}
});
// 利用tensorflow.js的运算函数,输出计算结果
$("#result").click(function(){
if(flag == 1){
var vector1 = $("#vector1").val().split(',').map(Number);
}
if(flag == 2){
var vector1 = $("#vector1").val().toString().split(',').map(Number);
var vector2 = $("#vector2").val().toString().split(',').map(Number);
if(vector1.length != vector2.length)
alert("输入的两个向量长度不一样");
}
// 利用tensorflow.js的运算函数
if( flag == 1 || ((flag == 2) && (vector1.length == vector2.length))){
var op = $("input[name='optionsRadiosinline']:checked").val();
const pow2 = tf.tensor(2).toInt(); // 计算平方
const pow3 = tf.tensor(3).toInt(); // 计算三次方
switch (op) // JavaScript的switch结构
{
case "add": // 加法
res = tf.tensor(vector1).add(tf.tensor(vector2));
break;
case "sub": // 减法
res = tf.tensor(vector1).sub(tf.tensor(vector2));
break;
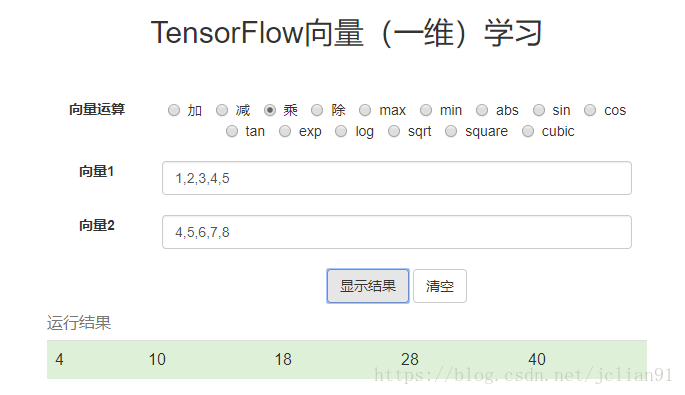
case "mul": // 乘法
res = tf.tensor(vector1).mul(tf.tensor(vector2));
break;
case "div": // 除法
res = tf.tensor(vector1).div(tf.tensor(vector2));
break;
case "max": // 两个向量中的最大值,element-wise
res = tf.tensor(vector1).maximum(tf.tensor(vector2));
break;
case "min": // 两个向量中的最小值,element-wise
res = tf.tensor(vector1).minimum(tf.tensor(vector2));
break;
case "abs": // 绝对值
res = tf.tensor(vector1).abs();
break;
case "sin": // 正弦函数
res = tf.tensor(vector1).sin();
break;
case "cos": // 余弦函数
res = tf.tensor(vector1).cos();
break;
case "tan": // 正切函数
res = tf.tensor(vector1).tan();
break;
case "exp": // 指数函数,以e为底
res = tf.tensor(vector1).exp();
break;
case "log": // 对数函数,以e为底
res = tf.tensor(vector1).log();
break;
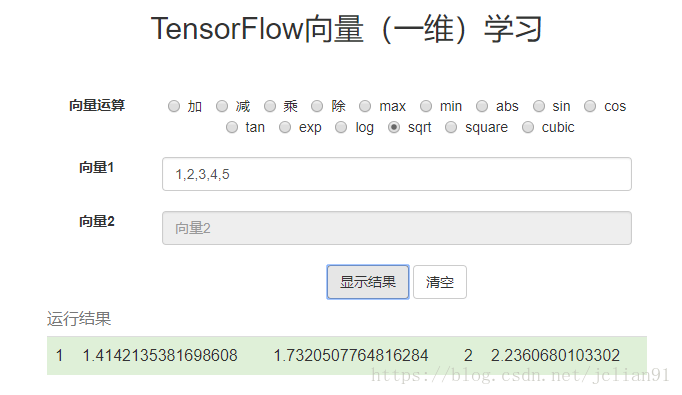
case "sqrt": // 平方根
res = tf.tensor(vector1).sqrt();
break;
case "square": // 平方
res = tf.tensor(vector1).pow(pow2);
break;
case "cubic": // 三次方
res = tf.tensor(vector1).pow(pow3);
break;
default:
res = tf.tensor([]);
}
$("#table").html(""); // 清空原有表格中的数据
// 输入计算结果
for(var i=0; i< res.shape; i++){
$("tr").append("<td>"+res.get(i)+"</td>;");
}
}
});
});
运行刚才的网页,效果如下:
怎么样,是不是觉得TensorFlow.js也酷酷的呢?结合TensorFlow.js以及前端网页方面的知识,我们可以给出许多酷炫的TensorFlow的应用,以后我们会慢慢讲到。本次项目的Github地址为:https://github.com/percent4/tensorflow_js_learning 。
注意:本人现已开通两个微信公众号: 因为Python(微信号为:python_math)以及轻松学会Python爬虫(微信号为:easy_web_scrape), 欢迎大家关注哦~~
TensorFlow.js入门(一)一维向量的学习的更多相关文章
- TensorFlow.js入门:一维向量的学习
转载自:https://blog.csdn.net/weixin_34061042/article/details/89700664 一维向量及其运算 tensor 是 TensorFlow.js 的 ...
- 【一统江湖的大前端(9)】TensorFlow.js 开箱即用的深度学习工具
示例代码托管在:http://www.github.com/dashnowords/blogs 博客园地址:<大史住在大前端>原创博文目录 目录 一. 上手TensorFlow.js 二. ...
- 【特别推荐】Node.js 入门教程和学习资源汇总
这篇文章与大家分享一批很有用的 Node.js 入门教程和学习资源.Node 是一个服务器端的 JavaScript 解释器,它将改变服务器应该如何工作的概念.它的目标是帮助程序员构建高度可伸缩的应用 ...
- Node.js 入门教程和学习资源汇总
这篇文章与大家分享一批很有用的 Node.js 入门教程和学习资源.Node 是一个服务器端的 JavaScript 解释器,它将改变服务器应该如何工作的概念.它的目标是帮助程序员构建高度可伸缩的应用 ...
- 分享《机器学习实战基于Scikit-Learn和TensorFlow》中英文PDF源代码+《深度学习之TensorFlow入门原理与进阶实战》PDF+源代码
下载:https://pan.baidu.com/s/1qKaDd9PSUUGbBQNB3tkDzw <机器学习实战:基于Scikit-Learn和TensorFlow>高清中文版PDF+ ...
- 让我们一起学习《Node.js入门》一书吧!
Node.js入门 读完本书之后,你将完成一个完整的web应用,该应用允许用户浏览页面以及上传文件. 里面对一些知识的讲解,让你略窥Node.js的门径.最好一段代码一段代码的写下来,我的习惯是手里拿 ...
- Tensorflow从入门到精通之——Tensorflow基本操作
前边的章节介绍了什么是Tensorflow,本节将带大家真正走进Tensorflow的世界,学习Tensorflow一些基本的操作及使用方法.同时也欢迎大家关注我们的网站和系列教程:http://ww ...
- TensorFlow.js之安装与核心概念
TensorFlow.js是通过WebGL加速.基于浏览器的机器学习js框架.通过tensorflow.js,我们可以在浏览器中开发机器学习.运行现有的模型或者重新训练现有的模型. 一.安装 ...
- Tensorflow高速入门2--实现手写数字识别
Tensorflow高速入门2–实现手写数字识别 环境: 虚拟机ubuntun16.0.4 Tensorflow 版本号:0.12.0(仅使用cpu下) Tensorflow安装见: http://b ...
随机推荐
- .net HttpListener 很慢
使用 HttpListener 做的webserver ,撒逻辑没有,内网跨机器访问,都要200ms 替换方案 EvHttpSharp.dll 使用了 libevent_core,libevent ...
- spak数据倾斜解决方案
数据倾斜解决方案 数据倾斜的解决,跟之前讲解的性能调优,有一点异曲同工之妙. 性能调优中最有效最直接最简单的方式就是加资源加并行度,并注意RDD架构(复用同一个RDD,加上cache缓存).相对于前面 ...
- ES6中的箭头函数和普通函数有什么区别?
1.普通函数中的this总是指向调用它的那个对象, 箭头函数没有自己的this,他的this永远指向其定义环境,任何方法都改变不了其指向,如call().bind().apply().(正是因为它没有 ...
- Codeforces Round #424 (Div. 1, rated, based on VK Cup Finals)
A 题意:给你人的坐标,钥匙的坐标,办公室的坐标.要求所有人能够拿到钥匙并且走到办公室的最短时间.一个位置只能有一个人,一个位置只有一把钥匙,人和钥匙可以在同一个位置. 思路:DP+贪心,dp[i]表 ...
- redis启动出现错误creating server tcp listening socket 127.0.0.1:6379: bind No error
creating server tcp listening socket 127.0.0.1:6379: bind No error 的解决方案如下按顺序输入如下命令就可以连接成功 1. redis- ...
- wordcounter
这周是一个wc的程序,通过C语言在WINDOWS上实现的. 我在通过参考的代码后,发现WC程序的代码其实相当简洁,主要的代码不过十数行.主要通过设置一个字符型变量,这个变量可以得到一个从键盘输入的字符 ...
- 关键字提取算法TF-IDF
在文本分类的学习过程中,在“如何衡量一个关键字在文章中的重要性”的问题上,遇到了困难.在网上找了很多资料,大多数都提到了这个算法,就是今天要讲的TF-IDF. 总起 TF-IDF,理解起来相当简单,他 ...
- 纯小白创建第一个Node程序失败-容易忽略的一个细节
一直觉得自己基础还很差,所以自觉不敢去碰node.js,但又对其心怀好奇.恰巧最近有一点空闲时间,忍不住去试了一下水 这不,在创建第一个node程序时就吃了闭门羹,总是提示我没有定义,如下图, 这 ...
- 小程序入口构造工具&二维码测试工具
小程序入口构造工具&二维码测试工具 本文将介绍我们小程序中隐藏的两个工具页面.原理虽不复杂,收益却实实在在,或许也能给诸君带来启发. 入口构造工具 痛点 PM&运营 投放链接 PM&a ...
- python基础-字典(8)
一.字典介绍 字典和列表一样,也是存储多个数据的容器,只不过存储和读取的方式不同 字典的语法格式: 字典名 = {key1 : value1,key2:value2,key3:value3,……} 说 ...