Spring-boot -Web开发
1)、创建SpringBoot应用,选中我们需要的模块;
2)、SpringBoot已经默认将这些场景配置好了,只需要在配置文件中指定少量配置就可以运行起来
3)、自己编写业务代码;
文件名的功能
xxxxAutoConfiguration:帮我们给容器中自动配置组件;

xxxxProperties:配置类来封装配置文件的内容;
SpringBoot对静态资源的映射规则;
可配置:
@ConfigurationProperties(prefix = "spring.resources", ignoreUnknownFields = false)

public class ResourceProperties implements ResourceLoaderAware {

  //可以设置和静态资源有关的参数,缓存时间等
自动配置类里面所规定的一些映射:
WebMvcAuotConfiguration:

        @Override

        public void addResourceHandlers(ResourceHandlerRegistry registry) {

            if (!this.resourceProperties.isAddMappings()) {

                logger.debug("Default resource handling disabled");

                return;

            }

            Integer cachePeriod = this.resourceProperties.getCachePeriod();

            if (!registry.hasMappingForPattern("/webjars/**")) {

                customizeResourceHandlerRegistration(

                        registry.addResourceHandler("/webjars/**")

                                .addResourceLocations(

                                        "classpath:/META-INF/resources/webjars/")

                        .setCachePeriod(cachePeriod));

            }

            String staticPathPattern = this.mvcProperties.getStaticPathPattern();

              //静态资源文件夹映射

            if (!registry.hasMappingForPattern(staticPathPattern)) {

                customizeResourceHandlerRegistration(

                        registry.addResourceHandler(staticPathPattern)

                                .addResourceLocations(

                                        this.resourceProperties.getStaticLocations())

                        .setCachePeriod(cachePeriod));

            }

        }

        //配置欢迎页映射

        @Bean

        public WelcomePageHandlerMapping welcomePageHandlerMapping(

                ResourceProperties resourceProperties) {

            return new WelcomePageHandlerMapping(resourceProperties.getWelcomePage(),

                    this.mvcProperties.getStaticPathPattern());

        }

       //配置喜欢的图标

        @Configuration

        @ConditionalOnProperty(value = "spring.mvc.favicon.enabled", matchIfMissing = true)

        public static class FaviconConfiguration {

            private final ResourceProperties resourceProperties;

            public FaviconConfiguration(ResourceProperties resourceProperties) {

                this.resourceProperties = resourceProperties;

            }

            @Bean

            public SimpleUrlHandlerMapping faviconHandlerMapping() {

                SimpleUrlHandlerMapping mapping = new SimpleUrlHandlerMapping();

                mapping.setOrder(Ordered.HIGHEST_PRECEDENCE + 1);

                  //所有  **/favicon.ico

                mapping.setUrlMap(Collections.singletonMap("**/favicon.ico",

                        faviconRequestHandler()));

                return mapping;

            }

            @Bean

            public ResourceHttpRequestHandler faviconRequestHandler() {

                ResourceHttpRequestHandler requestHandler = new ResourceHttpRequestHandler();

                requestHandler

                        .setLocations(this.resourceProperties.getFaviconLocations());

                return requestHandler;

            }

        }
所有 /webjars/** ,都去 classpath:/META-INF/resources/webjars/ 找资源;==
webjars:以jar包的方式引入静态资源;

、"/**" 访问当前项目的任何资源,都去(静态资源的文件夹)找映射==
"classpath:/META-INF/resources/",

"classpath:/resources/",

"classpath:/static/",

"classpath:/public/"

"/":当前项目的根路径
localhost:8080/abc === 去静态资源文件夹里面找abc
欢迎页; 静态资源文件夹下的所有index.html页面;被"/**"映射;==
localhost:8080/ 找index页面
所有的 **/favicon.ico 都是在静态资源文件下找;==
这个favicon.ico,就是我们访问网站的小标志

模板引擎
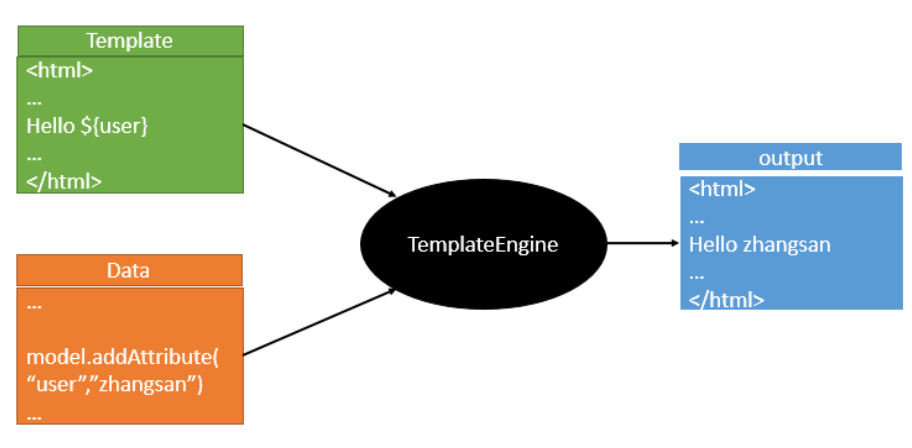
将数据库的内容和静态文件的变量都由模板引擎去解决对应的变量问题

最后模板引擎呈现给大家的最终的画面
SpringBoot推荐的Thymeleaf;
语法更简单,功能更强大;
引入thymeleaf 依赖:
        <dependency>

            <groupId>org.springframework.boot</groupId>

            <artifactId>spring-boot-starter-thymeleaf</artifactId>

        </dependency>
因为我们没有设置版本,所以默认spring-boot里面的版本是2.多
如果我们要切换默认的版本的化:
<properties>

        <thymeleaf.version>3.0.9.RELEASE</thymeleaf.version>

        <!-- 布局功能的支持程序  thymeleaf3主程序  layout2以上版本 -->

        <!-- thymeleaf2   layout1-->

        <thymeleaf-layout-dialect.version>2.2.2</thymeleaf-layout-dialect.version>

  </properties>
spring-boot 2.0之前是使用2.1.1版本的,但是我查看后发现2.0以后使用了高本吧:
查看步骤:pom.xml文件--spring-boot-starter-parent
--spring-boot-dependencies
---搜索thymeleaf就行

所以使用spring-boot不需要切换版本
thymeleaf 的使用方法和语法:
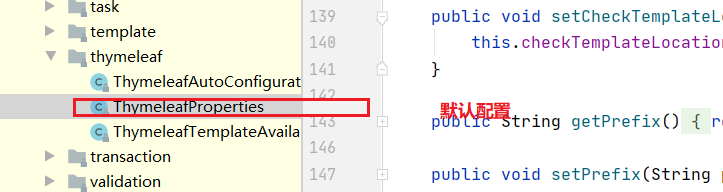
@ConfigurationProperties(prefix = "spring.thymeleaf")

public class ThymeleafProperties {

    private static final Charset DEFAULT_ENCODING = Charset.forName("UTF-8");

    private static final MimeType DEFAULT_CONTENT_TYPE = MimeType.valueOf("text/html");

    public static final String DEFAULT_PREFIX = "classpath:/templates/";

    public static final String DEFAULT_SUFFIX = ".html";

      //
只要我们把HTML页面放在classpath:/templates/,thymeleaf就能自动渲染;
在html文件里面导图名称空间,支持提示写入
<html lang="en" xmlns:th="http://www.thymeleaf.org">
简单使用:
<!DOCTYPE html>

<html lang="en" xmlns:th="http://www.thymeleaf.org">

<head>

    <meta charset="UTF-8">

    <title>Title</title>

</head>

<body>

    <h1>成功!</h1>

    <!--th:text 将div里面的文本内容设置为 -->

    <div th:text="${hello}">这是显示欢迎信息</div>

</body>

</html>
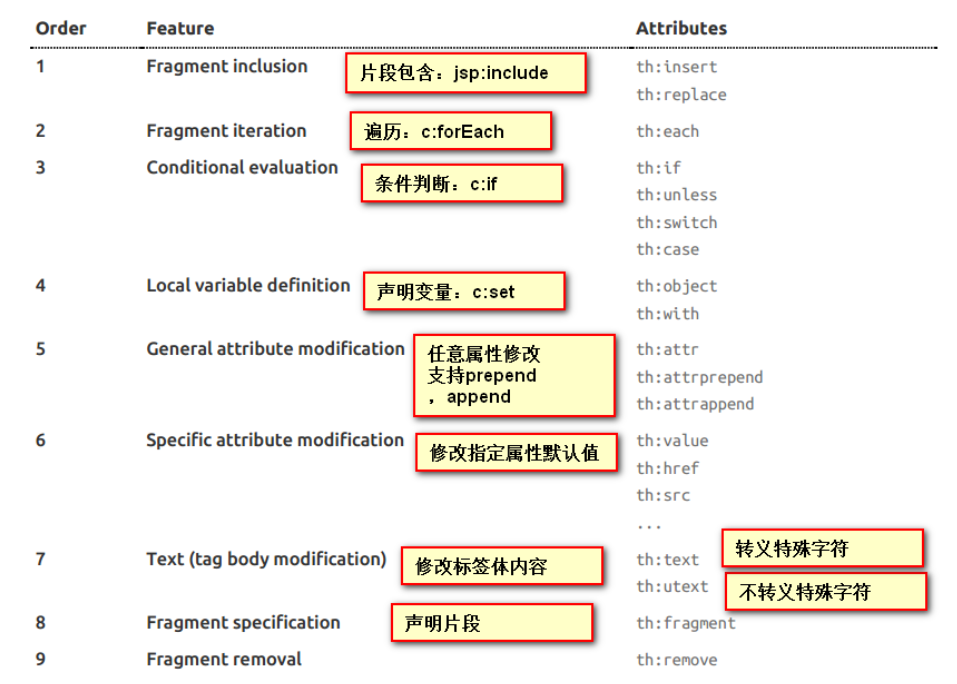
thymeleaf的语法规则:
1)、th:text;改变当前元素里面的文本内容;
th:任意html属性;来替换原生属性的值
2)、表达式
Simple expressions:(表达式语法)

    Variable Expressions: ${...}:获取变量值;OGNL;

            1)、获取对象的属性、调用方法

            2)、使用内置的基本对象:

                #ctx : the context object.

                #vars: the context variables.

                #locale : the context locale.

                #request : (only in Web Contexts) the HttpServletRequest object.

                #response : (only in Web Contexts) the HttpServletResponse object.

                #session : (only in Web Contexts) the HttpSession object.

                #servletContext : (only in Web Contexts) the ServletContext object.

                ${session.foo}

            3)、内置的一些工具对象:

#execInfo : information about the template being processed.

#messages : methods for obtaining externalized messages inside variables expressions, in the same way as they would be obtained using #{…} syntax.

#uris : methods for escaping parts of URLs/URIs

#conversions : methods for executing the configured conversion service (if any).

#dates : methods for java.util.Date objects: formatting, component extraction, etc.

#calendars : analogous to #dates , but for java.util.Calendar objects.

#numbers : methods for formatting numeric objects.

#strings : methods for String objects: contains, startsWith, prepending/appending, etc.

#objects : methods for objects in general.

#bools : methods for boolean evaluation.

#arrays : methods for arrays.

#lists : methods for lists.

#sets : methods for sets.

#maps : methods for maps.

#aggregates : methods for creating aggregates on arrays or collections.

#ids : methods for dealing with id attributes that might be repeated (for example, as a result of an iteration).

    Selection Variable Expressions: *{...}:选择表达式:和${}在功能上是一样;

        补充:配合 th:object="${session.user}:

   <div th:object="${session.user}">

    <p>Name: <span th:text="*{firstName}">Sebastian</span>.</p>

    <p>Surname: <span th:text="*{lastName}">Pepper</span>.</p>

    <p>Nationality: <span th:text="*{nationality}">Saturn</span>.</p>

    </div>

    Message Expressions: #{...}:获取国际化内容

    Link URL Expressions: @{...}:定义URL;

            @{/order/process(execId=${execId},execType='FAST')}

    Fragment Expressions: ~{...}:片段引用表达式

            <div th:insert="~{commons :: main}">...</div>

Literals(字面量)

      Text literals: 'one text' , 'Another one!' ,…

      Number literals: 0 , 34 , 3.0 , 12.3 ,…

      Boolean literals: true , false

      Null literal: null

      Literal tokens: one , sometext , main ,…

Text operations:(文本操作)

    String concatenation: +

    Literal substitutions: |The name is ${name}|

Arithmetic operations:(数学运算)

    Binary operators: + , - , * , / , %

    Minus sign (unary operator): -

Boolean operations:(布尔运算)

    Binary operators: and , or

    Boolean negation (unary operator): ! , not

Comparisons and equality:(比较运算)

    Comparators: > , < , >= , <= ( gt , lt , ge , le )

    Equality operators: == , != ( eq , ne )

Conditional operators:条件运算(三元运算符)

    If-then: (if) ? (then)

    If-then-else: (if) ? (then) : (else)

    Default: (value) ?: (defaultvalue)

Special tokens:

    No-Operation: _
简单的例子:
controller:
@Controller
public class HelloController {
// @ResponseBody
@RequestMapping("/hello")
public String hello(){
return "hello";
} @RequestMapping("/success")
public String success(Map<String,Object> map){
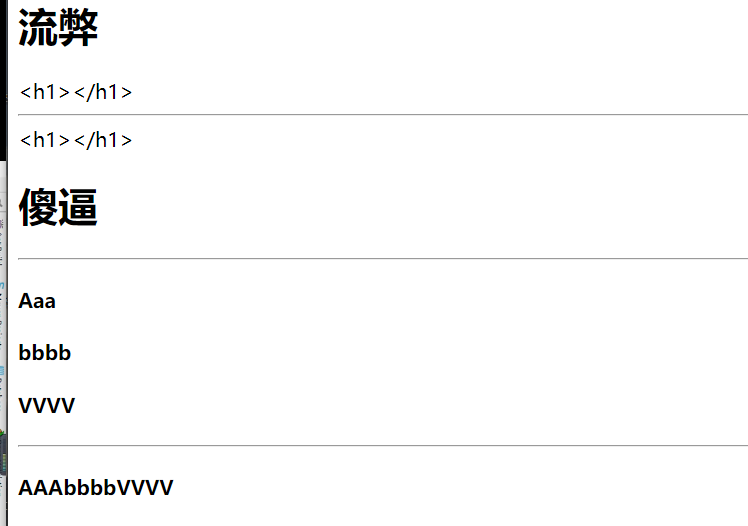
map.put("hello","<h1>傻逼</h1>");
map.put("users", Arrays.asList("AAA","bbbb","VVVV")); return "success";
} }
html
<!DOCTYPE html>

<html lang="en" xmlns:th="http://www.thymeleaf.org">

<head>

    <meta charset="UTF-8">

    <title>Title</title>

</head>

<body>

    <h1>流弊</h1>

    <div th:text="${hello}"></div>

    <hr/>

    <div th:text="${hello}"></div>

    <div th:utext="${hello}"></div>

    <hr/>

    <h4 th:text="${user}" th:each="user:${users}"></h4>

    <hr/>

    <h4>

        <span th:each="user:${users}">[[${user}]]</span>

    </h4>

</body>

</html>
结果:
‘
Spring-boot -Web开发的更多相关文章
- Springboot 系列(六)Spring Boot web 开发之拦截器和三大组件
1. 拦截器 Springboot 中的 Interceptor 拦截器也就是 mvc 中的拦截器,只是省去了 xml 配置部分.并没有本质的不同,都是通过实现 HandlerInterceptor ...
- Springboot 系列(七)Spring Boot web 开发之异常错误处理机制剖析
前言 相信大家在刚开始体验 Springboot 的时候一定会经常碰到这个页面,也就是访问一个不存在的页面的默认返回页面. 如果是其他客户端请求,如接口测试工具,会默认返回JSON数据. { &quo ...
- Springboot 系列(五)Spring Boot web 开发之静态资源和模版引擎
前言 Spring Boot 天生的适合 web 应用开发,它可以快速的嵌入 Tomcat, Jetty 或 Netty 用于包含一个 HTTP 服务器.且开发十分简单,只需要引入 web 开发所需的 ...
- Spring Boot Web 开发注解篇
本文提纲 1. spring-boot-starter-web 依赖概述 1.1 spring-boot-starter-web 职责 1.2 spring-boot-starter-web 依赖关系 ...
- 四、Spring Boot Web开发
四.Web开发 1.简介 使用SpringBoot: 1).创建SpringBoot应用,选中我们需要的模块: 2).SpringBoot已经默认将这些场景配置好了,只需要在配置文件中指定少量配置就可 ...
- spring boot系列(二)spring boot web开发
json 接口开发 在以前的spring 开发的时候需要我们提供json接口的时候需要做如下配置: 1 添加jackjson等jar包 2 配置spring controller扫描 3 对接的方法添 ...
- Spring Boot Web 开发@Controller @RestController 使用教程
在 Spring Boot 中,@Controller 注解是专门用于处理 Http 请求处理的,是以 MVC 为核心的设计思想的控制层.@RestController 则是 @Controller ...
- 4.Spring Boot web开发
1.创建一个web模块 (1).创建SpringBoot应用,选中我们需要的模块: (2).SpringBoot已经默认将这些场景配置好了,只需要在配置文件中指定少量配置就可以运行起来 (3).自己编 ...
- Spring Boot Web开发中Thymeleaf模板引擎的使用
这里使用的是idea 1.新建Spring Boot项目 File-->New-->Project...,然后选择左边的Spring Initializr-->Next,可根据自己的 ...
- (5)Spring Boot web开发 --- Restful CRUD
文章目录 `@RestController` vs `@Controller` 默认访问首页 设置项目名 国际化 登陆 & 拦截 Restful 风格 @RestController vs @ ...
随机推荐
- Github 29K Star的开源对象存储方案——Minio入门宝典
对象存储不是什么新技术了,但是从来都没有被替代掉.为什么?在这个大数据发展迅速地时代,数据已经不单单是简单的文本数据了,每天有大量的图片,视频数据产生,在短视频火爆的今天,这个数量还在增加.有数据表明 ...
- 【二食堂】Beta - 测试报告
Beta - 测试报告 测试过程中发现的bug Beta阶段的新bug 我们在Beta阶段的开发过程中就进行了测试,发现了许多bug.这其中后端的bug比较多,在这里我列举一些比较重要的功能性bug. ...
- OO前三次作业思考(第一次OO——Blog)
OO前三次作业总结 基于度量分析程序结构 由于三次作业较多,决定分析内容.功能最为复杂的第三次作业. 上图为第三次作业的类图.我使用了一个抽象类Factor,写了五个因子继承Factor,然后又单独开 ...
- 基于ImportBeanDefinitionRegistrar和FactoryBean动态注入Bean到Spring容器中
基于ImportBeanDefinitionRegistrar和FactoryBean动态注入Bean到Spring容器中 一.背景 二.实现方案 1.基于@ComponentScan注解实现 2.基 ...
- Noip模拟12 2021.7.12
T1 interval 亏得昨天晚上改掉了T3并且理解了单调栈,今天一扫这题目就知道要用啥了. 先预处理出以a[i]为最大值的最大左右区间.然后再将a[i]取%!!!是的,要不然会影响单调栈的使用.. ...
- hdfs基本操作命令
hdfs文件的相关操作主要使用hadoop fs.hadoop dfs.hdfs dfs 命令,以下对最常用的相关命令进行简要说明. hadoop fs -ls 显示当前目录结构,-ls -R 递归 ...
- poj 2226 Muddy Fields(最小点覆盖)
题意: M*N的矩阵,每个格不是*就是#. *代表水坑,#代表草地. 农民要每次可以用一块宽为1,长不限的木板去铺这个矩阵.要求这块木板不能覆盖草地.木板可以重复覆盖(即一块木板与另一块木板有 ...
- 议题解析与复现--《Java内存攻击技术漫谈》(一)
解析与复现议题 Java内存攻击技术漫谈 https://mp.weixin.qq.com/s/JIjBjULjFnKDjEhzVAtxhw allowAttachSelf绕过 在Java9及以后的版 ...
- systemd-nspawn以及container的学习
container的分类 目前container可以分为两大类,一类是Privileged container,一类是Unprivileged container. Privileged contai ...
- F5 BIG-IP 远程代码执行RCE(CVE-2020-5902)复现
漏洞简介 F5 BIG-IP 是美国``F5公司一款集成流量管理.DNS.出入站规则.web应用防火墙.web网关.负载均衡等功能的应用交付平台. 在F5 BIG-IP产品的流量管理用户页面 (TMU ...