
Springboot 系列(五)Spring Boot web 开发之静态资源和模版引擎
前言
Spring Boot 天生的适合 web 应用开发,它可以快速的嵌入 Tomcat, Jetty 或 Netty 用于包含一个 HTTP 服务器。且开发十分简单,只需要引入 web 开发所需的包,然后编写业务代码即可。
自动配置原理?
在进行 web 开发之前让我再来回顾一下自动配置,可以参考系列文章第三篇。Spring Boot 为 Spring MVC 提供了自动配置,添加了如下的功能:
- 视图解析的支持。
- 静态资源映射,WebJars 的支持。
- 转换器 Converter 的支持。
- 自定义 Favicon 的支持。
- 等等
在引入每个包时候我们需要思考是如何实现自动配置的,以及我们能自己来配置哪些东西,这样开发起来才会得心应手。
关于 Spring Boot Web 开发的更详细介绍可以参考官方文档。
1. JSON 格式转换
Spring Boot 默认使用 Jackson 进行 JSON 化处理,如果想要切换成 FastJson 可以首先从官方文档里查询信息。从这里知道对于 ResponseBody 的渲染主要是通过 HttpMessageConverters, 而首先引入FastJson Pom依赖并排除 Spring Boot 自带的 Jackson。
<dependency>

     <groupId>org.springframework.boot</groupId>

     <artifactId>spring-boot-starter-web</artifactId>

     <exclusions>

           <exclusion>

               <artifactId>spring-boot-starter-json</artifactId>

               <groupId>org.springframework.boot</groupId>

           </exclusion>

     </exclusions>

</dependency>

<dependency>

     <groupId>com.alibaba</groupId>

     <artifactId>fastjson</artifactId>

     <version>1.2.47</version>

</dependency>
编写转换器处理 json 的日期格式同时处理中文乱码问题。
@Configuration

public class WebMvcConfig implements WebMvcConfigurer {

    /**

     * 自定义JSON转换器

     *

     * @param converters

     */

    @Override

    public void configureMessageConverters(List<HttpMessageConverter<?>> converters) {

        FastJsonHttpMessageConverter converter = new FastJsonHttpMessageConverter();

        FastJsonConfig fastJsonConfig = new FastJsonConfig();

        fastJsonConfig.setSerializerFeatures(SerializerFeature.PrettyFormat);

        //日期格式化

        fastJsonConfig.setDateFormat("yyyy-MM-dd HH:mm:ss");

        //处理中文乱码问题

        List<MediaType> fastMediaTypes = new ArrayList<>();

        fastMediaTypes.add(MediaType.APPLICATION_JSON_UTF8);

        converter.setSupportedMediaTypes(fastMediaTypes);

        converter.setFastJsonConfig(fastJsonConfig);

        converters.add(converter);

    }

}
2. 静态资源映射
By default, Spring Boot serves static content from a directory called
/static(or/publicor/resourcesor/META-INF/resources) in the classpath or from the root of theServletContext.
2.1 默认映射
官方文档告诉我们 Spring Boot 对于静态资源的映射目录是 /static , /public , /resources 以及 /META-INF/resource。除此之外其实还映射了 /webjars/** 到 classpath:/META-INF/resources/webjars。
很明显此处是自动配置实现的,通过查看源码分析这段配置。
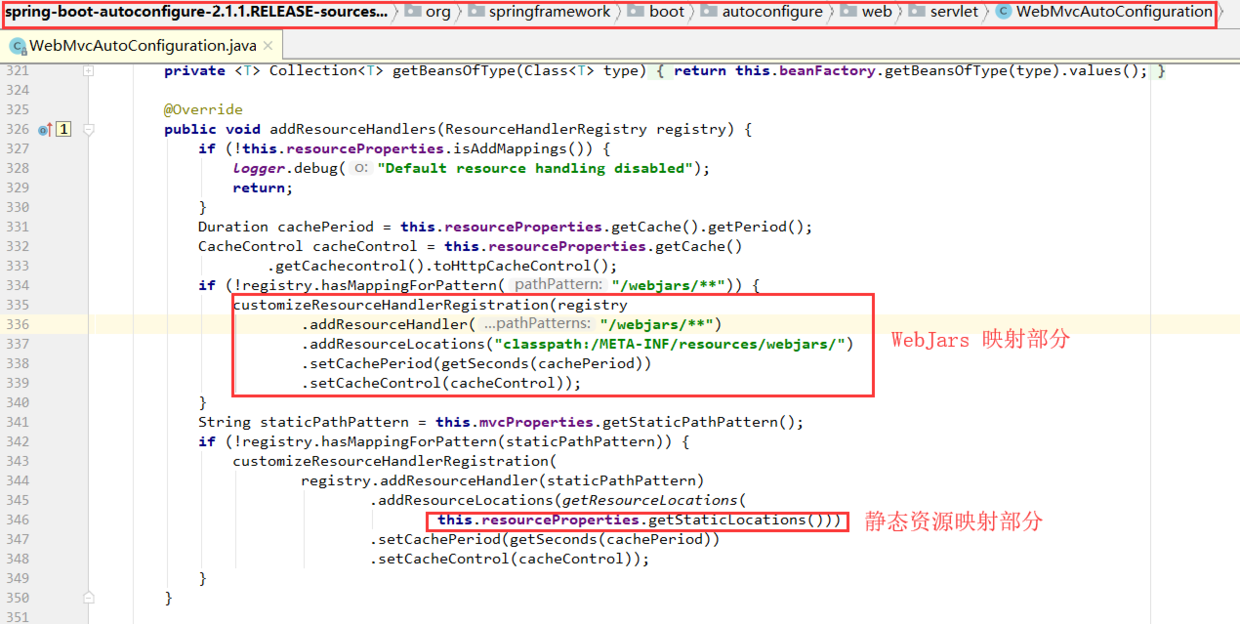
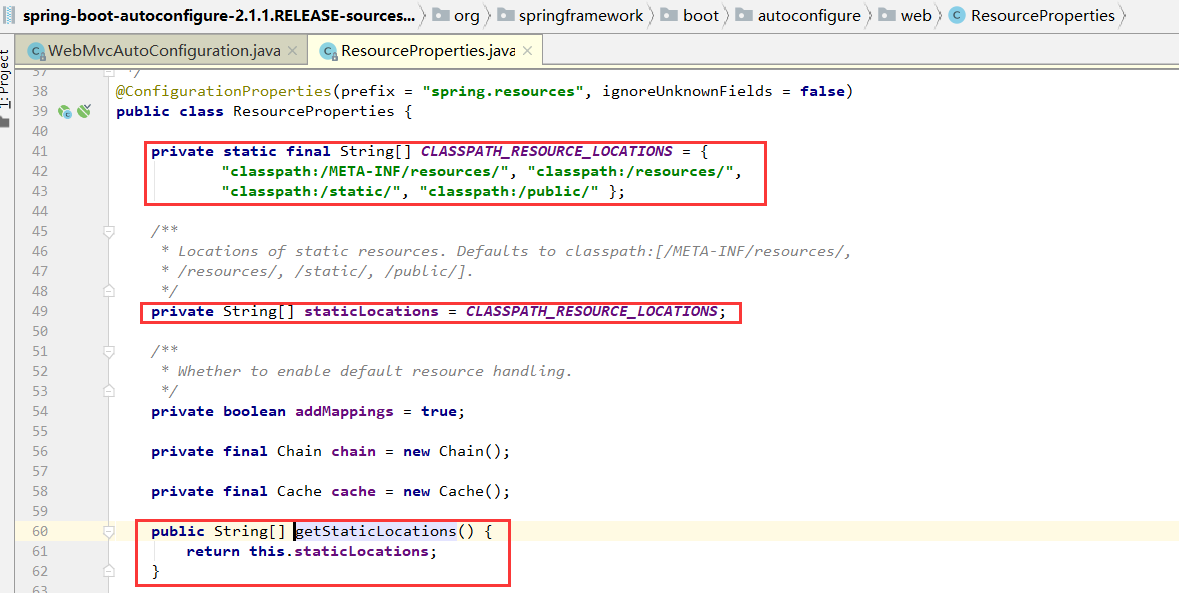
而对于网站图标,Spring Boot 也已经配置了默认位置,可以在看到。
// path: org.springframework.boot.autoconfigure.web.servlet.WebMvcAutoConfiguration

@Bean

public SimpleUrlHandlerMapping faviconHandlerMapping() {

	SimpleUrlHandlerMapping mapping = new SimpleUrlHandlerMapping();

	mapping.setOrder(Ordered.HIGHEST_PRECEDENCE + 1);

	mapping.setUrlMap(Collections.singletonMap("**/favicon.ico", // 图表

			faviconRequestHandler()));

	return mapping;

}

@Bean

public ResourceHttpRequestHandler faviconRequestHandler() {

	ResourceHttpRequestHandler requestHandler = new ResourceHttpRequestHandler();

	requestHandler.setLocations(resolveFaviconLocations());

	return requestHandler;

}

private List<Resource> resolveFaviconLocations() {

	String[] staticLocations = getResourceLocations(

			this.resourceProperties.getStaticLocations());

	List<Resource> locations = new ArrayList<>(staticLocations.length + 1);

	Arrays.stream(staticLocations).map(this.resourceLoader::getResource)

			.forEach(locations::add);

	locations.add(new ClassPathResource("/"));

	return Collections.unmodifiableList(locations);

}
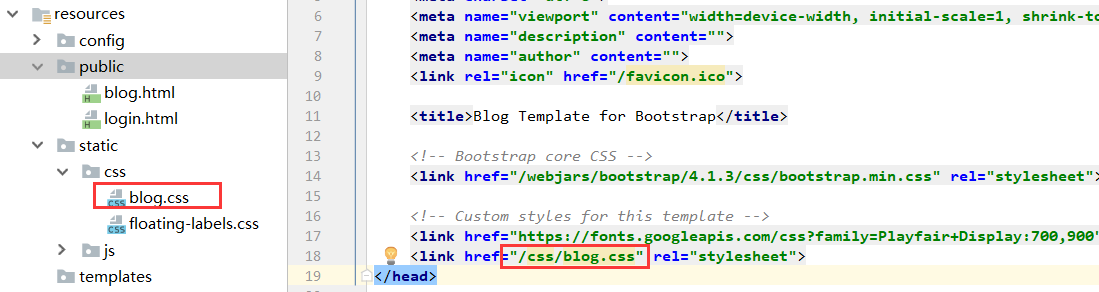
根据 Spring Boot 默认的静态资源映射规则,可以直接把需要的静态资源放在响应的文件夹下然后直接引用即可。
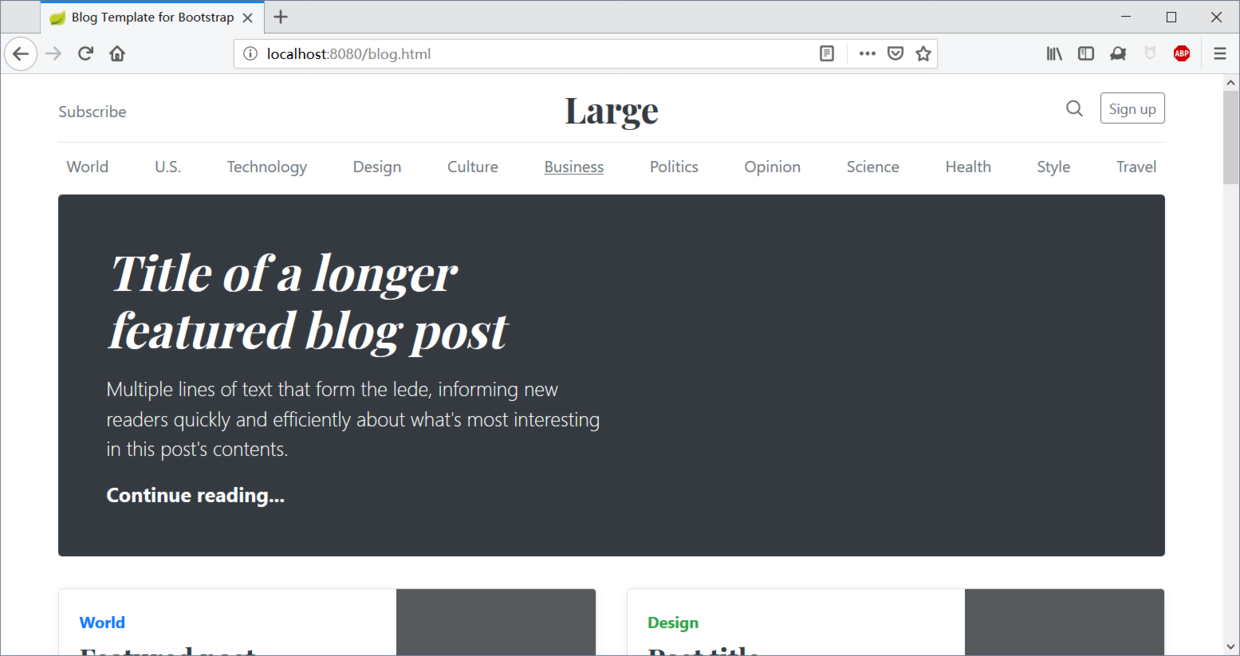
而放在 Public 文件夹下的 HTML 页面也可以直接访问。
2.2 webjars
webjars 的思想是把静态资源打包到 Jar 包中,然后使用 JVM 构建工具进行管理,如 maven , Gradle 等。
使用 webjars 第一步需要进入依赖,如要使用 bootstrap。
 <!-- Web Jars 静态资源文件 -->

 <dependency>

     <groupId>org.webjars</groupId>

     <artifactId>bootstrap</artifactId>

     <version>4.1.3</version>

</dependency>
引入之后查看 bootstrap 资源。
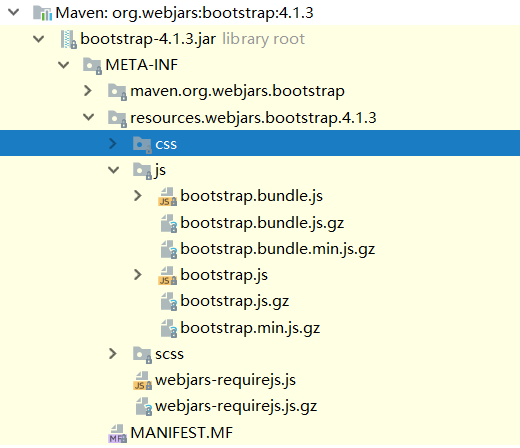
由于 Springboot 映射了 /webjars/** 到 classpath:/META-INF/resources/webjars. 因此可以直接在文件中引用 webjars 的静态资源。
<!-- Bootstrap core CSS -->

<link href="/webjars/bootstrap/4.1.3/css/bootstrap.min.css" rel="stylesheet">

<script src="/webjars/bootstrap/4.1.3/js/bootstrap.min.js"></script>
3. 模版引擎
Spring MVC 支持各种模版技术,如 Thymeleaf , FreeMarker , JSP 等。而Thyemeleaf 原型即页面的特性或许更符合 Spring Boot 快速开发的思想而被官方推荐。
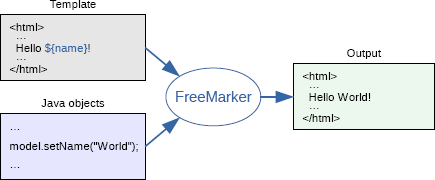
Thymeleaf 是适用于 Web 开发的服务端 Java 模版引擎,Thymeleaf 为开发工作流程带来优雅自然的模版,由于其非侵入的特性,可以让页面不管是在静态原型下还是用作模版引擎时都有良好的页面展现。
<table>

  <thead>

    <tr>

      <th th:text="#{msgs.headers.name}">Name</th>

      <th th:text="#{msgs.headers.price}">Price</th>

    </tr>

  </thead>

  <tbody>

    <tr th:each="prod: ${allProducts}">

      <td th:text="${prod.name}">Oranges</td>

      <td th:text="${#numbers.formatDecimal(prod.price, 1, 2)}">0.99</td>

    </tr>

  </tbody>

</table>
3.1 引入 Thymeleaf
 		<!-- thymeleaf 模版-->

        <dependency>

            <groupId>org.springframework.boot</groupId>

            <artifactId>spring-boot-starter-thymeleaf</artifactId>

        </dependency>
3.2 使用 Thymeleaf
根据 Spring Boot 自动配置原理,先看一下 Thymeleaf 的配置类,从中可以看出 Thymeleaf 的相关配置。我们可以知道 默认存放目录是 templates 文件夹,文件后缀为 .html 且开启了缓存。
@ConfigurationProperties(prefix = "spring.thymeleaf")

public class ThymeleafProperties {

	private static final Charset DEFAULT_ENCODING = StandardCharsets.UTF_8;

	public static final String DEFAULT_PREFIX = "classpath:/templates/";

	public static final String DEFAULT_SUFFIX = ".html";

	/**

	 * Whether to enable template caching.

	 */

	private boolean cache = true;
为了在开发中编写模版文件时不用重启,可以在配置中关闭缓存。
# 关闭模版缓存

spring.thymeleaf.cache=false

# 如果需要进行其他的配置,可以参考配置类:ThymeleafProperties

# org.springframework.boot.autoconfigure.thymeleaf.ThymeleafProperties
编写 Controller 响应信息。
  /**

     * 获取ID为1的用户信息

     *

     * @return

     */

    @GetMapping(value = "/user/1")

    public String getUserById(Model model) {

        User user1 = new User("Darcy", "password", 24, new Date(), Arrays.asList("Java", "GoLang"));

        User user2 = new User("Chris", "password", 22, new Date(), Arrays.asList("Java", "Web"));

        ArrayList<User> userList = new ArrayList<>();

        userList.add(user1);

        userList.add(user2);

        model.addAttribute("userList", userList);

        model.addAttribute("user", user1);

        return "user";

    }
因为 Thymelaf 默认模版位置在 templates 文件夹下,因此在这个文件夹下编写页面信息。
<!doctype html>

<html lang="en" xmlns:th="http://www.thymeleaf.org">

<head>

    <title>Thymeleaf 的基本使用</title>

    <!-- 引入JS文件 -->

    <!--<script th:src="@{/static/js/alert.js}"></script>-->

</head>

<body>

<div>

    <p><b>Hello Thymeleaf Index</b></p>

    用户名称:<input th:id="${user.username}" th:name="${user.username}" th:value="${user.username}">

    <br/>

    用户技能:<input th:value="${user.skills}">

    <br/>

    用户年龄:<input th:value="${user.age}">

    <br/>

    用户生日:<input th:value="${#dates.format(user.birthday,'yyyy-MM-dd hh:mm:ss ')}">

</div>

<div th:object="${user}">

    <p><b>Hello Thymeleaf Index</b></p>

    用户名称:<input th:id="*{username}" th:name="*{username}" th:value="*{username}">

    <br/>

    用户技能:<input th:value="*{skills}">

    <br/>

    用户年龄:<input th:value="*{age}">

    <br/>

    用户生日:<input th:value="*{#dates.format(birthday,'yyyy-MM-dd hh:mm:ss')}">

</div>

<div>

    <p><b>Text 与 utext</b></p>

    <!-- th:text 显示HTML源码,作为字符串 -->

    <span th:text="${user.username}">abc</span>

    <br>

    <span th:utext="${user.username}">abc</span>

</div>

<div>

    <p><b>URL 的引用</b></p>

    <a th:href="@{https://www.baidu.com}">网站网址</a>

</div>

<div>

    <p><b>表单的使用</b></p>

    <form th:action="@{/th/postform}" th:object="${user}" method="post">

        用户名称:<input type="text" th:field="*{username}">

        <br/>

        用户技能:<input type="text" th:field="*{skills}">

        <br/>

        用户年龄:<input type="text" th:field="*{age}">

        <input type="submit">

    </form>

</div>

<div>

    <p><b>判断的使用</b></p>

    <div th:if="${user.age} == 18">18岁了</div>

    <div th:if="${user.age} gt 18">大于18岁</div>

    <div th:if="${user.age} lt 18">小于18岁</div>

    <div th:if="${user.age} ge 18">大于等于</div>

    <div th:if="${user.age} le 18">小于等于</div>

</div>

<div>

    <p><b>选择框</b></p>

    <select>

        <option>请选择一本书</option>

        <option th:selected="${user.username eq 'admin'}">管理员</option>

        <option th:selected="${user.username eq 'Darcy'}">Darcy</option>

        <option th:selected="${user.username eq 'Chris'}">Chris</option>

    </select>

</div>

<div>

    <p><b>遍历功能</b></p>

    <table>

        <tr>

            <th>用户名称</th>

            <th>年龄</th>

            <th>技能</th>

        </tr>

        <tr th:each="u:${userList}">

            <td th:text="${u.username}"></td>

            <td th:text="${u.age}"></td>

            <td th:text="${u.skills}"></td>

        </tr>

    </table>

</div>

<div>

    <p><b>Switch功能</b></p>

    <div th:switch="${user.username}">

        <p th:case="'admin'">欢迎管理员</p>

    </div>

</div>

</body>

</html>
访问页面可以看到数据正常显示。
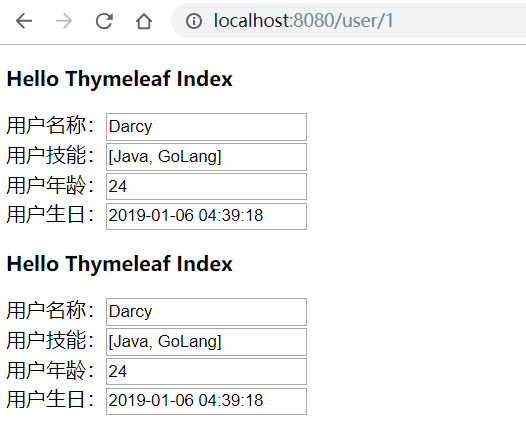
文章代码已经上传到 GitHub Spring Boot Web开发 - 静态资源。
文章代码已经上传到 GitHub Spring Boot Web开发 - 模版引擎。
<完>
本文原发于个人博客:https://www.codingme.net 转载请注明出处

Springboot 系列(五)Spring Boot web 开发之静态资源和模版引擎的更多相关文章
- Springboot 系列(六)Spring Boot web 开发之拦截器和三大组件
1. 拦截器 Springboot 中的 Interceptor 拦截器也就是 mvc 中的拦截器,只是省去了 xml 配置部分.并没有本质的不同,都是通过实现 HandlerInterceptor ...
- Springboot 系列(七)Spring Boot web 开发之异常错误处理机制剖析
前言 相信大家在刚开始体验 Springboot 的时候一定会经常碰到这个页面,也就是访问一个不存在的页面的默认返回页面. 如果是其他客户端请求,如接口测试工具,会默认返回JSON数据. { &quo ...
- spring boot系列(二)spring boot web开发
json 接口开发 在以前的spring 开发的时候需要我们提供json接口的时候需要做如下配置: 1 添加jackjson等jar包 2 配置spring controller扫描 3 对接的方法添 ...
- SpringBoot系列:Spring Boot使用模板引擎FreeMarker
一.Java模板引擎 模板引擎(这里特指用于Web开发的模板引擎)是为了使用户界面与业务数据(内容)分离而产生的,它可以生成特定格式的文档,用于网站的模板引擎就会生成一个标准的HTML文档. 在jav ...
- SpringBoot系列:Spring Boot使用模板引擎Thymeleaf
一.Java模板引擎 模板引擎(这里特指用于Web开发的模板引擎)是为了使用户界面与业务数据(内容)分离而产生的,它可以生成特定格式的文档,用于网站的模板引擎就会生成一个标准的HTML文档. 在jav ...
- SpringBoot系列:Spring Boot使用模板引擎JSP
一.Java模板引擎 模板引擎(这里特指用于Web开发的模板引擎)是为了使用户界面与业务数据(内容)分离而产生的,它可以生成特定格式的文档,用于网站的模板引擎就会生成一个标准的HTML文档. 在jav ...
- Spring Boot Web 开发注解篇
本文提纲 1. spring-boot-starter-web 依赖概述 1.1 spring-boot-starter-web 职责 1.2 spring-boot-starter-web 依赖关系 ...
- 四、Spring Boot Web开发
四.Web开发 1.简介 使用SpringBoot: 1).创建SpringBoot应用,选中我们需要的模块: 2).SpringBoot已经默认将这些场景配置好了,只需要在配置文件中指定少量配置就可 ...
- SpringBoot系列:Spring Boot集成Spring Cache,使用RedisCache
前面的章节,讲解了Spring Boot集成Spring Cache,Spring Cache已经完成了多种Cache的实现,包括EhCache.RedisCache.ConcurrentMapCac ...
随机推荐
- RecyclerView 刷新后自动滚动的问题,notifyDataSetChanged 后自己滚动
把recyclerview 高度设为match_parent就解决了..... source: https://segmentfault.com/q/1010000005966966
- Netty实现高性能IOT服务器(Groza)之手撕MQTT协议篇上
前言 诞生及优势 MQTT由Andy Stanford-Clark(IBM)和Arlen Nipper(Eurotech,现为Cirrus Link)于1999年开发,用于监测穿越沙漠的石油管道.目标 ...
- Java ArrayList正确循环添加删除元素方法及分析
在阿里巴巴Java开发手册中,有这样一条规定: 但是手册中并没有给出具体原因,本文就来深入分析一下该规定背后的思考. 一.foreach循环 foreach循环(Foreach loop)是计算机编程 ...
- python接口自动化(八)--发送post请求的接口(详解)
简介 上篇介绍完发送get请求的接口,大家必然联想到发送post请求的接口也不会太难,被聪明的你又猜到了.答案是对的,虽然发送post请求的参考例子很简单,但是实际遇到的情况却是很复杂的,因为所有系统 ...
- ASP.NET Core 2 High Performance 目录和读书笔记
ASP.NET Core 2 High Performance 大概的翻看了一下这本书,这本C# 7 and .NET Core 2.0 High Performance内容要好很多,这里先放出对应目 ...
- C# 填充Excel图表、图例背景色
填充背景色,一般可以选择多种不同样式来填充背景,包括填充为纯色背景.渐变背景.图片背景或者纹理背景等.下面的内容将分别介绍通过C#来设置Excel中图表背景色.以及图表中的图例背景色的方法. 使用工具 ...
- 5.App Inventor 2编程实例--指南针
本视频来自:https://www.17coding.net 的 国庆特辑——指南针 共3个视频. 注意: 项目名字要使用英文. 项目完成后可以选择“打包APK”—“ 打包APK并下载到电脑”,然后 ...
- Flink源码分析 - 源码构建
原文地址:https://mp.weixin.qq.com/s?__biz=MzU2Njg5Nzk0NQ==&mid=2247483692&idx=1&sn=18cddc1ee ...
- 监控EXPDP/IMPDP进度
--获取JOB_NAMEselect * from DBA_DATAPUMP_JOBS;OWNER_NAME JOB_NAME OPERATION JOB_MODE STATE DEGREE ATTA ...
- SQLServer多表联查,多表分页查询
多表联查: select p.*,s.Sheng , i.Shifrom [dbo].[ProductRecordInfo] --表名 p left join [ShengInfo] s on ...