CrawlSpider_获取图片名称地址,及入库
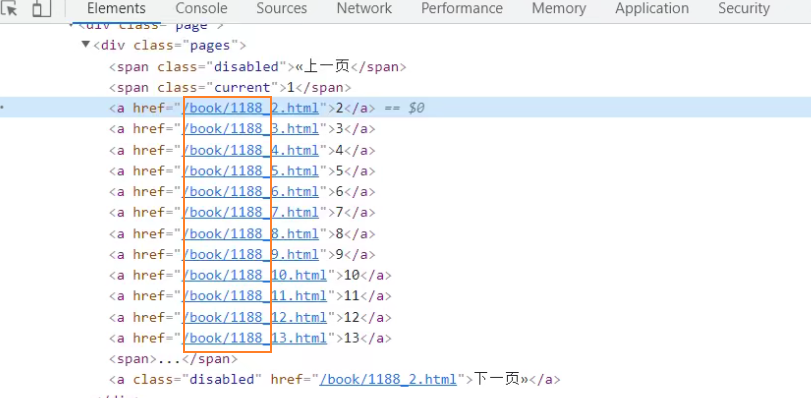
对当前网页链接提取

导入链接提取器

使用正则语法,比较多
\b 表数字
\b+ 一到多个数字
\. 转义点号

查看提取的链接


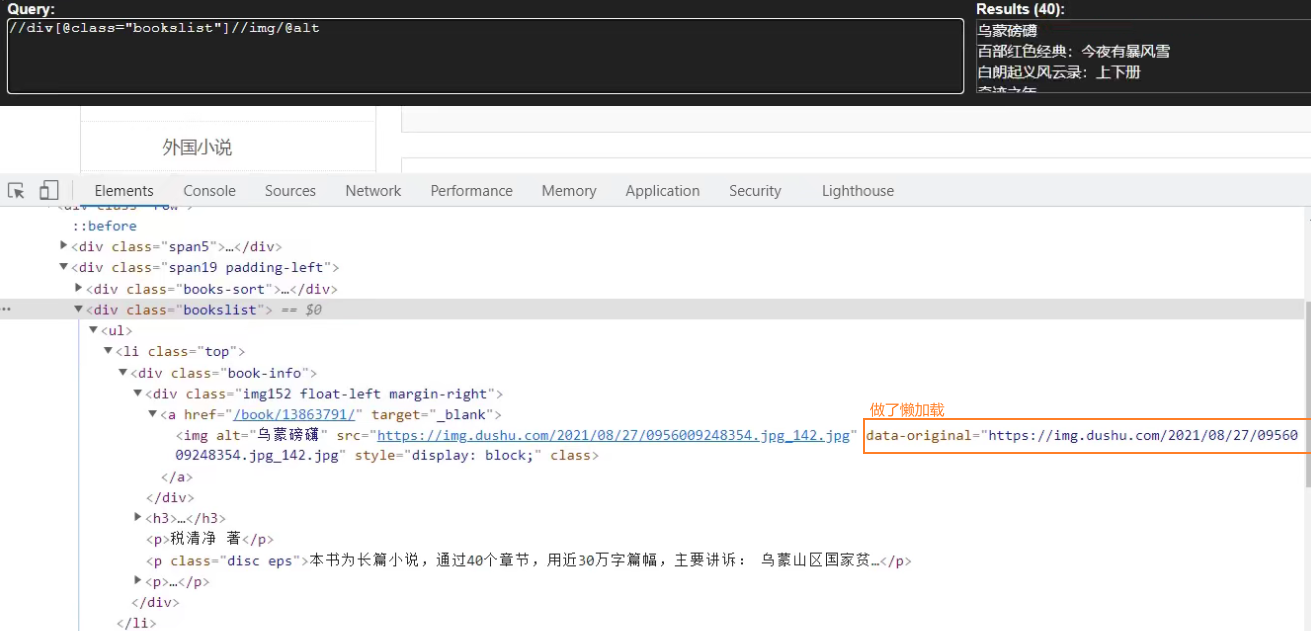
使用xpath语法

查看提取的链接


items定义爬取的数据结构类
name名字、src图片

items数据结构类的导包

运行


开启管道
pipelines管道功能

运行


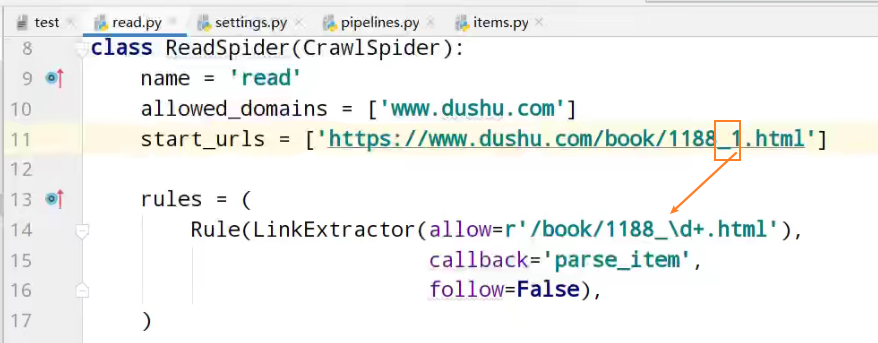
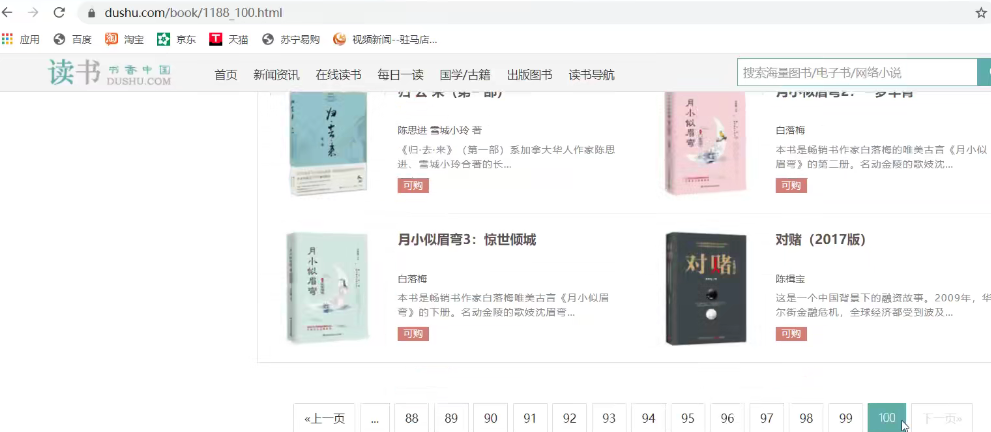
经过计算观察,缺失第一页的数据


运行
这次,没有问题,13页的所有数据

入库操作
链接mysql数据库

创建spider01数据库

使用spider01数据库

创建book表

查询book表内容

查询虚拟机ip

settings配置,链接使用数据库

开启数据库插入管道

pipelines数据库插入功能实现
# Define your item pipelines here
#
# Don't forget to add your pipeline to the ITEM_PIPELINES setting
# See: https://docs.scrapy.org/en/latest/topics/item-pipeline.html # useful for handling different item types with a single interface
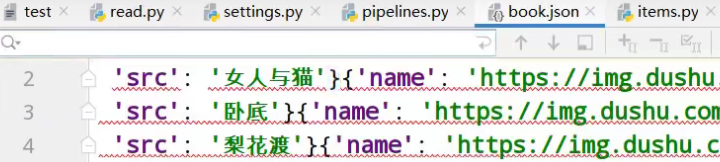
from itemadapter import ItemAdapter class ScrapyReadbook101Pipeline: def open_spider(self,spider):
self.fp = open('book.json','w',encoding='utf-8') def process_item(self, item, spider):
self.fp.write(str(item))
return item def close_spider(self,spider):
self.fp.close() # 加载settings文件,数据库参数
from scrapy.utils.project import get_project_settings
# 导入pyymsql
import pymysql # 创建mysql插入管道
class MysqlPipeline:
# 获取数据库链接参数
def open_spider(self,spider):
settings = get_project_settings()
self.host = settings['DB_HOST']
self.port =settings['DB_PORT']
self.user =settings['DB_USER']
self.password =settings['DB_PASSWROD']
self.name =settings['DB_NAME']
self.charset =settings['DB_CHARSET']
# 链接
self.connect()
# 链接数据库函数实现,获取cursor对象
def connect(self):
self.conn = pymysql.connect(
host=self.host,
port=self.port,
user=self.user,
password=self.password,
db=self.name,
charset=self.charset
)
# 创建执行mysql语句对象
self.cursor = self.conn.cursor() # 操作数据库函数
def process_item(self, item, spider):
# 插入操作
sql = 'insert into book(name,src) values("{}","{}")'.format(item['name'],item['src'])
# 执行sql语句
self.cursor.execute(sql)
# 提交
self.conn.commit() return item #关闭插入,关闭链接
def close_spider(self,spider):
self.cursor.close()
self.conn.close()
运行


虚拟机中,查询表中数据


以上是13页数据的爬取
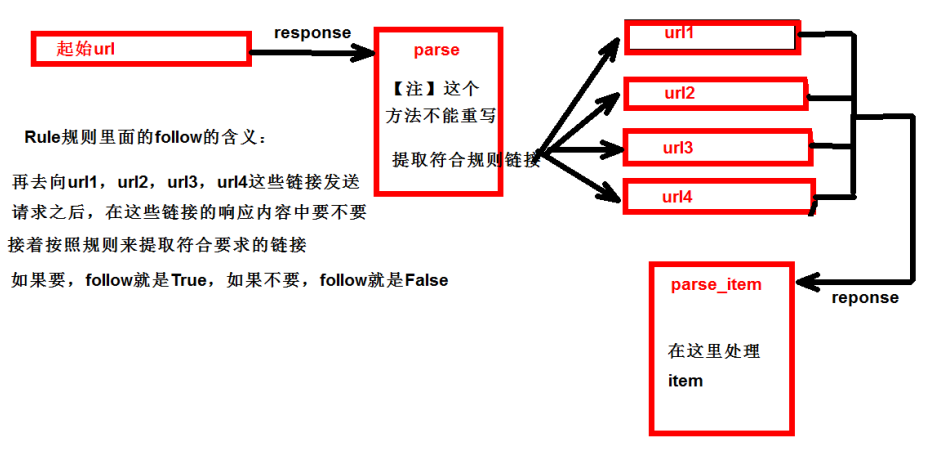
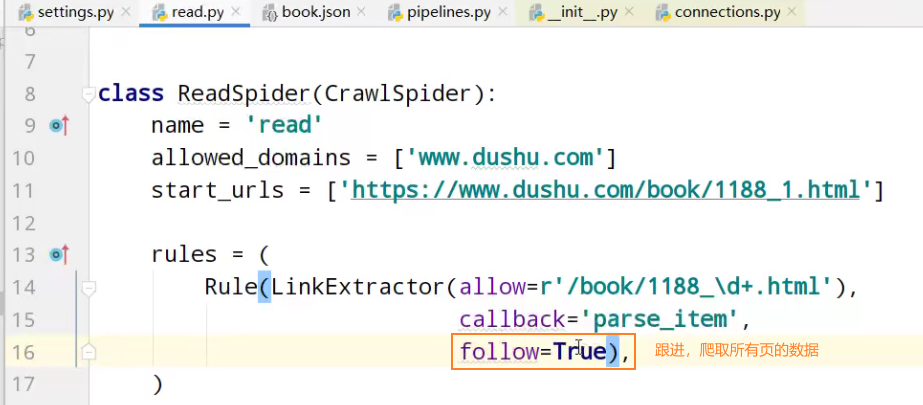
follow=true 跟进 按照提取连接规则进行提取
运行

虚拟机中,查询表中数据

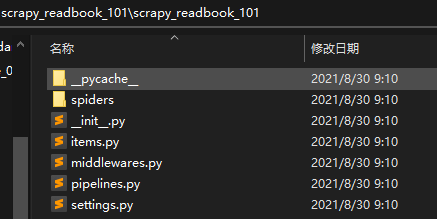
项目文件夹
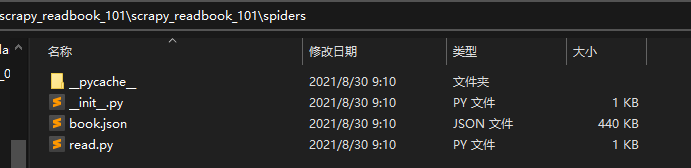
read.py爬虫核心文件
import scrapy
from scrapy.linkextractors import LinkExtractor
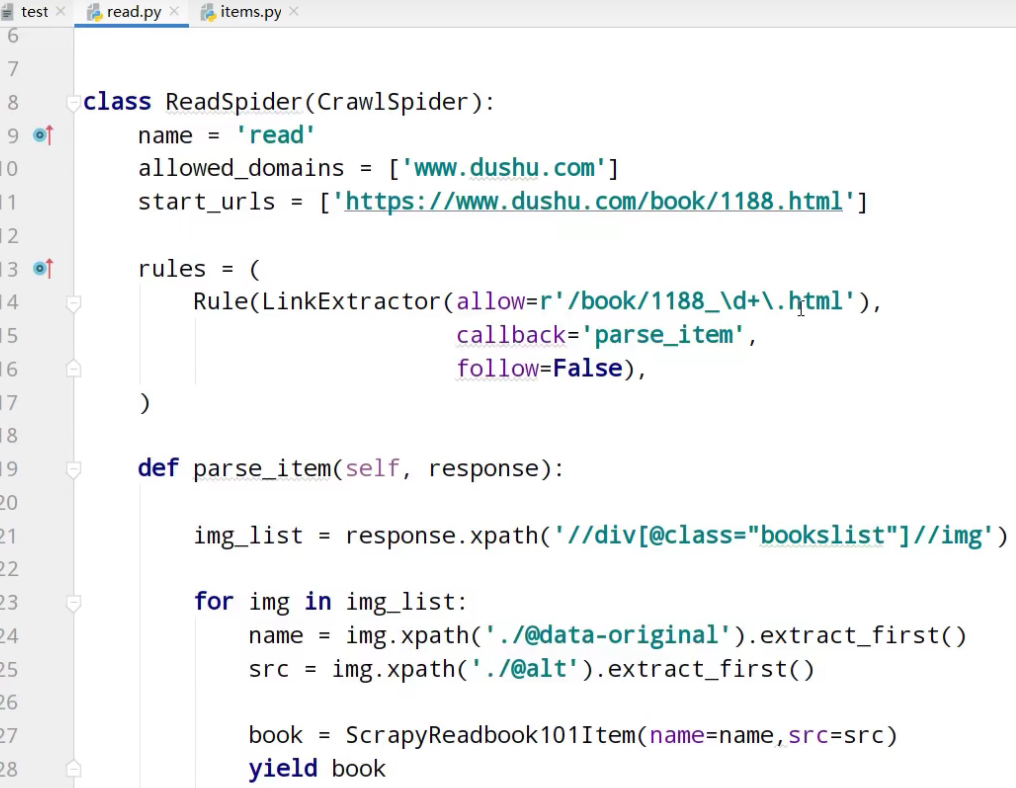
from scrapy.spiders import CrawlSpider, Rule from scrapy_readbook_101.items import ScrapyReadbook101Item class ReadSpider(CrawlSpider):
name = 'read'
allowed_domains = ['www.dushu.com']
start_urls = ['https://www.dushu.com/book/1188_1.html'] rules = (
Rule(LinkExtractor(allow=r'/book/1188_\d+.html'),
callback='parse_item',
follow=True),
) def parse_item(self, response): img_list = response.xpath('//div[@class="bookslist"]//img') for img in img_list:
name = img.xpath('./@data-original').extract_first()
src = img.xpath('./@alt').extract_first() book = ScrapyReadbook101Item(name=name,src=src)
yield book
items.py自定义数据结构类
# Define here the models for your scraped items

#

# See documentation in:

# https://docs.scrapy.org/en/latest/topics/items.html

import scrapy

class ScrapyReadbook101Item(scrapy.Item):

    # define the fields for your item here like:

    # name = scrapy.Field()

    name = scrapy.Field()

    src = scrapy.Field()
settings.py参数配置文件
# Scrapy settings for scrapy_readbook_101 project
#
# For simplicity, this file contains only settings considered important or
# commonly used. You can find more settings consulting the documentation:
#
# https://docs.scrapy.org/en/latest/topics/settings.html
# https://docs.scrapy.org/en/latest/topics/downloader-middleware.html
# https://docs.scrapy.org/en/latest/topics/spider-middleware.html BOT_NAME = 'scrapy_readbook_101' SPIDER_MODULES = ['scrapy_readbook_101.spiders']
NEWSPIDER_MODULE = 'scrapy_readbook_101.spiders' # Crawl responsibly by identifying yourself (and your website) on the user-agent
#USER_AGENT = 'scrapy_readbook_101 (+http://www.yourdomain.com)' # Obey robots.txt rules
ROBOTSTXT_OBEY = True # Configure maximum concurrent requests performed by Scrapy (default: 16)
#CONCURRENT_REQUESTS = 32 # Configure a delay for requests for the same website (default: 0)
# See https://docs.scrapy.org/en/latest/topics/settings.html#download-delay
# See also autothrottle settings and docs
#DOWNLOAD_DELAY = 3
# The download delay setting will honor only one of:
#CONCURRENT_REQUESTS_PER_DOMAIN = 16
#CONCURRENT_REQUESTS_PER_IP = 16 # Disable cookies (enabled by default)
#COOKIES_ENABLED = False # Disable Telnet Console (enabled by default)
#TELNETCONSOLE_ENABLED = False # Override the default request headers:
#DEFAULT_REQUEST_HEADERS = {
# 'Accept': 'text/html,application/xhtml+xml,application/xml;q=0.9,*/*;q=0.8',
# 'Accept-Language': 'en',
#} # Enable or disable spider middlewares
# See https://docs.scrapy.org/en/latest/topics/spider-middleware.html
#SPIDER_MIDDLEWARES = {
# 'scrapy_readbook_101.middlewares.ScrapyReadbook101SpiderMiddleware': 543,
#} # Enable or disable downloader middlewares
# See https://docs.scrapy.org/en/latest/topics/downloader-middleware.html
#DOWNLOADER_MIDDLEWARES = {
# 'scrapy_readbook_101.middlewares.ScrapyReadbook101DownloaderMiddleware': 543,
#} # Enable or disable extensions
# See https://docs.scrapy.org/en/latest/topics/extensions.html
#EXTENSIONS = {
# 'scrapy.extensions.telnet.TelnetConsole': None,
#} # 参数中一个端口号 一个是字符集 都要注意
DB_HOST = '192.168.231.130'
# 端口号是一个整数
DB_PORT = 3306
DB_USER = 'root'
DB_PASSWROD = '1234'
DB_NAME = 'spider01'
# utf-8的杠不允许写
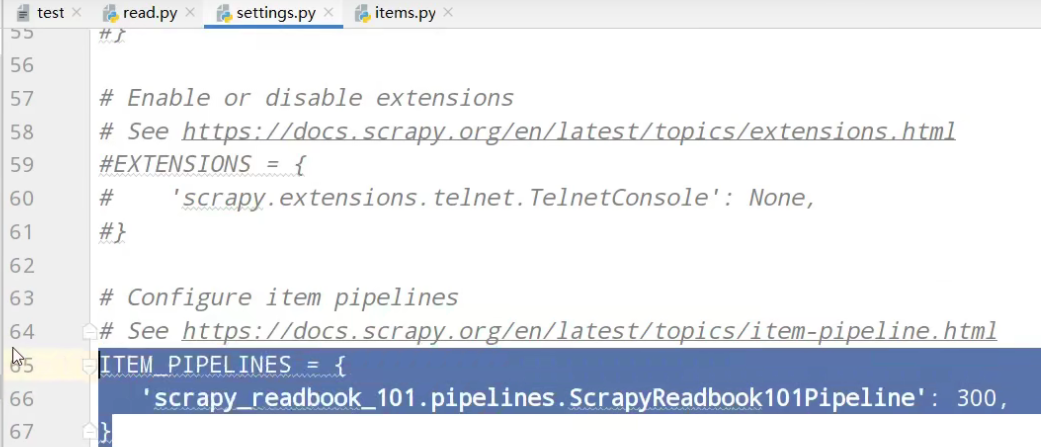
DB_CHARSET = 'utf8' # Configure item pipelines
# See https://docs.scrapy.org/en/latest/topics/item-pipeline.html
ITEM_PIPELINES = {
'scrapy_readbook_101.pipelines.ScrapyReadbook101Pipeline': 300,
# MysqlPipeline
'scrapy_readbook_101.pipelines.MysqlPipeline':301
} # Enable and configure the AutoThrottle extension (disabled by default)
# See https://docs.scrapy.org/en/latest/topics/autothrottle.html
#AUTOTHROTTLE_ENABLED = True
# The initial download delay
#AUTOTHROTTLE_START_DELAY = 5
# The maximum download delay to be set in case of high latencies
#AUTOTHROTTLE_MAX_DELAY = 60
# The average number of requests Scrapy should be sending in parallel to
# each remote server
#AUTOTHROTTLE_TARGET_CONCURRENCY = 1.0
# Enable showing throttling stats for every response received:
#AUTOTHROTTLE_DEBUG = False # Enable and configure HTTP caching (disabled by default)
# See https://docs.scrapy.org/en/latest/topics/downloader-middleware.html#httpcache-middleware-settings
#HTTPCACHE_ENABLED = True
#HTTPCACHE_EXPIRATION_SECS = 0
#HTTPCACHE_DIR = 'httpcache'
#HTTPCACHE_IGNORE_HTTP_CODES = []
#HTTPCACHE_STORAGE = 'scrapy.extensions.httpcache.FilesystemCacheStorage'
pipelines.py功能核心功能
# Define your item pipelines here

#

# Don't forget to add your pipeline to the ITEM_PIPELINES setting

# See: https://docs.scrapy.org/en/latest/topics/item-pipeline.html

# useful for handling different item types with a single interface

from itemadapter import ItemAdapter

class ScrapyReadbook101Pipeline:

    def open_spider(self,spider):

        self.fp = open('book.json','w',encoding='utf-8')

    def process_item(self, item, spider):

        self.fp.write(str(item))

        return item

    def close_spider(self,spider):

        self.fp.close()

# 加载settings文件

from scrapy.utils.project import get_project_settings

import pymysql

class MysqlPipeline:

    def open_spider(self,spider):

        settings = get_project_settings()

        self.host = settings['DB_HOST']

        self.port =settings['DB_PORT']

        self.user =settings['DB_USER']

        self.password =settings['DB_PASSWROD']

        self.name =settings['DB_NAME']

        self.charset =settings['DB_CHARSET']

        self.connect()

    def connect(self):

        self.conn = pymysql.connect(

                            host=self.host,

                            port=self.port,

                            user=self.user,

                            password=self.password,

                            db=self.name,

                            charset=self.charset

        )

        self.cursor = self.conn.cursor()

    def process_item(self, item, spider):

        sql = 'insert into book(name,src) values("{}","{}")'.format(item['name'],item['src'])

        # 执行sql语句

        self.cursor.execute(sql)

        # 提交

        self.conn.commit()

        return item

    def close_spider(self,spider):

        self.cursor.close()

        self.conn.close()
CrawlSpider_获取图片名称地址,及入库的更多相关文章
- ResDrawableImgUtil【根据图片名称获取resID值或者Bitmap对象】
版权声明:本文为HaiyuKing原创文章,转载请注明出处! 前言 根据图片名称获取项目的res/drawable-xxdhpi中相应资源的ID值以及bitmap值的封装类. 效果图 代码分析 根据图 ...
- java SpringWeb 接收安卓android传来的图片集合及其他信息入库存储
公司是做APP的,进公司一年了还是第一次做安卓的接口 安卓是使用OkGo.post("").addFileParams("key",File); 通过这种方式传 ...
- angular上传获取图片的directive指令
在AngularJS中,操作DOM一般在指令中完成,那么指令是如何实现的呢?指令的作用是把我们自定义的语义化标签替换成浏览器能够认识的HTML标签 一般的事件监听是在对静态的dom绑定事件,而如果在指 ...
- 阿里云使用js 实现OSS图片上传、获取OSS图片列表、获取图片外网访问地址(读写权限私有、读写权限公共);
详情请参考:https://help.aliyun.com/document_detail/32069.html?spm=a2c4g.11186623.6.763.ZgC59a 或者https://h ...
- 如何获取Flickr图片链接地址作为外链图片
Flickr,雅虎旗下图片分享网站.为一家提供免费及付费数位照片储存.分享方案之线上服务,也提供网络社群服务的平台.其重要特点就是基于社会网络的人际关系的拓展与内容的组织.这个网站的功能之强大,已超出 ...
- Android 获取手机Mac地址,手机名称
/** * 获取手机mac地址<br/> * 错误返回12个0 */ public static String getMacAddress(Context context) { // 获取 ...
- Android BLE与终端通信(一)——Android Bluetooth基础API以及简单使用获取本地蓝牙名称地址
Android BLE与终端通信(一)--Android Bluetooth基础API以及简单使用获取本地蓝牙名称地址 Hello,工作需要,也必须开始向BLE方向学习了,公司的核心技术就是BLE终端 ...
- 根据图片url地址获取图片的宽高
/** * 根据img获取图片的宽高 * @param img 图片地址 * @return 图片的对象,对象中图片的真实宽高 */ public BufferedImage getBufferedI ...
- 图片url地址的生成获取方法
在写博客插入图片时,许多时候需要提供图片的url地址.作为菜鸡的我,自然是一脸懵逼.那么什么是所谓的url地址呢?又该如何获取图片的url地址呢? 首先来看一下度娘对url地址的解释:url是统一资源 ...
随机推荐
- 深入浅出WPF-05.控件与布局
控件与布局 突出特点:1.专门的UI设计语言XAML,无需像MFC那样使用编程语言设计UI.2.前几代在UI和数据交互方面是由消息Message到控件事件,始终是把UI控件放在主导位置而把数据放在了次 ...
- FastAPI(59)- 详解使用 OAuth2PasswordBearer + JWT 认证
JWT JSON Web Tokens 它是一个将 JSON 对象编码为密集且没有空格的长字符串的标准 使用 JWT token 和安全密码 hash 使应用程序真正安全 JWT 小栗子 eyJhbG ...
- Java秘诀!Java逻辑运算符介绍
运算符丰富是 Java 语言的主要特点之一,它提供的运算符数量之多,在高级语言中是少见的. Java 语言中的运算符除了具有优先级之外,还有结合性的特点.当一个表达式中出现多种运算符时,执行的先后顺序 ...
- bzoj5210最大连通子块和 (动态dp+卡常好题)
卡了一晚上,经历了被卡空间,被卡T,被卡数组等一堆惨惨的事情之后,终于在各位大爹的帮助下过了这个题qwqqq (全网都没有用矩阵转移的动态dp,让我很慌张) 首先,我们先考虑一个比较基础的\(dp\) ...
- SPOJ2939 QTREE5(LCT维护子树信息)
QWQ嘤嘤嘤 此题正规题解应该是边分治??或者是树剖(总之不是LCT) 但是我这里还是把它当成一个LCT题目来做 首先,这个题的重点还是在update上 因为有\(makeroot\)这个操作的存在, ...
- Kubernetes Job Controller 原理和源码分析(一)
概述什么是 JobJob 入门示例Job 的 specPod Template并发问题其他属性 概述 Job 是主要的 Kubernetes 原生 Workload 资源之一,是在 Kubernete ...
- C++的智能指针学习笔记(初)
C++ primer plus 16.2节介绍了auto_ptr,该模板类在C++11中已弃用,目前已被shared_ptr代替. auto_ptr又叫做智能指针,用于管理动态内存分配的用法. 为什么 ...
- HCIP-RSTP
端口角色 根端口(RP): 非根桥收到最优的BPDU配置信息的端口为根端口,(到根桥开销最小的端口),根桥没有根端口. 指定端口(DP): 两非根交换机之间连接的两个端口必有一个为指定端口,比较两个非 ...
- 天脉2(ACoreOS653)操作系统学习02
天脉2(ACoreOS653)操作系统学习02 一.分区内通信方法 分区内通信指同一分区内进程之间的通信.ARINC 653定义的分区内进程通信机制,包括:缓存队列(Buffers-Queue).黑板 ...
- 【UE4 调试】C++ 常见编译 warnnings/errors
error LNK2019: unresolved external symbol "" referenced in function 描述 Link错误.无法解析的外部符号 解决 ...