SpringCloud整合Hystrix
1、Hystrix简介
Hystrix是由Nefflix开源的一个延迟和容错库,用于隔离访问远程系统、服务或第三方库,防止级联失败,从而提升系统的可用性、容错性与局部应用的弹性,是一个实现了超时机制和熔断器模式的工具类库。
2、Hystrix设计原则
- 防止任何单独的依赖耗尽资源(线程),过载立即切断并快速失败,防止排队。
- 尽可能提供回退以保护用户免受故障。
- 使用隔离技术(例如隔板、泳道和断路器模式)来限制任何一个依赖的影响。
- 通过近实时的指标,监控和告警,确保故障被及时发现。
- 通过动态修改配置属性,确保故障及时恢复。
- 防止整个依赖客户端执行失败,而不仅仅是网络通信。
3、Hystrix工作原理
- 使用命令模式将所有对外部服务(或依赖关系)的调用包装再HystrixCommand或HystrixObservableCommand对象中,并将该对象放在单独的线程中执行。
- 每个依赖都维护一个线程池(或信号量),线程池被耗尽则拒绝请求(而不是让请求排队)。
- 记录请求成功,失败,超时和线程拒绝。
- 服务错误百分比超过阀值,熔断器开关自动打开,一段时间内停止对该服务的所有请求。
- 请求失败,被拒绝,超时或熔断时执行降级逻辑。
- 近实时地讲课指标和配置的修改。
当使用Hystrix封装每个基础依赖项时,每个依赖项彼此隔离,受到延迟时发生饱和的资源的限制,并包含回退逻辑,该逻辑决定了在依赖项中发生任何类型的故障时做出什么响应。
4、Hystrix整合
1)实现eureka-server
pom.xml文件配置
<?xml version="1.0" encoding="UTF-8"?>

<project xmlns="http://maven.apache.org/POM/4.0.0"

         xmlns:xsi="http://www.w3.org/2001/XMLSchema-instance"

         xsi:schemaLocation="http://maven.apache.org/POM/4.0.0 http://maven.apache.org/xsd/maven-4.0.0.xsd">

    <parent>

        <groupId>org.springframework.boot</groupId>

        <artifactId>spring-boot-starter-parent</artifactId>

        <version>2.2.2.RELEASE</version>

        <relativePath/>

    </parent>

    <modelVersion>4.0.0</modelVersion>

    <artifactId>eureka-server</artifactId>

    <version>1.0</version>

    <properties>

        <project.build.sourceEncoding>UTF-8</project.build.sourceEncoding>

        <project.reporting.outputEncoding>UTF-8</project.reporting.outputEncoding>

        <java.version>1.8</java.version>

        <spring-cloud.version>Hoxton.RELEASE</spring-cloud.version>

    </properties>

    <dependencies>

        <dependency>

            <groupId>org.springframework.cloud</groupId>

            <artifactId>spring-cloud-starter-netflix-eureka-server</artifactId>

        </dependency>

        <dependency>

            <groupId>org.springframework.boot</groupId>

            <artifactId>spring-boot-starter-web</artifactId>

        </dependency>

    </dependencies>

    <dependencyManagement>

        <dependencies>

            <dependency>

                <groupId>org.springframework.cloud</groupId>

                <artifactId>spring-cloud-dependencies</artifactId>

                <version>${spring-cloud.version}</version>

                <type>pom</type>

                <scope>import</scope>

            </dependency>

        </dependencies>

    </dependencyManagement>

    <build>

        <plugins>

            <plugin>

                <groupId>org.apache.maven.plugins</groupId>

                <artifactId>maven-jar-plugin</artifactId>

        <version>2.6</version>

                <configuration>

                    <excludes>

                        <exclude>*.**</exclude>

                        <exclude>*/*.xml</exclude>

                    </excludes>

                    <archive>

                        <manifest>

                            <addClasspath>true</addClasspath>

                            <classpathPrefix>lib/</classpathPrefix>

                            <useUniqueVersions>false</useUniqueVersions>

                            <mainClass>cn.kenlab.org.EurekaServerApplication</mainClass>

                        </manifest>

                        <manifestEntries>

                            <Class-Path>./resources/</Class-Path>

                        </manifestEntries>

                    </archive>

                    <outputDirectory>${project.build.directory}</outputDirectory>

                </configuration>

            </plugin>

            <plugin>

                <groupId>org.apache.maven.plugins</groupId>

                <artifactId>maven-dependency-plugin</artifactId>

                <version>3.0.1</version>

                <executions>

                    <execution>

                        <id>copy-dependencies</id>

                        <phase>package</phase>

                        <goals>

                            <goal>copy-dependencies</goal>

                        </goals>

                        <configuration>

                            <outputDirectory>${project.build.directory}/lib/</outputDirectory>

                        </configuration>

                    </execution>

                </executions>

            </plugin>

            <plugin>

            <groupId>org.apache.maven.plugins</groupId>

                <artifactId>maven-resources-plugin</artifactId>

                <version>3.2.0</version>

                <executions>

                    <execution>

                        <id>copy-resources</id>

                        <phase>package</phase>

                        <goals>

                            <goal>copy-resources</goal>

                        </goals>

                        <configuration>

                            <resources>

                                <resource>

                                    <directory>src/main/resources</directory>

                                </resource>

                            </resources>

                            <outputDirectory>${project.build.directory}/resources</outputDirectory>

                        </configuration>

                    </execution>

                </executions>

            </plugin>

        </plugins>

    </build>

</project>
编写启动类,添加@EnableEurekaServer和@SpringBootApplication注解:
@EnableEurekaServer

@SpringBootApplication

public class EurekaServerApplication {

    public static void main(String[] args) {

        SpringApplication.run(EurekaServerApplication.class,args);

    }

}
配置文件application.properties内容:
server.port=8761

eureka.client.register-with-eureka=false

eureka.client.fetch-registry=false
2)创建服务提供者
pob文件添加依赖
<dependency>

       <groupId>org.springframework.cloud</groupId>

       <artifactId>spring-cloud-starter-netflix-eureka-client</artifactId>

</dependency>

 <dependency>

    <groupId>org.springframework.boot</groupId>

    <artifactId>spring-boot-starter-web</artifactId>

</dependency>
实现启动类,添加@EnableEurekaClient和@SpringBootApplication注解。
@SpringBootApplication

@EnableEurekaClient

public class UserServicerApplication {

    public static void main(String[] args) {

        SpringApplication.run(UserServicerApplication.class,args);

    }

}
实现UserController接口:
@RestController

@RequestMapping("/User")

public class UserController {

    static Map<Integer, User> userMap = new HashMap<>();

    static {

        //模拟数据库

        User user1 = new User(1, "张三", "123456");

        userMap.put(1, user1);

        User user2 = new User(2, "李四", "123123");

        userMap.put(2, user2);

    }

    @RequestMapping(value = "/getUser",method = RequestMethod.GET)

    public User getUser(int id)

    {

        User user = userMap.get(id);

        return user;

    }

}
配置文件application.properties内容:
eureka.client.service-url.defaultZone=http://127.0.0.1:8761/eureka/

eureka.client.register-with-eureka=true

eureka.client.fetch-registry=true

server.port=8082

spring.application.name=service
3)在Ribbon中使用熔断器
pom中添加依赖,熔断器在spring-cloud-starter-netflix-hystrix包中。
<dependency>

    <groupId>org.springframework.cloud</groupId>

    <artifactId>spring-cloud-starter-netflix-eureka-client</artifactId>

</dependency>

<dependency>

   <groupId>org.springframework.boot</groupId>

    <artifactId>spring-boot-starter-web</artifactId>

</dependency>

<dependency>

   <groupId>org.springframework.cloud</groupId>

   <artifactId>spring-cloud-starter-netflix-hystrix</artifactId>

</dependency>
启动类中加上@EnableHystrix注解,开启熔断器功能。
@EnableHystrix //在启动类上添加@EnableHystrix注解开启Hystrix的熔断器功能。

@SpringBootApplication

@EnableEurekaClient

public class ConsumerRibbonApplication {

    //当添加@LoadBalanced注解,就代表启动Ribbon,进行负载均衡

    @LoadBalanced

    @Bean

    public RestTemplate restTemplate() {

        return new RestTemplate();

    }

    public static void main(String[] args) {

        SpringApplication.run(ConsumerRibbonApplication.class,args);

    }

}
实现HystrixRibbonController类,在需要有熔断机制的方法上添加@HystrixCommand,属性fallbackMethod是熔断时返回的方法。
@RestController

@RequestMapping("/Hystrix/User")

public class HystrixRibbonController {

    @Autowired

    private RestTemplate restTemplate;

    /**

     * 调用 user微服务

     */

    @HystrixCommand(fallbackMethod = "getDefaultUser")

    @RequestMapping(value = "getUser",method = RequestMethod.GET)

    public String getUser(Integer id) {

        String url = "http://service/User/getUser?id=" + id;

        return restTemplate.getForObject(url, String.class);

    }

    public String getDefaultUser(Integer id) {

        System.out.println("熔断,默认回调函数");

        return "{\"id\":-1,\"name\":\"熔断用户\",\"password\":\"123456\"}";

    }

}
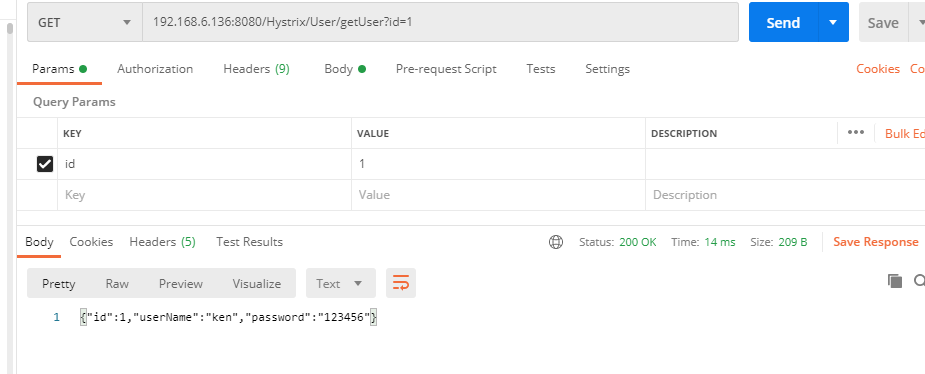
测试。正常情况下,在postman中访问192.168.1.136:8080/Hystrix/User/getUser?id=1,服务正常。如下图所示:
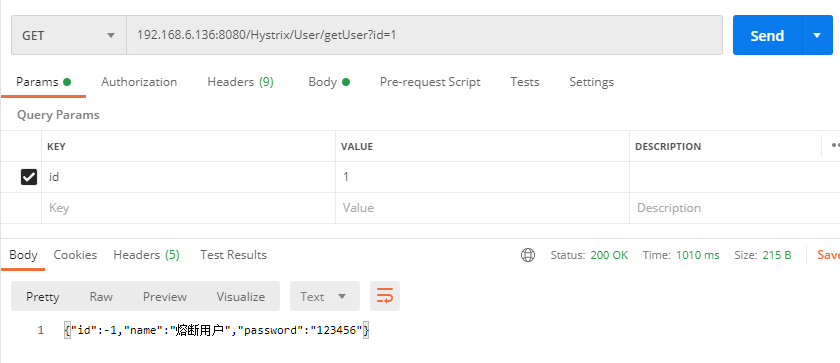
然后停掉service服务,再次访问192.168.1.136:8080/Hystrix/User/getUser?id=1,此时会触发熔断。运行结果如下所示:
4)在Feign中使用熔断器
pom文件中添加依赖。由于Feign依赖中已经加入了Hystrix依赖,因此,项目中添加Feign依赖后,无需添加Hstrix的其它依赖。只需要在application.properties文件中添加feign.hystrix.enabled=true,开启熔断机制即可,默认为false。
<dependency>

     <groupId>org.springframework.cloud</groupId>

     <artifactId>spring-cloud-starter-netflix-eureka-client</artifactId>

</dependency>

<dependency>

     <groupId>org.springframework.boot</groupId>

     <artifactId>spring-boot-starter-web</artifactId>

</dependency>

<dependency>

     <groupId>org.springframework.cloud</groupId>

     <artifactId>spring-cloud-starter-openfeign</artifactId>

</dependency>
启动类与普通feign启动类实现方式相同。即加上@EnableFeignClients。
@SpringBootApplication

@EnableEurekaClient

@EnableFeignClients

public class ConsumerFeignApplication {

    public static void main(String[] args) {

        SpringApplication.run(ConsumerFeignApplication.class,args);

    }

}
配置文件application.properties中加入feign.hystrix.enabled=true,开启熔断机制。
eureka.client.service-url.defaultZone=http://127.0.0.1:8761/eureka/

eureka.client.register-with-eureka=true

eureka.client.fetch-registry=true

server.port=8081

spring.application.name=Feign

feign.hystrix.enabled=true
实现feign客户端,调用服务提供者service模块的getUser接口,并配置fallback快速失败处理类UserFeignBackImpl。
//表示"service"的服务,指定fallback

@FeignClient(value = "service",fallback = UserFeignBackImpl.class)

public interface UserInterface {

    @RequestMapping(value = "/User/getUser",method = RequestMethod.GET)

    public String getUser(@RequestParam("id") int id);

}
实现UserFeignBackImpl类。
@Component

public class UserFeignBackImpl implements UserInterface {

    @Override

    public String getUser(int id) {

        return "{\"id\":-1,\"name\":\"熔断用户\",\"msg\":\"请求异常,返回熔断用户!\"}";

    }

}
实现外部访问接口。
@RestController

@RequestMapping("/HystrixFeign/User")

public class FeignHystrixController {

    @Autowired

    private UserInterface userInterface;

    @RequestMapping(value = "getUser",method = RequestMethod.GET)

    public String getUser(int id) {

        return  userInterface.getUser(id);

    }

}
测试方法同上。
SpringCloud整合Hystrix的更多相关文章
- Springcloud 整合Hystrix 断路器,支持Feign客户端调用
1,在这篇博文中,已经大致说过了Springcloud服务保护框架 Hystrix在服务隔离,服务降级,以及服务熔断中的使用 https://www.cnblogs.com/pickKnow/p/11 ...
- SpringCloud系列-整合Hystrix的两种方式
Hystrix [hɪst'rɪks],中文含义是豪猪,因其背上长满棘刺,从而拥有了自我保护的能力.本文所说的Hystrix是Netflix开源的一款容错框架,同样具有自我保护能力. 本文目录 一.H ...
- SpringCloud的Hystrix(一) 一个消费者内的两个服务监控
一.概念与定义 1.服务雪崩 在微服务架构中,整个系统按业务拆分出一个个服务,这些服务之间可以相互调用(RPC),为了保证服务的高可用,单个服务通常会集群部署. 但是由于网络原因或自身原因,服务并不能 ...
- springcloud使用Hystrix实现微服务的容错处理
使用Hystrix实现微服务的容错处理 容错机制 如果服务提供者相应非常缓慢,那么消费者对提供者的请求就会被强制等待,知道提供者相应超时.在高负载场景下,如果不作任何处理,此类问题可能会导致服务消费者 ...
- springcloud(八) Hystrix监控
一.Feign项目Hystrix自带的监控 在feign项目pom.xml 添加: <!-- 1,使用 Hystrix的模块 hystrix-metrics-event-stream,就可将这些 ...
- SpringCloud之Hystrix断路器(六)
整合Hystrix order-service pom.xml <dependency> <groupId>org.springframework.cloud& ...
- SpringCloud之Hystrix集群及集群监控turbine
目的: Hystrix集群及监控turbine Feign.Hystrix整合之服务熔断服务降级彻底解耦 集群后超时设置 Hystrix集群及监控turbine 新建一个springboot工程mic ...
- 19.SpringCloud实战项目-SpringCloud整合Alibaba-Nacos配置中心
SpringCloud实战项目全套学习教程连载中 PassJava 学习教程 简介 PassJava-Learning项目是PassJava(佳必过)项目的学习教程.对架构.业务.技术要点进行讲解. ...
- SpringCloud实战 | 第五篇:SpringCloud整合OpenFeign实现微服务之间的调用
一. 前言 微服务实战系列是基于开源微服务项目 有来商城youlai-mall 版本升级为背景来开展的,本篇则是讲述SpringCloud整合OpenFeign实现微服务之间的相互调用,有兴趣的朋友可 ...
随机推荐
- 【剑指Offer】最小的K个数 解题报告(Python)
[剑指Offer]最小的K个数 解题报告(Python) 标签(空格分隔): 剑指Offer 题目地址:https://www.nowcoder.com/ta/coding-interviews 题目 ...
- Null和空值对于avg计算时产生的影响以及处理
为什么要关注这一块呢:1.面试中可能会有涉及 2.工作中真的也可能会用,既然有可能我也用过,就拿出来跟大家分享一下,上一篇的博文,数据已准备好就不做数据准备的介绍了. step1:select * f ...
- html简单随机抽奖页面(在线抽奖、随机选取、自动挑选)
下载: https://download.csdn.net/download/weixin_44893902/20366745 效果: 代码: <!doctype html> <ht ...
- Java实习生常规技术面试题每日十题Java基础(四)
目录 1.String 和StringBuffer的区别. 2.数组有没有length()这个方法? String有没有length()这个方法? 3.final, finally, finalize ...
- docker学习:docker安装
Centos7 安装docker 下载安装 yum install docker-ce 启动docker systemctl start docker 创建并编写镜像加速文件 vim /etc/doc ...
- CentOS 7 连接不到网络解决方法(设置静态ip)
使用VM12创建虚拟机并安装CentOS 7,但是安装完成后发现连接不到网络. ping jd.com发现不通 因为在创建虚拟机的时候 我们选择的是NAT模式 这里给出NAT模式下对应的的解决方法: ...
- [ vue ] 解耦vuex(按照组件来组织vuex的结构)
问题描述 随着应用复杂度的增加,vuex用一个 store/index.js 文件来描述已经很难维护了,我们想把这些状态分割到单独文件里面. 参考1:https://vuex.vuejs.org/zh ...
- 物理机异常断电,linux虚拟机系统磁盘mount失败,导致无法启动; kubectl 连接失败
虚拟机 CentOS 7 挂载文件系统失败 上周五下班前没有关闭虚拟机和物理机, 今天周一开了虚拟机之后,发现操作系统启动失败. 原因跟 这篇文章描述的一模一样. 解决操作系统的文件系统挂载的问题之后 ...
- 新增访客数量MR统计之数据库准备
关注公众号:分享电脑学习回复"百度云盘" 可以免费获取所有学习文档的代码(不定期更新)云盘目录说明:tools目录是安装包res 目录是每一个课件对应的代码和资源等doc 目录是一 ...
- Java无包结构命令行编译
无包结构的命令行编译运行方式 如果图片损坏,点击链接:https://www.toutiao.com/i6491250431673500173/ 利用记事本编写一段简单的代码,文件名和类名要一致. 将 ...