Automate Screen or Button Taps via Tasker : Simulating keypress events
When using Tasker, sometimes we want to do some automation on screen e.g. screen or button taps.
We can use actions in "Input" category(especially "Dpad" action and "type" Action) to do some simple click/tap.
An example: http://tasker.wikidot.com/auto-usb-mass-storage
Auto USB mass storage when connected

With Tasker, use a trick to automatically enable USB mass storage when USB cable plugged.


Require:

- Android 2.3+

- USB debbuging off

- In fact, the button “Turn on USB storage” must show up when USB cable plugged.

Download this file

Otherwise, you can create the profile yourself with the following steps:

 Click New and select State

Select Hardware Action then USB plugged

 Click + in the bottom left to add an action

Select category Task and Wait

Set  ms and press Done

 Click + in the bottom left to add an action

Select category Input and DPad

Set Button Down and press done

 Click + in the bottom left to add an action

Select category Input and DPad

Set Button Press and press done

 Click + in the bottom left to add an action

Select category Task and Wait

Set  ms and press Done

 Click + in the bottom left to add an action

Select category Input and DPad

Set Button Right and press done

 Click + in the bottom left to add an action

Select category Input and DPad

Set Button Press only If %WIN ~ Turn off USB storage < replace it with your langage

Explanation:

Tasker simulates a tap on the button “Turn on USB storage” when it appears.
Use some type of Script to do this. Yes, script may be the best solution for automation.
2.1 Monkey Script
In order to get the correct coordinates, on your device go to Settings -> dev options and turn on "show pointer location" then you can go into your app and tap on the correct location and it will display the x/y coordinates of the tap which you can input on that script.
Some docs about the monkey tool>>>.
2.2 "Input" command in shell
With "input" command in shell, we can simulate keypress event on Android. The keycode sucks!
More info about "Input" command, here.
Android shell support sendevent and getevent command to grab and generate tap/swipe events on screen.
So we can make a way to do this. The method "listens" to your input actions (screen taps, button presses, etc)
and turns them into a script you can use to reproduce them.
Think of it as something similar to Excel's Macro Recording feature.
Of course, you need have knowledge of basic screen events(refer to tutorial).
TUTORIAL: Remote Control Touch Screen
Solution 1:
1. run getevent ini adb shell2. copy/paste it's output to file on PC3. run script which contents one line cat $1 | gawk --non-decimal-data '{print $1, ("0x"$2)+0, ("0x"$3)+0, ("0x"$4)+0}' | sed 's/://g;s/^/sendevent /g' as convert.sh file.in > file out4. put file.out on SD-card5. Source it with Run Shell action
Note: the solution comes from here. Thanks to Vladimir Oz .
Solution 2:
You can use "Sendevent->Getevent Toolbox" to find a way out.
Simulating keypress events on Android
- During development/testing of the button-drivers itself.
- To implement automated rigorous tests. ( MonkeyTest? )
- To implement/interface additional custom software keyboards.
- Just because we can!
Q. How to generate a hardware-button-press event

    WITHOUT actually pressing any key on the device?
Let us first understand what happens when a hardware button is pressed. Here is what happens when you press a button on an Android device:
- The h/w button triggers an interrupt.
- The ISR of the corresponding driver gets called (in kernel).
- In the ISR, the driver generates an input-event.
- Android-framework (in userspace) gets the notification of the event.
- Android reads the input-event code & type.
- Compares it with the proper "keymap/keylayout" file.
- The proper button is identified.
[ drum-roll... ]
input keyevent <event_code>
Now, before we try to send any keyevent, we need to find out the event-code that maps to the h/w key we want to simulate.
The following table summarizes all the supported keycodes in Android:
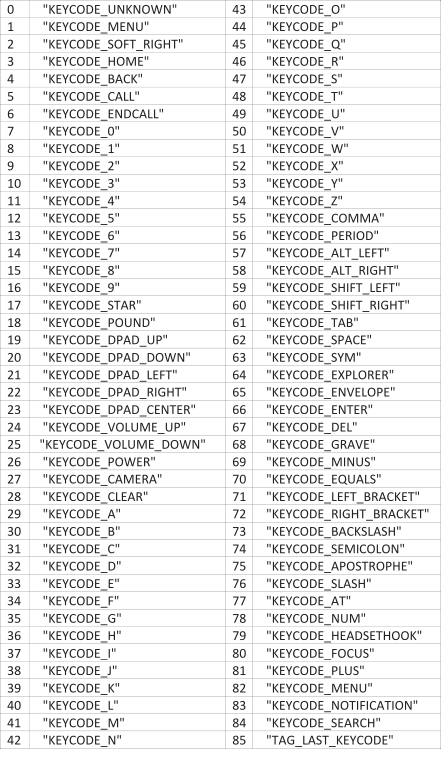
input keyevent <keycode>
The value of keycode can be any of the integer values from the above table.
In case a serial-console is NOT available on your device, you can always run the command via adb as follows:
adb shell input keyevent <keycode>
That's how a hardware-button-press is simulated in software!!
simulate screen tap with tasker
run shell -> input tap x y -> ensure use root is ticked
x y are the coordinates (activate them to show on screen in developer menu in settings)
run shell -> input tap 500 500
run shell -> input swipe 500 500 500 800
run shell -> input swipe 500 500 500 500 s
Emulating touch in Android is apparently possible with shell commands, using Tasker’s Run Shell action.
The command you use is
input tap x y
Where X and Y are coordinates. Root must be checked in the action options, and obviously Tasker needs root access to do this.
As for how you find X and Y, that’s easy:
Go to system settings, developer options, and enable “Show pointer location”.
Use that option to find the X and Y coordinates of whatever you need the touch emulation to press, and write them down.
Then use them in the above command.
You can also emulate swipes, using the following command:
input swipe X1 Y1 X2 Y2
Where X1 Y1 are the star coordinates and X2 Y2 are the end coordinates.
As an example, “input swipe 400 400 100 400″ on my phone swipes the image thumbnails in a Google Play listing.
This works great on my device, but might be dependent on device and/or OS version/ROM.
For long tap use , using the following command:
input swipe x1 y1 x2 y2 s
Set x1 and x2 to the same value and y1 and y2 to the same value to keep your swipe in the same place and set s to the number of milliseconds you want your long press to last.
TIP:
don't forget to turn off the "Show Pointer Location" and "Show Touches" BEFORE running the task.
That caused several reboots for me. Oops!
This is fantastic, only issue I'm having is that it doesn't seem to work with the screen off.. maybe if I remove keyguard?
yeah, have to wake disable key guard/ disable pattern lock, run the emulation,
enable keyguard/enable pattern lock, but totally worth it
Automate Screen or Button Taps via Tasker : Simulating keypress events的更多相关文章
- Simulating Mouse Events in JavaScript
http://marcgrabanski.com/simulating-mouse-click-events-in-javascript/
- Content portal for Pocketables Tasker articles
http://www.pocketables.com/2013/03/overview-of-pocketables-tasker-articles.html I write a lot about ...
- man screen
http://www.gnu.org/software/screen/manual/screen.html Screen User's Manual Next: Overview, Previous: ...
- How To Make A Swipeable Table View Cell With Actions – Without Going Nuts With Scroll Views
How To Make A Swipeable Table View Cell With Actions – Without Going Nuts With Scroll Views Ellen S ...
- bootstrap-modal 学习笔记 源码分析
Bootstrap是Twitter推出的一个开源的用于前端开发的工具包,怎么用直接官网 http://twitter.github.io/bootstrap/ 我博客的定位就是把这些年看过的源码给慢慢 ...
- The Engine Document of JustWeEngine
JustWeEngine - Android FrameWork An easy open source Android Native Game FrameWork. Github Game core ...
- ArcGIS Engine环境下创建自定义的ArcToolbox Geoprocessing工具
在上一篇日志中介绍了自己通过几何的方法合并断开的线要素的ArcGIS插件式的应用程序.但是后来考虑到插件式的程序的配置和使用比较繁琐,也没有比较好的错误处理机制,于是我就把之前的程序封装成一个类似于A ...
- View Focus的处理过程及ViewGroup的mFocused字段分析
通过上篇的介绍,我们知道在对KeyEvent的处理中有非常重要的一环,那就是KeyEvent在focus view的path上自上而下的分发, 换句话说只有focus的view才有资格参与KeyEve ...
- ExtJS笔记 Using Events
Using Events The Components and Classes of Ext JS fire a broad range of events at various points in ...
随机推荐
- Autofac Named命名和Key Service服务
参考:http://www.cnblogs.com/wolegequ/archive/2012/06/03/2532605.html
- Celery 框架学习笔记(生产者消费者模式)
生产者消费者模式 在实际的软件开发过程中,经常会碰到如下场景:某个模块负责产生数据,这些数据由另一个模块来负责处理(此处的模块是广义的,可以是类.函数.线程.进程等).产生数据的模块,就形象地称为生产 ...
- PowerMock+SpringMVC整合并测试Controller层方法
PowerMock扩展自Mockito,实现了Mockito不支持的模拟形式的单元测试.PowerMock实现了对静态方法.构造函数.私有方法以及final方法的模拟支持,对静态初始化过程的移除等强大 ...
- 最大子段和(Max Sum)
Max Sum. The following is an instance. a) (-2,11,-4,13,-5,-2) 思路: 最大子段和:给定一个序列(元素可正可负),找出其子序列中元素和 ...
- CCF CSP 201503-3 节日
CCF计算机职业资格认证考试题解系列文章为meelo原创,请务必以链接形式注明本文地址 CCF CSP 201503-3 节日 问题描述 有一类节日的日期并不是固定的,而是以“a月的第b个星期c”的形 ...
- CCF CSP 201512-3 画图
CCF计算机职业资格认证考试题解系列文章为meelo原创,请务必以链接形式注明本文地址 CCF CSP 201512-3 画图 问题描述 用 ASCII 字符来画图是一件有趣的事情,并形成了一门被称为 ...
- uc 下载页面 记录备份
记录一下 <!doctype html> <html> <head> <meta charset="utf-8"> <titl ...
- 【POJ】2165.Gunman
题解 把直线的斜率分解成二维,也就是随着z的增加x的增量和y的增量 我们发现一条合法直线向上移一点一定能碰到一条横线 知道了这条横线可以算出y的斜率 我们旋转一下,让这条横线碰到两条竖线,就可以算出x ...
- 本机ip和127.0.0.1的区别
简介 连接上因特网的每一台计算机都会有一个IP地址, 在linux下可以使用命令ifconfig来查看本机的ip地址(windows为ipconfig), 比如我当前电脑的ip地址为192.168.0 ...
- [HDU - 5408] CRB and Farm
题意: 给出一个由n个点组成的凸包,以及凸包内的k个点,问是否能够在凸包上选择最多2k个点构造一个新的 凸包,使得新的凸包覆盖原来的k个点. 要求2k个点覆盖原本的k个点,只要对原k个点构造凸包,然后 ...