安卓—自定义 AlertDialog 的样式
自定义修改安卓弹出框的样式
效果图:

1.在style.xml下添加
<!-- 自定义弹出样式 -->

    <style name="MyDialogStyle" parent="Theme.AppCompat.Light.Dialog.Alert">

        <!--是否浮在窗口之上-->

        <!--<item name="android:windowIsFloating">true</item>-->

        <!--半透明-->

        <!--<item name="android:windowIsTranslucent">true</item>-->

        <!--是否显示title-->

        <item name="android:windowNoTitle">true</item>

        <!--dialog之外没有焦点的区域是否罩上黑色半透明-->

        <item name="android:background">@color/white</item>

        <item name="android:textColor">@color/gray</item>

        <item name="android:textSize">@dimen/f24</item>

        <!-- 这里是修改顶部标题背景颜色,具体颜色自己定,可以是图片 -->

        <item name="android:topDark">@color/blue_alert</item>

        <!-- 这里是修改内容区域背景颜色 -->

        <item name="android:layout_gravity">center</item>

        <item name="buttonBarButtonStyle">@color/white</item>

    </style>
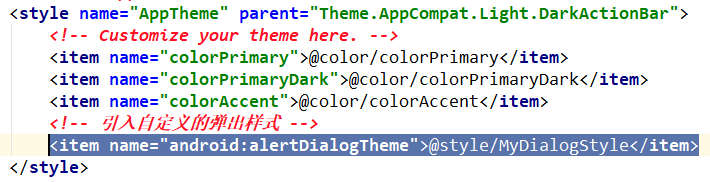
2.在主体配置里引入自定义的AlertDialog主题
3.java代码写法
/**

     * 默认的弹出窗口

     * @param view

     */

    public void alertDialog(View view) {

        AlertDialog.Builder builder = new AlertDialog.Builder(this);

        builder.setTitle("弹出窗");

        builder.setMessage("提示信息!");

        builder.setPositiveButton("确认", new DialogInterface.OnClickListener() {

            @Override

            public void onClick(DialogInterface dialogInterface, int i) {

                System.out.println("确认执行函数");

            }

        }).setNegativeButton("取消", null);

        builder.show();

    }

    /**

     * 自定义样式的弹出窗

     * @param view

     */

    public void alertDialog2(View view) {

        final AlertDialog.Builder builder = new AlertDialog.Builder(this);

        // 自定义 title样式

        TextView title = new TextView(this);

        title.setText("自定义弹出窗");

        title.setTextSize(24);

        title.setGravity(Gravity.CENTER);

        title.setPadding(0,20,0,20);

        builder.setCustomTitle(title);

        // 中间的信息以一个view的形式设置进去

        TextView msg = new TextView(this);

        msg.setText("自定义弹出提示信息");

        msg.setTextSize(24);

        msg.setGravity(Gravity.CENTER);

        msg.setPadding(20, 40, 20, 40);

        builder.setView(msg);

        builder.setPositiveButton("确认", new DialogInterface.OnClickListener() {

            @Override

            public void onClick(DialogInterface dialogInterface, int i) {

                System.out.println("确认执行函数");

            }

        }).setNegativeButton("取消", null);

        // 调用 show()方法后得到 dialog对象

        AlertDialog dialog = builder.show();

        final Button positiveButton = dialog.getButton(AlertDialog.BUTTON_POSITIVE);

        final Button negativeButton=dialog.getButton(AlertDialog.BUTTON_NEGATIVE);

        LinearLayout.LayoutParams positiveParams =(LinearLayout.LayoutParams)positiveButton.getLayoutParams();

        positiveParams.gravity = Gravity.CENTER;

        positiveParams.setMargins(10,10,10,10);

        positiveParams.width = 0;

        // 安卓下面有三个位置的按钮,默认权重为 1,设置成 500或更大才能让两个按钮看起来均分

        positiveParams.weight = 500;

        LinearLayout.LayoutParams negativeParams =(LinearLayout.LayoutParams)negativeButton.getLayoutParams();

        negativeParams.gravity = Gravity.CENTER;

        negativeParams.setMargins(10,10,10,10);

        negativeParams.width = 0;

        negativeParams.weight = 500;

        positiveButton.setLayoutParams(positiveParams);

        negativeButton.setLayoutParams(negativeParams);

        positiveButton.setBackgroundColor(Color.parseColor("#FF733E"));

        positiveButton.setTextColor(Color.parseColor("#FFFFFF"));

        negativeButton.setBackgroundColor(Color.parseColor("#DDDDDD"));

    }
安卓—自定义 AlertDialog 的样式的更多相关文章
- 安卓 自定义AlertDialog对话框(加载提示框)
AlertDialog有以下六种使用方法: 一.简单的AlertDialog(只显示一段简单的信息) 二.带按钮的AlertDialog(显示提示信息,让用户操作) 三.类似ListView的Aler ...
- 自定义AlertDialog的样式
一.在XML中定义好要显示的AlertDialog的布局 二.在代码中创建alertdialog 对象 AlertDialog dialog = new AlertDialog.Builder(thi ...
- 自定义AlertDialog(仿微信)
安卓自定义AlertDialog,原理很简单: AlertDialog dialog = new AlertDialog.Builder(MainActivity.this).create(); di ...
- AlertDialog.Builder 样式设置
AlertDialog.Builder builder = new AlertDialog.Builder(new ContextThemeWrapper(this, R.style.AlertDia ...
- jQuery Validate 表单验证插件----自定义校验结果样式
一.下载依赖包 网盘下载:https://yunpan.cn/cryvgGGAQ3DSW 访问密码 f224 二.引入依赖包 <script src="../../scripts/j ...
- Android 自定义RadioButton的样式
Android 自定义RadioButton的样式 我们知道Android控件里的button,listview可以用xml的样式自定义成自己希望的漂亮样式. 最近用到RadioButton,利用xm ...
- ActionBar官方教程(11)自定义ActionBar的样式(含重要的样式属性表及练习示例)
Styling the Action Bar If you want to implement a visual design that represents your app's brand, th ...
- 自定义input file样式
自定义input file样式:一般都是通过隐藏input,通过定义label来实现.这种做法要注意的是label的for属性要指定input对应的id; <!DOCTYPE html> ...
- WPF界面设计技巧(4)—自定义列表项样式
原文:WPF界面设计技巧(4)-自定义列表项样式 有前面修改按钮样式的基础,我们可以尝试来定制一个即好看又好用的 ListBox ,今天先来讲“好看”部分. 打开 Microsoft Visual S ...
随机推荐
- 揭秘C# SQLite的从安装到使用
SQLite,是一款轻型的数据库,是遵守ACID的关联式数据库管理系统,它的设计目标是嵌入式的,而且目前已经在很多嵌入式产品中使用了它,它占用资源非常的低,在嵌入式设备中,可能只需要几百K的内存就够了 ...
- Java 学习笔记之 线程isAlive方法
isAlive方法: 方法isAlive()功能是判断当前线程是否处于活动状态. 活动状态就是线程启动且尚未终止,比如正在运行或准备开始运行. public class IsAliveThread e ...
- 鱼和熊掌可兼得?一文看懂又拍云 SCDN
转眼已是 9102 年,参与工作多年的二狗子凭借他聪明的脑瓜和孜孜不倦的钻研精神,成为了某中型企业的资深网站管理员.不同于一般的"网管",二狗子自然是业内最优秀的那一类. 但是,最 ...
- spring-data-redis-cache 使用及源码走读
预期读者 准备使用 spring 的 data-redis-cache 的同学 了解 @CacheConfig,@Cacheable,@CachePut,@CacheEvict,@Caching 的使 ...
- ssrf漏洞学习(PHP)
自己最近原本是想深入的学习一下关于xss.csrf的东西的,可是感觉这些东西需要有很好的js的基础来进行学习..还有感觉自己感觉也差不多该要学习内网渗透了..正好ssrf在内网这一块也是比较有用的.于 ...
- 无人机基于Matlab/Simulink的模型开发(连载一)
"一切可以被控制的对象,都需要被数学量化" 这是笔者从事多年研发工作得出的道理,无论是车辆控制,机器人控制,飞机控制,还是无人机控制,所有和机械运动相关的控制,如果不能被很好的数学 ...
- wildfly(JBoss AS)应用服务器快速入门
什么是wildfly JBoss AS 从8版本起名为wildfly.Wildfly是一个开源的基于JavaEE的轻量级应用服务器.可以在任何商业应用中免费使用. WildFly是一个灵活的.轻量的. ...
- repr() Vs str()
在python中,将对象转换为字符串有两个内建函数: str Vs repr .str 是一个友好的,人们可读的字符串.repr 应该包含关于对象内容的详细信息(有时他们会返回相同的内容,例如整数). ...
- VMware15.5版本下安装Windows_Server_2008_R2
一.新建虚拟机 第一步:打开VMware15.5虚拟机,在欢迎界面点击新建虚拟机: 第二步:选择典型(推荐)选项-->适用于新手,单击下一步: 第三步:选定最后一项稍后安装操作系统,单击下一步: ...
- RF页面断言
title should be(断言title与预期指定的title内容相等): should be equal (断言某个字符串与预期指定的字符串相等) should not be equal ( ...