UI篇--Android中TableLayout中的布局
Apache MINA 2 是一个开发高性能和高可伸缩性网络应用程序的网络应用框架。它提供了一个抽象的事件驱动的异步 API,可以使用 TCP/IP、UDP/IP、串口和虚拟机内部的管道等传输方式。
首先,mina server端acceptor启动方法:
1、NioSocketAcceptor.bind(InetSocketAddress)或者NioSocketAcceptor.bind(SocketAddress...)方法。
例如:
acceptor.bind(new InetSocketAddress(1234));
mina底层的调用链:
NioSocketAcceptor.bind(InetSocketAddress)-->
AbstractIoAcceptor.bind(SocketAddress localAddress) -->
AbstractIoAcceptor.bind(Iterable<? extends SocketAddress> localAddresses)-->
AbstractPollingIoAcceptor.bindInternal(List<? extends SocketAddress> localAddresses)-->
AbstractPollingIoAcceptor.startupAcceptor()
1、创建线程Acceptor线程-->
acceptor线程启动run()
1、初始化acceptor端的Selector,即NioSocketAcceptor.Selector
2、NioSocketAcceptor.open(SocketAddress localAddress)
// Register the channel within the selector for ACCEPT event
channel.register(selector, SelectionKey.OP_ACCEPT);
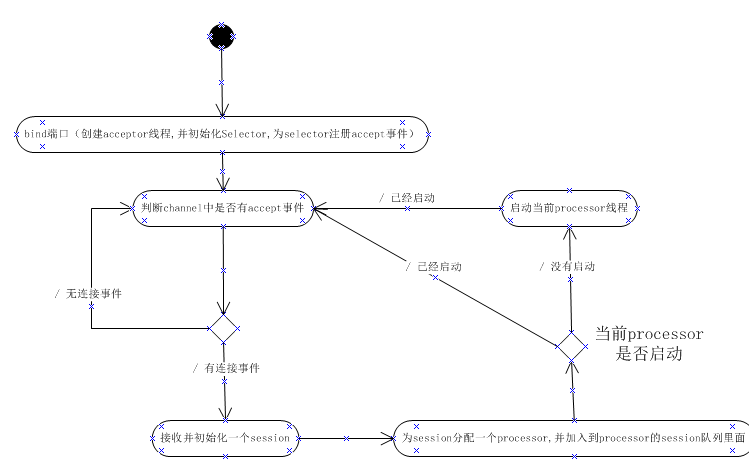
acceptor工作流程:
一、IoService类图
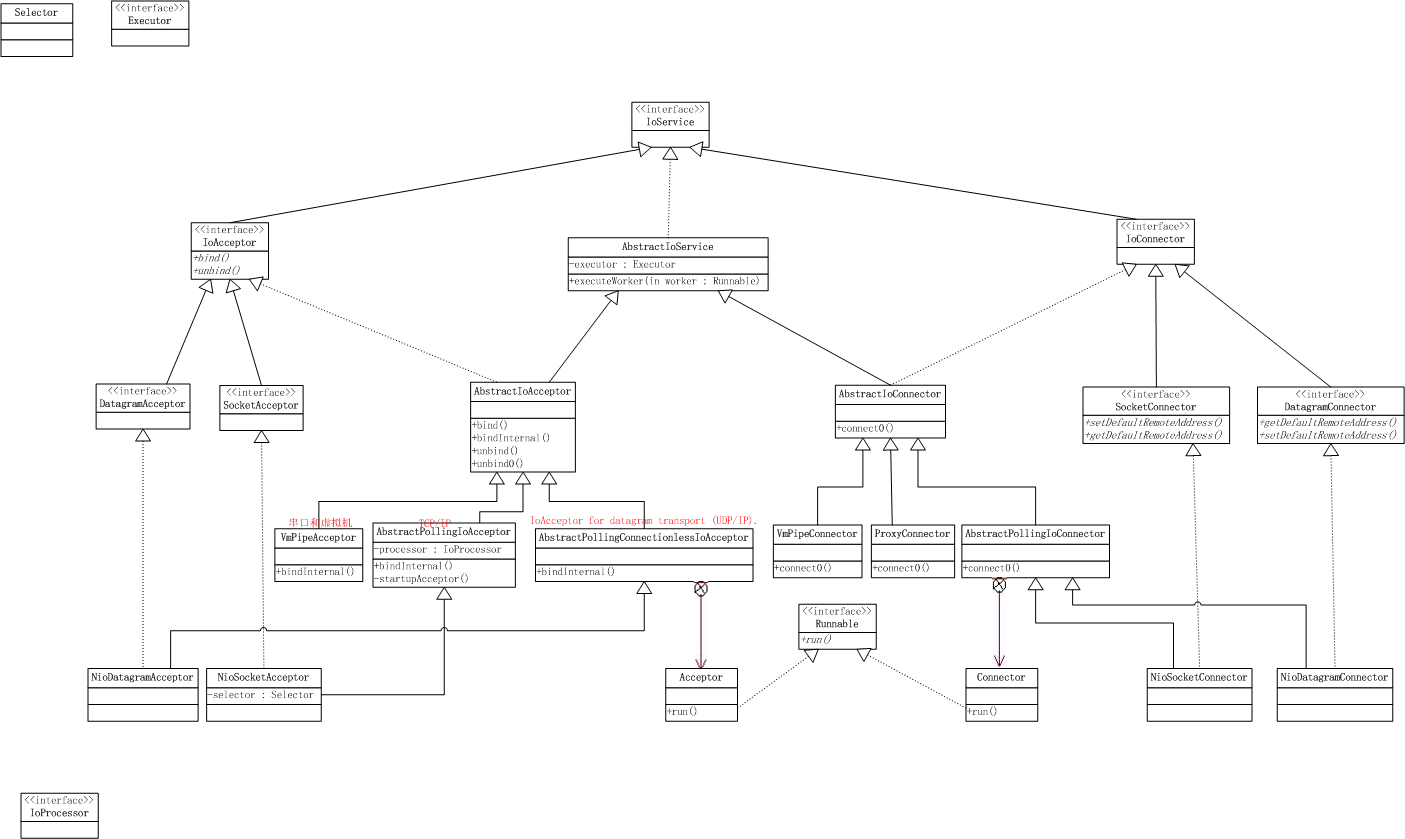
如上图所示,IOService层根据不同的角色又分为IOAcceptor(服务端左半部分)和IOConnector (客户端右半部分),分别用于接受连接与请求连接操作。
二、服务端
2.1、IoAcceptor接口
IoAcceptor相当于是对ServerSocketChannel的封装,最重要的两个操作是绑定(解绑)与接受连接,IoAcceptor接口中有多个重载的bind()方法,当然呼应有多个重载的unbind()方法。
public interface IoAcceptor extends IoService {

void bind() throws IOException;

void bind(SocketAddress localAddress) throws IOException;

void bind(SocketAddress firstLocalAddress, SocketAddress... addresses) throws IOException;

void bind(Iterable<? extends SocketAddress> localAddresses) throws IOException;

void unbind();

void unbind(SocketAddress localAddress);

void unbind(SocketAddress firstLocalAddress, SocketAddress... otherLocalAddresses);

void unbind(Iterable<? extends SocketAddress> localAddresses);

}
2.2、IoAcceptor的实现类AbstractIOAcceptor
IoAcceptor其方法的实现在抽象类AbstractIOAcceptor的bind方法中,这个方法在做了参数检查等操作后,将真正的绑定操作交给abstract bindInternal()来完成。对于bindInternal有基于TCP/IP,UDP/IP,VMPipe三种实现类,分别对应
- AbstractPollingIoAcceptor对应TCP/IP
- AbstractPollingConnectionlessIoAcceptor对应UDP/IP
- VmPipeAcceptor对应串口和虚拟机内部的管道
以TCP/IP为例来看绑定过程,见AbstractPollingIoAcceptor.java的源码:
protected final Set<SocketAddress> bindInternal(List<? extends SocketAddress> localAddresses) throws Exception {

        // Create a bind request as a Future operation. When the selector

        // have handled the registration, it will signal this future.

        AcceptorOperationFuture request = new AcceptorOperationFuture(localAddresses);

        // adds the Registration request to the queue for the Workers

        // to handle

        registerQueue.add(request);

        // creates the Acceptor instance and has the local

        // executor kick it off.

        startupAcceptor();

        // As we just started the acceptor, we have to unblock the select()

        // in order to process the bind request we just have added to the

        // registerQueue.

        try {

            lock.acquire();

            // Wait a bit to give a chance to the Acceptor thread to do the select()

            Thread.sleep(10);

            wakeup();

        } finally {

            lock.release();

        }

        // Now, we wait until this request is completed.

        request.awaitUninterruptibly();

        if (request.getException() != null) {

            throw request.getException();

        }

        // Update the local addresses.

        // setLocalAddresses() shouldn't be called from the worker thread

        // because of deadlock.

        Set<SocketAddress> newLocalAddresses = new HashSet<SocketAddress>();

        for (H handle : boundHandles.values()) {

            newLocalAddresses.add(localAddress(handle));

        }

        return newLocalAddresses;
主要做了以下几件事情:
1、将绑定请求放入registerQueue中
2、启动Acceptor,从Acceptor类的run方法可以看到,这一步会阻塞在Acceptor选择器的选择操作中
3、调用wakeup让选择器返回
4、等待请求处理完成,这一步会阻塞在ready变量中,当ready变量为true时才会返回,当接受连接后ready会被设置为true.
现在重点看一下AbstractPollingIoAcceptor$Acceptor的run方法:
        public void run() {

            assert (acceptorRef.get() == this);

            int nHandles = 0;

            // Release the lock

            lock.release();

            while (selectable) {

                try {

                    // Detect if we have some keys ready to be processed

                    // The select() will be woke up if some new connection

                    // have occurred, or if the selector has been explicitly

                    // woke up

                    int selected = select();

                    // this actually sets the selector to OP_ACCEPT,

                    // and binds to the port on which this class will

                    // listen on

                    nHandles += registerHandles();

                    // Now, if the number of registred handles is 0, we can

                    // quit the loop: we don't have any socket listening

                    // for incoming connection.

                    if (nHandles == 0) {

                        acceptorRef.set(null);

                        if (registerQueue.isEmpty() && cancelQueue.isEmpty()) {

                            assert (acceptorRef.get() != this);

                            break;

                        }

                        if (!acceptorRef.compareAndSet(null, this)) {

                            assert (acceptorRef.get() != this);

                            break;

                        }

                        assert (acceptorRef.get() == this);

                    }

                    if (selected > 0) {

                        // We have some connection request, let's process

                        // them here.

                        processHandles(selectedHandles());

                    }

                    // check to see if any cancellation request has been made.

                    nHandles -= unregisterHandles();

                } catch (ClosedSelectorException cse) {

                    // If the selector has been closed, we can exit the loop

                    break;

                } catch (Throwable e) {

                    ExceptionMonitor.getInstance().exceptionCaught(e);

                    try {

                        Thread.sleep(1000);

                    } catch (InterruptedException e1) {

                        ExceptionMonitor.getInstance().exceptionCaught(e1);

                    }

                }

            }

            // Cleanup all the processors, and shutdown the acceptor.

            if (selectable && isDisposing()) {

                selectable = false;

                try {

                    if (createdProcessor) {

                        processor.dispose();

                    }

                } finally {

                    try {

                        synchronized (disposalLock) {

                            if (isDisposing()) {

                                destroy();

                            }

                        }

                    } catch (Exception e) {

                        ExceptionMonitor.getInstance().exceptionCaught(e);

                    } finally {

                        disposalFuture.setDone();

                    }

                }

            }

        }
(1)、selector被wakeup唤醒后,调用registerHandles方法从registerQueue中取出请求依次调用open方法
    private int registerHandles() {

        for (;;) {

            // The register queue contains the list of services to manage

            // in this acceptor.

            AcceptorOperationFuture future = registerQueue.poll();

            if (future == null) {

                return 0;

            }

            // We create a temporary map to store the bound handles,

            // as we may have to remove them all if there is an exception

            // during the sockets opening.

            Map<SocketAddress, H> newHandles = new ConcurrentHashMap<SocketAddress, H>();

            List<SocketAddress> localAddresses = future.getLocalAddresses();

            try {

                // Process all the addresses

                for (SocketAddress a : localAddresses) {

                    H handle = open(a);

                    newHandles.put(localAddress(handle), handle);

                }

                // Everything went ok, we can now update the map storing

                // all the bound sockets.

                boundHandles.putAll(newHandles);

                // and notify.

                future.setDone();

                return newHandles.size();

            } catch (Exception e) {

                // We store the exception in the future

                future.setException(e);

            } finally {

                // Roll back if failed to bind all addresses.

                if (future.getException() != null) {

                    for (H handle : newHandles.values()) {

                        try {

                            close(handle);

                        } catch (Exception e) {

                            ExceptionMonitor.getInstance().exceptionCaught(e);

                        }

                    }

                    // TODO : add some comment : what is the wakeup() waking up ?

                    wakeup();

                }

            }

        }

    }
open方法完成了ServerSocket的绑定和注册(NioSocketAcceptor.open(SocketAddress localAddress)方法如下)
    protected ServerSocketChannel open(SocketAddress localAddress) throws Exception {

        // Creates the listening ServerSocket

        ServerSocketChannel channel = ServerSocketChannel.open();

        boolean success = false;

        try {

            // This is a non blocking socket channel

            channel.configureBlocking(false);

            // Configure the server socket,

            ServerSocket socket = channel.socket();

            // Set the reuseAddress flag accordingly with the setting

            socket.setReuseAddress(isReuseAddress());

            // and bind.

            socket.bind(localAddress, getBacklog());

            // Register the channel within the selector for ACCEPT event

            channel.register(selector, SelectionKey.OP_ACCEPT);

            success = true;

        } finally {

            if (!success) {

                close(channel);

            }

        }

        return channel;

    }
(2)、从(1)中可以知道selector上注册了ServerSocketChannel的OP_ACCEPT键,注册后nHandles==0,selected==0,进行下一次循环,同样是阻塞在select方法上
(3)、当连接到来时,select方法返回,selected>0,执行processHandles方法
        private void processHandles(Iterator<H> handles) throws Exception {

            while (handles.hasNext()) {

                H handle = handles.next();

                handles.remove();

                // Associates a new created connection to a processor,

                // and get back a session

                S session = accept(processor, handle);

                if (session == null) {

                    continue;

                }

                initSession(session, null, null);

                // add the session to the SocketIoProcessor

                session.getProcessor().add(session);

            }

        }
该方法在完成真正的接受连接操作后,创建session并扔到processor中,后续的工作交给processor来完成。每个session中其实有一个SocketChannel,这个socketChannel实际上是被注册到了processor的selector上。注册代码在NioProcessor类中可以找到
总结一下:Acceptor线程专门负责接受连接,在其上有一个selector,轮询是否有连接建立上来,当有连接建立上来,调用ServerSocketChannel.accept方法来接受连接,这个方法返回一个session对象,然后将这个session对象加入processor中,由processor遍历每个session来完成真正的IO操作。processor上也有一个selector与一个Processor线程,selector用于轮询session,Processor线程处理每个session的IO操作。
UI篇--Android中TableLayout中的布局的更多相关文章
- (Android UI)Android应用程序中资源:图片、字符串、颜色、布局等
Android系统设计采用代码和布局分离的设计模式,因此在设计Android应用程序时需要遵循该设计模式. “把非代码资源(如图片和字符串常量)和代码分离开来始终是一种很好的做法.”---<An ...
- UI篇--Android中3种方法实现back键动作
方法一:重写onBackPressed方法 @Override public void onBackPressed() { // do something what you want super.on ...
- UI篇--android实现底部按钮布局
1.采用LinearLayout布局: <LinearLayout android:id="@+id/main" android:layout_width="fil ...
- Android:GridView中实现点击Item变色,再点击还原。
使用GridView时想实现点击其中的一个Item,该Item改变背景,再次点击Item变回原来的背景,网上搜了很多资料都没有看到类似的案例,但还是有所启发,现来分享我的做法. 首先,首先为GridV ...
- Android 自定义View及其在布局文件中的使用示例(三):结合Android 4.4.2_r1源码分析onMeasure过程
转载请注明出处 http://www.cnblogs.com/crashmaker/p/3549365.html From crash_coder linguowu linguowu0622@gami ...
- Android 自定义View及其在布局文件中的使用示例(二)
转载请注明出处 http://www.cnblogs.com/crashmaker/p/3530213.html From crash_coder linguowu linguowu0622@gami ...
- Android studio中的6大布局
1.相对布局代码: <?xml version="1.0" encoding="utf-8"?> <RelativeLayout xmlns: ...
- iOS开发UI篇—在UIImageView中添加按钮以及Tag的参数说明
ios开发UI篇—在ImageView中添加按钮以及Tag的参数说明 一.tag参数 一个视图通常都只有一个父视图,多个子视图,在开发中可以通过使用子视图的tag来取出对应的子视图.方法为Viewwi ...
- iOS开发UI篇—IOS开发中Xcode的一些使用技巧
iOS开发UI篇—IOS开发中Xcode的一些使用技巧 一.快捷键的使用 经常用到的快捷键如下: 新建 shift + cmd + n 新建项目 cmd + n 新建文 ...
随机推荐
- 在UWSGI和NGINX配合的情况下,配置个别目录上传及超时
笨办法就是多加一个LOCATION. 然后,自定义以下类似参数 client_max_body_size uwsgi_connect_timeout uwsgi_read_timeout server ...
- FFMpeg那些事——独立运行的二进制文件ffmpeg编译
想编译一个Android可用的二进制文件(要求:支持libx264/liblamemp3) github资源: 1.首先编译一个带lame库的ffmpeg https://github.com/aks ...
- 【转载】jxl操作excel 字体 背景色 合并单元格 列宽等 .
package com.email.jav; import java.io.File;import java.io.IOException;import java.net.URL; import jx ...
- java使用Apache POI操作excel文件
官方介绍 HSSF is the POI Project's pure Java implementation of the Excel '97(-2007) file format. XSSF is ...
- SRAM与SDRAM的区别
http://www.cnblogs.com/spartan/archive/2011/05/06/2038747.html SDRAM SDRAM(Synchronous Dynamic Rando ...
- WCF入门(三)---WCF与Web服务/Web Service
下面列出了WCF和Web服务之间存在一些重大差异. 属性:WCF服务是通过定义ServiceContract和OperationContract属性,而在Web服务,WebService和WebMet ...
- 10个提供免费PHP脚本下载的网站
本文将重点介绍10个PHP脚本的免费资源下载站.之前推荐 <16个下载超酷脚本的热门网站>,这些网站除了PHP脚本,还有JavaScript.Java.Perl.ASP等脚本.如果你已是脚 ...
- struts2中利用POI导出Excel文档并下载
1.项目组负责人让我实现这个接口,因为以前做过类似的,中间并没有遇到什么太困难的事情.其他不说,先上代码: package com.tydic.eshop.action.feedback; impor ...
- NFC(1)NFC简介,3种模式
简介 NFC(Near Field Communication,近场通信),是一种数据传输技术.但与Wi-Fi.蓝牙.红外线等数据传输技术的一个主要差异就 是有效距离一般不能超过4厘米. NFC支持如 ...
- 加密解密(11)HMAC-在sha1,md5基础上加密
HMAC: Hash-based Message Authentication Code http://baike.sogou.com/v10977193.htm http://www.baike.c ...