Ubuntu系统部署tomcat并启用JMX实战案例
Ubuntu系统部署tomcat并启用JMX实战案例
作者:尹正杰
版权声明:原创作品,谢绝转载!否则将追究法律责任。
一.安装JDK环境
1>.更换阿里云的软件源
[root@zabbix_gateway250.yinzhengjie.org.cn ~]# vim /etc/apt/sources.list

[root@zabbix_gateway250.yinzhengjie.org.cn ~]#

[root@zabbix_gateway250.yinzhengjie.org.cn ~]# cat /etc/apt/sources.list

deb http://mirrors.aliyun.com/ubuntu/ bionic main restricted universe multiverse

deb-src http://mirrors.aliyun.com/ubuntu/ bionic main restricted universe multiverse

deb http://mirrors.aliyun.com/ubuntu/ bionic-security main restricted universe multiverse

deb-src http://mirrors.aliyun.com/ubuntu/ bionic-security main restricted universe multiverse

deb http://mirrors.aliyun.com/ubuntu/ bionic-updates main restricted universe multiverse

deb-src http://mirrors.aliyun.com/ubuntu/ bionic-updates main restricted universe multiverse

deb http://mirrors.aliyun.com/ubuntu/ bionic-proposed main restricted universe multiverse

deb-src http://mirrors.aliyun.com/ubuntu/ bionic-proposed main restricted universe multiverse

deb http://mirrors.aliyun.com/ubuntu/ bionic-backports main restricted universe multiverse

deb-src http://mirrors.aliyun.com/ubuntu/ bionic-backports main restricted universe multiverse

[root@zabbix_gateway250.yinzhengjie.org.cn ~]#

[root@zabbix_gateway250.yinzhengjie.org.cn ~]# apt-get update

2>.安装JDK
[root@tomcat250.yinzhengjie.org.cn ~]# apt-get -y install openjdk--jdk

3>.以二进制方式安装JDK
  博主推荐阅读:

    https://www.cnblogs.com/yinzhengjie/p/12199413.html
二.配置tomcat支持JMX功能
1>.基于二进制方式部署tomcat
  博主推荐阅读:

    https://www.cnblogs.com/yinzhengjie/p/12199468.html
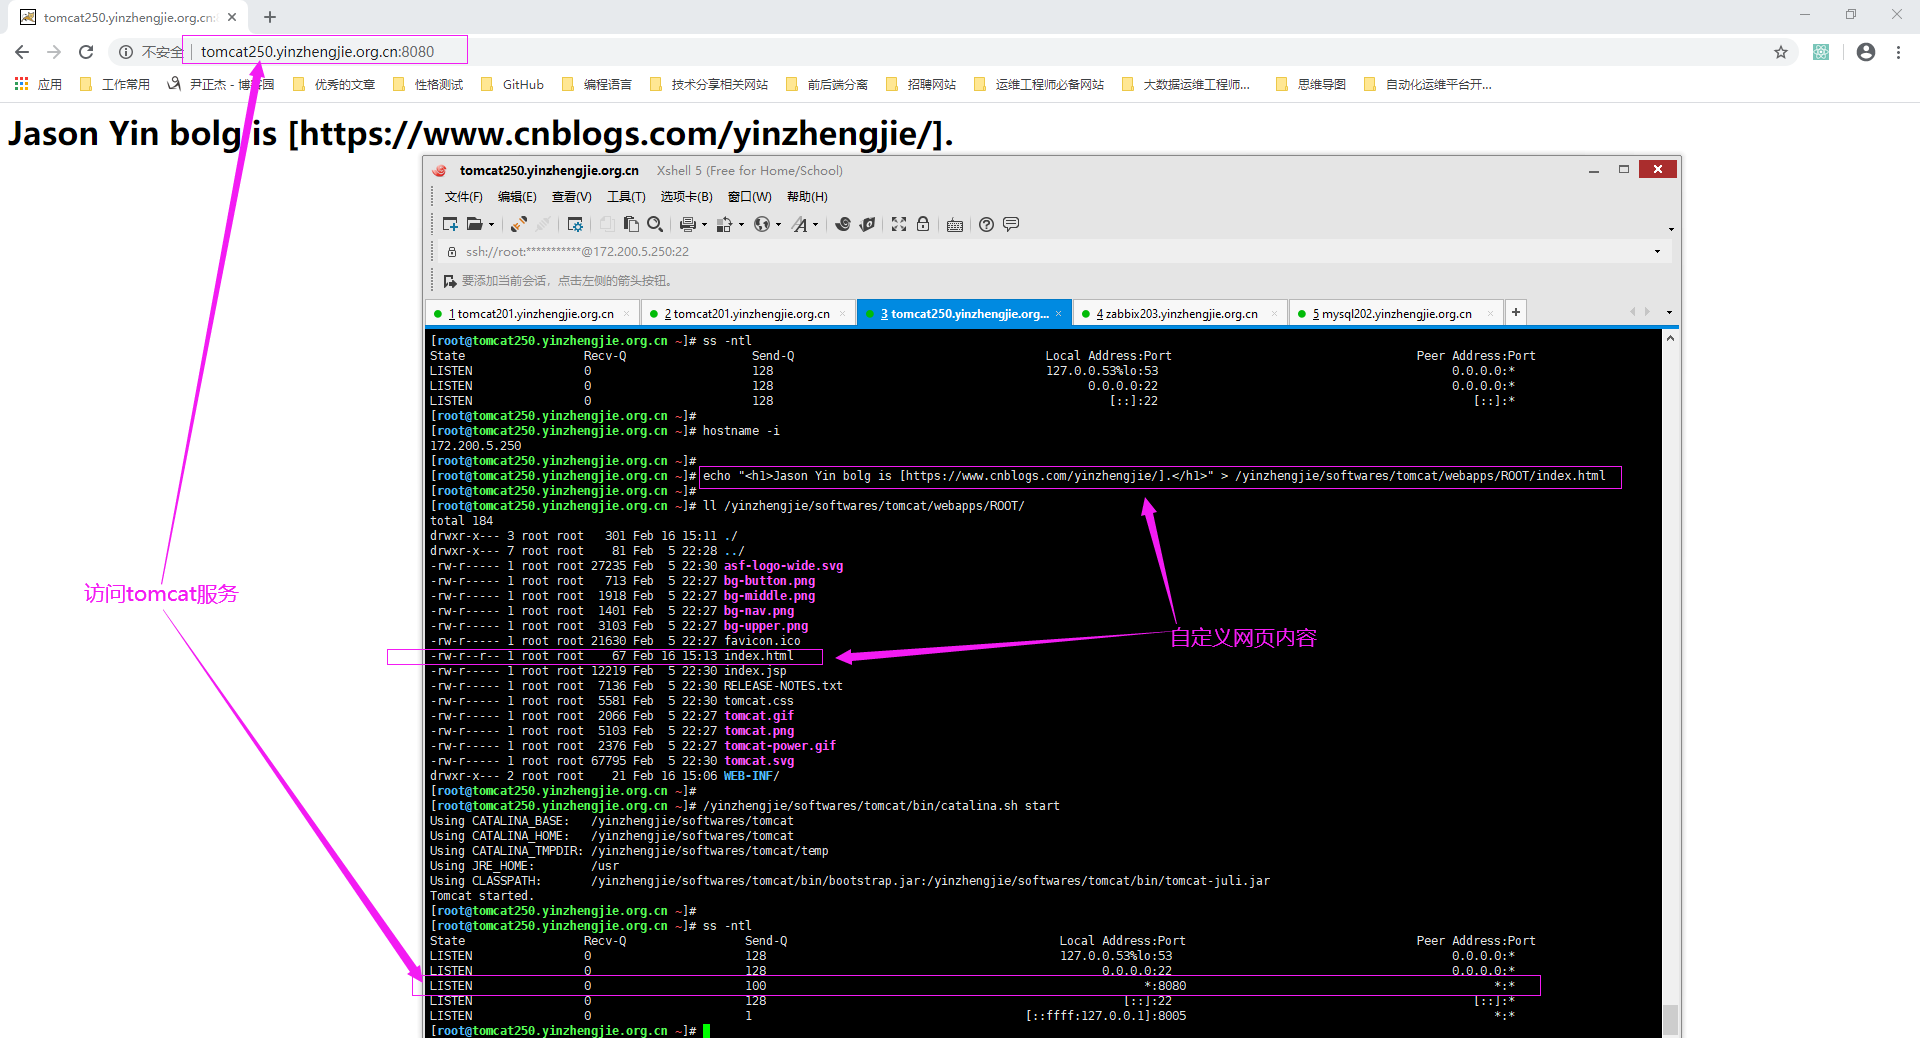
2>.自定义tomcat测试首页
[root@tomcat250.yinzhengjie.org.cn ~]# echo "<h1>Jason Yin bolg is [https://www.cnblogs.com/yinzhengjie/].</h1>" > /yinzhengjie/softwares/tomcat/webapps/ROOT/index.html

[root@tomcat250.yinzhengjie.org.cn ~]#

[root@tomcat250.yinzhengjie.org.cn ~]# /yinzhengjie/softwares/tomcat/bin/catalina.sh start
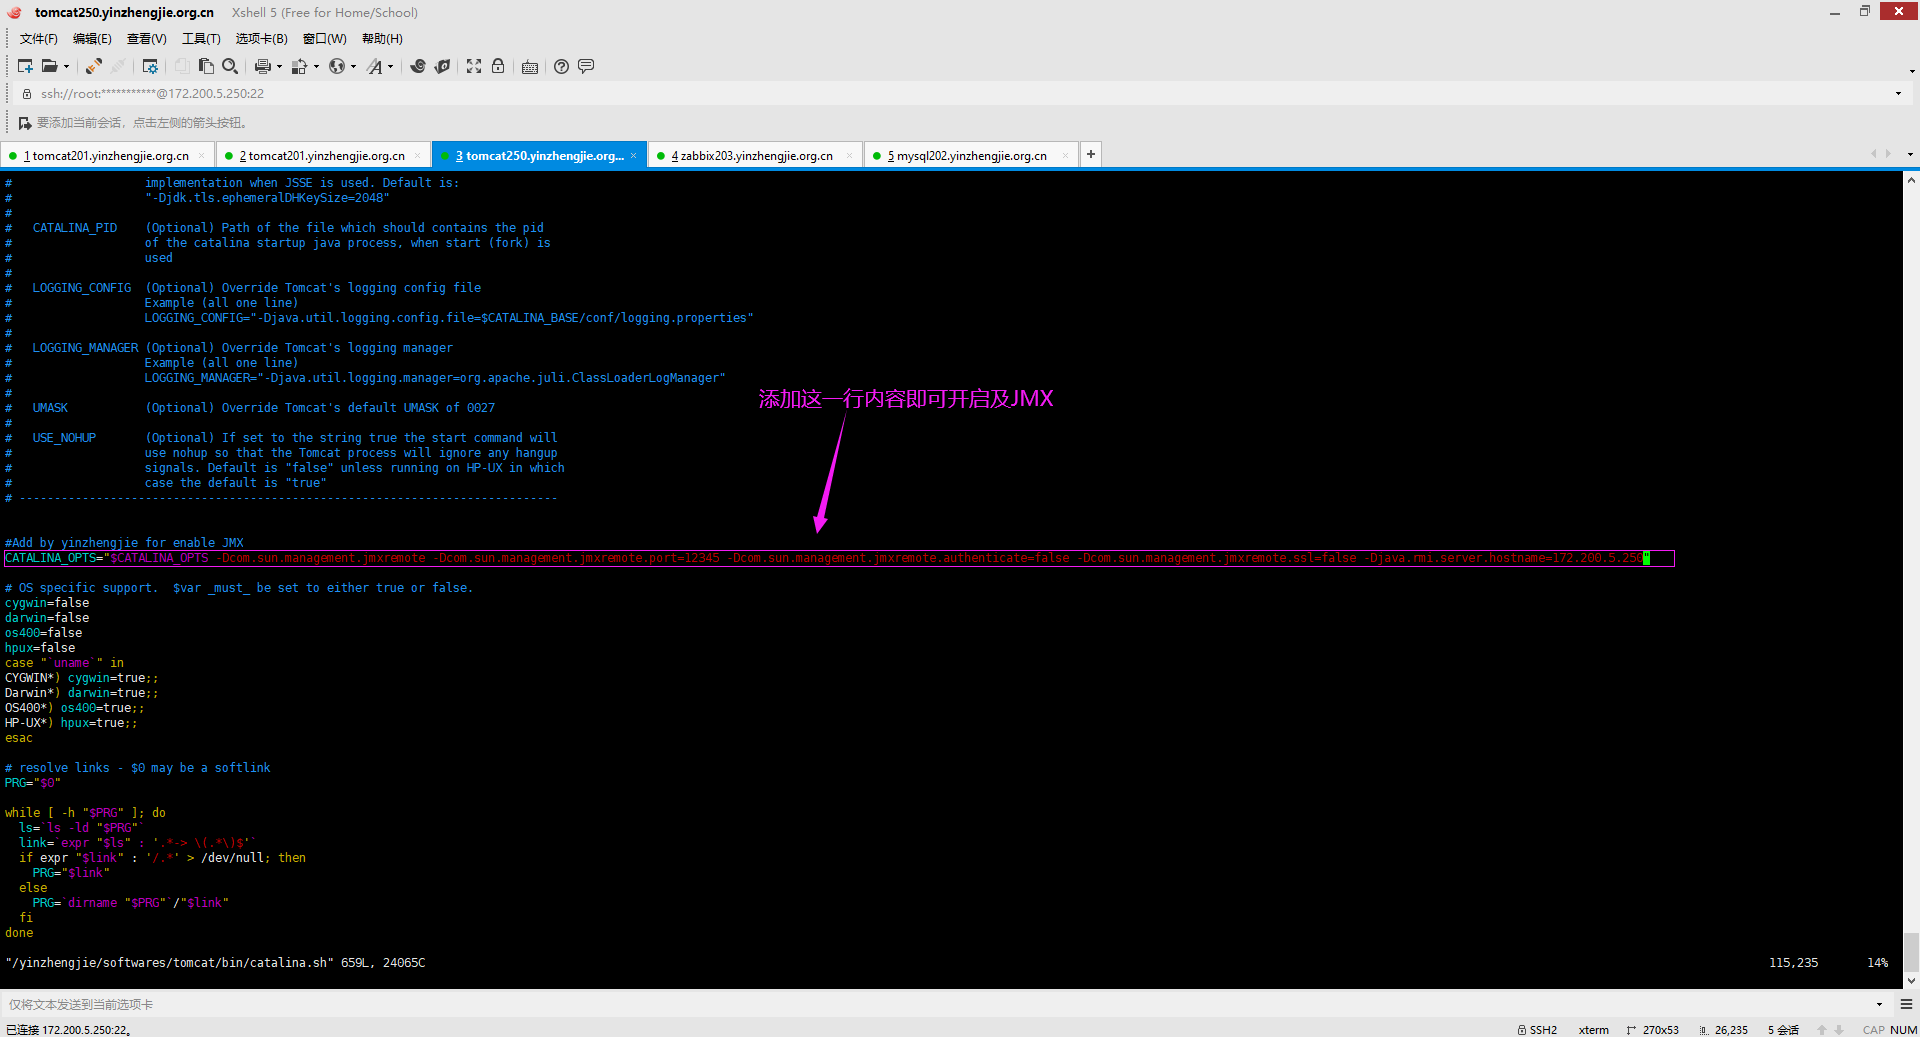
3>.配置tomcat支持JMX功能(/yinzhengjie/softwares/tomcat/bin/catalina.sh)
#Add by yinzhengjie for enable JMX

CATALINA_OPTS="$CATALINA_OPTS -Dcom.sun.management.jmxremote -Dcom.sun.management.jmxremote.port=12345 -Dcom.sun.management.jmxremote.authenticate=false -Dcom.sun.management.jmxremote.ssl=false -Djava.rmi.server.hostname=172.200.5.250"

温馨提示:

  -Dcom.sun.management.jmxremote:

    启用远程监控JMX。

  -Dcom.sun.management.jmxremote.port=:

    默认启动的JMX端口号,要和zabbix添加主机时候的端口一致即可。

  -Dcom.sun.management.jmxremote.authenticate=false :

    不使用用户名密码。

  -Dcom.sun.management.jmxremote.ssl=false:

    不使用ssl认证。

  -Djava.rmi.server.hostname=172.200.5.250":

    tomcat主机自己的IP地址,不要写zabbix服务器的地址。
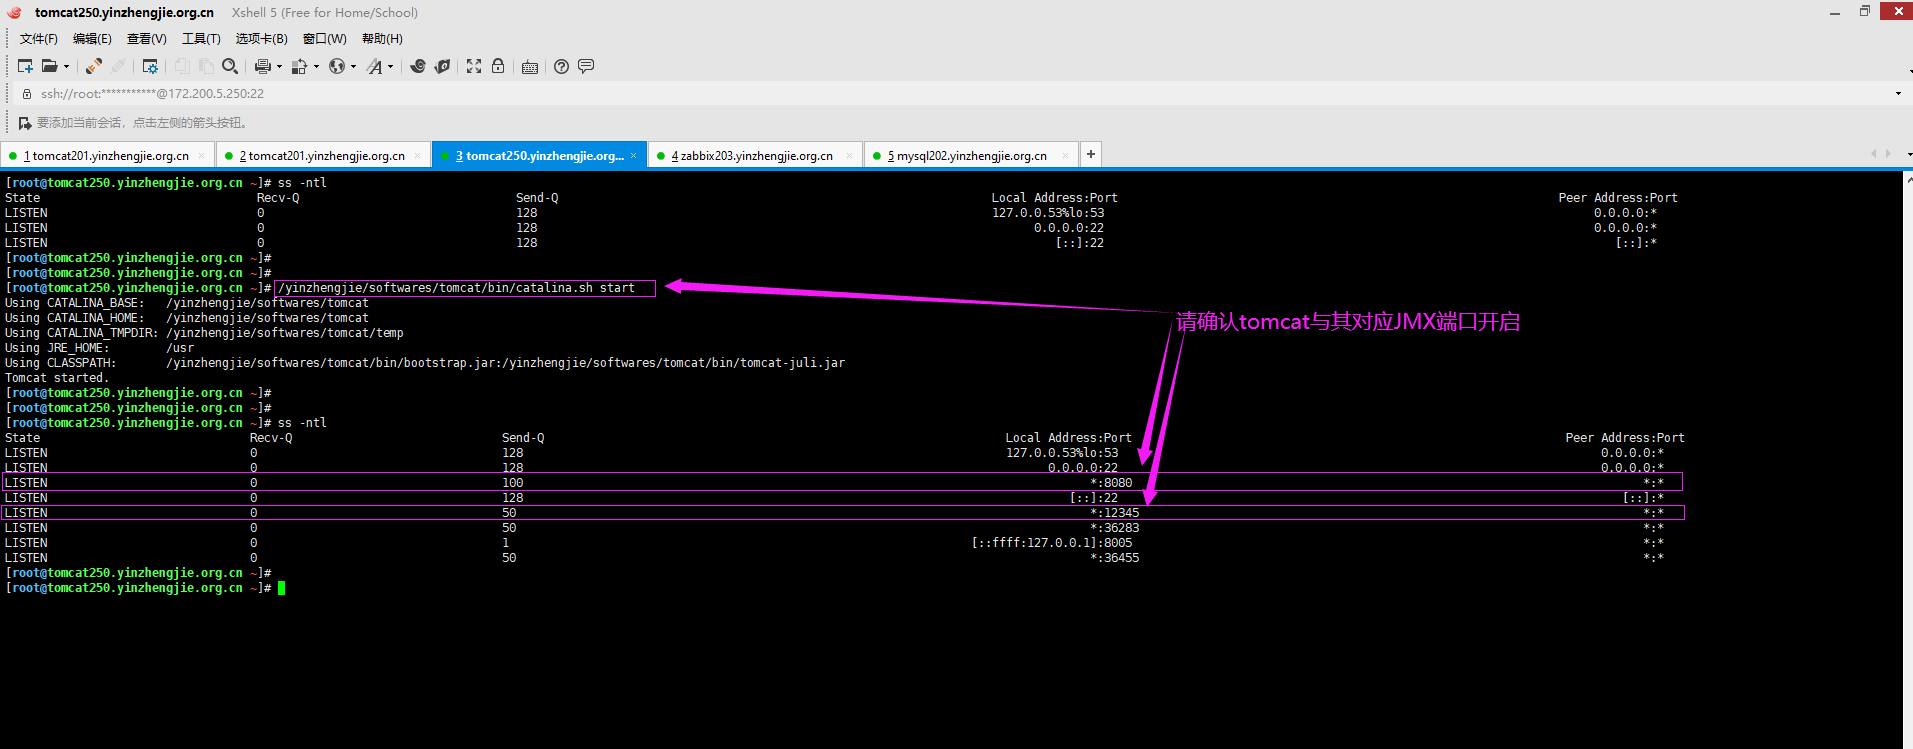
4>.重启tomcat并确认tomcat服务
[root@tomcat250.yinzhengjie.org.cn ~]# ss -ntl

State                              Recv-Q                              Send-Q                                                                   Local Address:Port                                                             Peer Address:Port

LISTEN                                                                                                                                      127.0.0.53%lo:                                                                    0.0.0.0:*

LISTEN                                                                                                                                            0.0.0.0:                                                                    0.0.0.0:*

LISTEN                                                                                                                                                  *:                                                                        *:*

LISTEN                                                                                                                                               [::]:                                                                       [::]:*

LISTEN                                                                                                                                   [::ffff:127.0.0.1]:                                                                        *:*

[root@tomcat250.yinzhengjie.org.cn ~]#

[root@tomcat250.yinzhengjie.org.cn ~]#

[root@tomcat250.yinzhengjie.org.cn ~]# /yinzhengjie/softwares/tomcat/bin/catalina.sh stop

Using CATALINA_BASE:   /yinzhengjie/softwares/tomcat

Using CATALINA_HOME:   /yinzhengjie/softwares/tomcat

Using CATALINA_TMPDIR: /yinzhengjie/softwares/tomcat/temp

Using JRE_HOME:        /usr

Using CLASSPATH:       /yinzhengjie/softwares/tomcat/bin/bootstrap.jar:/yinzhengjie/softwares/tomcat/bin/tomcat-juli.jar

[root@tomcat250.yinzhengjie.org.cn ~]#

[root@tomcat250.yinzhengjie.org.cn ~]#

[root@tomcat250.yinzhengjie.org.cn ~]# ss -ntl

State                               Recv-Q                               Send-Q                                                              Local Address:Port                                                               Peer Address:Port

LISTEN                                                                                                                                   127.0.0.53%lo:                                                                      0.0.0.0:*

LISTEN                                                                                                                                         0.0.0.0:                                                                      0.0.0.0:*

LISTEN                                                                                                                                            [::]:                                                                         [::]:*

[root@tomcat250.yinzhengjie.org.cn ~]#

[root@tomcat250.yinzhengjie.org.cn ~]#
[root@tomcat250.yinzhengjie.org.cn ~]# /yinzhengjie/softwares/tomcat/bin/catalina.sh stop
三.使用JConsole连接tomcat jmx进行测试
1>.window操作系统安装JAVA
  博主推荐阅读:

    https://www.cnblogs.com/yinzhengjie2020/p/12206579.html
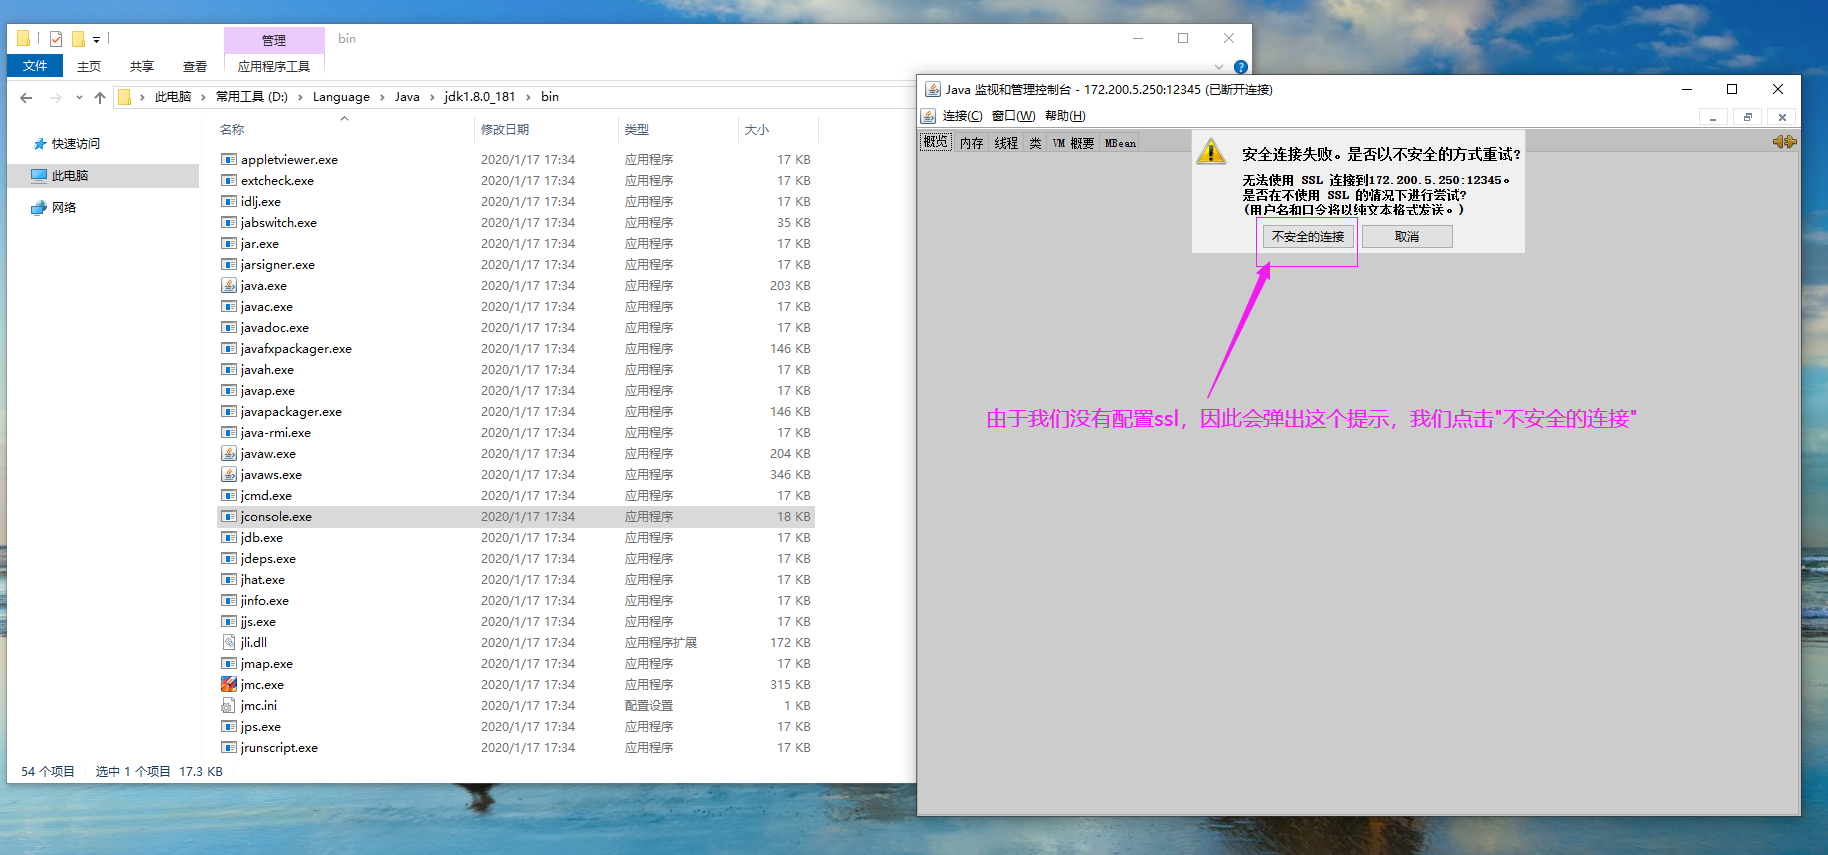
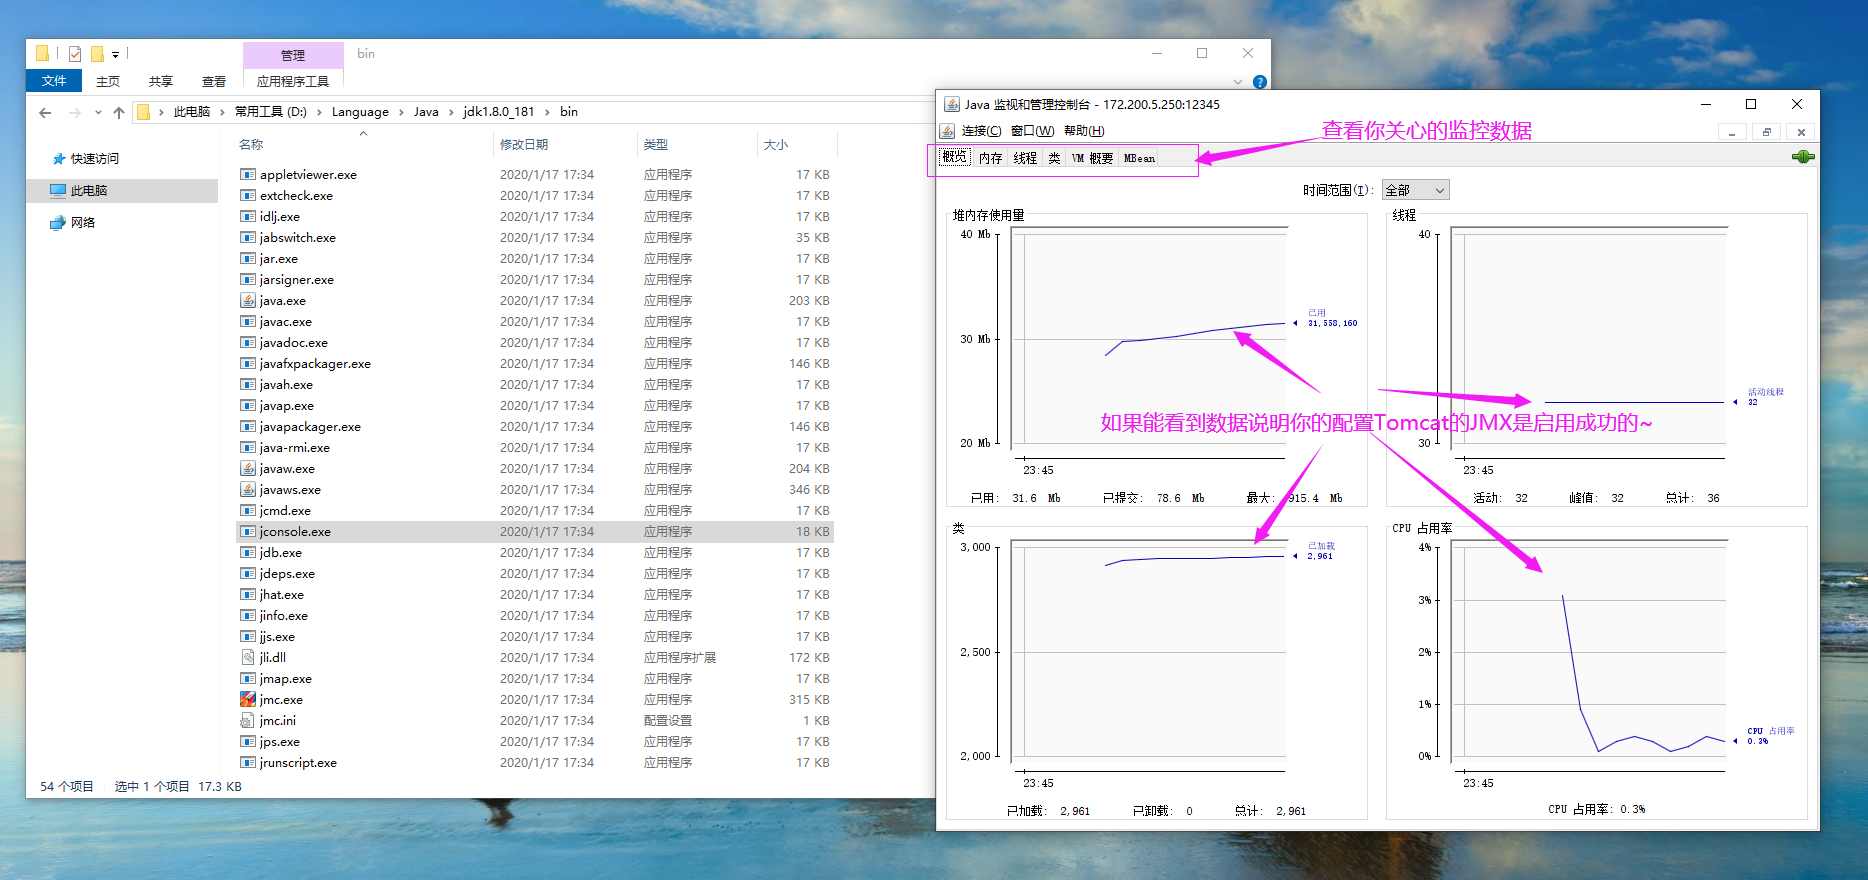
2>.如下图所示,运行JConsole并配置tomcat的JMX连接地址及端口,并点击"连接"

3>.点击"不安全的连接"
4>.查看你关心的监控数据
Ubuntu系统部署tomcat并启用JMX实战案例的更多相关文章
- 基于Ubuntu系统的Tomcat部署项目
第一步.拿到项目war包 第二步.上传到服务器/var/lib/tomcat8/webapps/ROOT目录下 第三步.使用命令解压war包 jar -xvf star1.0.0.war 第三步.重启 ...
- ubuntu系统部署python3.6.4
Ubuntu的版本为16.04,系统自带的Python版本较低,使用亲本版本3.6.4,下为安装步骤: 一.官网下载Python3.6.4版本 新建目录: sudo mkidr /usr/local/ ...
- Ubuntu上部署tomcat后无法访问8080端口问题
在tomacat的bin目录下,修改startup.sh文件,添加信息: #set java environment export JAVA_HOME=/usr/java/jdk1.8.0_111 e ...
- ubuntu系统部署web项目
1.安装java 下载java安装文件 可至http://www.oracle.com/technetwork/java/javase/downloads/index.html下载最新的JDK版本,当 ...
- 使用zabbix server监控tomcat实战案例
使用zabbix server监控tomcat实战案例 作者:尹正杰 版权声明:原创作品,谢绝转载!否则将追究法律责任. 大家都知道,zabbix server效率高是使用C语言编写的,有很多应用程序 ...
- 高级运维(四):Nginx常见问题处理、安装部署Tomcat服务器、使用Tomcat部署虚拟主机
一.Nginx常见问题处理 目标: 本案例要求对Nginx服务器进行适当优化,以提升服务器的处理性能: 1> 不显示Nginx软件版本号 2> 如果客户端访问服务器提示“Too many ...
- 使用Ubuntu系统编译安装Zabbix企业级监控系统
使用Ubuntu系统编译安装Zabbix企业级监控系统 作者:尹正杰 版权声明:原创作品,谢绝转载!否则将追究法律责任. Ubuntu系统部署笔记:https://www.cnblogs.com/ ...
- Ubuntu部署Tomcat Web服务
在Ubuntu平台中安装TomCat 本文将为大家介绍TomCat在Ubuntu平台中如何进行部署使用,带你快速入门使用TomCat TomCat简介 Tomcat是Apache 软件基金会(Apac ...
- CentOS和Ubuntu系统下安装 HttpFS (助推Hue部署搭建)
不多说,直接上干货! 我的集群机器情况是 bigdatamaster(192.168.80.10).bigdataslave1(192.168.80.11)和bigdataslave2(192.168 ...
随机推荐
- 【PAT甲级】1004 Counting Leaves (30 分)(BFS)
题意:给出一棵树的点数N,输入M行,每行输入父亲节点An,儿子个数n,和a1,a2,...,an(儿子结点编号),从根节点层级向下依次输出当前层级叶子结点个数,用空格隔开.(0<N<100 ...
- vue.js 第十课-第十六课
第十课: http://note.youdao.com/noteshare?id=25b5ba45286464856f21eb4b6b391ecd&sub=19C4429995384F72BD ...
- 解决IDEA部署web项目时,jar包拷贝不全的问题
原因 先前已部署过,输出目录有lib文件夹. 再次部署时,IDEA一检测,发现输出目录已经存在lib文件夹,认为已经拷贝过了,为节省时间,不再重新拷贝jar包,殊不知我们新添加了jar包. 于是我们新 ...
- 设计模式课程 设计模式精讲 3-11 合成复用原则coding
1 课堂概念 1.0 继承关系的选择 1.1 起名 1.2 定义 1.3 组合聚合优缺点 1.4 继承优缺点 1.5 组合聚合区别 2 代码演练 2.1 反例 2.2 正例 3 疑问解答3.1 疑问解 ...
- 阿里云短信接口开发实践(Java
随着互联网的兴起,各行各业的需求都在不断的增加.随着业务的扩大,企业给用户发送短信验证码的业务,也是如火如荼.在这里,calvin给各位开发者推荐阿里云短信平台.原因有二:1.接入较简单,开发成本低 ...
- 使用外网访问Flask项目
在学习flask过程中,想使用手机访问项目,根据flask手册中可以将 app.run(host='192.168.1.109', port=8000,debug=True) 但是发现手机依然无法连接 ...
- luogu P2280 激光炸弹(二维前缀和)
由题给的xi, yi范围,可以建立二维地图maze[i][j],记录i j范围上的所有目标的价值总和 即有maze[xi][yi] += wi 然后接下来的目标就是求出该二维数组的前缀和 可得到前缀和 ...
- 嵌入式编程中使用 do{...} while(0) 的解释
最近在看esp32的idf,有一些宏定义使用了do while(0)这种看起来好像没啥用的代码.然后我查了一下资料,发现在linux内核代码中经常用到这个东西! 现在就将这个东西整理一下. 为什么在内 ...
- C/C++ - 多线程
前几天简单对C和C++中的创建多线程的函数进行了测试,这篇随笔就简单介绍一下创建线程的相关函数. C中三个创建线程函数:pthread_create()._beginthread().CreateTh ...
- Django 学习 之路由层(URL)
路由层(URL) 1.路由层简单配置 (1)path方法 写固定的url. (2)re_path方法 可以正则规则 例: urlpatterns = [ path('admin/', admin.si ...