
requests模块使用一
1、安装与简介
Urllib和requests模块是python中发起http请求最常见的模块,但是requests模块使用更加方便简单。
pip install requests
2、GET请求
2.1、格式
response = requests.get(

			url=请求url地址,

			headers = 请求头字典,

			params=请求参数字典,

		)
2.2、基本使用
import requests

params= {'key1': 'value1', 'key2': 'value2'}

headers={

'User-Agent':'Mozilla/5.0 (Windows NT 10.0; Win64; x64) AppleWebKit/537.36 (KHTML, like Gecko) Chrome/80.0.3987.149 Safari/537.36'

}

r = requests.get("http://httpbin.org/get", params=params,headers=headers)

print(r.text)
2.3、爬取百度贴吧关键字下的所有页面,保存至文件夹中
2.3.1获取全部页面url的两个方法
同一个网站下,很大一部分网页,只需要修改get请求参数,就可以达到访问不同页面的效果,我们可以利用这个特性,通过找出url中的特殊参数,构建url列表,达到全部抓取的效果
https://tieba.baidu.com/f?kw=%E6%AD%A6%E6%B1%89&ie=utf-8&cid=&tab=corearea&pn=0  (第一页)

https://tieba.baidu.com/f?kw=%E6%AD%A6%E6%B1%89&ie=utf-8&cid=&tab=corearea&pn=50(第二页)

例如 百度贴吧页面的url,刚好符合,我们发现修改pn参数的值就可以达到翻页效果。
通过对第一个页面的内容进行提取,找出下一个页面的url地址,直接上代码,我这里使用正则去提取下一页url。
import os
import requests
from urllib.parse import quote
import re class Tieba(object):
def __init__(self, kw, path='.'):
self.kw = kw
self.base_url = f"https://tieba.baidu.com/f?kw={quote(self.kw)}&ie=utf-8&cid=&tab=corearea&pn=0"
self.headers = {
'User-Agent': 'Mozilla/5.0 (Windows NT 10.0; Win64; x64) AppleWebKit/537.36 (KHTML, like Gecko) Chrome/80.0.3987.149 Safari/537.36'
}
self.path = path
self.page = 1 def get_html(self):
res = requests.get(url=self.base_url, headers=self.headers)
return res.content.decode() def get_next_url(self, content):
next_url = re.search(r'<a href="(.*?)" class="next pagination-item " >下一页></a>', content)
self.base_url = 'https:' + next_url.group(1) if next_url else None def save_file(self, content):
sub_path = os.path.join(self.path, self.kw)
if not os.path.exists(sub_path):
os.mkdir(sub_path)
filename = os.path.join(sub_path, self.kw + str(self.page) + '.html')
with open(filename, 'w', encoding='utf-8') as file:
file.write(content) def run(self):
while self.base_url:
print(self.base_url)
content = self.get_html()
self.save_file(content)
self.get_next_url(content)
self.page += 1 if __name__ == '__main__':
t = Tieba('武汉')
t.run()
3、POST请求
3.1、格式
response = requests.get(

			url=请求url地址,

			headers = 请求头字典,

			data=表单数据字典,

		)
3.2、简单使用
import requests

headers={

'User-Agent':'Mozilla/5.0 (Windows NT 10.0; Win64; x64) AppleWebKit/537.36 (KHTML, like Gecko) Chrome/80.0.3987.149 Safari/537.36'

}

data={

'name':'花花',

'age':18

}

r = requests.post('http://httpbin.org/post', data = data,headers=headers)

print(r.text)
4、数据分类
1、结构化数据:能用关系型数据库描述的数据。
特点:数据以行为单位,一行数据表示一个实体的信息,每一行的数据的属性是相同的。
举例:关系数据库中存储的表
处理方法:sql---结构化查询语言---语言---可以在关系型数据库中对数据的操作。
2、半结构化数据:拥有字描述结构数据
特点:包含相关标记,用来分隔语义元素以及对记录和字段进行分层----也别成为自描述结构
举例:html,xml,json。
处理方法:正则,xpath(xml,html)
3、非结构化数据:
特点:没有固定结构的数据。
举例:文档,图片,视频,音频等等,都是通过整体存储二进制格式来保存的,一般为视频,音乐等。
处理:直接保存,但是需要注意文件名后缀
5、获取响应
5.1、response对象的常用方法
import requests

res=requests.get('https://www.baidu.com/more/')

print(res.apparent_encoding)  #页面真实编码

print(res.encoding)           #页面推测编码

print(res.url)                #请求url

print(res.status_code)        #返回状态码

print(res.headers)			  #响应头

print(res.request.headers)    #请求头

print(res.request.url)        #请求url

#结果

utf-8

ISO-8859-1

https://www.baidu.com/more/

200

{'Accept-Ranges': 'bytes', 'Cache-Control': 'max-age=86400', 'Content-Encoding': 'gzip', 'Content-Length': '10725', 'Content-Type': 'text/html', 'Date': 'Sun, 22 Mar 2020 14:42:49 GMT', 'Etag': '"aebd-59bafefa98680"', 'Expires': 'Mon, 23 Mar 2020 14:42:49 GMT', 'Last-Modified': 'Thu, 09 Jan 2020 07:27:06 GMT', 'P3p': 'CP=" OTI DSP COR IVA OUR IND COM ", CP=" OTI DSP COR IVA OUR IND COM "', 'Server': 'Apache', 'Set-Cookie': 'BAIDUID=2886A8C54AD6E00BAD273F89AE0B92F5:FG=1; expires=Mon, 22-Mar-21 14:42:49 GMT; max-age=31536000; path=/; domain=.baidu.com; version=1, BAIDUID=2886A8C54AD6E00B93A795B185A4330E:FG=1; expires=Mon, 22-Mar-21 14:42:49 GMT; max-age=31536000; path=/; domain=.baidu.com; version=1', 'Vary': 'Accept-Encoding,User-Agent'}

{'User-Agent': 'python-requests/2.22.0', 'Accept-Encoding': 'gzip, deflate', 'Accept': '*/*', 'Connection': 'keep-alive'}

https://www.baidu.com/more/
5.2、返回字符串,使用text方法,上面都是使用此方法,返回字符串格式的网页内容。
import requests

res=requests.get('https://www.baidu.com/more/')

print(res.text)
但是需要考虑返回字符串的编码问题,不然容易导致乱码。我们可以摁 F12查看网页源代码,查看当前网页的编码也可以通过apparent_encoding方法查看。
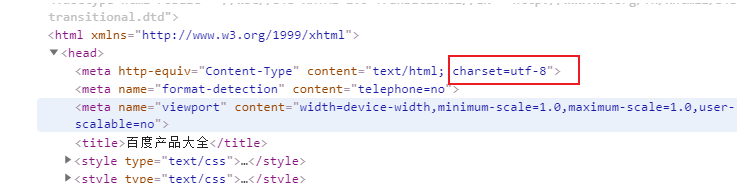
我们再用代码获取网页
import requests

res=requests.get('https://www.baidu.com/more/')

print(res.encoding)

ISO-8859-1
此时发现返回的内容使用的是ISO-8859-1编码,由此可知,打印出来的内容一定会乱码。
我们有两个方法,来防止乱码
1、自己指定编码
import requests

res=requests.get('https://www.baidu.com/more/')

res.encoding='utf-8'

print(res.text)
2、先接受bytes内容,然后在解码
import requests

res=requests.get('https://www.baidu.com/more/')

print(res.content.decode('utf-8'))
5.3、返回bytes类型数据,一般用于视频,音乐等数据,使用content,方法
import requests

res = requests.get('https://www.baidu.com/img/superlogo_c4d7df0a003d3db9b65e9ef0fe6da1ec.png?where=super')

with open('logo.png', 'wb') as file:

    file.write(res.content)
5.4、返回json数据
5.4.1、什么是json
json是一种数据交换的格式,json其实是在js语言中,用'字符串'的形式来表示json中的对象和数组的一种技术,所以json本质上是字符串。
5.4.2、python中如何进行json与python数据类型转换
可以使用 json 模块将数据转成python中的数据类型,再进行数据提取。
json_str:json类型数据

json.loads(json_str)--->python的list或者字典

json.dumps(python的list或者字典)--->json_str
我在这里使用了jsonpath模块,进行数据提取。
具体使用方法可参考如下网址:https://goessner.net/articles/JsonPath/
例1、百度翻译
import requests

from jsonpath import jsonpath

def fanyi(kw):

    s = 'https://fanyi.baidu.com/sug'

    data = {

        'kw': kw

    }

    res = requests.post(url=s, data=data)

    jp = jsonpath(res.json(), '$.data.*')  #注意res.json(),数据类型为python内置类型,他不是字符串

    for line in jp:

        print(line.get('k', None), line.get('v', None))

if __name__ == '__main__':

    kw = input('请输入需要查询的单词>>>:')

    fanyi(kw)
例2、金山词霸翻译
import requests

from jsonpath import jsonpath

def fanyi(kw):

    s = 'http://fy.iciba.com/ajax.php?a=fy'

    data = {

        'w': kw

    }

    headers = {

        'Referer': 'http://fy.iciba.com/',

        'User-Agent': 'Mozilla/5.0 (Windows NT 10.0; Win64; x64) AppleWebKit/537.36 (KHTML, like Gecko) Chrome/80.0.3987.149 Safari/537.36',

    }

    res = requests.post(url=s, data=data, headers=headers)

    jp = jsonpath(res.json(), '$..word_mean.*.')

    if not jp:

        jp = jsonpath(res.json(), '$..out')

    for line in jp:

        print(line)

if __name__ == '__main__':

    kw = input('请输入需要查询的单词>>>:')

    fanyi(kw)
例3、高德地图天气查询
import requests

from jsonpath import jsonpath

class Weather():

    def __init__(self, city):

        self.code_url = 'https://www.amap.com/service/cityList?'

        self.headers = {

            'User-Agent': 'Mozilla/5.0 (Windows NT 10.0; Win64; x64) AppleWebKit/537.36 (KHTML, like Gecko) Chrome/80.0.3987.149 Safari/537.36'

        }

        self.city = city

        self.weather_url = 'https://www.amap.com/service/weather?adcode={}'

    def __get_code(self):

        res = requests.get(self.code_url, headers=self.headers)

        jp = jsonpath(res.json(), '$.data.cityByLetter.*.*')

        jp_dic = {i.get('name'): i.get('adcode') for i in jp}

        return jp_dic.get(self.city)

    def __get_weather_json(self, code):

        self.weather_url = self.weather_url.format(code)

        return requests.get(self.weather_url, headers=self.headers).json()

    def __parse_content(self, content):

        jp = jsonpath(content, '$.data.data.[0].*')

        info_dic = {

            '查询时间': jp[0],

            '天气情况': jsonpath(jp, '$.*.weather_name')[0],

            '实时温度': jsonpath(jp, '$.*.temperature')[0],

            '最高温度': jsonpath(jp, '$.*.*.max_temp')[0],

            '最低温度': jsonpath(jp, '$.*.*.min_temp')[0],

            '风向': jsonpath(jp, '$.*.*.wind_direction_desc')[0]

        }

        return info_dic

    def view(self):

        code = self.__get_code()

        if code:

            content = self.__get_weather_json(code)

            res = self.__parse_content(content)

            print('查询城市为:',self.city)

            for i in res:

                print(i, ':', res[i])

        else:

            print('错误城市...')

if __name__ == '__main__':

    t = Weather('衡阳')

    t.view()
requests模块使用一的更多相关文章
- 爬虫requests模块 1
让我们从一些简单的示例开始吧. 发送请求¶ 使用 Requests 发送网络请求非常简单. 一开始要导入 Requests 模块: >>> import requests 然后,尝试 ...
- requests 模块
发送请求 使用Requests发送网络请求非常简单. 一开始要导入Requests模块: >>> import requests 然后,尝试获取某个网页.本例子中,我们来获取Gith ...
- requests模块--python发送http请求
requests模块 在Python内置模块(urllib.urllib2.httplib)的基础上进行了高度的封装,从而使得Pythoner更好的进行http请求,使用Requests可以轻而易举的 ...
- Python requests模块学习笔记
目录 Requests模块说明 Requests模块安装 Requests模块简单入门 Requests示例 参考文档 1.Requests模块说明 Requests 是使用 Apache2 Li ...
- Python高手之路【八】python基础之requests模块
1.Requests模块说明 Requests 是使用 Apache2 Licensed 许可证的 HTTP 库.用 Python 编写,真正的为人类着想. Python 标准库中的 urllib2 ...
- Python requests模块
import requests 下面就可以使用神奇的requests模块了! 1.向网页发送数据 >>> payload = {'key1': 'value1', 'key2': [ ...
- 基于python第三方requests 模块的HTTP请求类
使用requests模块构造的下载器,首先安装第三方库requests pip install requests 1 class StrongDownload(object): def __init_ ...
- 使用requests模块爬虫
虽然干技术多年了,但从没有写过博客,想来甚是惭愧,本篇作为我博客的第一篇,也是测试篇.不为写的好,只为博诸君一眸而已. 使用python爬虫,有几个比较常用的,获取html_content的模块url ...
- [实战演练]python3使用requests模块爬取页面内容
本文摘要: 1.安装pip 2.安装requests模块 3.安装beautifulsoup4 4.requests模块浅析 + 发送请求 + 传递URL参数 + 响应内容 + 获取网页编码 + 获取 ...
- python爬虫之requests模块介绍
介绍 #介绍:使用requests可以模拟浏览器的请求,比起之前用到的urllib,requests模块的api更加便捷(本质就是封装了urllib3) #注意:requests库发送请求将网页内容下 ...
随机推荐
- 16各种设计LOGO标准尺寸
继续抄写文章 网页设计标准尺寸: 1.800*600下,网页宽度保持在778以内, 2.1024*768下,网页宽度保持在1002以内, 3.在ps里面做网页可以在800*600状态下显 4.在PS里 ...
- spring+mybatis+mysql5.7实现读写分离,主从复制
申明:请尽量与我本博文所有的软件版本保持一致,避免不必要的错误. 所用软件版本列表:MySQL 5.7spring5mybaties3.4.6 首先搭建一个完整的spring5+springMVC5+ ...
- Leetcode刷题记录 剑指offer
面试题3:数组中重复数字 # 使用set,时间复杂度O(n),空间复杂度O(n)class Solution(object): def findRepeatNumber(self, nums): &q ...
- Pip安装TensorFlow报错:MemoryError
问题描述 使用pip安装TensorFlow时,一直报错,情况如下: 解决办法 使用如下命令可正常安装: pip3 install --no-cache-dir tenstoflow --no-cac ...
- 这有一管信息量很大的DNA
题图:华盛顿大学副教授Luis Henrique Ceze(照片中的男士)和研究科学家Lee Organick正将数字数据保存进DNA测序,以供"读取"并追溯原始文件. 来自微软和 ...
- React Native Build Apk
1 React Native安卓项目打包APK 1.1 产生签名的key 先通过keytool生成key 1 keytool -genkey -v -keystore demo-release-key ...
- Android下的定时任务
Android中的定时任务一般有两种实现方式,一种是使用JavaAPI里的Timer类,另一种是使用android的Alarm机制. 这两种方式在多数情况下都能实现类似的效果,但Timer有一个明显的 ...
- 《HelloGitHub》第 47 期
兴趣是最好的老师,HelloGitHub 就是帮你找到兴趣! 简介 分享 GitHub 上有趣.入门级的开源项目. 这是一个面向编程新手.热爱编程.对开源社区感兴趣 人群的月刊,月刊的内容包括:各种编 ...
- jenkins-设置定时任务
前言 跑自动化用例每次用手工点击 jenkins 出发自动化用例太麻烦了,我们希望能每天固定时间 跑,这样就不用管了,坐等收测试报告结果就行. 一.定时构建语法 * * * * * (五颗星,中间用 ...
- python列表解析补充:
python列表解析补充: # 补充: f = [x + y for x in 'ABCDE' for y in '1234567'] print(f) test = [] for x in 'ABC ...