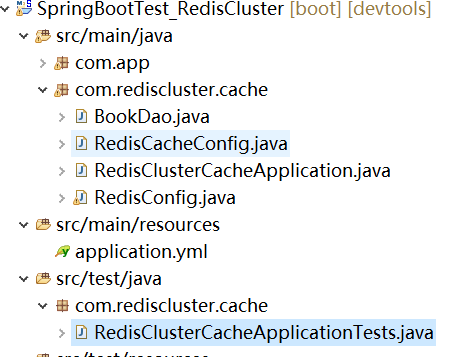
Redis Cluster Cache with SpringBoot
前提:
根据 https://www.cnblogs.com/luffystory/p/12081074.html
创建好Redis集群

<project xmlns="http://maven.apache.org/POM/4.0.0" xmlns:xsi="http://www.w3.org/2001/XMLSchema-instance"

    xsi:schemaLocation="http://maven.apache.org/POM/4.0.0 https://maven.apache.org/xsd/maven-4.0.0.xsd">

    <modelVersion>4.0.0</modelVersion>

    <parent>

        <groupId>org.springframework.boot</groupId>

        <artifactId>spring-boot-starter-parent</artifactId>

        <version>2.0.1.RELEASE</version>

        <relativePath /> <!-- lookup parent from repository -->

    </parent>

    <groupId>com.study</groupId>

    <artifactId>SpringBootTest_RedisCluster</artifactId>

    <version>0.0.1-SNAPSHOT</version>

    <name>SpringBootTest-2</name>

    <description>Demo project for Spring Boot</description>

    <properties>

        <java.version>1.8</java.version>

    </properties>

    <dependencies>

        <dependency>

            <groupId>org.springframework.boot</groupId>

            <artifactId>spring-boot-starter-web</artifactId>

        </dependency>

        <dependency>

            <groupId>org.springframework.boot</groupId>

            <artifactId>spring-boot-devtools</artifactId>

            <optional>true</optional>

        </dependency>

        <dependency>

            <groupId>org.springframework.boot</groupId>

            <artifactId>spring-boot-starter-test</artifactId>

            <scope>test</scope>

        </dependency>

        <dependency>

            <groupId>org.springframework.boot</groupId>

            <artifactId>spring-boot-starter-cache</artifactId>

        </dependency>

        <dependency>

            <groupId>org.springframework.boot</groupId>

            <artifactId>spring-boot-starter-data-redis</artifactId>

            <exclusions>

                <exclusion>

                    <groupId>io.lettuce</groupId>

                    <artifactId>lettuce-core</artifactId>

                </exclusion>

            </exclusions>

        </dependency>

        <dependency>

            <groupId>org.apache.commons</groupId>

            <artifactId>commons-pool2</artifactId>

        </dependency>

        <dependency>

            <groupId>redis.clients</groupId>

            <artifactId>jedis</artifactId>

        </dependency>

    </dependencies>

    <build>

        <plugins>

            <plugin>

                <groupId>org.springframework.boot</groupId>

                <artifactId>spring-boot-maven-plugin</artifactId>

            </plugin>

        </plugins>

    </build>

</project>
RedisCacheManager 中使用 configMap 做如下 c1 和 redisCacheConfig 的mapping
 configMap.put("c1" , redisCacheConfig);
如下
@Cacheable(value = "c1")
@Cacheable(vaule = "c2")

c1 存在于configMap 中,因此使用的缓存策略是 configMap 集合中 c1 所对应的缓存策略;
c2 不存在于 configMap 集合中,因此使用的缓存策略是默认的缓存策略。
RedisCacheManager redisCacheManager = new RedisCacheManager(cacheWriter,

        RedisCacheConfiguration.defaultCacheConfig(), configMap);
package com.rediscluster.cache;

import org.springframework.cache.annotation.CacheEvict;

import org.springframework.cache.annotation.CachePut;

import org.springframework.cache.annotation.Cacheable;

import org.springframework.stereotype.Repository;

@Repository

public class BookDao {

    @Cacheable(value = "c1")

    public String getBookById(Integer id) {

    System.out.println("getBookById");

    return "Book : SanGuoYanYi";

    }

    @CachePut(value = "c1")

    public String updateBookById(Integer id) {

    return "Brand new Book : SanGuoYanYi";

    }

    @CacheEvict(value = "c1")

    public void deleteById(Integer id) {

    System.out.println("deleteById");

    }

    @Cacheable(value = "c2")

    public String getBookById2(Integer id) {

    System.out.println("getBookById2");

    return "Book : HongLouMeng";

    }

}
package com.rediscluster.cache;

import java.time.Duration;

import java.util.HashMap;

import java.util.Map;

import org.springframework.beans.factory.annotation.Autowired;

import org.springframework.context.annotation.Bean;

import org.springframework.context.annotation.Configuration;

import org.springframework.data.redis.cache.RedisCacheConfiguration;

import org.springframework.data.redis.cache.RedisCacheManager;

import org.springframework.data.redis.cache.RedisCacheWriter;

import org.springframework.data.redis.connection.RedisConnectionFactory;

@Configuration

public class RedisCacheConfig {

    @Autowired

    RedisConnectionFactory conFactory;

    @Bean

    RedisCacheManager redisCacheManager() {

    Map<String, RedisCacheConfiguration> configMap = new HashMap<>();

    RedisCacheConfiguration redisCacheConfig = RedisCacheConfiguration.defaultCacheConfig().prefixKeysWith("xluffy:")

        .disableCachingNullValues().entryTtl(Duration.ofMinutes(30));

    configMap.put("c1" , redisCacheConfig);

    RedisCacheWriter cacheWriter = RedisCacheWriter.nonLockingRedisCacheWriter(conFactory);

    RedisCacheManager redisCacheManager = new RedisCacheManager(cacheWriter,

        RedisCacheConfiguration.defaultCacheConfig(), configMap);

    return redisCacheManager;

    }

}
package com.rediscluster.cache;

import org.springframework.boot.SpringApplication;

import org.springframework.boot.autoconfigure.SpringBootApplication;

import org.springframework.cache.annotation.EnableCaching;

@SpringBootApplication

@EnableCaching

public class RedisClusterCacheApplication {

    public static void main(String[] args) {

        SpringApplication.run(RedisClusterCacheApplication.class, args);

    }

}
package com.rediscluster.cache;

import java.util.ArrayList;

import java.util.List;

import org.springframework.boot.context.properties.ConfigurationProperties;

import org.springframework.context.annotation.Bean;

import org.springframework.context.annotation.Configuration;

import org.springframework.data.redis.connection.RedisClusterConfiguration;

import org.springframework.data.redis.connection.RedisNode;

import org.springframework.data.redis.connection.jedis.JedisConnectionFactory;

import org.springframework.data.redis.core.RedisTemplate;

import org.springframework.data.redis.core.StringRedisTemplate;

import org.springframework.data.redis.serializer.JdkSerializationRedisSerializer;

import org.springframework.data.redis.serializer.StringRedisSerializer;

import redis.clients.jedis.JedisPoolConfig;

@Configuration

@ConfigurationProperties("spring.redis.cluster")

public class RedisConfig {

    List<Integer> ports;

    String host;

    JedisPoolConfig poolConfig;

    @Bean

    RedisClusterConfiguration redisClusterConfiguarion() {

    RedisClusterConfiguration configuration = new RedisClusterConfiguration();

    List<RedisNode> nodes = new ArrayList<>();

    for(Integer port : ports) {

        nodes.add(new RedisNode(host,port));

    }

    configuration.setClusterNodes(nodes);

    return configuration;

    }

    @Bean

    JedisConnectionFactory jedisConnectionFactory() {

    JedisConnectionFactory factory = new JedisConnectionFactory(redisClusterConfiguarion(), poolConfig);

        return factory;

    }

    @Bean

    RedisTemplate redisTempalte() {

    RedisTemplate redisTempalte = new RedisTemplate();

    redisTempalte.setConnectionFactory(jedisConnectionFactory());

    redisTempalte.setKeySerializer(new StringRedisSerializer());

    redisTempalte.setValueSerializer(new JdkSerializationRedisSerializer());

    return redisTempalte;

    }

    @Bean

    StringRedisTemplate stringRedisTemplate() {

    StringRedisTemplate stringRedisTemplate = new StringRedisTemplate(jedisConnectionFactory());

    stringRedisTemplate.setKeySerializer(new StringRedisSerializer());

    stringRedisTemplate.setValueSerializer(new StringRedisSerializer());

    return stringRedisTemplate;

    }

    public List<Integer> getPorts() {

        return ports;

    }

    public void setPorts(List<Integer> ports) {

        this.ports = ports;

    }

    public String getHost() {

        return host;

    }

    public void setHost(String host) {

        this.host = host;

    }

    public JedisPoolConfig getPoolConfig() {

        return poolConfig;

    }

    public void setPoolConfig(JedisPoolConfig poolConfig) {

        this.poolConfig = poolConfig;

    }

}
server:

  port: 8091

spring:

  redis:

    cluster:

      ports:

        - 8001

        - 8002

        - 8003

        - 8004

        - 8005

        - 8006

        - 8007

        - 8008

      host: 192.168.157.131

      poolConfig:

        max-total: 8

        max-idle: 8

        max-wait-millis: -1

        min-idle: 0
package com.rediscluster.cache;

import org.junit.Test;

import org.junit.runner.RunWith;

import org.springframework.beans.factory.annotation.Autowired;

import org.springframework.boot.test.context.SpringBootTest;

import org.springframework.test.context.junit4.SpringRunner;

@RunWith(SpringRunner.class)

@SpringBootTest

public class RedisClusterCacheApplicationTests {

    @Autowired

    BookDao bookDao;

    @Test

    public void contextLoad() {

    bookDao.getBookById(100);

    String book = bookDao.getBookById(100);

    System.out.println(book);

    bookDao.updateBookById(100);

    String book2 = bookDao.getBookById(100);

    System.out.println(book2);

    bookDao.deleteById(100);

    bookDao.getBookById(100);

    bookDao.getBookById2(99);

    }

}
代码配置好之后 run RedisClusterCacheApplicationTests as Junit Test, test 通过之后
可以看到方法的参数和返回值已被缓存到 Redis 中。

Redis Cluster Cache with SpringBoot的更多相关文章
- Redis Cluster with SpringBoot
前提: 按照 https://www.cnblogs.com/luffystory/p/12081074.html 配置好Redis Cluster in Ubuntu 按照如下结构搭建项目结构: P ...
- 实践篇 -- Redis客户端缓存在SpringBoot应用的探究
本文探究Redis最新特性--客户端缓存在SpringBoot上的应用实战. Redis Tracking Redis客户端缓存机制基于Redis Tracking机制实现的.我们先了解一下Redis ...
- Redis Cluster 集群搭建与扩容、缩容
说明:仍然是伪集群,所有的Redis节点,都在一个服务器上,采用不同配置文件,不同端口的形式实现 前提:已经安装好了Redis,本文的redis的版本是redis-6.2.3 Redis的下载.安装参 ...
- jedis处理redis cluster集群的密码问题
环境介绍:jedis:2.8.0 redis版本:3.2 首先说一下redis集群的方式,一种是cluster的 一种是sentinel的,cluster的是redis 3.0之后出来新的集群方式 本 ...
- Redis Cluster的搭建与部署,实现redis的分布式方案
前言 上篇Redis Sentinel安装与部署,实现redis的高可用实现了redis的高可用,针对的主要是master宕机的情况,我们发现所有节点的数据都是一样的,那么一旦数据量过大,redi也会 ...
- Redis Cluster 4.0 on CentOS 6.9 搭建
集群简介 Redis 集群是一个可以在多个 Redis 节点之间进行数据共享的设施(installation). Redis 集群不支持那些需要同时处理多个键的 Redis 命令, 因为执行这些命令需 ...
- Redis Cluster架构优化
Redis Cluster架构优化 在<全面剖析Redis Cluster原理和应用>中,我们已经详细剖析了现阶段Redis Cluster的缺点: 无中心化架构 Gossip消息的开销 ...
- Redis Cluster(集群)
一.概述 在前面的文章中介绍过了redis的主从和哨兵两种集群方案,redis从3.0版本开始引入了redis-cluster(集群).从主从-哨兵-集群可以看到redis的不断完善:主从复制是最简单 ...
- redis cluster介绍
讲解分布式数据存储的核心算法,数据分布的算法 hash算法 -> 一致性hash算法(memcached) -> redis cluster,hash slot算法 一.概述 1.我们的m ...
随机推荐
- JAVA基础:Java中equals和==的区别
java中的数据类型,可分为两类: 1.基本数据类型,也称原始数据类型.byte,short,char,int,long,float,double,boolean 他们之间的比较,应用双等号( ...
- 加快ALTER TABLE 操作速度
mysql的alter table操作的性能对于大表来说是个大问题.mysql大部分修改表结构操作的方法都是用新的结构创建一个 新表,从旧表中查出数据插入新表,然后在删除旧表.这样的操作很耗费时间,而 ...
- Wizard's Tour CodeForces - 860D (图,构造)
大意: 给定$n$节点$m$条边无向图, 不保证连通, 求选出最多邻接边, 每条边最多选一次. 上界为$\lfloor\frac{m}{2}\rfloor$, $dfs$贪心划分显然可以达到上界. # ...
- redis 学习(6)-- 集合类型
redis 学习(6)-- 集合类型 set 结构 无序 无重复 集合间操作 set 集合内操作 命令 含义 sadd key memebr1 [member2...] 向集合中添加一个或多个成员 s ...
- 谷歌对Intel 10nm进度不满
Intel 在 10nm 处理器上的节奏可谓是“龟速”,一拖三年,且目前大规模发货的 10nm Ice Lake 处理器仅仅是移动平台低电压,桌面要到明年. 表面波澜不惊,实际上却暗流涌动. 首先是 ...
- Chrome安装Axure插件axure-chrome-extension
用Chrome打开Axure发布的原型图打不开,提示需要安装axure-chrome-extension插件,如下图提示 下面记录一下安装过程,其实很简单,插件没必要从网上到处找,在你发布的路径下就有 ...
- vim简明教程--半小时从入门到精通
https://download.csdn.net/download/qccz123456/10567716 vim三种模式:命令模式.插入模式.底行模式.使用ESC.i.:切换模式. vim [路径 ...
- opengl学习-利用模板测试勾画物体轮廓中出现的一个问题
我在学习OpenGL模板测试勾画物体轮廓的时候,出现了这个问题: 这个出现的原因就是,改变摄像机的时候,每次绘制,上次绘制中模板缓冲区的数据没有清除的原因.也就是在while循环开始的时候,glCle ...
- springboot中使用拦截器
5.1 回顾SpringMVC使用拦截器步骤 自定义拦截器类,实现HandlerInterceptor接口 注册拦截器类 5.2 Spring Boot使用拦截器步骤 5.2.1 按照S ...
- Django学习系列13:Django ORM和第一个模型
ORM—对象关系映射器,是一个数据抽象层,描述存储在数据库中的表,行和列.处理数据库时,可以使用熟悉的面向对象方式,写出更好的代码. 在ORM的概念中,类对应数据库中的表,属性对应列,类的单个实例表示 ...
