
016-zabbix低级自动发现以及MySQL多实例
1、概述
Zabbix的网络发现是指zabbix server通过配置好的规则,自动添加host,group,template
Zabbix的主动注册刚好和网络发现是相反的,功能基本一致。zabbix agent主动联系zabbix server,server自动添加host,group,template
以上两种方式都是发现host,添加host,而low-level discovery(低级自动发现)更加底层,用于发现item,trigger,graph等等。
2、MySQL多实例的低级自动发现

(1)配置3307、3308的实例

[root@linux-node2 ~]# mkdir /data/{3307,3308} -p

[root@linux-node2 ~]# chown -R mysql.mysql /data

[root@linux-node2 ~]# cp /etc/my.cnf /etc/my3307.cnf

[root@linux-node2 ~]# vim /etc/my3307.cnf

[mysqld]

datadir=/data/3307

socket=/data/3307/mysql.sock

# Disabling symbolic-links is recommended to prevent assorted security risks

symbolic-links=0

port=3307

# Settings user and group are ignored when systemd is used.

# If you need to run mysqld under a different user or group,

# customize your systemd unit file for mariadb according to the

# instructions in http://fedoraproject.org/wiki/Systemd

[mysqld_safe]

log-error=/data/3307/mariadb.log

pid-file=/data/3307/mariadb.pid

#

# include all files from the config directory

#

!includedir /etc/my.cnf.d

[root@linux-node2 ~]# cp /etc/my3307.cnf /etc/my3308.cnf

[root@linux-node2 ~]# vim /etc/my3308.cnf

[mysqld]

datadir=/data/3308

socket=/data/3308/mysql.sock

# Disabling symbolic-links is recommended to prevent assorted security risks

symbolic-links=0

port=3308

# Settings user and group are ignored when systemd is used.

# If you need to run mysqld under a different user or group,

# customize your systemd unit file for mariadb according to the

# instructions in http://fedoraproject.org/wiki/Systemd

[mysqld_safe]

log-error=/data/3308/mariadb.log

pid-file=/data/3308/mariadb.pid

#

# include all files from the config directory

#

!includedir /etc/my.cnf.d

(2)初始化数据库

[root@linux-node2 ~]# mysql_install_db --user=mysql --defaults-file=/etc/my3307.cnf

Installing MariaDB/MySQL system tables in '/data/3307' ...

171218 12:01:02 [Note] /usr/libexec/mysqld (mysqld 5.5.56-MariaDB) starting as process 4804 ...

OK

Filling help tables...

171218 12:01:02 [Note] /usr/libexec/mysqld (mysqld 5.5.56-MariaDB) starting as process 4813 ...

OK

To start mysqld at boot time you have to copy

support-files/mysql.server to the right place for your system

PLEASE REMEMBER TO SET A PASSWORD FOR THE MariaDB root USER !

To do so, start the server, then issue the following commands:

'/usr/bin/mysqladmin' -u root password 'new-password'

'/usr/bin/mysqladmin' -u root -h linux-node2 password 'new-password'

Alternatively you can run:

'/usr/bin/mysql_secure_installation'

which will also give you the option of removing the test

databases and anonymous user created by default.  This is

strongly recommended for production servers.

See the MariaDB Knowledgebase at http://mariadb.com/kb or the

MySQL manual for more instructions.

You can start the MariaDB daemon with:

cd '/usr' ; /usr/bin/mysqld_safe --datadir='/data/3307'

You can test the MariaDB daemon with mysql-test-run.pl

cd '/usr/mysql-test' ; perl mysql-test-run.pl

Please report any problems at http://mariadb.org/jira

The latest information about MariaDB is available at http://mariadb.org/.

You can find additional information about the MySQL part at:

http://dev.mysql.com

Consider joining MariaDB's strong and vibrant community:

https://mariadb.org/get-involved/

[root@linux-node2 ~]# mysqld_safe --defaults-file=/etc/my3307.cnf &

[1] 4825

[root@linux-node2 ~]# 171218 12:01:53 mysqld_safe Logging to '/data/3307/mariadb.log'.

171218 12:01:53 mysqld_safe Starting mysqld daemon with databases from /data/3307

[root@linux-node2 ~]# mysql_install_db --user=mysql --defaults-file=/etc/my3308.cnf

Installing MariaDB/MySQL system tables in '/data/3308' ...

171218 12:03:48 [Note] /usr/libexec/mysqld (mysqld 5.5.56-MariaDB) starting as process 5041 ...

OK

Filling help tables...

171218 12:03:48 [Note] /usr/libexec/mysqld (mysqld 5.5.56-MariaDB) starting as process 5049 ...

OK

To start mysqld at boot time you have to copy

support-files/mysql.server to the right place for your system

PLEASE REMEMBER TO SET A PASSWORD FOR THE MariaDB root USER !

To do so, start the server, then issue the following commands:

'/usr/bin/mysqladmin' -u root password 'new-password'

'/usr/bin/mysqladmin' -u root -h linux-node2 password 'new-password'

Alternatively you can run:

'/usr/bin/mysql_secure_installation'

which will also give you the option of removing the test

databases and anonymous user created by default.  This is

strongly recommended for production servers.

See the MariaDB Knowledgebase at http://mariadb.com/kb or the

MySQL manual for more instructions.

You can start the MariaDB daemon with:

cd '/usr' ; /usr/bin/mysqld_safe --datadir='/data/3308'

You can test the MariaDB daemon with mysql-test-run.pl

cd '/usr/mysql-test' ; perl mysql-test-run.pl

Please report any problems at http://mariadb.org/jira

The latest information about MariaDB is available at http://mariadb.org/.

You can find additional information about the MySQL part at:

http://dev.mysql.com

Consider joining MariaDB's strong and vibrant community:

https://mariadb.org/get-involved/

[root@linux-node2 ~]# mysqld_safe --defaults-file=/etc/my3308.cnf &

[2] 5061

[root@linux-node2 ~]# 171218 12:03:56 mysqld_safe Logging to '/data/3308/mariadb.log'.

171218 12:03:56 mysqld_safe Starting mysqld daemon with databases from /data/3308

[root@linux-node2 ~]# netstat -tulnp

Active Internet connections (only servers)

Proto Recv-Q Send-Q Local Address           Foreign Address         State       PID/Program name

tcp        0      0 0.0.0.0:3307            0.0.0.0:*               LISTEN      4972/mysqld

tcp        0      0 0.0.0.0:3308            0.0.0.0:*               LISTEN      5207/mysqld

tcp        0      0 0.0.0.0:80              0.0.0.0:*               LISTEN      8237/nginx: master

tcp        0      0 0.0.0.0:22              0.0.0.0:*               LISTEN      866/sshd

tcp        0      0 127.0.0.1:25            0.0.0.0:*               LISTEN      2235/master

tcp        0      0 0.0.0.0:10050           0.0.0.0:*               LISTEN      3263/zabbix_agentd

tcp        0      0 0.0.0.0:3306            0.0.0.0:*               LISTEN      4645/mysqld

tcp6       0      0 :::22                   :::*                    LISTEN      866/sshd

tcp6       0      0 ::1:25                  :::*                    LISTEN      2235/master

tcp6       0      0 :::10050                :::*                    LISTEN      3263/zabbix_agentd

[root@linux-node2 ~]# netstat -tulnp |grep mysql|awk -F "[ :]+" '{print $5}'

3307

3308

3306
"[ :]+":以1个或多个 :(空格或冒号)作为分隔符
例如:printf"1:2::3:::4::::5"|awk-F'[:]+''{print $4}' 结果为 4
(3)编写获取端口号的shell脚本

[root@linux-node2 scripts]# vim discovery_mysql.sh

#!/bin/bash

#mysql low-lever discovery

res=`netstat -lntp|grep mysql |awk -F "[ :]+" '{print $5}'`

port=($res)

printf '{'

printf '"data":['

for key in ${!port[@]}

do

        if [[ "${#port[@]}" -gt 1 && "${key}"  -ne "$((${#port[@]}-1))" ]];then

                printf '{'

                printf "\"{#MYSQLPORT}\":\"${port[${key}]}\"},"

        else [[ "${key}" -eq "((${#port[@]}-1))" ]]

                printf '{'

                printf "\"{#MYSQLPORT}\":\"${port[${key}]}\"}"

        fi

done

printf ']'

printf '}'

[root@linux-node2 scripts]# sh discovery_mysql.sh |python -m json.tool    #采用json格式显示

{

    "data": [

        {

            "{#MYSQLPORT}": "3307"

        },

        {

            "{#MYSQLPORT}": "3308"

        },

        {

            "{#MYSQLPORT}": "3306"

        }

    ]

}

[root@linux-node2 zabbix_agentd.d]# vim discovery_mysql.conf    #编辑自定义key

UserParameter=discovery_mysql,/bin/bash /etc/zabbix/zabbix_agentd.d/scripts/discovery_mysql.sh

[root@linux-node1 ~]# zabbix_get -s linux-node2 -k discovery_mysql    #测试server端获取数据

(Not all processes could be identified, non-owned process info

 will not be shown, you would have to be root to see it all.)

{"data":[]}

#这里报错是因为netstat -tulnp的参数-p在执行时需要root的权限,这里使用suid的方式进行授权

[root@linux-node2 ~]# chmod u+s `which netstat`

[root@linux-node2 ~]# ll `which netstat`

-rwsr-xr-x. 1 root root 155000 8月   3 17:17 /usr/bin/netstat

[root@linux-node1 ~]# zabbix_get -s linux-node2 -k discovery_mysql

{"data":[{"{#MYSQLPORT}":"3307"},{"{#MYSQLPORT}":"3308"},{"{#MYSQLPORT}":"3306"}]}

(4)编辑自定义key,获取每个端口的状态数据

[root@linux-node2 zabbix_agentd.d]# cat userparameter_mysql.conf

UserParameter=mysql.status[*],echo "show global status where Variable_name='$2';" | HOME=/var/lib/zabbix mysql -uroot -p123456 -h 127.0.0.1 -P $1 -N | awk '{print $$2}'

修改不同端口的mysql密码:

[root@linux-node2 zabbix_agentd.d]# mysqladmin -h 127.0.0.1 -uroot password '123456' -P3306

[root@linux-node2 zabbix_agentd.d]# mysqladmin -h 127.0.0.1 -uroot password '123456' -P3307

[root@linux-node2 zabbix_agentd.d]# mysqladmin -h 127.0.0.1 -uroot password '123456' -P3308

测试是否正常

[root@linux-node2 zabbix_agentd.d]# mysql -uroot -p123456 -h 127.0.0.1 -P3306 -e "use mysql;show GLOBAL VARIABLES like 'port';"

+---------------+-------+

| Variable_name | Value |

+---------------+-------+

| port          | 3306  |

+---------------+-------+

[root@linux-node2 zabbix_agentd.d]# mysql -uroot -p123456 -h 127.0.0.1 -P3307 -e "use mysql;show GLOBAL VARIABLES like 'port';"

+---------------+-------+

| Variable_name | Value |

+---------------+-------+

| port          | 3307  |

+---------------+-------+

[root@linux-node2 zabbix_agentd.d]# mysql -uroot -p123456 -h 127.0.0.1 -P3308 -e "use mysql;show GLOBAL VARIABLES like 'port';"

+---------------+-------+

| Variable_name | Value |

+---------------+-------+

| port          | 3308  |

+---------------+-------+

zabbix_get测试是否能正常获取数据:

[root@linux-node1 ~]# zabbix_get -s linux-node2 -k mysql.status[3306,Bytes_sent]

1808
3、创建发现规则
这里直接在linux-node2上进行创建
"Configuration"-->"Host"-->"linux-node2"-->"Discovery"-->"Create discovery rule"-->"Add"
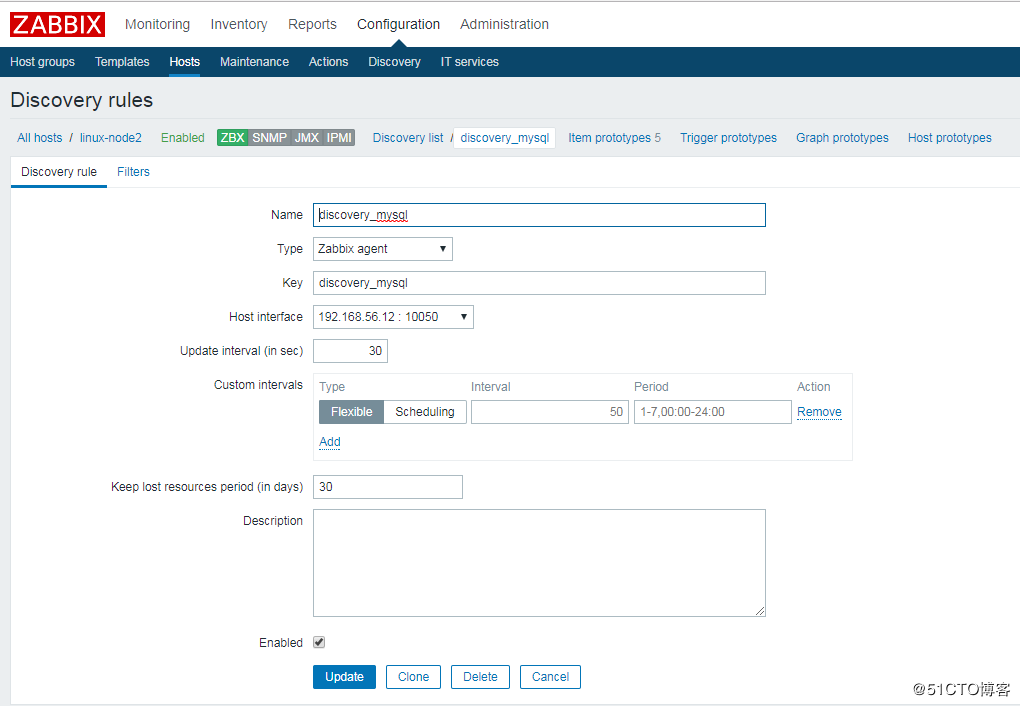
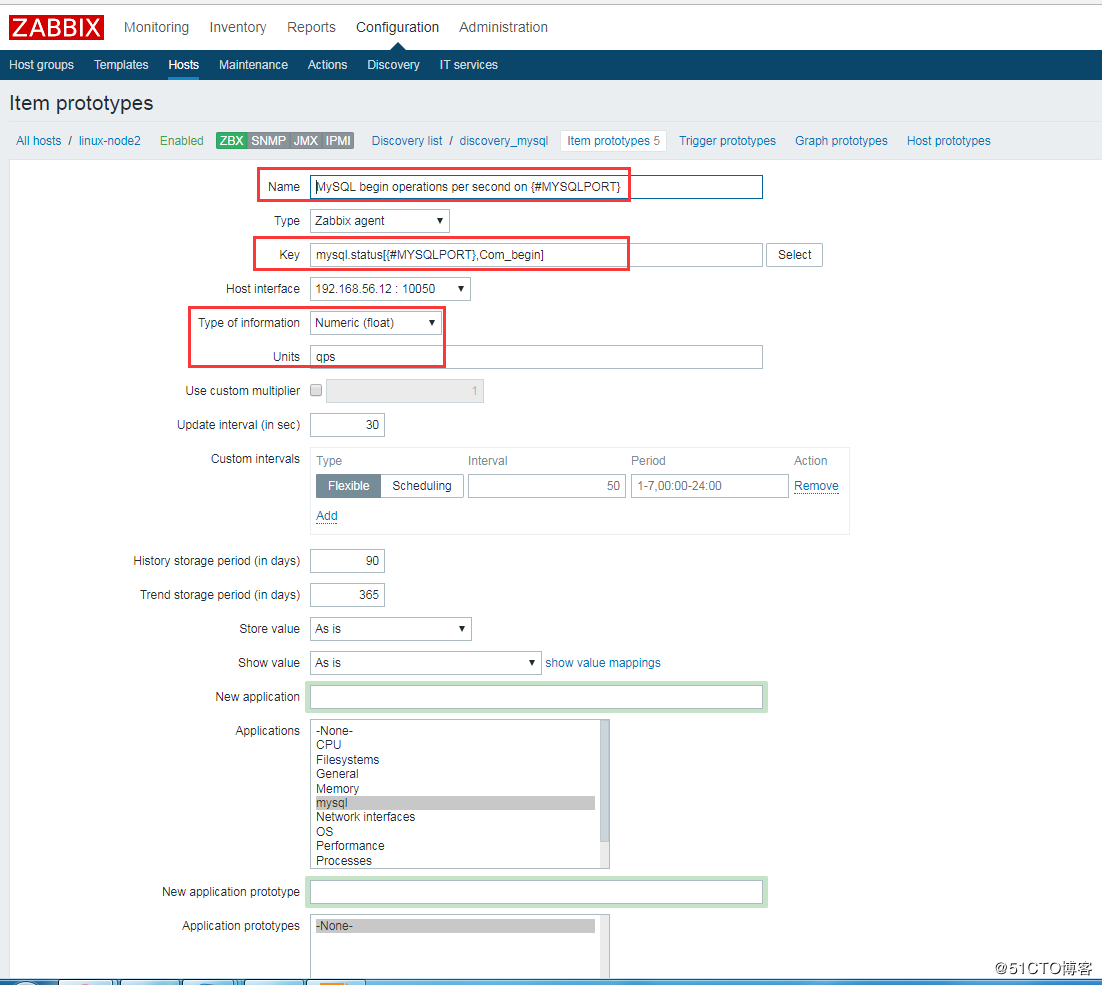
创建 Item prototypes,其实就是一个创建一个 item
Item prototypes (0)>>create Item prototypes,按照官方模板来配置。这里配5个展示

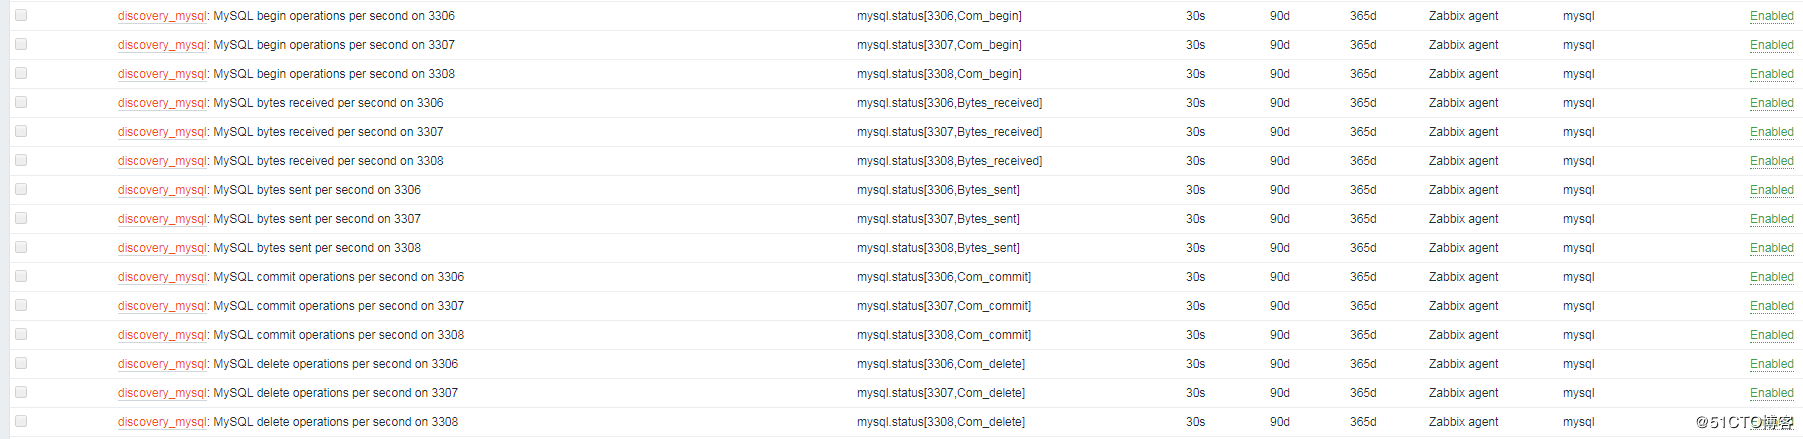
再查看Host中的item项,会多出以下监控项:
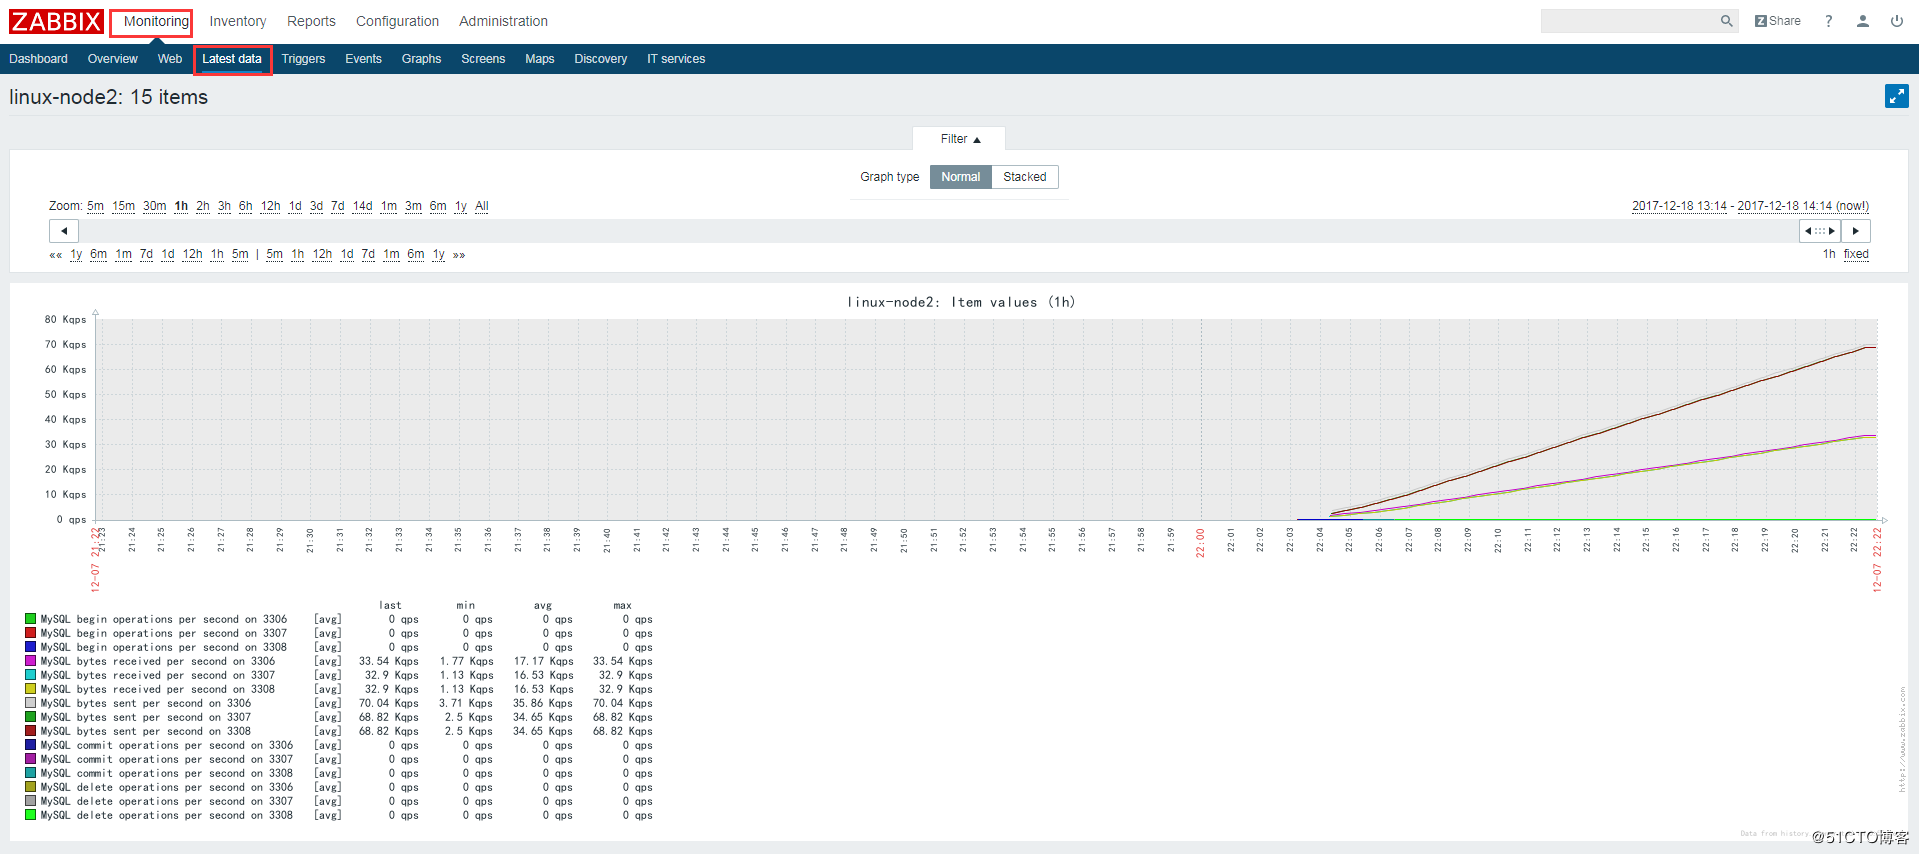
查看监控最新数据图表,即可看到3306、3307、3308的数据库状态信息:
第二个笔记:
1、低级自动发现概述
zabbix的低级自动发现(LLD)适用于监控多实例,监控变化的数据(分区、网卡)。
自动发现(LLD)提供了一种在计算机上为不同实体自动创建监控项,触发器和图形的方法。例如,Zabbix可以在你的机器上自动开始监控文件系统或网络接口,而无需为每个文件系统或网络接口手动创建监控项。此外,可以配置Zabbix根据定期执行发现后的得到实际结果,来移除不需要的监控项。
在zabbix中,支持六种类型的发现项目:
系统文件的发现
网络接口的发现
CPU和CPU内核的发现
SNMP OID的发现
使用ODBC SQL查询的发现
Windows服务的发现
用户可以自己定义发现类型,只要它们遵循特定的JSON协议。
发现过程的一般架构如下。
首先,用户在"配置"→"模板"→"发现"列中创建一个发现规则。发现规则包括(1)发现必要实体(例如,文件系统或网络接口)的项目和(2)应该根据该项目的值创建的监控项,触发器和图形的原型
发现必要实体的项目就像其他地方所看到的常规项目:服务器向该项目的值询问Zabbix agent(或者该项目的任何类型的设置),agent以文本值进行响应。区别在于agent响应的值应该包含特定JSON格式的发现实体的列表。这种格式的自定义检查者发现的细节才是最重要的,因为返回值必须包含宏→值对。例如,项目"net.if.discovery"可能会返回两对键值:"{#IFNAME}"→"lo"和"{#IFNAME}"→"eth0"。
这些宏用于名称,键值和其他原型字段中,然后用接收到的值为每个发现的实体创建实际的监控项,触发器,图形甚至主机。
当服务器接收到发现项目的值时,它会查看宏→值对,每对都根据原型生成实际监控项,触发器和图形。在上面的"net.if.discovery"示例中,服务器将生成环路接口"lo"的一组监控项,触发器和图表,另一组用于界面"eth0"。
2、mysql多实例
2.1 什么是MySQL多实例
MySQL多实例就是在一台机器上开启多个不同的服务端口(如:3306,3307),运行多个MySQL服务进程,通过不同的socket监听不同的服务端口来提供各自的服务
2.2 MySQL多实例的特点
有效利用服务器资源,当单个服务器资源有剩余时,可以充分利用剩余的资源提供更多的服务
节约服务器资源
资源互相抢占问题,当某个服务实例服务并发很高时或者开启慢查询时,会消耗更多的内存、CPU、磁盘IO资源,导致服务器上的其他实例提供服务的质量下降
2.3 部署mysql多实例的两种方式
第一种是使用多个配置文件启动不同的进程来实现多实例,这种方式的优势逻辑简单,配置简单,缺点是管理起来不太方便
第二种是通过官方自带的mysqld_multi使用单独的配置文件来实现多实例,这种方式定制每个实例的配置不太方面,优点是管理起来很方便,集中管理
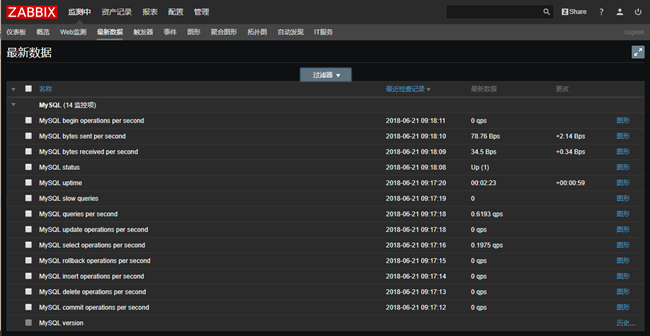
3、mysql单实例监控
即为主机链接mysql模板,进行监控,查看最新数据
4、开启mysql多实例
4.1 准备配置文件
[root@db01 ~]# cp /etc/my.cnf /etc/my3307.cnf
[root@db01 ~]# vim /etc/my3307.cnf
[mysqld]
datadir=/data/3307/
socket=/data/3307/mysql.sock
port=3307
user=mysql
symbolic-links=0
[mysqld_safe]
log-error=/data/3307/mysqld.log
pid-file=/data/3307/mysqld.pid
[root@db01 ~]# cp /etc/my3307.cnf /etc/my3308.cnf
[root@db01 ~]# sed -i 's#3307#3308#g' /etc/my3308.cnf
4.2 初始化数据库
初始化数据库3307
[root@db01 ~]# mysql_install_db --user=mysql --defaults-file=/etc/my3307.cnf
[root@db01 ~]# mysqld_safe --defaults-file=/etc/my3307.cnf &
初始化数据库3308
[root@db01 ~]# mysql_install_db --user=mysql --defaults-file=/etc/my3308.cnf
[root@db01 ~]# mysqld_safe --defaults-file=/etc/my3308.cnf &
4.3 检查多实例是否正常
[root@db01 ~]# netstat -lntup|grep mysqld
tcp 0 0 0.0.0.0:3306 0.0.0.0:* LISTEN 1648/mysqld
tcp 0 0 0.0.0.0:3307 0.0.0.0:* LISTEN 5434/mysqld
tcp 0 0 0.0.0.0:3308 0.0.0.0:* LISTEN 6021/mysqld
[root@db01 ~]# mkdir /data/3306
[root@db01 ~]# ln -s /var/lib/mysql/mysql.sock /data/3306/
检查
[root@db01 ~]# find /data -name "*.sock"
/data/3307/mysql.sock
/data/3308/mysql.sock
/data/3306/mysql.sock
[root@db01 ~]# chmod 755 /data/*
[root@db01 ~]# ll -d /data/*
drwxr-xr-x 2 root root 23 6月 21 09:58 /data/3306
drwxr-xr-x 5 mysql root 4096 6月 21 09:48 /data/3307
drwxr-xr-x 5 mysql root 4096 6月 21 09:53 /data/3308
[root@db01 ~]# netstat -lntp|awk -F "[ :]+" '/mysqld/{print$5}'
3306
3307
3308
5、编写脚本并测试
编写脚本获取多实例并输出为json格式
[root@db01 ~]# mkdir /etc/zabbix/scripts
[root@db01 ~]# cd /etc/zabbix/scripts
[root@db01 scripts]# vim discover.sh
#!/bin/bash
#mysql low-level discovery
res=`sudo netstat -lntp|awk -F "[ :\t]+" '/mysqld/{print$5}'`
port=($res)
printf '{'
printf '"data":['
for key in ${!port[@]}
do
if [[ "{#port[@]}" -gt 1 && "{#port[@]}" -gt 1 && "{key}" -ne "(((({#port[@]}-1))" ]];then
printf '{'
printf "\"{#MYSQLPORT}\":\"${port[${key}]}\"},"
else [[ "key"−eq"((key"−eq"(({#port[@]}-1))" ]]
printf '{'
printf "\"{#MYSQLPORT}\":\"${port[${key}]}\"}"
fi
done
printf ']'
printf '}\n'
脚本中需要为zabbix用户授权netstat的命令
方法一:
sed -i '98a zabbix\tALL=(ALL)\tNOPASSWD: /bin/netstat' /etc/sudoers
sed -i 's@^Defaults requiretty@#Defaults requiretty@g' /etc/sudoers
方法二:
去掉脚本的sudo,添加suid
usermod -s /bin/bash zabbix
chmod u+s /usr/bin/netstat
测试脚本
[root@db01 scripts]# sh discover.sh
{"data":[{"{#MYSQLPORT}":"3306"},{"{#MYSQLPORT}":"3307"},{"{#MYSQLPORT}":"3308"}]}
6、自定义key
[root@db01 ~]# cd /etc/zabbix/zabbix_agentd.d/
[root@db01 zabbix_agentd.d]# vim mysql.conf
UserParameter=mysql.discovery,sh /etc/zabbix/scripts/discover.sh
[root@db01 zabbix_agentd.d]# systemctl restart zabbix-agent.service
在server端命令行测试
[root@zabbix ~]# zabbix_get -s 192.168.1.51 -k mysql.discovery
{"data":[{"{#MYSQLPORT}":"3306"},{"{#MYSQLPORT}":"3307"},{"{#MYSQLPORT}":"3308"}]}
增加自定义key
[root@db01 zabbix_agentd.d]# vim mysql.conf
UserParameter=mysql.discovery,sh /etc/zabbix/scripts/discover.sh
UserParameter=mysql-status[*],echo "show global status where Variable_name='2′;"|mysql−S/data/2′;"|mysql−S/data/1/mysql.sock -N | awk '{print $$2}'
UserParameter=mysql-ping[*],mysqladmin -S /data/$1/mysql.sock ping | grep -c alive
UserParameter=mysql-version,mysql -V
[root@db01 zabbix_agentd.d]# systemctl restart zabbix-agent.service
在server端命令行进行测试
[root@zabbix ~]# zabbix_get -s 192.168.1.51 -k mysql-ping[3306]
1
[root@zabbix ~]# zabbix_get -s 192.168.1.51 -k mysql-ping[3307]
1
[root@zabbix ~]# zabbix_get -s 192.168.1.51 -k mysql-ping[3308]
1
7、server端web界面操作
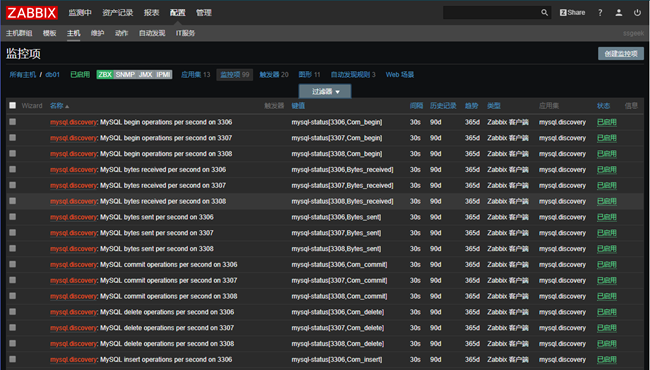
创建自动发现规则,添加监控项原型,触发器类型,图形原型,可以参照系统已有的规则进行创建
为了简化操作,直接导入做好的模板并为主机链接模板
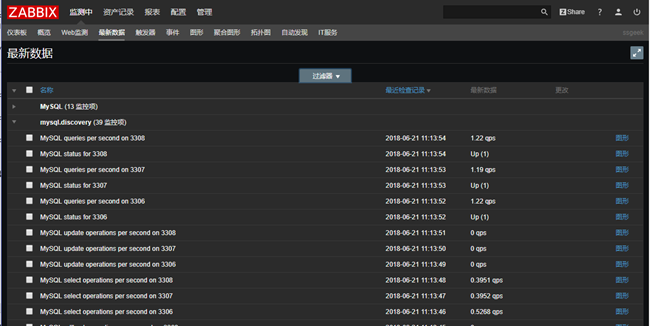
成功链接模板后查看最新数据
016-zabbix低级自动发现以及MySQL多实例的更多相关文章
- zabbix低级自动发现之mysql多实例
1.低级自动发现概述 zabbix的低级自动发现(LLD)适用于监控多实例,监控变化的数据(分区.网卡). 自动发现(LLD)提供了一种在计算机上为不同实体自动创建监控项,触发器和图形的方法.例如,Z ...
- Zabbix学习之路(九)之低级自动发现以及MySQL多实例
1.概述 Zabbix的网络发现是指zabbix server通过配置好的规则,自动添加host,group,template Zabbix的主动注册刚好和网络发现是相反的,功能基本一致.zabbix ...
- Zabbix低级主动发现之MySQL多实例
接上篇:Zabbix自动发现与主动注册 在一个agent安装一个maraidb 拷贝一个原始配置文档并且修改配置用于开启多实例 按照配置文件初始化数据库 mysql_install_db --user ...
- Zabbix--06主动模式和被动模式、低级自动发现、性能优化、
目录 一. Zabbix主动模式和被动模式 1.克隆模版 2.修改克隆后的模版为主动模式 3.修改监控主机关联的模版为主动模式 4.修改客户端配置文件并重启 5.查看最新数据 二.Zabbix低级自动 ...
- zabbix自动发现监控mysql
一. 数据库给只读权限 1.1 grant usage on *.* to 'zabbix'@'127.0.0.1' identified by 'zabbix'; flush privileges; ...
- 【Zabbix】Zabbix Server自动发现
Zabbix自动发现 由于有上百台的虚拟机需要监控,如果一个个去添加配置,费时费力.Zabbix的自动发现,可以自动发现需要监控的机器,监控相应指标. 前置条件 安装部署好Zabbix Server. ...
- zabbix使用自动发现监控esxi的磁盘存储storage
zabbix使用自动发现监控esxi的磁盘存储storage 在任意一台可以访问vcenter的zabbix-agent服务器上添加exsi的磁盘监控模板即可 创建模板过程: custom.esxi. ...
- zabbix的自动发现、自定义添加监控项目、配置邮件告警
1.zabbix的自动发现这里的自动发现,所显示出来的是规则的上自动了现 然后 可以对其内容进行相关的配制,如时间或周期 注意:对于单个主机的规则,可以自行添加或删除, 但对于已经添加好了的规则,若需 ...
- 01 - zabbix | LLD自动发现
01 - zabbix | LLD自动发现 1. 原理 zabbix支持设置变量,用{#VAR_NAME}来表示.然后有一些系统保留的变量 2. 设置 2.1 交换机电源自动发现 名字写好后进进入 ...
随机推荐
- EMQ插件组合实现物联网边缘平台的设备通信管理
上一篇随笔我简单的记录了我对EMQ插件开发的了解过程,最后发现还是可以组合复用已有插件,因此这篇随笔用于记录使用的情况以及是否达到预期. 首先测试mysql认证插件的使用方式: emqx_auth_m ...
- 请描述一下 BroadcastReceiver?
BroadCastReceiver 是 Android 四大组件之一,主要用于接收系统或者 app 发送的广播事件. 广播分两种:有序广播和无序广播. 内部通信实现机制:通过 Android 系统的 ...
- Radio 单选框
Radio 单选框 在一组备选项中进行单选 ¶基础用法 由于选项默认可见,不宜过多,若选项过多,建议使用 Select 选择器. 要使用 Radio 组件,只需要设置v-model绑定变量,选中意味着 ...
- Git中.gitignore忽略文件(maven项目)
使用情景: 有些时候,你必须把某些文件放到Git工作目录中,但又不能提交它们 解决方案: 在Git工作区的根目录下创建一个特殊的.gitignore文件,然后把要忽略的文件名填进去,Git就会自动忽略 ...
- 什么是lambda?有什么好处
lambda 函数是一个可以接收任意多个参数(包括可选参数)并且返回单个表达式值的函数 1.lambda 函数比较轻便,即用即仍,很适合需要完成一项功能,但是此功能只在此一处使用,连名字都很随意的情况 ...
- 在IOS系统中微信浏览器input输入框输入值无效
[contenteditable="true"], input, textarea { -webkit-user-select: auto!important; -khtml-us ...
- P4878 [USACO05DEC] 布局
题面lalala 这居然是个紫题???原谅我觉得这题是模板... 这个这个,这题的算法呢其实是一个叫差分约束的东西,也是今天下午我们机房的重点,如果不知道这个差分约束是个啥的人呢,自行百度一下谢谢.. ...
- XSS跨站简析
XSS跨站脚本原理 当应用程序发送给浏览器的页面中包含用户提交的数据,但没有经过适当验证或转义时,就会导致跨站脚本漏洞 这个“跨”实际上属于浏览器的特性,而不是缺陷 (参考:浏览器同源策略) 不去直接 ...
- 开启sentry权限控制hue
参考: cloudera官方授权:包括webui, ldap,sentry https://www.cloudera.com/documentation/enterprise/6/6.2/topics ...
- spring配置添加多个事务(转)
大多数项目只需要一个事务管理器.然而,有些项目为了提高效率.或者有多个完全不同又不相干的数据源,最好用多个事务管理器.机智的Spring的Transactional管理已经考虑到了这一点,首先分别定义 ...