
(转载)spring mvc DispatcherServlet详解之一---处理请求深入解析
要深入理解spring mvc的工作流程,就需要先了解spring mvc的架构:
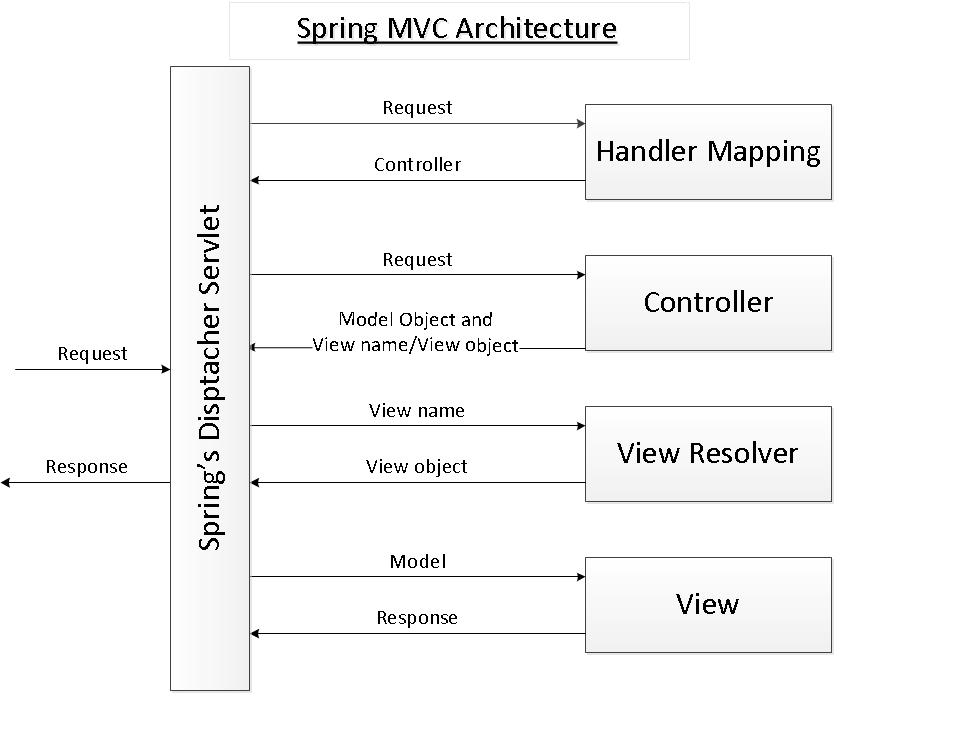
从上图可以看到 前端控制器DispatcherServlet在其中起着主导作用,理解了DispatcherServlet 就完全可以说弄清楚了spring mvc。
为了加深对spring mvc的整个工作流程的理解,本文从分析DispatcherServlet的工作过程来一窥spring mvc的整个面貌。
1. 初始化
protected void initStrategies(ApplicationContext context) {

initMultipartResolver(context); //文件上传解析,如果请求类型是multipart将通过MultipartResolver进行文件上传解析;

initLocaleResolver(context); //本地化解析

initThemeResolver(context);   //主题解析

initHandlerMappings(context); //通过HandlerMapping,将请求映射到处理器

initHandlerAdapters(context); //通过HandlerAdapter支持多种类型的处理器

initHandlerExceptionResolvers(context); //如果执行过程中遇到异常将交给HandlerExceptionResolver来解析

initRequestToViewNameTranslator(context); //直接解析请求到视图名

initViewResolvers(context); //通过ViewResolver解析逻辑视图名到具体视图实现

initFlashMapManager(context); //flash映射管理器

}
单个resolver
initMultipartResolver,initLocaleResolver,initThemeResolver,initRequestToViewNameTranslator,initFlashMapManager 这五个初始化方法流程相同,都是使用
context.getBean(String name, Class<FlashMapManager> requiredType)的方式获取到相应的Resolver。以initMultipartResolver为例,见如下:

    /**

     * Initialize the MultipartResolver used by this class.

     * <p>If no bean is defined with the given name in the BeanFactory for this namespace,

     * no multipart handling is provided.

     */

    private void initMultipartResolver(ApplicationContext context) {

        try {

            this.multipartResolver = context.getBean(MULTIPART_RESOLVER_BEAN_NAME, MultipartResolver.class);

            if (logger.isDebugEnabled()) {

                logger.debug("Using MultipartResolver [" + this.multipartResolver + "]");

            }

        }

        catch (NoSuchBeanDefinitionException ex) {

            // Default is no multipart resolver.

            this.multipartResolver = null;

            if (logger.isDebugEnabled()) {

                logger.debug("Unable to locate MultipartResolver with name '" + MULTIPART_RESOLVER_BEAN_NAME +

                        "': no multipart request handling provided");

            }

        }

    }
多个resolver
initHandlerMappings,initHandlerAdapters,initHandlerExceptionResolvers,initViewResolvers 获取方式相同,使用:
BeanFactoryUtils.beansOfTypeIncludingAncestors(ListableBeanFactory lbf, Class<HandlerMapping> type, boolean includeNonSingletons, boolean allowEagerInit)
的方式获取到相应的Resolver。以initHandlerMappings为例,见如下:
/**

     * Initialize the HandlerMappings used by this class.

     * <p>If no HandlerMapping beans are defined in the BeanFactory for this namespace,

     * we default to BeanNameUrlHandlerMapping.

     */

    private void initHandlerMappings(ApplicationContext context) {

        this.handlerMappings = null;

        if (this.detectAllHandlerMappings) {

            // Find all HandlerMappings in the ApplicationContext, including ancestor contexts.

            Map<String, HandlerMapping> matchingBeans =

                    BeanFactoryUtils.beansOfTypeIncludingAncestors(context, HandlerMapping.class, true, false);

            if (!matchingBeans.isEmpty()) {

                this.handlerMappings = new ArrayList<HandlerMapping>(matchingBeans.values());

                // We keep HandlerMappings in sorted order.

                OrderComparator.sort(this.handlerMappings);

            }

        }

        else {

            try {

                HandlerMapping hm = context.getBean(HANDLER_MAPPING_BEAN_NAME, HandlerMapping.class);

                this.handlerMappings = Collections.singletonList(hm);

            }

            catch (NoSuchBeanDefinitionException ex) {

                // Ignore, we'll add a default HandlerMapping later.

            }

        }

        // Ensure we have at least one HandlerMapping, by registering

        // a default HandlerMapping if no other mappings are found.

        if (this.handlerMappings == null) {

            this.handlerMappings = getDefaultStrategies(context, HandlerMapping.class);

            if (logger.isDebugEnabled()) {

                logger.debug("No HandlerMappings found in servlet '" + getServletName() + "': using default");

            }

        }

    }
那么深入看一下BeanFactoryUtils.beansOfTypeIncludingAncestors 究竟做了什么?返回指定类型和子类型的所有bean,若该bean factory 是一个继承类型的beanFactory,这个方法也会获取祖宗factory中定义的指定类型的bean。
/**

     * Return all beans of the given type or subtypes, also picking up beans defined in

     * ancestor bean factories if the current bean factory is a HierarchicalBeanFactory.

     * The returned Map will only contain beans of this type.

     * <p>Does consider objects created by FactoryBeans if the "allowEagerInit" flag is set,

     * which means that FactoryBeans will get initialized. If the object created by the

     * FactoryBean doesn't match, the raw FactoryBean itself will be matched against the

     * type. If "allowEagerInit" is not set, only raw FactoryBeans will be checked

     * (which doesn't require initialization of each FactoryBean).

     * <p><b>Note: Beans of the same name will take precedence at the 'lowest' factory level,

     * i.e. such beans will be returned from the lowest factory that they are being found in,

     * hiding corresponding beans in ancestor factories.</b> This feature allows for

     * 'replacing' beans by explicitly choosing the same bean name in a child factory;

     * the bean in the ancestor factory won't be visible then, not even for by-type lookups.

     * @param lbf the bean factory

     * @param type type of bean to match

     * @param includeNonSingletons whether to include prototype or scoped beans too

     * or just singletons (also applies to FactoryBeans)

     * @param allowEagerInit whether to initialize <i>lazy-init singletons</i> and

     * <i>objects created by FactoryBeans</i> (or by factory methods with a

     * "factory-bean" reference) for the type check. Note that FactoryBeans need to be

     * eagerly initialized to determine their type: So be aware that passing in "true"

     * for this flag will initialize FactoryBeans and "factory-bean" references.

     * @return the Map of matching bean instances, or an empty Map if none

     * @throws BeansException if a bean could not be created

     */

    public static <T> Map<String, T> beansOfTypeIncludingAncestors(

            ListableBeanFactory lbf, Class<T> type, boolean includeNonSingletons, boolean allowEagerInit)

            throws BeansException {

        Assert.notNull(lbf, "ListableBeanFactory must not be null");

        Map<String, T> result = new LinkedHashMap<String, T>(4);

        result.putAll(lbf.getBeansOfType(type, includeNonSingletons, allowEagerInit));

        if (lbf instanceof HierarchicalBeanFactory) {

            HierarchicalBeanFactory hbf = (HierarchicalBeanFactory) lbf;

            if (hbf.getParentBeanFactory() instanceof ListableBeanFactory) {

                Map<String, T> parentResult = beansOfTypeIncludingAncestors(

                        (ListableBeanFactory) hbf.getParentBeanFactory(), type, includeNonSingletons, allowEagerInit);

                for (Map.Entry<String, T> entry : parentResult.entrySet()) {

                    String beanName = entry.getKey();

                    if (!result.containsKey(beanName) && !hbf.containsLocalBean(beanName)) {

                        result.put(beanName, entry.getValue());

                    }

                }

            }

        }

        return result;

    }
2. 提供服务
我们来看看这个servlet是如何提供服务的?
    @Override

    protected void doService(HttpServletRequest request, HttpServletResponse response) throws Exception {

        if (logger.isDebugEnabled()) {

            String resumed = WebAsyncUtils.getAsyncManager(request).hasConcurrentResult() ? " resumed" : "";

            logger.debug("DispatcherServlet with name '" + getServletName() + "'" + resumed +

                    " processing " + request.getMethod() + " request for [" + getRequestUri(request) + "]");

        }

        // Keep a snapshot of the request attributes in case of an include,

        // to be able to restore the original attributes after the include.

        Map<String, Object> attributesSnapshot = null;

        if (WebUtils.isIncludeRequest(request)) {

            attributesSnapshot = new HashMap<String, Object>();

            Enumeration<?> attrNames = request.getAttributeNames();

            while (attrNames.hasMoreElements()) {

                String attrName = (String) attrNames.nextElement();

                if (this.cleanupAfterInclude || attrName.startsWith("org.springframework.web.servlet")) {

                    attributesSnapshot.put(attrName, request.getAttribute(attrName));

                }

            }

        }

        // Make framework objects available to handlers and view objects.

        request.setAttribute(WEB_APPLICATION_CONTEXT_ATTRIBUTE, getWebApplicationContext());

        request.setAttribute(LOCALE_RESOLVER_ATTRIBUTE, this.localeResolver);

        request.setAttribute(THEME_RESOLVER_ATTRIBUTE, this.themeResolver);

        request.setAttribute(THEME_SOURCE_ATTRIBUTE, getThemeSource());

        FlashMap inputFlashMap = this.flashMapManager.retrieveAndUpdate(request, response);

        if (inputFlashMap != null) {

            request.setAttribute(INPUT_FLASH_MAP_ATTRIBUTE, Collections.unmodifiableMap(inputFlashMap));

        }

        request.setAttribute(OUTPUT_FLASH_MAP_ATTRIBUTE, new FlashMap());

        request.setAttribute(FLASH_MAP_MANAGER_ATTRIBUTE, this.flashMapManager);

        try {

            doDispatch(request, response);

        }

        finally {

            if (WebAsyncUtils.getAsyncManager(request).isConcurrentHandlingStarted()) {

                return;

            }

            // Restore the original attribute snapshot, in case of an include.

            if (attributesSnapshot != null) {

                restoreAttributesAfterInclude(request, attributesSnapshot);

            }

        }

    }
从上面我们可以看到,提供服务只要分4步:
1. 保存现场。保存request 熟悉的快照,以便能在必要时恢复。
2. 将框架需要的对象放入request中,以便view和handler使用。
3. 请求分发服务.
4. 恢复现场。
其中最重要的是请求分发服务:
    /**

     * Process the actual dispatching to the handler.

     * <p>The handler will be obtained by applying the servlet's HandlerMappings in order.

     * The HandlerAdapter will be obtained by querying the servlet's installed HandlerAdapters

     * to find the first that supports the handler class.

     * <p>All HTTP methods are handled by this method. It's up to HandlerAdapters or handlers

     * themselves to decide which methods are acceptable.

     * @param request current HTTP request

     * @param response current HTTP response

     * @throws Exception in case of any kind of processing failure

     */

    protected void doDispatch(HttpServletRequest request, HttpServletResponse response) throws Exception {

        HttpServletRequest processedRequest = request;

        HandlerExecutionChain mappedHandler = null;

        boolean multipartRequestParsed = false;

        WebAsyncManager asyncManager = WebAsyncUtils.getAsyncManager(request);

        try {

            ModelAndView mv = null;

            Exception dispatchException = null;

            try {

                processedRequest = checkMultipart(request);

                multipartRequestParsed = (processedRequest != request);

                // Determine handler for the current request.

                mappedHandler = getHandler(processedRequest);

                if (mappedHandler == null || mappedHandler.getHandler() == null) {

                    noHandlerFound(processedRequest, response);

                    return;

                }

                // Determine handler adapter for the current request.

                HandlerAdapter ha = getHandlerAdapter(mappedHandler.getHandler());

                // Process last-modified header, if supported by the handler.

                String method = request.getMethod();

                boolean isGet = "GET".equals(method);

                if (isGet || "HEAD".equals(method)) {

                    long lastModified = ha.getLastModified(request, mappedHandler.getHandler());

                    if (logger.isDebugEnabled()) {

                        logger.debug("Last-Modified value for [" + getRequestUri(request) + "] is: " + lastModified);

                    }

                    if (new ServletWebRequest(request, response).checkNotModified(lastModified) && isGet) {

                        return;

                    }

                }

                if (!mappedHandler.applyPreHandle(processedRequest, response)) {

                    return;

                }

                try {

                    // Actually invoke the handler.

                    mv = ha.handle(processedRequest, response, mappedHandler.getHandler());

                }

                finally {

                    if (asyncManager.isConcurrentHandlingStarted()) {

                        return;

                    }

                }

                applyDefaultViewName(request, mv);

                mappedHandler.applyPostHandle(processedRequest, response, mv);

            }

            catch (Exception ex) {

                dispatchException = ex;

            }

            processDispatchResult(processedRequest, response, mappedHandler, mv, dispatchException);

        }

        catch (Exception ex) {

            triggerAfterCompletion(processedRequest, response, mappedHandler, ex);

        }

        catch (Error err) {

            triggerAfterCompletionWithError(processedRequest, response, mappedHandler, err);

        }

        finally {

            if (asyncManager.isConcurrentHandlingStarted()) {

                // Instead of postHandle and afterCompletion

                mappedHandler.applyAfterConcurrentHandlingStarted(processedRequest, response);

                return;

            }

            // Clean up any resources used by a multipart request.

            if (multipartRequestParsed) {

                cleanupMultipart(processedRequest);

            }

        }

    }
分发过程如下:
1. 判断是否设置了multipart resolver,设置的话转换为multipart request,没有的话则继续下面的步骤。
2. 根据当前request,获取hangdler。
3. 根据当前request,获取HandlerAdapter。
4. 如果支持http请求头,处理 last-modified header请求头。
5. 应用已注册interceptor的preHandle方法
6. HandlerAdapter处理请求。
7. 设置默认视图。
8. 应用已注册interceptor的postHandle方法。
9. 处理异常或者视图渲染。
小结:
DispatherServlet整个过程的细节一章之内很难描述的面面俱到,只能分析部分流程,想了解更具体的实现需要从源代码中去寻找。
原文地址:
(转载)spring mvc DispatcherServlet详解之一---处理请求深入解析的更多相关文章
- spring mvc DispatcherServlet详解之一---处理请求深入解析
要深入理解spring mvc的工作流程,就需要先了解spring mvc的架构: 从上图可以看到 前端控制器DispatcherServlet在其中起着主导作用,理解了DispatcherServl ...
- spring mvc DispatcherServlet详解之一---处理请求深入解析(续)
上文中,我们知道分发过程有以下步骤: 分发过程如下: 1. 判断是否设置了multipart resolver,设置的话转换为multipart request,没有的话则继续下面的步骤. 2. 根据 ...
- spring mvc DispatcherServlet详解之前传---FrameworkServlet
做项目时碰到Controller不能使用aop进行拦截,从网上搜索得知:使用spring mvc 启动了两个context:applicationContext 和WebapplicationCont ...
- spring mvc DispatcherServlet详解之三---request通过ModelAndView中获取View实例的过程
整个spring mvc的架构如下图所示: 上篇文件讲解了DispatcherServlet第二步:通过request从Controller获取ModelAndView.现在来讲解第三步:reques ...
- spring mvc DispatcherServlet详解之二---request通过Controller获取ModelAndView过程
整个spring mvc的架构如下图所示: 上篇文件讲解了DispatcherServlet通过request获取控制器Controller的过程,现在来讲解DispatcherServletDisp ...
- spring mvc DispatcherServlet详解之一--request通过HandlerMaping获取控制器Controller过程
整个spring mvc的架构如下图所示: 现在来讲解DispatcherServletDispatcherServlet的第一步:获取控制器. HandlerMapping HandlerMappi ...
- spring mvc DispatcherServlet详解之四---视图渲染过程
整个spring mvc的架构如下图所示: 现在来讲解DispatcherServletDispatcherServlet的最后一步:视图渲染.视图渲染的过程是在获取到ModelAndView后的过程 ...
- spring mvc DispatcherServlet详解之interceptor和filter的区别
首先我们看一下spring mvc Interceptor的功能及实现: http://wenku.baidu.com/link?url=Mw3GaUhCRMhUFjU8iIDhObQpDcbmmRy ...
- spring mvc DispatcherServlet详解之前传---前端控制器架构
前端控制器是整个MVC框架中最为核心的一块,它主要用来拦截符合要求的外部请求,并把请求分发到不同的控制器去处理,根据控制器处理后的结果,生成相应的响应发送到客户端.前端控制器既可以使用Filter实现 ...
随机推荐
- jq点击显示,再点击隐藏
每次都会遇到的问题: <script> $("button").click(function(){ if($(".div").css("d ...
- php调试
转自:http://www.cnblogs.com/gidot/p/4307709.html
- JavaScript 富文本编辑器
WEB项目中使用UEditor(富文本编辑器) UEditor - 完整示例 http://ueditor.baidu.com/website/onlinedemo.html UEditor注意事项: ...
- WebForm控件Repeater
我们会发现用拼接字符串来显示一个查询非常的麻烦,有一个控件Repeater帮助你,省去写Foreach LinQ to SQL类 函数类: using System; using System.Col ...
- [开源]用MQL4实现MD5加密
本文转载自博客园:混沌的世界 原文地址:http://www.cnblogs.com/niniwzw/archive/2009/12/05/1617685.html 在用MQL4进行金融交易的时候,经 ...
- React的双向绑定
以前对于双向绑定概念来自于Angular.js,现在我用我感兴趣的react.js来实现这样的方式.有2种方式分析,1:不用插件,2:用插件 (引入react.js操作省略...) 不用插件: 先创建 ...
- Spring任务调度之Quartz
一.Quartz作业类的继承方式来讲,可以分为两类: 作业类需要继承自特定的作业类基类,如Quartz中需要继承自org.springframework.scheduling.quartz.Quart ...
- 咪咕视讯与美国AR公司ODG达成战略合作,联合打造尖端产品
昨日,中国移动下属生态公司咪咕视讯科技有限公司(简称咪咕视讯)与美国AR公司Osterhout Design Group (ODG)达成战略合作.本次合作将充分发挥ODG的先进技术优势,与咪咕视讯共同 ...
- gong server
宫 server mac os 系统 vpn 202.39.176.66 funmobigtmvpn 密码 funmobi!@ 安装 eclipse 安装mysql 1 配置 ...
- ps 文字处理篇
ps文字处理篇 1.对文字镂空处理并且移除到新图像上: 首先创建图层-文字编辑-横排编辑 其次 魔棒工具选择通过颜色来选择选区 右击图层-栅格化图层 删除键将选择的颜色删除留下选区- 复制粘贴到另一个 ...