
使用Spring框架入门四:基于注解的方式的AOP的使用
一、简述
前面讲了基于XML配置的方式实现AOP,本文简单讲讲基于注解的方式实现。
基于注解的方式实现前,要先在xml配置中通过配置aop:aspectj-autoproxy来启用注解方式注入。
<?xml version="1.0" encoding="UTF-8"?>

<beans xmlns="http://www.springframework.org/schema/beans"

       xmlns:xsi="http://www.w3.org/2001/XMLSchema-instance"

       xmlns:aop="http://www.springframework.org/schema/aop"

       xsi:schemaLocation="

       http://www.springframework.org/schema/beans

       http://www.springframework.org/schema/beans/spring-beans-2.5.xsd

       http://www.springframework.org/schema/aop

       http://www.springframework.org/schema/aop/spring-aop-2.5.xsd">

        <aop:aspectj-autoproxy/>

/>
当然,这一步也可以通过注解来实现,来看代码吧。
二、步骤
1、引入依赖
和前面讲的一样,先引入Spring-Aop和AspectJ的依赖
        <!--测试1使用-->

        <dependency>

            <groupId>org.springframework</groupId>

            <artifactId>spring-context</artifactId>

            <version>5.0.5.RELEASE</version>

        </dependency>

        <!--测试2、3、4、5、6使用-->

        <dependency>

            <groupId>org.springframework</groupId>

            <artifactId>spring-aop</artifactId>

            <version>5.0.5.RELEASE</version>

        </dependency>

        <!--测试Aop使用-->

        <!-- https://mvnrepository.com/artifact/org.aspectj/aspectjweaver -->

        <dependency>

            <groupId>org.aspectj</groupId>

            <artifactId>aspectjweaver</artifactId>

            <version>1.9.1</version>

        </dependency>
2、在/src/test/java/aoptest2下建立下列类:
package aoptest2;

import org.aspectj.lang.annotation.Pointcut;

import org.springframework.context.annotation.ComponentScan;

import org.springframework.context.annotation.EnableAspectJAutoProxy;

import org.springframework.stereotype.Component;

@Component

public class MyTeacher {

   public void aopPointMethod1() {

        System.out.println("this is aopPointMethod1 executed.");

    }

}
package aoptest2;

import org.aspectj.lang.ProceedingJoinPoint;

import org.aspectj.lang.annotation.*;

import org.springframework.stereotype.Component;

@Aspect

@Component@EnableAspectJAutoProxy //需要启用注解方式的AOP

public class MyTeacherExtension {

    @Before("execution(* aoptest2.MyTeacher.aopPointMethod1(..))")

    public void aopInspectAtBefore() {

        System.out.println("this is aopInspectAtBefore method execute.");

    }

    @AfterReturning("execution(* aoptest2.MyTeacher.aopPointMethod1(..))")public void aopInspectAtAfterReturing() {

        System.out.println("this is aopInspectAtAfterReturing method execute.");

    }

    @After("execution(* aoptest2.MyTeacher.aopPointMethod1(..))")public void aopInspectAtAfter() {

        System.out.println("this is aopInspectAtAfter method execute.");

    }

    @Around("execution(* aoptest2.MyTeacher.aopPointMethod1(..))")public void aopAround(ProceedingJoinPoint proceedingJoinPoint) {

        try {

            System.out.println("aopAround1");

            Object obj = proceedingJoinPoint.proceed();

            System.out.println("aopAround2");

        } catch (Throwable throwable) {

            throwable.printStackTrace();

        }

    }

}
3、添加一个测试类:
import org.junit.Test;

import org.springframework.context.ApplicationContext;

import org.springframework.context.annotation.AnnotationConfigApplicationContext;

import org.springframework.context.support.ClassPathXmlApplicationContext;

public class AopTest {

      @Test

    public void aopTest2() {

        ApplicationContext context = new AnnotationConfigApplicationContext("aoptest2");

        aoptest2.MyTeacher mywoker = context.getBean(aoptest2.MyTeacher.class);

        mywoker.aopPointMethod1();

    }

}
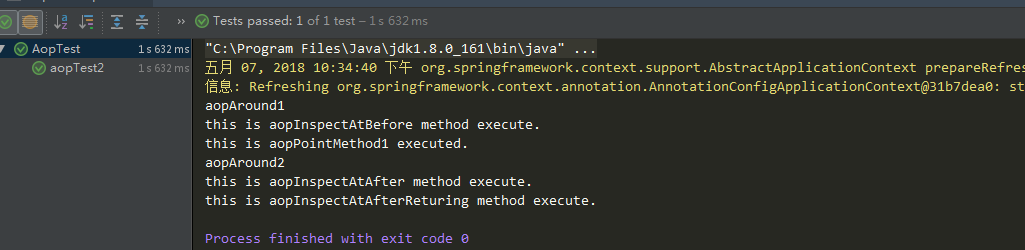
4、运行测试
aopAround1

this is aopInspectAtBefore method execute.

this is aopPointMethod1 executed.

aopAround2

this is aopInspectAtAfter method execute.

this is aopInspectAtAfterReturing method execute.
使用Spring框架入门四:基于注解的方式的AOP的使用的更多相关文章
- Spring框架入门之基于Java注解配置bean
Spring框架入门之基于Java注解配置bean 一.Spring bean配置常用的注解 常用的有四个注解 Controller: 用于控制器的注解 Service : 用于service的注解 ...
- Spring框架入门之基于xml文件配置bean详解
关于Spring中基于xml文件配置bean的详细总结(spring 4.1.0) 一.Spring中的依赖注入方式介绍 依赖注入有三种方式 属性注入 构造方法注入 工厂方法注入(很少使用,不推荐,本 ...
- [原创]java WEB学习笔记103:Spring学习---Spring Bean配置:基于注解的方式(基于注解配置bean,基于注解来装配bean的属性)
本博客的目的:①总结自己的学习过程,相当于学习笔记 ②将自己的经验分享给大家,相互学习,互相交流,不可商用 内容难免出现问题,欢迎指正,交流,探讨,可以留言,也可以通过以下方式联系. 本人互联网技术爱 ...
- Spring的事务控制-基于注解的方式
模拟转账操作,即Jone减少500,tom增加500 如果有疑问请访问spring事务控制-基于xml方式 1.创建数据表 2.创建Account实体类 public class Account { ...
- Spring框架学习07——基于传统代理类的AOP实现
在Spring中默认使用JDK动态代理实现AOP编程,使用org.springframework.aop.framework.ProxyFactoryBean创建代理是Spring AOP 实现的最基 ...
- Spring Boot入门(四):开发Web Api接口常用注解总结
本系列博客记录自己学习Spring Boot的历程,如帮助到你,不胜荣幸,如有错误,欢迎指正! 在程序员的日常工作中,Web开发应该是占比很重的一部分,至少我工作以来,开发的系统基本都是Web端访问的 ...
- 【原创】NIO框架入门(四):Android与MINA2、Netty4的跨平台UDP双向通信实战
概述 本文演示的是一个Android客户端程序,通过UDP协议与两个典型的NIO框架服务端,实现跨平台双向通信的完整Demo. 当前由于NIO框架的流行,使得开发大并发.高性能的互联网服务端成为可能. ...
- Java - Struts框架教程 Hibernate框架教程 Spring框架入门教程(新版) sping mvc spring boot spring cloud Mybatis
https://www.zhihu.com/question/21142149 http://how2j.cn/k/hibernate/hibernate-tutorial/31.html?tid=6 ...
- Mybatis框架基于注解的方式,实对数据现增删改查
编写Mybatis代码,与spring不一样,不需要导入插件,只需导入架包即可: 在lib下 导入mybatis架包:mybatis-3.1.1.jarmysql驱动架包:mysql-connecto ...
随机推荐
- C#输出到Release VS中Release模式下生成去掉生成pdb文件
Release 与 Debug 的区别就不多说了, 简单来说 Release 优化过, 性能高一些. Debug 为方便调试. 默认情况下是 Debug, 那如何改成 Release 呢? 项目上右键 ...
- 【docker】docker的简单状态监控
命令: docker stats 可以使用占位符,显示想要看的信息: docker stats --format "table {{.Container}}\t{{.CPUPerc}}\t{ ...
- c++中 extern
用例子给你示范 // 1.cpp int x = 10; // 2.cpp 注意没有包含1.cpp #include <iostream> using namespace std; ext ...
- 疑犯追踪第一季/全集Person Of Interest迅雷下载
本季Person of Interest Season 1 第一季(2011)看点:如今,<疑犯追踪>正在纽约热拍,在11月1日的片场,刚刚完成了一场爆炸的戏.另外,<探索者传说第一 ...
- [Web 前端] React Js img 图片显示默认 占位符
cp from : https://blog.csdn.net/wyk304443164/article/details/77093339 没有考虑到兼容性,因为我们暂时只适配了webkit. 也没有 ...
- MySQL中的IFNULL,IF,NULLIF函数
MySQL中的IFNULL函数和IF函数 MySQL中的IFNULL函数类似于Oracle中的NVL函数,其表达式为:IFNULL(expr1,expr2),含义是:如果第一个参数不为空,则返回第一个 ...
- 用make编译openCV报错:ts_gtest.cpp:(.text._ZN7testing8internal2RED2Ev+0xf): undefined reference to 'regfreeA'
解决方案: the cause is the google tests is looking for the generic regex.h but cmake used the regex.h fr ...
- Verilog 加法器和减法器(5)
前面二进制加法运算,我们并没有提操作数是有符号数,还是无符号数.其实前面的二进制加法对于有符号数和无符号数都成立.比如前面的8位二进制加法运算,第一张图我们选radix是unsigned,表示无符号加 ...
- 阿里NLP总监分享-NLP技术的应用与思考
https://yq.aliyun.com/articles/78031 NLP技术的应用及思考
- 鼠标悬浮在img上让图片变大
样式: <style type="text/css"> img:hover{ transform:scale(1.02,1.02)}</style& ...