Angular6封装LED时钟数字组件
一、运行截图
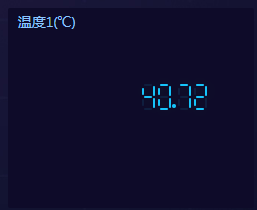
截图1:
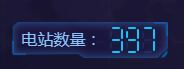
截图2:
二、代码
html代码:
 <div class="time" >

   <ng-container #container>

   </ng-container>

 </div>

 <ng-template #child_elem>

   <div class="digit minutes">

     <div class="segment "></div>

     <div class="segment "></div>

     <div class="segment "></div>

     <div class="segment "></div>

     <div class="segment "></div>

     <div class="segment "></div>

     <div class="segment "></div>

   </div>

 </ng-template>

 <ng-template #point_elem>

   <div class="separator minutes"></div>

 </ng-template>
css代码:
 .time {

     height: 40px;

     position: absolute;

     top:;

     left: 28%;

     width: 100px;

     margin-left: 0px;

     text-align: center;

     z-index:;

     margin-top: -7px;

   }

   .time .digit {

     width: 16px;

     height: 44px;

     position: relative;

     display: inline-block;

     margin-top: 2px;

   }

   .digit .segment {

     background:#11c4fb;

     border-radius:2px;

     position:absolute;

     opacity:0.1;

     transition:opacity 0.2s;

     -webkit-transition:opacity 0.2s;

     -ms-transition:opacity 0.2s;

     -moz-transition:opacity 0.2s;

     -o-transition:opacity 0.2s;

   }

   .digit .segment.on, .separator {

     opacity:;

     background:#11c4fb;

     box-shadow:0 0 30px rgba(0,255,0,0.1);

     transition:opacity 0s;

     -webkit-transition:opacity 0s;

     -ms-transition:opacity 0s;

     -moz-transition:opacity 0s;

     -o-transition:opacity 0s;

   }

   .time .separator {

     width: 4px;

     height: 4px;

     background: #11c4fb;

     border-radius: 50%;

     display: inline-block;

     position: relative;

     bottom: 10px;

   }

   .digit .segment:nth-child(1) {

     top: 10px;

     left: 4px;

     right: 4px;

     height: 2px;

     background: #11c4fb;

   }

   .digit .segment:nth-child(2) {

     top: 12px;

     right: 1px;

     width: 2px;

     height: 75px;

     height: calc(71% - 21px);

     background: #11c4fb;

   }

   .digit .segment:nth-child(3) {

     bottom: 10px;

     right: 1px;

     width: 2px;

     height: 72px;

     height: calc(71% - 21px);

     background: #11c4fb;

   }

   .digit .segment:nth-child(4) {

     bottom: 8px;

     right: 4px;

     height: 2px;

     left: 4px;

     background: #11c4fb;

   }

   .digit .segment:nth-child(5) {

     bottom: 12px;

     left: 2px;

     width: 2px;

     height: 75px;

     height: calc(70% - 24px);

     background: #11c4fb;

   }

   .digit .segment:nth-child(6) {

     top: 14px;

     left: 2px;

     width: 2px;

     height: 75px;

     height: calc(70% - 24px);

     background: #11c4fb;

   }

   .digit .segment:nth-child(7) {

     bottom: 95px;

     bottom: calc(71% - 11px);

     right: 4px;

     left: 4px;

     height: 2px;

     background: #11c4fb;

   }
ts代码:
 import { Component, OnInit, Input, ViewChild, ViewContainerRef, TemplateRef, ElementRef, QueryList, SimpleChanges } from '@angular/core';

 @Component({

   selector: 'app-led-clockfont',

   templateUrl: './led-clockfont.component.html',

   styleUrls: ['./led-clockfont.component.css']

 })

 export class LedClockfontComponent implements OnInit {

   @ViewChild("container", {read: ViewContainerRef}) container_elem: ViewContainerRef;

   @ViewChild("child_elem") tpl_elem: TemplateRef<any>;

   @ViewChild("point_elem") tpl_point_elem: TemplateRef<any>;

   @Input() fontValue:number = 0;

   //数值模型数组,0,1,2,3,4,5,6,7,8,9

   private digitSegments = [

       [1, 2, 3, 4, 5, 6],

       [2, 3],

       [1, 2, 7, 5, 4],

       [1, 2, 7, 3, 4],

       [6, 7, 2, 3],

       [1, 6, 7, 3, 4],

       [1, 6, 5, 4, 3, 7],

       [1, 2, 3],

       [1, 2, 3, 4, 5, 6, 7],

       [1, 2, 7, 3, 6, 4]

   ]

   constructor(private el:ElementRef) {

    }

   ngOnInit() {

   }

   ngOnChanges(changes: SimpleChanges): void {

     if(parseFloat(this.fontValue.toString())){

       this.createDomContainer();

     }else{

       //Do-nothing

     }

     // this.createDomContainer();

   }

   createDomContainer(){

     //根据当前数值长度处理DOM容器

     if(0 !== this.fontValue.toString().length){

       //清空容器内视图

       this.container_elem.clear();

       //处理容器内视图

       let view = null;

       let point_index = this.fontValue.toString().indexOf('.');

       for(let i=0;i<this.fontValue.toString().length;i++){

         if((-1 != point_index) && (i == point_index)){

           view = this.tpl_point_elem.createEmbeddedView(null);

           this.container_elem.insert(view);

         }else{

           view = this.tpl_elem.createEmbeddedView(null);

           this.container_elem.insert(view);

         }

       }

       this.typeConversionst();

     }else{

       //Do-nothing

     }

   }

   //截取数字,类型转换

   typeConversionst(){

     let _minutes = this.el.nativeElement.querySelectorAll('.minutes');

     //字符串格式

     let fontValue_string = this.fontValue.toString();

     //转化成number类型,调用设置数值方法,设置数值

     if(0 != _minutes.length){

       for(let i=0;i<_minutes.length;i++){

         this.setNumber(_minutes[i], parseInt(fontValue_string.slice(i,i+1)), 1);

       }

     }

   }

   setNumber(digit, number, on){

     let segments = digit.querySelectorAll('.segment');

     let current = parseInt(digit.getAttribute('data-value'));

     if(!isNaN(number)){

       //处理数字

       this.digitSegments[number].forEach(function(digitSegment, index) {

         setTimeout(function() {

           segments[digitSegment - 1].classList.add('on');

         }, index * 1)

       });

       digit.setAttribute('data-value', number);

     }else{

       //Do-nothing

     }

   }

 }
三、使用
图一使用:
 <p *ngIf="selfFontStyle == 'clockStyle' && value != '--'" style="height: 140px;line-height: 120px;text-align: right;font-size: 40px;color: #13b4eb;position: relative;float: right;right: 130px;">

   <app-led-clockfont  [fontValue]="value"  *ngIf="selfFontStyle == 'clockStyle'"></app-led-clockfont>

   <!-- value = 40.72  -->

 </p>
图二使用:
 <app-led-clockfont [fontValue]="mapComponentConfig.length"></app-led-clockfont>

 <!-- mapComponentConfig.length = 397 -->
四、说明
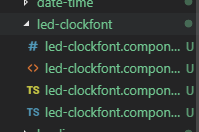
利用Angular6创建一个led-clockfont组件,目录结构如下图:
css代码详见第二步 css代码,html代码详见第二步 html代码,ts代码详见第二步 ts代码。
使用部分详见第三步
Angular6封装LED时钟数字组件的更多相关文章
- C#进阶系列——一步一步封装自己的HtmlHelper组件:BootstrapHelper(三:附源码)
前言:之前的两篇封装了一些基础的表单组件,这篇继续来封装几个基于bootstrap的其他组件.和上篇不同的是,这篇的有几个组件需要某些js文件的支持. 本文原创地址:http://www.cnblog ...
- 原生JS面向对象思想封装轮播图组件
原生JS面向对象思想封装轮播图组件 在前端页面开发过程中,页面中的轮播图特效很常见,因此我就想封装一个自己的原生JS的轮播图组件.有了这个需求就开始着手准备了,代码当然是以简洁为目标,轮播图的各个功能 ...
- C#进阶系列——一步一步封装自己的HtmlHelper组件:BootstrapHelper
前言:之前学习过很多的Bootstrap组件,博主就在脑海里构思:是否可以封装一套自己Bootstrap组件库呢.再加上看到MVC的Razor语法里面直接通过后台方法输出前端控件的方式,于是打算仿照H ...
- JS组件系列——封装自己的JS组件,你也可以
前言:之前分享了那么多bootstrap组件的使用经验,这篇博主打算研究下JS组件的扩展和封装,我们来感受下JQuery为我们提供$.Extend的神奇,看看我们怎么自定义自己的组件,比如我们想扩展一 ...
- JS组件系列——分享自己封装的Bootstrap树形组件:jqTree
前言:之前的一篇介绍了下如何封装自己的组件,这篇再次来体验下自己封装组件的乐趣.看过博主博客的园友应该记得之前分享过一篇树形菜单的使用JS组件系列——Bootstrap 树控件使用经验分享,这篇里面第 ...
- JS组件系列——封装自己的JS组件
前言:之前分享了那么多bootstrap组件的使用经验,这篇博主打算研究下JS组件的扩展和封装,我们来感受下JQuery为我们提供$.Extend的神奇,看看我们怎么自定义自己的组件,比如我们想扩展一 ...
- 从零开始教你封装自己的vue组件
组件(component)是vue.js最强大的功能之一,它可以实现功能的复用,以及对其他逻辑的解耦.但经过一段时间的使用,我发现自己并没有在业务中发挥出组件的最大价值.相信很多刚开始使用vue的朋友 ...
- Android Widget小组件开发(一)——Android实现时钟Widget组件的步骤开发,这些知识也是必不可少的!
Android Widget小组件开发(一)--Android实现时钟Widget组件的步骤开发,这些知识也是必不可少的! PS:学习自某网站(不打广告) 这个小组件相信大家都很熟悉吧,以前的墨迹天气 ...
- vue和echarts 封装的 v-charts 图表组件
https://v-charts.js.org/#/ 在使用 echarts 生成图表时,经常需要做繁琐的数据类型转化.修改复杂的配置项,v-charts 的出现正是为了解决这个痛点.基于 Vue2. ...
随机推荐
- array_filter()函数
用回调函数过滤数组中的值 array_filter(array,callbackfunction); 返回过滤后的数组
- liunx 安装jdk
1 下载jdk http://www.oracle.com/technetwork/java/javase/downloads/jdk8-downloads-2133151.html 2 切换root ...
- PowerBuilder常用字符串函数
http://blog.sina.com.cn/s/blog_5995b53d0100a694.html Fill()功能建立一个由指定字符串填充的指定长度的字符串.语法Fill ( chars, n ...
- C#+ZXing.dll生成手机路径导航二维码
1.原谅我先写点废话哈 这两天用C#写一个C端的软件,甲方提出一个很无理的需求(在C端的程序中实现路径导航,关键是这个程序最终是运行在物理隔绝的电脑上的……),头疼了好几天,领导突然想到可以把坐标+百 ...
- zabbix docker - 安装和初始化配置
zabbix docker - 安装和初始化配置 安装zabbix server docker-mysql版本 zabbix server支持不同的数据库(详见zabbix的docker hub),这 ...
- Java 数组的创建
与C.C++不同,Java在定义数组时并不为数组元素分配内存,因此[ ]中无需指定数组元素的个数,即数组长度. 定义一个数组有两种方式: int[] array; int array[]; 对于如上定 ...
- js的微观性能
概述 js的微观性能是指js的某一个表达式或者某一行或者某一块代码的性能.几天前和同事讨论过这方面的内容,今天深入研究了一下,记录下来,供以后开发时参考,相信对其他人也有用. 从一段代码说起 记得以前 ...
- EasyUI 获取展开表中行数据
var index = $('#dg').datagrid('getRowIndex', row); //为destory_user.php传递参数id var ids = $("#dg&q ...
- iOS开发笔记-一种任意字体、颜色混排UILabel的实现
最近开发新App,射妓狮给的图上出现一种不同大小字体混排的Label,就像下面这种: 想了想,最简单的方法是使用多个UILabel排列显示,但是这样不仅麻烦而且效果也不好,索性自定义UILabel来尽 ...
- Ehcache3开发入门简介
在高并发应用中缓存就是核心机制.最近在研究Ehcache,发现这是一个更加灵活易用的缓存框架(相对于Redis.Memcache),Ehcache更加小巧轻便.而且都有持久化机制,不用担心JVM和服务 ...