
云计算管理平台之OpenStack块存储服务cinder
一、cinder简介
cinder是openstack环境中的块存储服务,主要为运行在openstack之上的虚拟机提供块存储服务的;所谓块存储就是我们经常用的硬盘呀,U盘啊,SD卡等等这些块设备的,这里不同我们生活中看到的那样的磁盘,这里我们可以理解为类似云盘的东西;对于cinder来讲,它主要由三个组件组成,cinder-api、cinder-scheduler、cinder-volume;其中cinder-api和cinder-scheduler这两个组件通常部署在在控制节点,cinder-volume通常部署在storage节点;cinder-volume主要作用是通过接收openstack控制节点上cinder-scheduler发送过来的请求,进行卷管理;cinder-api主要作用是接收请求,并将请求负责丢到对应的队列中去;cinder-scheduler主要负责调度后面的cinder-volume来完成管理卷;
cinder架构
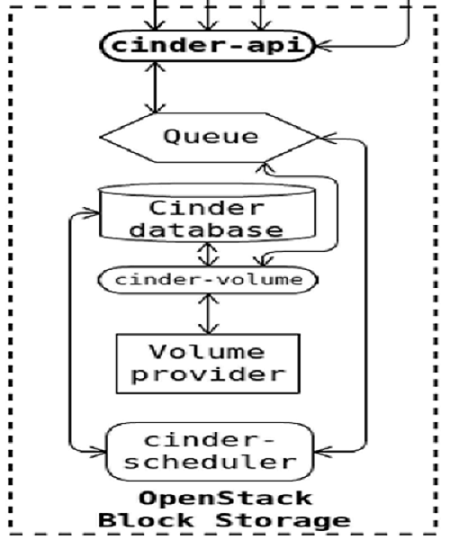
cinder工作过程:首先客户端会把请求发送给cinder-api,cinder-api接收请求,并将其放到对应的消息队列中;然后cinder-scheduler从对应的消息队列取出用户的请求进行调度,把最终的调度结果放到对应的消息队列中去,同时也往数据库中保存一份;在cinder-scheduler把调度结果放到消息队列中去以后,对应的cinder-volume会从对应的消息队列取出消息在本地执行,最后把执行的状态信息写一份到数据库,同时把执行的状态放到消息队列,从而让cinder-api把对应的结果返回给客户端;大致工作流程就是这样;
二、cinder服务安装配置
1、在控制节点安装配置cinder-api、cinder-scheduler
创建cinder数据库以及相关访问数据库的用户和授权
[root@node02 ~]# mysql

Welcome to the MariaDB monitor.  Commands end with ; or \g.

Your MariaDB connection id is 318

Server version: 10.1.20-MariaDB MariaDB Server

Copyright (c) 2000, 2016, Oracle, MariaDB Corporation Ab and others.

Type 'help;' or '\h' for help. Type '\c' to clear the current input statement.

MariaDB [(none)]> CREATE DATABASE cinder;

Query OK, 1 row affected (0.01 sec)

MariaDB [(none)]> GRANT ALL PRIVILEGES ON cinder.* TO 'cinder'@'%'  IDENTIFIED BY 'cinder';

Query OK, 0 rows affected (0.01 sec)

MariaDB [(none)]> flush privileges;

Query OK, 0 rows affected (0.00 sec)

MariaDB [(none)]>
验证:在其他节点使用cinder用户登录数据库,看看创建的cinder用户是否可以正常登录数据库?
[root@node01 ~]# mysql -ucinder -pcinder -hnode02

Welcome to the MariaDB monitor.  Commands end with ; or \g.

Your MariaDB connection id is 319

Server version: 10.1.20-MariaDB MariaDB Server

Copyright (c) 2000, 2016, Oracle, MariaDB Corporation Ab and others.

Type 'help;' or '\h' for help. Type '\c' to clear the current input statement.

MariaDB [(none)]> show databases;

+--------------------+

| Database           |

+--------------------+

| cinder             |

| information_schema |

| test               |

+--------------------+

3 rows in set (0.00 sec)

MariaDB [(none)]> exit

Bye

[root@node01 ~]#
在控制节点上导出admin用户环境变量,创建cinder用户并将其域指向default,密码设置为cinder
[root@node01 ~]# source admin.sh

[root@node01 ~]# openstack user create --domain default --password-prompt cinder

User Password:

Repeat User Password:

+---------------------+----------------------------------+

| Field               | Value                            |

+---------------------+----------------------------------+

| domain_id           | 47c0915c914c49bb8670703e4315a80f |

| enabled             | True                             |

| id                  | a795dd0941e942da85291177fe434f60 |

| name                | cinder                           |

| options             | {}                               |

| password_expires_at | None                             |

+---------------------+----------------------------------+

[root@node01 ~]#
将cinder用户添加到service项目,并授权为admin角色权限
[root@node01 ~]# openstack role add --project service --user cinder admin

[root@node01 ~]#
创建cinderv2和cinderv3服务
[root@node01 ~]#  openstack service create --name cinderv2 \

>   --description "OpenStack Block Storage" volumev2

+-------------+----------------------------------+

| Field       | Value                            |

+-------------+----------------------------------+

| description | OpenStack Block Storage          |

| enabled     | True                             |

| id          | 1145b9f35e3f419bb707f0d500bc2e3b |

| name        | cinderv2                         |

| type        | volumev2                         |

+-------------+----------------------------------+

[root@node01 ~]# openstack service create --name cinderv3 \

>   --description "OpenStack Block Storage" volumev3

+-------------+----------------------------------+

| Field       | Value                            |

+-------------+----------------------------------+

| description | OpenStack Block Storage          |

| enabled     | True                             |

| id          | aa142423921d408db8ba8dc7e48784f0 |

| name        | cinderv3                         |

| type        | volumev3                         |

+-------------+----------------------------------+

[root@node01 ~]#
提示:cinder有两个版本,这两个版本都要创建服务端点;
分别注册cinderv2和cinderv3到公共、私有、管理端点
cinderv2公共端点
[root@node01 ~]# openstack endpoint create --region RegionOne \

>   volumev2 public http://controller:8776/v2/%\(project_id\)s

+--------------+------------------------------------------+

| Field        | Value                                    |

+--------------+------------------------------------------+

| enabled      | True                                     |

| id           | b60100d78284490a886b8b134f730b76         |

| interface    | public                                   |

| region       | RegionOne                                |

| region_id    | RegionOne                                |

| service_id   | 1145b9f35e3f419bb707f0d500bc2e3b         |

| service_name | cinderv2                                 |

| service_type | volumev2                                 |

| url          | http://controller:8776/v2/%(project_id)s |

+--------------+------------------------------------------+

[root@node01 ~]#
cinderv2私有端点
[root@node01 ~]# openstack endpoint create --region RegionOne \

>   volumev2 internal http://controller:8776/v2/%\(project_id\)s

+--------------+------------------------------------------+

| Field        | Value                                    |

+--------------+------------------------------------------+

| enabled      | True                                     |

| id           | 8c5b226eab8e4882af33e09e91f5a478         |

| interface    | internal                                 |

| region       | RegionOne                                |

| region_id    | RegionOne                                |

| service_id   | 1145b9f35e3f419bb707f0d500bc2e3b         |

| service_name | cinderv2                                 |

| service_type | volumev2                                 |

| url          | http://controller:8776/v2/%(project_id)s |

+--------------+------------------------------------------+

[root@node01 ~]#
cinderv2管理端点
[root@node01 ~]#  openstack endpoint create --region RegionOne \

>   volumev2 admin http://controller:8776/v2/%\(project_id\)s

+--------------+------------------------------------------+

| Field        | Value                                    |

+--------------+------------------------------------------+

| enabled      | True                                     |

| id           | b0d35d4b02954fe0a335f8e94365471d         |

| interface    | admin                                    |

| region       | RegionOne                                |

| region_id    | RegionOne                                |

| service_id   | 1145b9f35e3f419bb707f0d500bc2e3b         |

| service_name | cinderv2                                 |

| service_type | volumev2                                 |

| url          | http://controller:8776/v2/%(project_id)s |

+--------------+------------------------------------------+

[root@node01 ~]#
cinderv3公共端点
[root@node01 ~]# openstack endpoint create --region RegionOne \

>   volumev3 public http://controller:8776/v3/%\(project_id\)s

+--------------+------------------------------------------+

| Field        | Value                                    |

+--------------+------------------------------------------+

| enabled      | True                                     |

| id           | dff608b23a6b45cebb44d54c7ff68718         |

| interface    | public                                   |

| region       | RegionOne                                |

| region_id    | RegionOne                                |

| service_id   | aa142423921d408db8ba8dc7e48784f0         |

| service_name | cinderv3                                 |

| service_type | volumev3                                 |

| url          | http://controller:8776/v3/%(project_id)s |

+--------------+------------------------------------------+

[root@node01 ~]#
cinderv3私有端点
[root@node01 ~]# openstack endpoint create --region RegionOne \

>   volumev3 internal http://controller:8776/v3/%\(project_id\)s

+--------------+------------------------------------------+

| Field        | Value                                    |

+--------------+------------------------------------------+

| enabled      | True                                     |

| id           | 240ea84001e740c7b1514122e38cdca8         |

| interface    | internal                                 |

| region       | RegionOne                                |

| region_id    | RegionOne                                |

| service_id   | aa142423921d408db8ba8dc7e48784f0         |

| service_name | cinderv3                                 |

| service_type | volumev3                                 |

| url          | http://controller:8776/v3/%(project_id)s |

+--------------+------------------------------------------+

[root@node01 ~]#
cinderv3管理端点
[root@node01 ~]# openstack endpoint create --region RegionOne \

>   volumev3 admin http://controller:8776/v3/%\(project_id\)s

+--------------+------------------------------------------+

| Field        | Value                                    |

+--------------+------------------------------------------+

| enabled      | True                                     |

| id           | 19b83da138564fb586ddd0f9edf57c67         |

| interface    | admin                                    |

| region       | RegionOne                                |

| region_id    | RegionOne                                |

| service_id   | aa142423921d408db8ba8dc7e48784f0         |

| service_name | cinderv3                                 |

| service_type | volumev3                                 |

| url          | http://controller:8776/v3/%(project_id)s |

+--------------+------------------------------------------+

[root@node01 ~]#
安装openstack-cinder软件包
[root@node01 ~]# yum install openstack-cinder -y
编辑配置文件/etc/cinder/cinder.conf,在【database】配置段配置连接cinder数据库的地址

在【DEFAULT】配置段配置使用keystone来做认证以及rabbitmq连接地址

在【keystone_authtoken】配置段配置去keystone认证的相关信息
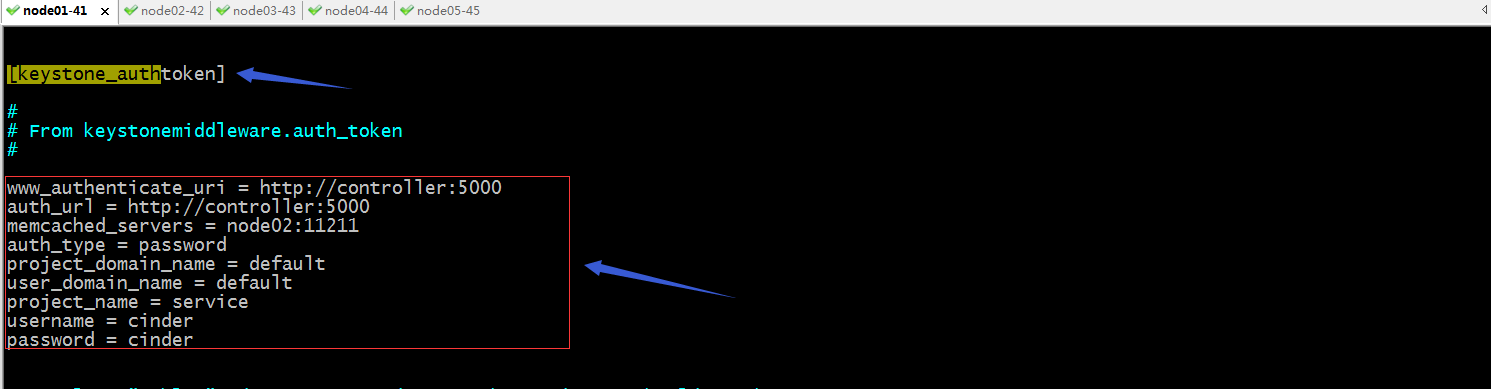
在【DEFAULT】配置段配置my_ip为本地ip地址

在【oslo_concurrency】配置段配置存放锁文件路径

cinder.conf的最终配置
[root@node01 ~]# grep -i ^"[a-z\[]" /etc/cinder/cinder.conf

[DEFAULT]

transport_url = rabbit://openstack:openstack123@node02

auth_strategy = keystone

my_ip = 192.168.0.41

[backend]

[backend_defaults]

[barbican]

[brcd_fabric_example]

[cisco_fabric_example]

[coordination]

[cors]

[database]

connection = mysql+pymysql://cinder:cinder@node02/cinder

[fc-zone-manager]

[healthcheck]

[key_manager]

[keystone_authtoken]

www_authenticate_uri = http://controller:5000

auth_url = http://controller:5000

memcached_servers = node02:11211

auth_type = password

project_domain_name = default

user_domain_name = default

project_name = service

username = cinder

password = cinder

[matchmaker_redis]

[nova]

[oslo_concurrency]

lock_path = /var/lib/cinder/tmp

[oslo_messaging_amqp]

[oslo_messaging_kafka]

[oslo_messaging_notifications]

[oslo_messaging_rabbit]

[oslo_messaging_zmq]

[oslo_middleware]

[oslo_policy]

[oslo_reports]

[oslo_versionedobjects]

[profiler]

[sample_remote_file_source]

[service_user]

[ssl]

[vault]

[root@node01 ~]#
填充数据库
[root@node01 ~]# su -s /bin/sh -c "cinder-manage db sync" cinder

Deprecated: Option "logdir" from group "DEFAULT" is deprecated. Use option "log-dir" from group "DEFAULT".

[root@node01 ~]#
验证:在cinder库中,查看是否有表生成?
MariaDB [(none)]> use cinder

Reading table information for completion of table and column names

You can turn off this feature to get a quicker startup with -A

Database changed

MariaDB [cinder]> show tables;

+----------------------------+

| Tables_in_cinder           |

+----------------------------+

| attachment_specs           |

| backup_metadata            |

| backups                    |

| cgsnapshots                |

| clusters                   |

| consistencygroups          |

| driver_initiator_data      |

| encryption                 |

| group_snapshots            |

| group_type_projects        |

| group_type_specs           |

| group_types                |

| group_volume_type_mapping  |

| groups                     |

| image_volume_cache_entries |

| messages                   |

| migrate_version            |

| quality_of_service_specs   |

| quota_classes              |

| quota_usages               |

| quotas                     |

| reservations               |

| services                   |

| snapshot_metadata          |

| snapshots                  |

| transfers                  |

| volume_admin_metadata      |

| volume_attachment          |

| volume_glance_metadata     |

| volume_metadata            |

| volume_type_extra_specs    |

| volume_type_projects       |

| volume_types               |

| volumes                    |

| workers                    |

+----------------------------+

35 rows in set (0.00 sec)

MariaDB [cinder]>
编辑控制节点/etc/nova/nova.conf配置文件,在【cinder】配置段配置nova使用cinder服务
[cinder]

os_region_name = RegionOne

重启nova服务
[root@node01 ~]# systemctl restart openstack-nova-api.service

[root@node01 ~]# ss -tnl

State      Recv-Q Send-Q                      Local Address:Port                                     Peer Address:Port

LISTEN     0      128                                     *:9292                                                *:*

LISTEN     0      128                                     *:22                                                  *:*

LISTEN     0      100                             127.0.0.1:25                                                  *:*

LISTEN     0      100                                     *:6080                                                *:*

LISTEN     0      128                                     *:9696                                                *:*

LISTEN     0      128                                     *:8774                                                *:*

LISTEN     0      128                                     *:8775                                                *:*

LISTEN     0      128                                     *:9191                                                *:*

LISTEN     0      128                                    :::80                                                 :::*

LISTEN     0      128                                    :::22                                                 :::*

LISTEN     0      100                                   ::1:25                                                 :::*

LISTEN     0      128                                    :::5000                                               :::*

LISTEN     0      128                                    :::8778                                               :::*

[root@node01 ~]#
提示:重启请确保nova-api服务所监听端口(8774/8775)处于正常监听;
启动cinder-api和cinder-scheduler服务,并将其设置为开机启动
[root@node01 ~]# systemctl start openstack-cinder-api.service openstack-cinder-scheduler.service

[root@node01 ~]# systemctl enable openstack-cinder-api.service openstack-cinder-scheduler.service

Created symlink from /etc/systemd/system/multi-user.target.wants/openstack-cinder-api.service to /usr/lib/systemd/system/openstack-cinder-api.service.

Created symlink from /etc/systemd/system/multi-user.target.wants/openstack-cinder-scheduler.service to /usr/lib/systemd/system/openstack-cinder-scheduler.service.

[root@node01 ~]# ss -tnl

State      Recv-Q Send-Q                      Local Address:Port                                     Peer Address:Port

LISTEN     0      128                                     *:9292                                                *:*

LISTEN     0      128                                     *:22                                                  *:*

LISTEN     0      100                             127.0.0.1:25                                                  *:*

LISTEN     0      100                                     *:6080                                                *:*

LISTEN     0      128                                     *:9696                                                *:*

LISTEN     0      128                                     *:8774                                                *:*

LISTEN     0      128                                     *:8775                                                *:*

LISTEN     0      128                                     *:9191                                                *:*

LISTEN     0      128                                     *:8776                                                *:*

LISTEN     0      128                                    :::80                                                 :::*

LISTEN     0      128                                    :::22                                                 :::*

LISTEN     0      100                                   ::1:25                                                 :::*

LISTEN     0      128                                    :::5000                                               :::*

LISTEN     0      128                                    :::8778                                               :::*

[root@node01 ~]#
提示:请确保8776端口处于正常监听就说明cinder服务启动正常;或者直接查看有没有cinder进程启动,以此来判断cinder服务是否都启动正常;如下
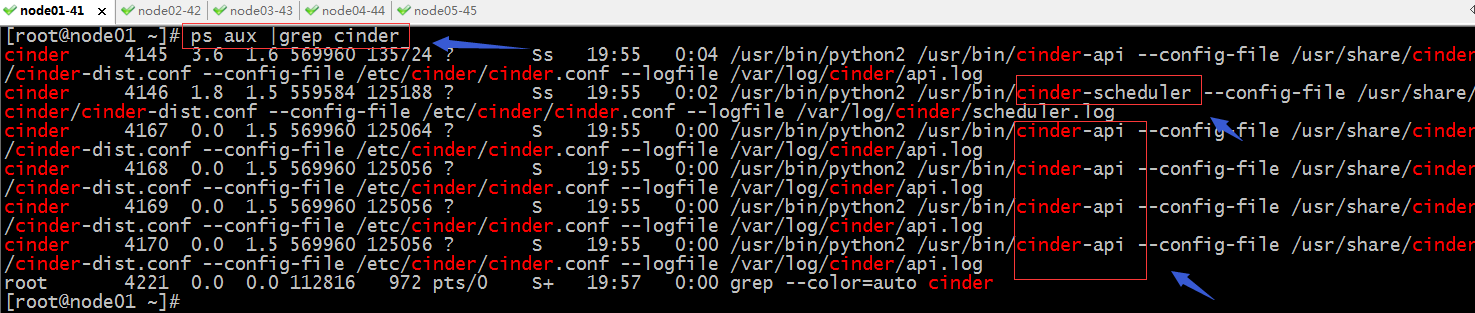
到此,在控制节点安装配置cinder-api和cinder-scheduler服务就完成了;
2、在cinder storage节点安装配置cinder-volume服务
storage node 环境说明,配置好yum仓库,时间同步,以及主机名解析等等;有关基础环境的配置,请参考https://www.cnblogs.com/qiuhom-1874/p/13886693.html;为了演示,我在node05上附加了三块20g的硬盘,方便待会测试;
准备好基础环境后,接下来开始cinder-volume服务需要的包
[root@node05 ~]# yum install lvm2 device-mapper-persistent-data -y
启动lvm2-lvmetad服务并将其设置为开机启动
[root@node05 ~]# systemctl start lvm2-lvmetad.service

[root@node05 ~]# systemctl enable lvm2-lvmetad.service

[root@node05 ~]#
查看node05上的硬盘
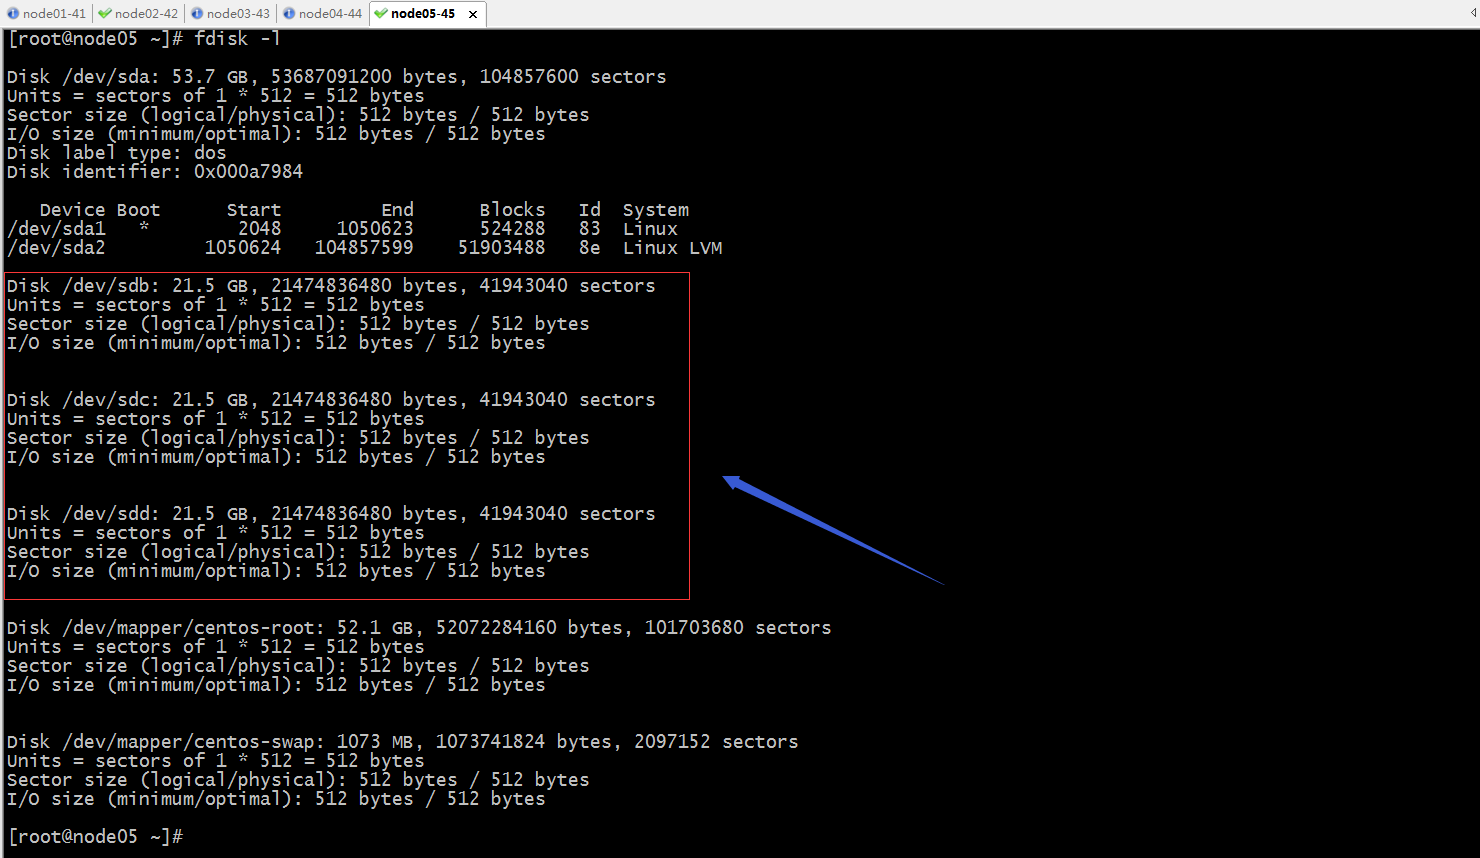
把/dev/sdb整块盘创建一个pv
[root@node05 ~]# pvcreate /dev/sdb

  Physical volume "/dev/sdb" successfully created.

[root@node05 ~]#
创建vg
[root@node05 ~]# vgcreate cinder-volumes /dev/sdb

  Volume group "cinder-volumes" successfully created

[root@node05 ~]#
编辑lvm配置文件/etc/lvm/lvm.conf,将其只允许扫描我们附加的三块磁盘和本地/dev/sda,默认lvm会扫描整个/dev下的所有设备

安装openstack-cinder targetcli python-keystone包
[root@node05 ~]# yum install openstack-cinder targetcli python-keystone -y
编辑配置文件/etc/cinder/cinder.conf,在【database】配置段配置连接cinder数据库相关信息

在【DEFAULT】配置段配置连接rabbitmq相关信息,配置认证策略为keystone,配置my_ip为本地和控制节点通信网卡ip地址

在【keystone_authtoken】配置段配置去keystone认证相关信息

在【lvm】配置段配置连接lvm相关驱动,vg,以及使用的传输协议;默认配置文件中没有【lvm】配置段,我们可以在配置文件的末尾添加【lvm】配置段,把对应要配置的内容配置上就好;
[lvm]

volume_driver = cinder.volume.drivers.lvm.LVMVolumeDriver

volume_group = cinder-volumes

iscsi_protocol = iscsi

iscsi_helper = lioadm
提示:这里的volume_group要和我们之前创建的vg名称保持一致;
在【DEFAULT】配置段开启lvm back end,以及连接glance服务的地址

在【oslo_concurrency】配置锁路径

cinder.conf最终配置
[root@node05 ~]#

[root@node05 ~]# grep -i ^"[a-z\[]" /etc/cinder/cinder.conf

[DEFAULT]

my_ip = 192.168.0.45

transport_url = rabbit://openstack:openstack123@node02

auth_strategy = keystone

enabled_backends = lvm

glance_api_servers = http://controller:9292

[backend]

[backend_defaults]

[barbican]

[brcd_fabric_example]

[cisco_fabric_example]

[coordination]

[cors]

[database]

connection = mysql+pymysql://cinder:cinder@node02/cinder

[fc-zone-manager]

[healthcheck]

[key_manager]

[keystone_authtoken]

www_authenticate_uri = http://controller:5000

auth_url = http://controller:5000

memcached_servers = node02:11211

auth_type = password

project_domain_name = default

user_domain_name = default

project_name = service

username = cinder

password = cinder

[matchmaker_redis]

[nova]

[oslo_concurrency]

lock_path = /var/lib/cinder/tmp

[oslo_messaging_amqp]

[oslo_messaging_kafka]

[oslo_messaging_notifications]

[oslo_messaging_rabbit]

[oslo_messaging_zmq]

[oslo_middleware]

[oslo_policy]

[oslo_reports]

[oslo_versionedobjects]

[profiler]

[sample_remote_file_source]

[service_user]

[ssl]

[vault]

[lvm]

volume_driver = cinder.volume.drivers.lvm.LVMVolumeDriver

volume_group = cinder-volumes

iscsi_protocol = iscsi

iscsi_helper = lioadm

[root@node05 ~]#
启动服务,并将其设置为开机启动
[root@node05 ~]# systemctl start openstack-cinder-volume.service target.service

[root@node05 ~]# systemctl enable openstack-cinder-volume.service target.service

Created symlink from /etc/systemd/system/multi-user.target.wants/openstack-cinder-volume.service to /usr/lib/systemd/system/openstack-cinder-volume.service.

Created symlink from /etc/systemd/system/multi-user.target.wants/target.service to /usr/lib/systemd/system/target.service.

[root@node05 ~]#
验证:查看服务是否正常启动

提示:能够看到cinder-volume进程启动,说明服务启动没有问题;
到此,在storage node上的配置就完成了;
验证:在控制节点导出admin用户环境变量,使用openstack volume service list命令,看看是否能够列出服务组件信息?
[root@node01 ~]# source admin.sh

[root@node01 ~]# openstack volume service list

+------------------+---------------------+------+---------+-------+----------------------------+

| Binary           | Host                | Zone | Status  | State | Updated At                 |

+------------------+---------------------+------+---------+-------+----------------------------+

| cinder-volume    | node05.test.org@lvm | nova | enabled | up    | 2020-11-02T13:58:10.000000 |

| cinder-scheduler | node01.test.org     | nova | enabled | up    | 2020-11-02T13:58:10.000000 |

+------------------+---------------------+------+---------+-------+----------------------------+

[root@node01 ~]#
提示:能够列出cinder-scheduler和cinder-volume这两个组件就表示我们在控制节点和storage 节点上安装的组件没有问题;
验证:导出demo用户环境,创建卷,看看是否能够正常创建?
[root@node01 ~]# source demo.sh

[root@node01 ~]# openstack volume create --size 1 volume1

+---------------------+--------------------------------------+

| Field               | Value                                |

+---------------------+--------------------------------------+

| attachments         | []                                   |

| availability_zone   | nova                                 |

| bootable            | false                                |

| consistencygroup_id | None                                 |

| created_at          | 2020-11-02T14:16:37.000000           |

| description         | None                                 |

| encrypted           | False                                |

| id                  | f41c1ad9-8fb3-426c-bb63-33dafabfd47d |

| multiattach         | False                                |

| name                | volume1                              |

| properties          |                                      |

| replication_status  | None                                 |

| size                | 1                                    |

| snapshot_id         | None                                 |

| source_volid        | None                                 |

| status              | creating                             |

| type                | None                                 |

| updated_at          | None                                 |

| user_id             | 5453d68782a34429a7dab7da9c51f0d9     |

+---------------------+--------------------------------------+

[root@node01 ~]#
查看当前用户的卷列表
[root@node01 ~]# openstack volume list

+--------------------------------------+---------+-----------+------+-------------+

| ID                                   | Name    | Status    | Size | Attached to |

+--------------------------------------+---------+-----------+------+-------------+

| f41c1ad9-8fb3-426c-bb63-33dafabfd47d | volume1 | available |    1 |             |

+--------------------------------------+---------+-----------+------+-------------+

[root@node01 ~]#
在storage 节点上查看逻辑卷,看看是否有我们刚才创建的卷呢?

将卷附加到某个虚拟机实例上
[root@node01 ~]# openstack server list

+--------------------------------------+-----------+---------+----------------------------------------------+--------+---------+

| ID                                   | Name      | Status  | Networks                                     | Image  | Flavor  |

+--------------------------------------+-----------+---------+----------------------------------------------+--------+---------+

| 057103fc-97eb-4f5b-910d-beddccd3bd22 | test_vm-3 | SHUTOFF | provider-net=192.168.0.124                   | cirros | m1.nano |

| 32622be2-47dc-47c8-b0ef-c5c5c85eb9ba | test_vm-1 | SHUTOFF | provider-net=192.168.0.102                   | cirros | m1.nano |

| 5523730d-9dc4-4827-b53a-43f3c860b838 | test_vm-2 | SHUTOFF | provider-net=192.168.0.119                   | cirros | m1.nano |

| 3f220e22-50ce-4068-9b0b-cd9c07446e6c | demo_vm2  | SHUTOFF | demo_selfservice_net=10.0.1.2, 192.168.0.104 | cirros | m1.nano |

| a9f76200-0636-48ab-9eda-69526dab0653 | demo_vm1  | SHUTOFF | provider-net=192.168.0.103                   | cirros | m1.nano |

+--------------------------------------+-----------+---------+----------------------------------------------+--------+---------+

[root@node01 ~]# openstack volume list

+--------------------------------------+---------+-----------+------+-------------+

| ID                                   | Name    | Status    | Size | Attached to |

+--------------------------------------+---------+-----------+------+-------------+

| f41c1ad9-8fb3-426c-bb63-33dafabfd47d | volume1 | available |    1 |             |

+--------------------------------------+---------+-----------+------+-------------+

[root@node01 ~]# openstack server add volume demo_vm1 volume1

[root@node01 ~]# openstack volume list

+--------------------------------------+---------+--------+------+-----------------------------------+

| ID                                   | Name    | Status | Size | Attached to                       |

+--------------------------------------+---------+--------+------+-----------------------------------+

| f41c1ad9-8fb3-426c-bb63-33dafabfd47d | volume1 | in-use |    1 | Attached to demo_vm1 on /dev/vdb  |

+--------------------------------------+---------+--------+------+-----------------------------------+

[root@node01 ~]#
提示:可以看到当把某个卷附加给某个虚拟机实例以后,再次查看卷的状态就变成了in-use状态,并明确说明该卷附加在那个实例之上,并识别成那个设备;
验证:连接对应虚拟机,查看是否有/dev/vdb的设备附加到虚拟机上?
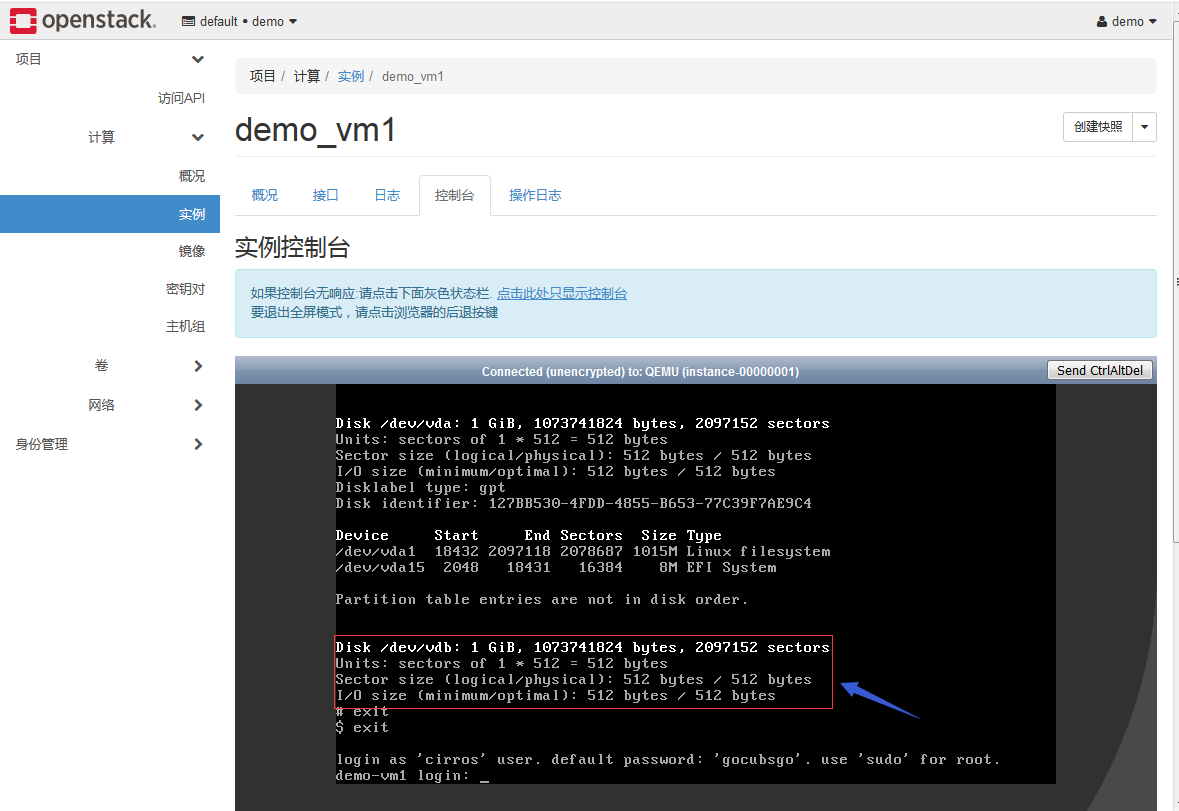
在demo_vm1上对/dev/vdb进行分区
[root@node01 ~]# ssh cirros@192.168.0.103

$ sudo su -

# fdisk -l /dev/vdb

Disk /dev/vdb: 1 GiB, 1073741824 bytes, 2097152 sectors

Units: sectors of 1 * 512 = 512 bytes

Sector size (logical/physical): 512 bytes / 512 bytes

I/O size (minimum/optimal): 512 bytes / 512 bytes

# fdisk  /dev/vdb

Welcome to fdisk (util-linux 2.27).

Changes will remain in memory only, until you decide to write them.

Be careful before using the write command.

Device does not contain a recognized partition table.

Created a new DOS disklabel with disk identifier 0xcc2cfc07.

Command (m for help): n

Partition type

   p   primary (0 primary, 0 extended, 4 free)

   e   extended (container for logical partitions)

Select (default p): p

Partition number (1-4, default 1):

First sector (2048-2097151, default 2048):

Last sector, +sectors or +size{K,M,G,T,P} (2048-2097151, default 2097151): +300M

Created a new partition 1 of type 'Linux' and of size 300 MiB.

Command (m for help): p

Disk /dev/vdb: 1 GiB, 1073741824 bytes, 2097152 sectors

Units: sectors of 1 * 512 = 512 bytes

Sector size (logical/physical): 512 bytes / 512 bytes

I/O size (minimum/optimal): 512 bytes / 512 bytes

Disklabel type: dos

Disk identifier: 0xcc2cfc07

Device     Boot Start    End Sectors  Size Id Type

/dev/vdb1        2048 616447  614400  300M 83 Linux

Command (m for help): w

The partition table has been altered.

Calling ioctl() to re-read partition table.

Syncing disks.

#
格式化/dev/vdb1,并将其挂在至/mnt目录
# mkfs.ext4 /dev/vdb1

mke2fs 1.42.12 (29-Aug-2014)

Creating filesystem with 307200 1k blocks and 76912 inodes

Filesystem UUID: bc228b69-bc7d-47ff-81bd-2b5a2291aa02

Superblock backups stored on blocks:

        8193, 24577, 40961, 57345, 73729, 204801, 221185

Allocating group tables: done

Writing inode tables: done

Creating journal (8192 blocks): done

Writing superblocks and filesystem accounting information: done

# mount /dev/vdb1 /mnt

# df -Th

Filesystem           Type            Size      Used Available Use% Mounted on

/dev                 devtmpfs       19.2M         0     19.2M   0% /dev

/dev/vda1            ext3          978.9M     24.1M    914.0M   3% /

tmpfs                tmpfs          23.2M         0     23.2M   0% /dev/shm

tmpfs                tmpfs          23.2M     88.0K     23.1M   0% /run

/dev/vdb1            ext4          282.5M      2.0M    261.5M   1% /mnt

#
提示:可以看到格式化成功,并成功挂载至/mnt
复制文件到/mnt下进行存储,看看是否可正常存储?
# ls -l /mnt

total 12

drwx------    2 root     root         12288 Nov  1 15:22 lost+found

# cp /etc/passwd /mnt

# ls -l /mnt

total 13

drwx------    2 root     root         12288 Nov  1 15:22 lost+found

-rw-------    1 root     root           586 Nov  1 15:24 passwd

# cat /mnt/passwd

root:x:0:0:root:/root:/bin/sh

daemon:x:1:1:daemon:/usr/sbin:/bin/sh

bin:x:2:2:bin:/bin:/bin/sh

sys:x:3:3:sys:/dev:/bin/sh

sync:x:4:100:sync:/bin:/bin/sync

mail:x:8:8:mail:/var/spool/mail:/bin/sh

proxy:x:13:13:proxy:/bin:/bin/sh

www-data:x:33:33:www-data:/var/www:/bin/sh

backup:x:34:34:backup:/var/backups:/bin/sh

operator:x:37:37:Operator:/var:/bin/sh

haldaemon:x:68:68:hald:/:/bin/sh

dbus:x:81:81:dbus:/var/run/dbus:/bin/sh

ftp:x:83:83:ftp:/home/ftp:/bin/sh

nobody:x:99:99:nobody:/home:/bin/sh

sshd:x:103:99:Operator:/var:/bin/sh

cirros:x:1000:1000:non-root user:/home/cirros:/bin/sh

#
提示:可以看到可以正常的存入文件,读取文件内容都没有问题;
重启虚拟机,看看卷是否会自动挂载到对应虚拟机呢?
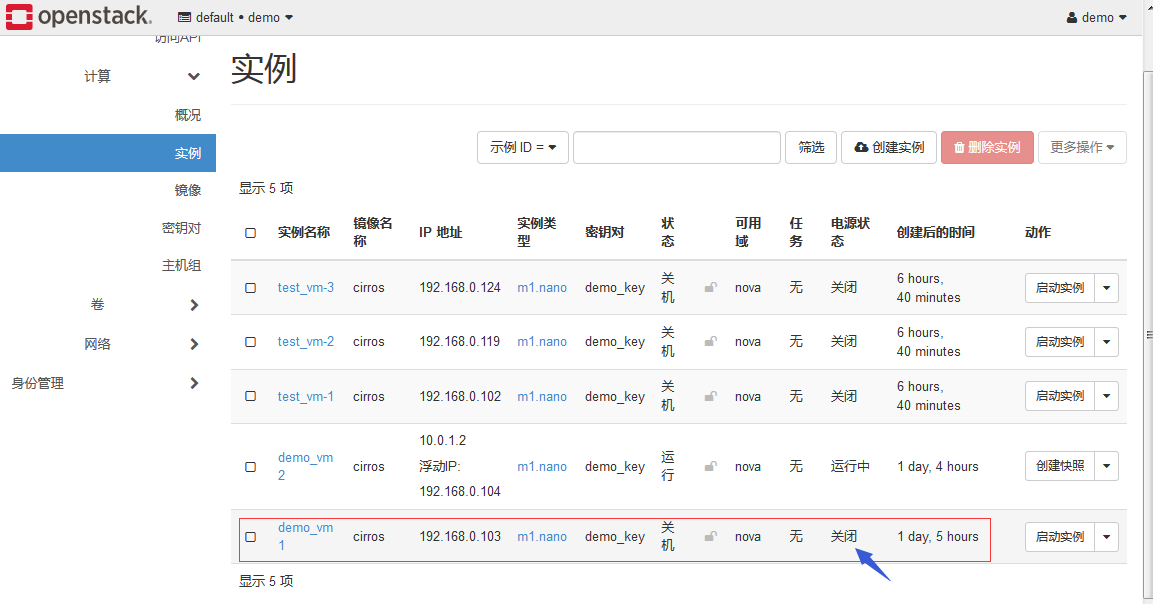
再启动虚拟机
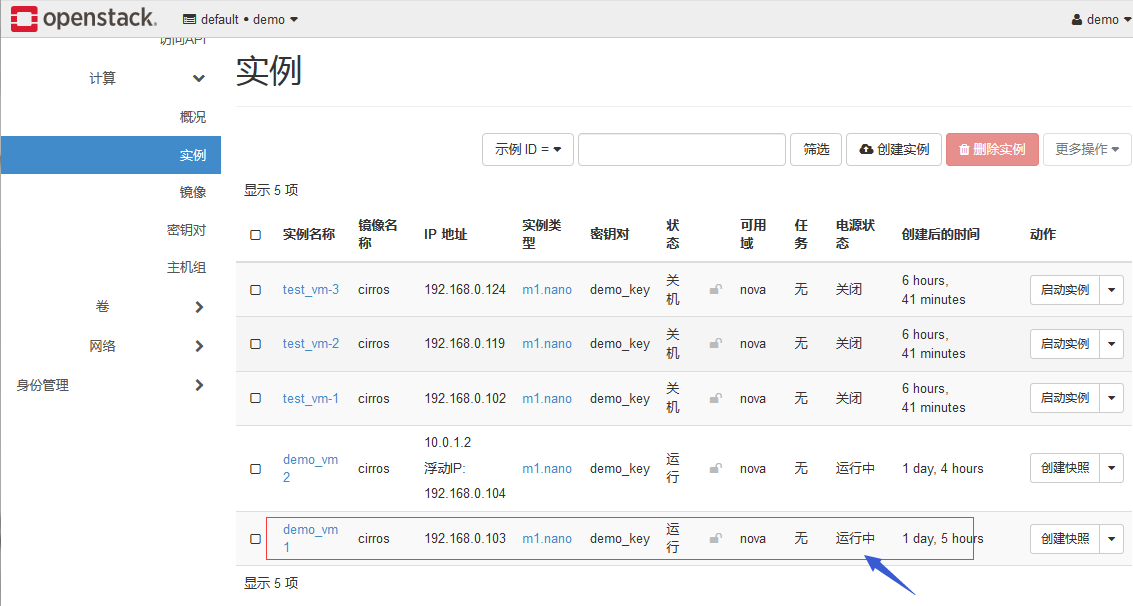
查看虚拟机是否有之前的块设备?是否自动挂载了?数据是否有丢失?
[root@node01 ~]# ssh cirros@192.168.0.103

$ sudo su -

# df -Th

Filesystem           Type            Size      Used Available Use% Mounted on

/dev                 devtmpfs       19.2M         0     19.2M   0% /dev

/dev/vda1            ext3          978.9M     24.1M    914.0M   3% /

tmpfs                tmpfs          23.2M         0     23.2M   0% /dev/shm

tmpfs                tmpfs          23.2M     88.0K     23.1M   0% /run

# fdisk -l /dev/vdb

Disk /dev/vdb: 1 GiB, 1073741824 bytes, 2097152 sectors

Units: sectors of 1 * 512 = 512 bytes

Sector size (logical/physical): 512 bytes / 512 bytes

I/O size (minimum/optimal): 512 bytes / 512 bytes

Disklabel type: dos

Disk identifier: 0xcc2cfc07

Device     Boot Start    End Sectors  Size Id Type

/dev/vdb1        2048 616447  614400  300M 83 Linux

# mount /dev/vdb1 /mnt

# ls -l /mnt

total 13

drwx------    2 root     root         12288 Nov  1 15:22 lost+found

-rw-------    1 root     root           586 Nov  1 15:24 passwd

# cat /mnt/passwd

root:x:0:0:root:/root:/bin/sh

daemon:x:1:1:daemon:/usr/sbin:/bin/sh

bin:x:2:2:bin:/bin:/bin/sh

sys:x:3:3:sys:/dev:/bin/sh

sync:x:4:100:sync:/bin:/bin/sync

mail:x:8:8:mail:/var/spool/mail:/bin/sh

proxy:x:13:13:proxy:/bin:/bin/sh

www-data:x:33:33:www-data:/var/www:/bin/sh

backup:x:34:34:backup:/var/backups:/bin/sh

operator:x:37:37:Operator:/var:/bin/sh

haldaemon:x:68:68:hald:/:/bin/sh

dbus:x:81:81:dbus:/var/run/dbus:/bin/sh

ftp:x:83:83:ftp:/home/ftp:/bin/sh

nobody:x:99:99:nobody:/home:/bin/sh

sshd:x:103:99:Operator:/var:/bin/sh

cirros:x:1000:1000:non-root user:/home/cirros:/bin/sh

#
提示:可以看到重启虚拟机它并不会自动帮我们挂载,原因是我们没有配置它自动挂载;但是虚拟机重启以后,块设备会自动和虚拟机关联;我们只需要配置对应的设备开机挂载就行;
到此cinder服务安装配置以及测试就完成了;这也意味着我们现有的openstack环境之上运行的虚拟机,可以拥有真正意义上的持久存储功能;只要我们的storage 节点不故障,保存在上面的卷就没有问题,虚拟机在卷上存储的数据就不会丢;
云计算管理平台之OpenStack块存储服务cinder的更多相关文章
- 探索 OpenStack 之(9):深入块存储服务Cinder (功能篇)
继研究了Neutron之后,继续Nova的外围研究之旅.本站是研究块存储服务Cinder. 0.验证环境 环境包括: 1.一个controller节点,运行nova-api, nova-schedul ...
- OpenStack Train版-13.安装块存储服务cinder(控制节点)
Cinder的核心功能是对卷的管理,允许对卷.卷的类型.卷的快照.卷备份进行处理.它为后端不同的存储设备提供给了统一的接口,不同的块设备服务厂商在Cinder中实现其驱动,可以被Openstack整合 ...
- 【openstack N版】——块存储服务cinder
一.块存储服务介绍 1.1块存储服务通常包含以下组件 cinder-api: 接受API请求,并将其路由到"cinder-volume"执行. cinder-volume: 与块存 ...
- 10.OpenStack块存储服务
添加块存储服务 安装和配置控制器节点 创建数据库 mysql -uroot -ptoyo123 CREATE DATABASE cinder; GRANT ALL PRIVILEGES ON cind ...
- OpenStack Train版-14.安装块存储服务cinder(存储节点)
安装cindoer块存储服务节点(存储节点192.168.0.40)使用默认的LVM卷方法,之后改为ceph存储 安装LVM软件包 [root@cinder01 ~]# yum install lvm ...
- 云计算管理平台之OpenStack镜像服务glance
一.glance简介 openstack中的glance服务是用来存储在openstack上启动虚拟机所需镜像:它主要用于发现.注册及检索虚拟机镜像:它通过提供RESTful风格的api对外提供服务: ...
- 云计算管理平台之OpenStack认证服务Keystone
一.keystone简介 keystone是openstack中的核心服务,它主要作用是实现用户认证和授权以及服务目录:所谓服务目录指所有可用服务的信息库,包含所有可用服务及其API endport路 ...
- 云计算管理平台之OpenStack Web管理工具dashboard
在上一篇博客中,我们成功的基于两种网络启动虚拟机:这意味着openstack的核心服务都搭建完成,并正常运行着:有关启动虚拟机实例请参考上一篇博客:今天我们来了解下,基于一个web界面图形工具来管理o ...
- 云计算管理平台之OpenStack网络服务neutron
一.简介 neutron的主要作用是在openstack中为启动虚拟机实例提供网络服务,对于neutron来讲,它可以提供两种类型的网络:第一种是provider network,这种网络就是我们常说 ...
随机推荐
- Lua table(表)
table 是 Lua 的一种数据结构用来帮助我们创建不同的数据类型,如:数组.字典等. Lua table 使用关联型数组,你可以用任意类型的值来作数组的索引,但这个值不能是 nil. Lua ta ...
- CentOS7设置内网时间同步
1.yum 安装 NTP服务器 [root@master ~]# yum -y install ntp 2.启动ntpd服务 [root@master ~]# systemctl start ntpd ...
- 001 01 Android 零基础入门 01 Java基础语法 01 Java初识 01 导学
001 01 Android 零基础入门 01 Java基础语法 01 Java初识 01 导学 welcome to Java World 欢迎来到Java世界 一起领略Java编程世界的奥秘与奥妙 ...
- 【奇淫巧技】sqlmap绕过过滤的tamper脚本分类汇总
sqlmap绕过过滤的tamper脚本分类汇总
- SPI通信基础学习
SPI是"Serial Peripheral Interface"的缩写,即"串行外设接口",是摩托罗拉公司推出的一种串行接口通信协议. 接线的示意图: SPI ...
- Java基础系列-RandomAccess
原创文章,转载请标注出处:https://www.cnblogs.com/V1haoge/p/10755424.html Random是随机的意思,Access是访问的意思,合起来就是随机访问的意思. ...
- servercat IOS Linux监控 SSH客户端
servercat IOS Linux监控 SSH客户端 iOS 平台上新出的一个挺有趣的服务器监控 + SSH 客户端. 监控服务器状态,内存.CPU.网络 还能对Docker容器进行监控 价格:¥ ...
- client: c#+protobuf, server: golang+protobuf
前段时间看到一篇博文<可在广域网部署运行的即时通讯系统 -- GGTalk总览(附源码下载)>,他是用C#实现的即时通讯系统,功能强大,界面漂亮. 就想用golang重写服务端,把代码下载 ...
- thinkphp6.0.x 反序列化详记(一)
前言 这几天算是进阶到框架类漏洞的学习了,首当其冲想到是thinkphp,先拿thinkphp6.0.x来学习一下,体验一下寻找pop链的快乐. 在此感谢楷师傅的帮忙~ 环境配置 用composer指 ...
- ansible:安装nginx1.18.0(使用role功能)
一,ansible使用role的用途? roles分别将变量/文件/任务/模板/handler等放置于单独的目录中, 并可以方便的include各目录下的功能 roles使playbook能实现代码被 ...