linux下P2P协议(BitTorrent)-libtorrent库编译,测试
1.libtorrent 简介,下载和编译
libtorrent简介
libtorrent是功能齐全的C ++ bittorrent的p2p协议实现,专注于效率和可伸缩性。它可以在嵌入式设备和台式机上运行。它拥有完善的文档库,易于使用。 它提供了client_test可以用于解析torrent种子和磁力链接。常见使用libtorrent库的项目有qBittorrent,deluge,Free download manager等。
libtorrent官网地址:http://libtorrent.org/index.html
官方libtorrent 测试客户端运行如图

Tracker简介
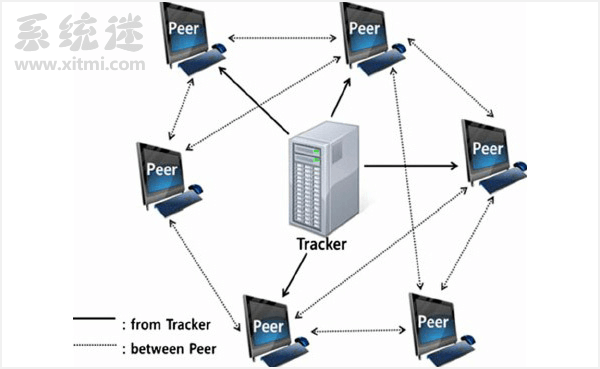
在BT下载中,有一个非常重要的角色,那就是Tracker服务器。Tracker会追踪有多少人在下载同一文件,并把这些名单发送到BT软件上。BT软件再尝试连接这些用户,以此来给你提供下载速度,同时你也会给他们贡献速度。
简单来说,Tracker服务器起到的,就是牵线搭桥的作用,而这正是BT下载的核心。越热门、越优质的Tracker,资源解析速度及下载速度就越快。普通BT软件速度不稳定,就是因为内置的Tracker太少。
opentracker是一个linux中开源和免费的BitTorrent Tracker ,旨在实现一个最小化资源使用,并且可以在无线路由器中使用的轻量级tracker服务器。
opentracker官网地址:https://erdgeist.org/arts/software/opentracker/
P2P网络中peer和tracker的关系图
(1).所有源码下载地址
boost下载地址:https://www.boost.org/users/download/#live
libtorrent下载地址:https://github.com/arvidn/libtorrent/releases
openssl下载地址:https://www.openssl.org/source/openssl-1.1.1g.tar.gz
opentracker下载地址: https://gitee.com/cc12655/OpenTracker
(2).安装gcc,g++编译器
$ sudo apt install gcc g++ automake autoconf
以下所有操作都是在ubuntu命令行下进行的。
!!!建议一切操作之前,先好好看看libtorrent手册 !!!
libtorrent manual
downloading and building:
https://www.libtorrent.org/building.html#building-with-bbv2
(3).编译boost
libtorrent使用boost C++库作为基础库而开发的,所以需要先编译boost库,注意boost版本>=1.58才可以在libtorrent库中使用.
首先解压到一个目录
$ tar -zxvf boost_1_74_0.tar.gz
进入boost_1_74_0目录中, 正常编译:
$ cd boost_1_74_0
$ ./bootstrap.sh --with-libraries=all --with-toolset=gcc
--with-liraries:指定需要编译的库 --with-toolset:指定编译时使用的编译器
安装boost库,这个过程很漫长。。。
$ ./b2 install --prefix=/usr/local
--prefix:boost库的安装目录,不加此参数,默认安装在/usr/local目录下
...patience...
...patience...
...patience...
...patience...
...patience...
...patience...
...found 13916 targets...
The Boost C++ Libraries were successfully built!
The following directory should be added to compiler include paths:
/home/kevin/programming/libtorrent/boost_1_74_0
The following directory should be added to linker library paths:
/home/kevin/programming/libtorrent/boost_1_74_0/stage/lib
boost库编译完成后可以看到它提示需要将boost库的头文件路径和库文件路径添加到系统的包含目录中,便于其他软件编译时进行调用。
boost库编译之后,会生成的编译管理系统boost-build v2,简称b2,b2是一个解释器。它通过解释jamfile,加载编译系统来编译其他软件,以下会使用b2来编译libtorrent库
(4).编译openssl
libtorrent依赖openssl,不安装openssl的情况下,编译libtorrent会报找不到ss1.h头文件
编译安装openssl
$ cd openssl-1.1.1g/
$ ./config --prefix=/usr/local/openssl
$ sudo make install
(5).编译libtorrent
libtorrent官网: https://www.libtorrent.org/index.html
在libtorrent目录运行b2(boost库编译之后生成的编译管理系统boost-build)来编译libtorrent
$ b2 install --prefix=/usr/local
(a).编译问题1:找不到boost-build.jam文件
会发现找不到boost-build.jam文件,报错如下
Unable to load Boost.Build: could not find "boost-build.jam"
b2(boost-build v2, 以下均简称b2)所做的第一件事不是查找Jamfile,而是加载编译系统。但是Boost.Build的编译系统究竟是什么呢?
b2是一个解释器。它不知道如何编译任何东西。b2的任务就是解释jamfile。Boost.Build实际上是在jamfile中实现的。它们包含了所有使Boost.Build成为强大工具的逻辑。因为b2只做它在Jamfiles中读取的任务,所以它需要知道在哪里可以找到构成Boost.Build的Jamfiles。
当b2启动时,它会在当前工作目录中寻找boost-build.jam。如果没有找到文件,它会搜索所有的父目录。这个文件只需要包含一行就可以告诉b2在哪里找到编译系统。
Windows下路径:
boost-build C:/boost_1_57_0/tools/build/src ;
Linux下在libtorrent解压目录下创建boost-build.jam文件,写入以下内容:
boost-build /home/kevin/programming/libtorrent/boost_1_74_0/tools/build/src ;
boost-build之后的路径必须引用一个目录,该目录包含一个名为bootstrap.jam的文件。这是b2加载编译系统所需的文件。随着Boost C++库,附带了Boost.Build。您可以引用Boost C++库根目录的子目录tools/build。而且,您可以始终使用斜杠作为路径分隔符,即使是Windows。
请注意,路径和行尾的分号之间必须有空格。没有空格是语法错误。在本文后面,您将了解更多Jamfiles中使用的语法。
(b).编译问题2:boost链接库无法链接的错误
mkdir: cannot create directory ‘/usr/local/share/cmake’: Permission denied
mkdir -p "/usr/local/share/cmake"
...failed common.mkdir /usr/local/share/cmake...
...skipped /usr/local/share/cmake/Modules for lack of /usr/local/share/cmake...
...skipped <p/usr/local/share/cmake/Modules>FindLibtorrentRasterbar.cmake for lack of /usr/local/share/cmake/Modules...
gcc.link.dll bin/gcc-9/debug/threading-multi/libtorrent.so.1.2.9
/usr/bin/ld: cannot find -lboost_system
collect2: error: ld returned 1 exit status
"g++" -L"/usr/local/lib" -L"/usr/local/opt/boost/lib"
用vi 打开/etc/profile,在文件最后把之前编译boost之后的boost相关头文件路径,库文件路径,链接库路径加上:
export CPLUS_INCLUDE_PATH=$CPLUS_INCLUDE_PATH:/home/kevin/programming/libtorrent/boost_1_74_0
export LIBRARY_PATH=$LIBRARY_PATH:/home/kevin/programming/libtorrent/boost_1_74_0/stage/lib
export LD_LIBRARY_PATH=$LD_LIBRARY_PATH:/home/kevin/programming/libtorrent/boost_1_74_0/stage/lib
然后终端中使用source命令使/etc/profile配置的路径生效
$ source /etc/profile
然后就可以接着编译libtorrent了
$ b2 install --prefix=/usr/local
CXXFLAGS =
LDFLAGS =
OS = LINUX
warning: No toolsets are configured.
warning: Configuring default toolset "gcc".
warning: If the default is wrong, your build may not work correctly.
warning: Use the "toolset=xxxxx" option to override our guess.
warning: For more configuration options, please consult
warning: http://boost.org/boost-build2/doc/html/bbv2/advanced/configuration.html
...patience...
...found 1613 targets...
...updating 5 targets...
gcc.link.dll bin/gcc-9/debug/threading-multi/libtorrent.so.1.2.9
common.copy /usr/local/lib/libtorrent.so.1.2.9
cp: cannot create regular file '/usr/local/lib/libtorrent.so.1.2.9': Permission denied
cp "bin/gcc-9/debug/threading-multi/libtorrent.so.1.2.9" "/usr/local/lib/libtorrent.so.1.2.9"
...failed common.copy /usr/local/lib/libtorrent.so.1.2.9...
从以下编译日志可以看出,解决了”/usr/bin/ld: cannot find -lboost_system“无法链接boost库的问题了。
gcc.link.dll bin/gcc-9/debug/threading-multi/libtorrent.so.1.2.9
但是会出现以下“ Permission denied”错误
cp: cannot create regular file '/usr/local/lib/libtorrent.so.1.2.9': Permission denied
所以要加sudo运行b2
$ sudo b2 install --prefix=/usr/local
CXXFLAGS =
LDFLAGS =
OS = LINUX
warning: No toolsets are configured.
warning: Configuring default toolset "gcc".
warning: If the default is wrong, your build may not work correctly.
warning: Use the "toolset=xxxxx" option to override our guess.
warning: For more configuration options, please consult
warning: http://boost.org/boost-build2/doc/html/bbv2/advanced/configuration.html
...patience...
...found 1613 targets...
...updating 4 targets...
common.copy /usr/local/lib/libtorrent.so.1.2.9
ln-UNIX /usr/local/lib/libtorrent.so
ln-UNIX /usr/local/lib/libtorrent.so.1
ln-UNIX /usr/local/lib/libtorrent.so.1.2
...updated 4 targets...
至此libtorrent库编译完成。
(6).编译libtorrent库的client test,运行和下载测试
在libtorrent的解压目录下的examples目录下运行b2即可编译client_test
$ b2
CXXFLAGS =
LDFLAGS =
OS = LINUX
warning: No toolsets are configured.
warning: Configuring default toolset "gcc".
warning: If the default is wrong, your build may not work correctly.
warning: Use the "toolset=xxxxx" option to override our guess.
warning: For more configuration options, please consult
warning: http://boost.org/boost-build2/doc/html/bbv2/advanced/configuration.html
...patience...
...found 1201 targets...
...updating 191 targets...
gcc.compile.c++ ../bin/gcc-9/debug-mode/link-static/threading-multi/ed25519/src/add_scalar.o
...
gcc.compile.c++ bin/gcc-9/debug-mode/link-static/threading-multi/client_test.o
...
gcc.link bin/gcc-9/debug-mode/link-static/threading-multi/client_test
gcc.link bin/gcc-9/debug-mode/link-static/threading-multi/simple_client
gcc.link bin/gcc-9/debug-mode/link-static/threading-multi/custom_storage
gcc.link bin/gcc-9/debug-mode/link-static/threading-multi/bt-get
gcc.link bin/gcc-9/debug-mode/link-static/threading-multi/bt-get2
gcc.link bin/gcc-9/debug-mode/link-static/threading-multi/stats_counters
gcc.link bin/gcc-9/debug-mode/link-static/threading-multi/dump_torrent
gcc.link bin/gcc-9/debug-mode/link-static/threading-multi/make_torrent
gcc.link bin/gcc-9/debug-mode/link-static/threading-multi/connection_tester
gcc.link bin/gcc-9/debug-mode/link-static/threading-multi/upnp_test
可以看到client_test已经编译成功!: )
client_test就在examples/bin/gcc-9/debug-mode/link-static/threading-multi目录下:
$ cd /bin/gcc-9/debug-mode/link-static/threading-multi
$ ./client_test
usage: client_test [OPTIONS] [TORRENT|MAGNETURL]
libtorrent支持torrent种子下载或者磁力链接下载。
libtorrent的client_test最简单的测试就是找一个网上现有的热门torrent种子资源或者magnet URL(磁力链接),即可进行下载(当然前提是连接互联网)。比如找一个美剧资源(比如在91美剧网 https://91mjw.com )的磁力链接:
magnet:?xt=urn:btih:5b5317b19416ac76f84d3119381e08e1a4affe69
$ ./client_test magnet:?xt=urn:btih:5b5317b19416ac76f84d3119381e08e1a4affe69 -s /home/kevin/Downloads
运行client_test之后,会进入client_test监控界面,client_test中可用的命令是:
q退出客户端(客户端等待跟踪器响应时会有延迟)
l切换日志。将在底部显示日志,通知有关跟踪器和对等事件的信息。
i切换种子信息。将显示每个种子的同级列表。
d切换下载信息。将显示每个种子的阻止列表,并显示下载和请求的阻止。
p暂停所有种子。
u恢复所有种子。
r强制跟踪器针对所有种子重新宣布。
f切换显示文件进度。显示所有文件的列表以及每个文件的下载进度。
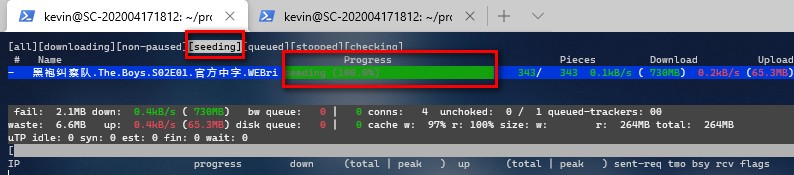
按 i 就可以看到所有的torrent信息节点来源,以及这些资源用的什么客户端以及客户端版本号,从下图就可以看出比如: BitComet, aria2, Transmission, uTorrent, qBittorrent这些常用的BT下载软件所提供的资源信息。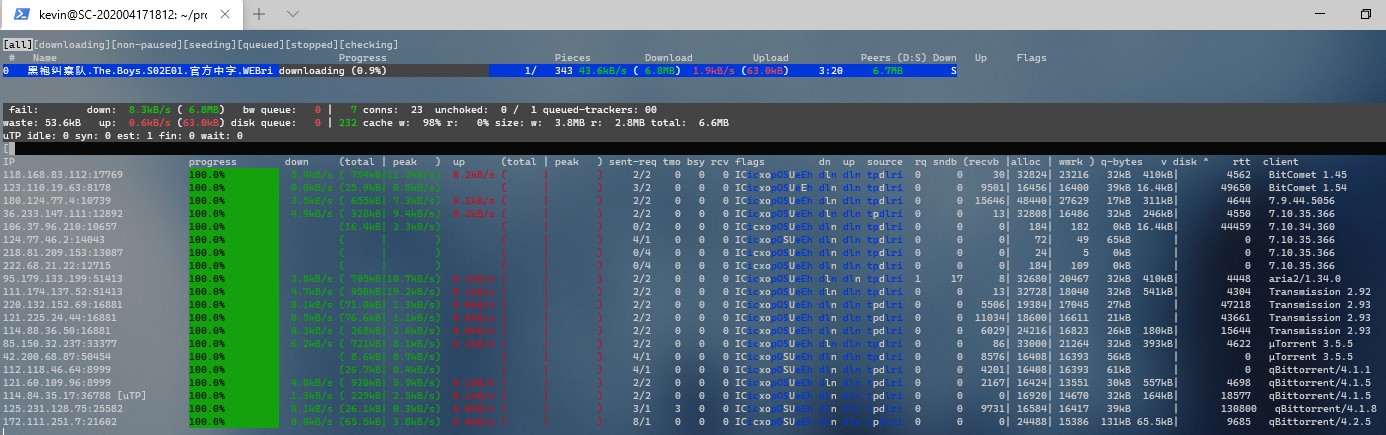
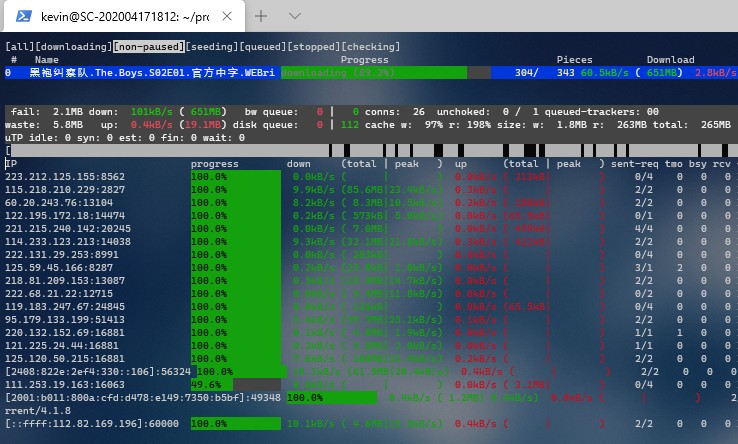
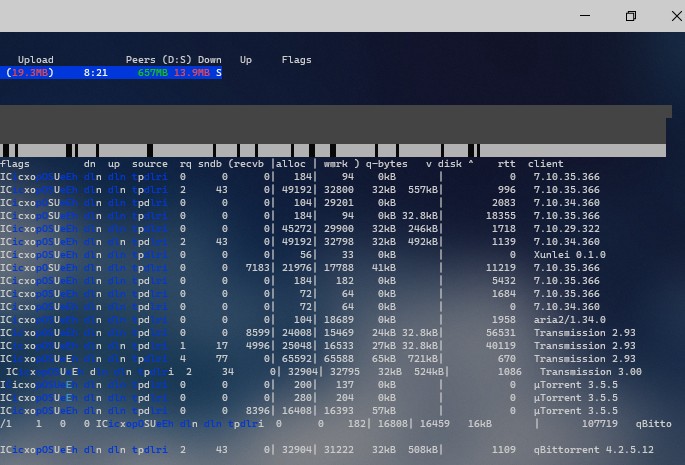
文件下载完成后,会为其他客户端seeding(做种)
2.搭建tracker服务器测试libtorrent
(1).运行tracker服务器
先把tracker服务器跑起来,指定ip地址和端口号
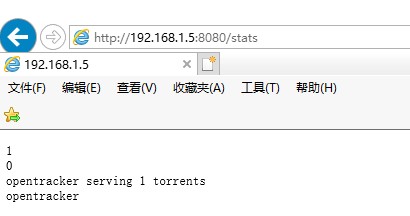
$ ./opentracker -i 192.168.1.5 -p 8080
用浏览器打开 http://ip:端口号/stats (比如这里就是刚设置的http://192.168.1.5:8080/stats),
可以查看到tracker服务器上记录的torrent信息。如下图:
(2).制作种子文件
在libtorrent/examples/bin/gcc-9/debug-mode/link-static/threading-multi目录下,运行make_torrent,根据原始文件制作种子文件(torrent),同时也可以指定tracker服务器地址。
$ ./make_torrent Faded-AlanWalker.mp4 -t http://192.168.1.5:8080/announce -t udp://192.168.1.5:8080/announce -o Faded-AlanWalker.mp4.torrent
(3).运行client_test
拷贝种子文件到其他目录下,运行client_test,通过p2p下载文件。
这里在三个不同的目录下都放了同一个种子文件Faded-AlanWalker.mp4.torrent,运行了三个客户端同时进行下载,-s 选项 指定了各自的保存下载文件目录路径。
特别注意 !!! 不要在同一个IP地址下运行三个客户端,这样是没办法多个客户端同时互传数据的。
$ ./client_test /mnt/e/test/aa/Faded-AlanWalker.mp4.torrent -s /mnt/e/test/aa/
$ ./client_test /mnt/e/test/bb/Faded-AlanWalker.mp4.torrent -s /mnt/e/test/bb/
$ ./client_test /mnt/e/test/cc/Faded-AlanWalker.mp4.torrent -s /mnt/e/test/cc/


实际用官方用例测试,可以下载文件,但是下载速度超级慢,原因待查...
3.重新编译libtorrent,取消调试
(1). configure错误
$ ./configure --disable-debug
Checking for boost libraries:
checking for boostlib >= 1.58 (105800)... yes
checking whether g++ supports C++11 features with -std=c++11... yes
checking whether the Boost::System library is available... yes
configure: error: Could not find a version of the Boost::System library!
不使用b2编译时,在configure阶段,每次都提示找不到boost系统库文件,这个问题的解决方案是在configure阶段添加指定system library路径
--with-boost-libdir=/home/kevin/programming/libtorrent/boost_1_74_0/stage/lib
$ ./configure --disable-debug \
--with-boost-libdir=/home/kevin/programming/libtorrent/boost_1_74_0/stage/lib
$ make clean
$ make
4.参考链接:
(1).libtorrent相关链接
libtorrent manual
Boost.Build 简明教程:https://blog.csdn.net/weixin_30911809/article/details/99513419
libtorrent downloading and building https://www.libtorrent.org/building.html#build-configurations
Boost.Build Tutorial :https://www.boost.org/doc/libs/1_58_0/tools/build/tutorial.html
What is BiTorrent? http://bittorrent.org/introduction.html
libtorrent资料整理:https://www.cnblogs.com/bugutian/p/8392328.html
P2P原理与技术:https://wenku.baidu.com/view/a042db0bf78a6529647d53bf.html
磁力链接是如何实现下载的?
https://www.aneasystone.com/archives/2015/05/how-does-magnet-link-work.html
百度网盘和视频网站都在用的P2P技术是什么?
https://blog.csdn.net/sinat_32970179/article/details/105690284
libtorrent源码分析(一)整体框架
BTlibtorrent/torrent_info接口笔记 :http://blog.chinaunix.net/uid-11707862-id-1608611.html
libtorrent 官方手册: https://www.libtorrent.org/reference.html
IPFS 和 BitTorrent 区别 https://www.jianshu.com/p/4aae453f1a67
有价值的IPFS博客 https://www.cnblogs.com/bugutian/p/10075321.html
BitTorrent的DHT协议(译自官方版本) https://blog.csdn.net/xxxxxx91116/article/details/7970815
Gingko——百度内网用于数据分发p2p工具 https://m.youku.com/video/id_XNzY4MzkyNzk2.html?from=s1.8-1-1.2&source=
基于 FUSE 的 Bittorrent 文件系统 | Linux 中国 https://mp.weixin.qq.com/s/vmh5hHrVA0fJJyFRS5IpKw
(2).tracker服务器相关链接
BitTorrent Tracker服务器源码分析(部分) BT https://www.cnblogs.com/pursue/articles/1598528.html
BT服务器的搭建(tracker-P2P服务器架设)https://www.cnblogs.com/EasonJim/p/6601330.html
Centos7使用OpenTracker自建高性能Tracker服务器
https://blog.csdn.net/qq1784855023/article/details/85332267
最新Tracker服务器地址 提升BT种子、磁力链接下载速度 https://www.xitmi.com/5784.html
OpenTracker https://gitee.com/cc12655/OpenTracker
opentracker – An open and free bittorrent tracker http://erdgeist.org/arts/software/opentracker/
OpenTracker的说明与安装 https://www.zybuluo.com/zhongdao/note/1434469
XBT Tracker http://xbtt.sourceforge.net/tracker/
Ubuntu搭建BT服务器&FTP服务器发布种子 https://blog.csdn.net/qq_25672665/article/details/81586640
搭建内网BT服务器 https://www.cnblogs.com/rupeng/archive/2010/06/19/1761070.html
使用BT协议构建软件快速分发系统(可用于Linux内网快速分发文件)
https://blog.csdn.net/jailman/article/details/86231517
trackerlist(这些trackerlist每天会更新)
https://github.com/ngosang/trackerslist
https://github.com/XIU2/TrackersListCollection
linux下P2P协议(BitTorrent)-libtorrent库编译,测试的更多相关文章
- Linux下C程序的编辑,编译和运行以及调试
国内私募机构九鼎控股打造APP,来就送 20元现金领取地址:http://jdb.jiudingcapital.com/phone.html 内部邀请码:C8E245J (不写邀请码,没有现金送) 国 ...
- 在Linux下安装PHP过程中,编译时出现错误的解决办法
在Linux下安装PHP过程中,编译时出现configure: error: libjpeg.(a|so) not found 错误的解决办法 configure: error: libjpeg.(a ...
- Linux下p2p的聊天功能实现
Linux下p2p的聊天功能实现细节 Do one thing at a time, and do well. 今天闲着没事,写一个P2P的点对点的聊天功能的小程序,我觉得对网络编程初学者的学习很有用 ...
- linux下getsockopt和setsockopt详解及测试
linux下getsockopt和setsockopt详解及测试 NAME 名字 getsockopt, setsockopt - get and set options on sockets 获取或 ...
- LINUX下一款不错的网站压力测试工具webbench
LINUX下一款不错的网站压力测试工具webbench 分类: Linux 2014-07-03 09:10 220人阅读 评论(0) 收藏 举报 [html] view plaincopy wget ...
- Linux下动态链接库和静态链接库
第一部分:编译过程 先了解一下linux下C代码的编译过程,C代码的编译,一般分成四个阶段,包括:预编译,编译,汇编和链接,这四个阶段的分工是 预处理过程,负责头文件展开,宏替换,条件编译的选择,删除 ...
- Linux下C语言编程中库的使用
零.问题 1. 为什么要用到库? 2. 我要用一个库,但是,尼玛命令行上该怎么写呢?或者说库文件如何使用? 3. Linux的库在那些地方? 4. 什么是静态库,什么是动态库,二者有啥区别? 5. 常 ...
- Linux下MySQL 5.6.24的编译安装与部署
MySQL 5.6正式版发布了,相对于5.5版本作出了不少改进,其源码安装配置方式也有所变化,本文根据实际操作,不断尝试,精确还原了安装的具体步骤. 在Linux下安装MySQL前,先确认卸载系统自带 ...
- linux下.a/.so/.la目标库区别
在linux平台上编译时,常会遇到目标库的疑问,有静态库也有动态库,单个理解都不太难,但是对复杂的工程而言,一旦混合到一起去,对整个工程的理解和调用,将会造成很大困扰,本文就汇总这几种常见编译结果文件 ...
随机推荐
- GPS位置显示在地图上
源码分析博客地址:https://blog.csdn.net/wuquan_1230/article/details/79614974 工具下载地址:http://download.csdn.net/ ...
- JS中escape()、encodeURI()、encodeURIComponent()区别详解
avaScript中有三个可以对字符串编码的函数,分别是: escape,encodeURI,encodeURIComponent,相应3个解码函数:unescape,decodeURI,decode ...
- java二进制表示形式与移位操作符
java二进制表示形式 java中数字的二进制表示形式称为"有符号的二进制补码",下面先介绍原码,反码,补码. 编码 计算方法 原码 用最高位表示符号位,'1'表示负号,'0'表示 ...
- 定宽整形(C++11起)
定义于头文件 cstdint中int8_t.int16_t.int32_t.int64_t 分别为宽度恰为 8 . 16 . 32 和 64 位的有符号整数类型无填充位并对负值使用补码(仅若实现支持该 ...
- 分析现有 WPF / Windows Forms 程序能否顺利迁移到 .NET Core 3.0
本文转自 https://blog.csdn.net/WPwalter/article/details/82859449 使用 .NET Core 3.0 Desktop API Analyzer 分 ...
- leetcode 877. Stone Game 详解 -——动态规划
原博客地址 https://blog.csdn.net/androidchanhao/article/details/81271077 题目链接 https://leetcode.com/proble ...
- golang的 strconv 包
前言 不做文字搬运工,多做思路整理 就是为了能速览标准库,只整理我自己看过的...... 注意!!!!!!!!!! 单词都是连着的,我是为了看着方便.理解方便才分开的 1.strconv 中文文档 [ ...
- 大侠稍等!URL 中为何出现奇怪的字符
为什么中文名称的图片打开后网址是一串乱码?为什么好好的短网址复制粘贴就变长了一大长串?罪魁祸首居然是-- 杭州终于出梅了!二狗子看到气象台发布的消息,开心的不得了.杭州的雨从五月底一直下,每天除了雨还 ...
- XXE漏洞学习笔记
XXE 参考文章 名称 地址 一篇文章带你深入理解漏洞之 XXE 漏洞 https://xz.aliyun.com/t/3357 Web Hacking 101 https://wizardforce ...
- 用java编程在10000到99999中的数字中找到aabcc类型的数字
package com.diyo.offer; public class FindNum { public static void main(String[] args) { int count = ...