Stable Diffusion
...using diffusers
Stable Diffusion is a text-to-image latent diffusion model created by the researchers and engineers from CompVis, Stability AI and LAION. It's trained on 512x512 images from a subset of the LAION-5B database. This model uses a frozen CLIP ViT-L/14 text encoder to condition the model on text prompts. With its 860M UNet and 123M text encoder, the model is relatively lightweight and can run on many consumer GPUs. See the model card for more information.
This Colab notebook shows how to use Stable Diffusion with the Hugging Face Diffusers library.
Let's get started!
1. How to use StableDiffusionPipeline
Before diving into the theoretical aspects of how Stable Diffusion functions, let's try it out a bit .
In this section, we show how you can run text to image inference in just a few lines of code!
Setup
First, please make sure you are using a GPU runtime to run this notebook, so inference is much faster. If the following command fails, use the Runtime menu above and select Change runtime type.
Fri Mar  3 07:38:29 2023

+-----------------------------------------------------------------------------+

| NVIDIA-SMI 525.85.12    Driver Version: 525.85.12    CUDA Version: 12.0     |

|-------------------------------+----------------------+----------------------+

| GPU  Name        Persistence-M| Bus-Id        Disp.A | Volatile Uncorr. ECC |

| Fan  Temp  Perf  Pwr:Usage/Cap|         Memory-Usage | GPU-Util  Compute M. |

|                               |                      |               MIG M. |

|===============================+======================+======================|

|   0  Tesla T4            Off  | 00000000:00:04.0 Off |                    0 |

| N/A   50C    P0    27W /  70W |      0MiB / 15360MiB |      0%      Default |

|                               |                      |                  N/A |

+-------------------------------+----------------------+----------------------+

+-----------------------------------------------------------------------------+

| Processes:                                                                  |

|  GPU   GI   CI        PID   Type   Process name                  GPU Memory |

|        ID   ID                                                   Usage      |

|=============================================================================|

|  No running processes found                                                 |

+-----------------------------------------------------------------------------+
Next, you should install diffusers as well scipy, ftfy and transformers. accelerate is used to achieve much faster loading.
!pip install diffusers==0.11.1
!pip install transformers scipy ftfy accelerate
Looking in indexes: https://pypi.org/simple, https://us-python.pkg.dev/colab-wheels/public/simple/

Collecting diffusers==0.11.1

  Downloading diffusers-0.11.1-py3-none-any.whl (524 kB)

     ━━━━━━━━━━━━━━━━━━━━━━━━━━━━━━━━━━━━━━ 524.9/524.9 KB 36.6 MB/s eta 0:00:00

Requirement already satisfied: requests in /usr/local/lib/python3.8/dist-packages (from diffusers==0.11.1) (2.25.1)

Requirement already satisfied: importlib-metadata in /usr/local/lib/python3.8/dist-packages (from diffusers==0.11.1) (6.0.0)

Requirement already satisfied: Pillow in /usr/local/lib/python3.8/dist-packages (from diffusers==0.11.1) (8.4.0)

Requirement already satisfied: numpy in /usr/local/lib/python3.8/dist-packages (from diffusers==0.11.1) (1.22.4)

Collecting huggingface-hub>=0.10.0

  Downloading huggingface_hub-0.12.1-py3-none-any.whl (190 kB)

     ━━━━━━━━━━━━━━━━━━━━━━━━━━━━━━━━━━━━━━ 190.3/190.3 KB 26.7 MB/s eta 0:00:00

Requirement already satisfied: regex!=2019.12.17 in /usr/local/lib/python3.8/dist-packages (from diffusers==0.11.1) (2022.6.2)

Requirement already satisfied: filelock in /usr/local/lib/python3.8/dist-packages (from diffusers==0.11.1) (3.9.0)

Requirement already satisfied: pyyaml>=5.1 in /usr/local/lib/python3.8/dist-packages (from huggingface-hub>=0.10.0->diffusers==0.11.1) (6.0)

Requirement already satisfied: typing-extensions>=3.7.4.3 in /usr/local/lib/python3.8/dist-packages (from huggingface-hub>=0.10.0->diffusers==0.11.1) (4.5.0)

Requirement already satisfied: tqdm>=4.42.1 in /usr/local/lib/python3.8/dist-packages (from huggingface-hub>=0.10.0->diffusers==0.11.1) (4.64.1)

Requirement already satisfied: packaging>=20.9 in /usr/local/lib/python3.8/dist-packages (from huggingface-hub>=0.10.0->diffusers==0.11.1) (23.0)

Requirement already satisfied: zipp>=0.5 in /usr/local/lib/python3.8/dist-packages (from importlib-metadata->diffusers==0.11.1) (3.15.0)

Requirement already satisfied: certifi>=2017.4.17 in /usr/local/lib/python3.8/dist-packages (from requests->diffusers==0.11.1) (2022.12.7)

Requirement already satisfied: chardet<5,>=3.0.2 in /usr/local/lib/python3.8/dist-packages (from requests->diffusers==0.11.1) (4.0.0)

Requirement already satisfied: idna<3,>=2.5 in /usr/local/lib/python3.8/dist-packages (from requests->diffusers==0.11.1) (2.10)

Requirement already satisfied: urllib3<1.27,>=1.21.1 in /usr/local/lib/python3.8/dist-packages (from requests->diffusers==0.11.1) (1.26.14)

Installing collected packages: huggingface-hub, diffusers

Successfully installed diffusers-0.11.1 huggingface-hub-0.12.1

Looking in indexes: https://pypi.org/simple, https://us-python.pkg.dev/colab-wheels/public/simple/

Collecting transformers

  Downloading transformers-4.26.1-py3-none-any.whl (6.3 MB)

     ━━━━━━━━━━━━━━━━━━━━━━━━━━━━━━━━━━━━━━━━ 6.3/6.3 MB 104.4 MB/s eta 0:00:00

Requirement already satisfied: scipy in /usr/local/lib/python3.8/dist-packages (1.10.1)

Collecting ftfy

  Downloading ftfy-6.1.1-py3-none-any.whl (53 kB)

     ━━━━━━━━━━━━━━━━━━━━━━━━━━━━━━━━━━━━━━━━ 53.1/53.1 KB 8.4 MB/s eta 0:00:00

Collecting accelerate

  Downloading accelerate-0.16.0-py3-none-any.whl (199 kB)

     ━━━━━━━━━━━━━━━━━━━━━━━━━━━━━━━━━━━━━━ 199.7/199.7 KB 26.5 MB/s eta 0:00:00

Requirement already satisfied: numpy>=1.17 in /usr/local/lib/python3.8/dist-packages (from transformers) (1.22.4)

Requirement already satisfied: requests in /usr/local/lib/python3.8/dist-packages (from transformers) (2.25.1)

Requirement already satisfied: tqdm>=4.27 in /usr/local/lib/python3.8/dist-packages (from transformers) (4.64.1)

Requirement already satisfied: regex!=2019.12.17 in /usr/local/lib/python3.8/dist-packages (from transformers) (2022.6.2)

Requirement already satisfied: filelock in /usr/local/lib/python3.8/dist-packages (from transformers) (3.9.0)

Requirement already satisfied: pyyaml>=5.1 in /usr/local/lib/python3.8/dist-packages (from transformers) (6.0)

Collecting tokenizers!=0.11.3,<0.14,>=0.11.1

  Downloading tokenizers-0.13.2-cp38-cp38-manylinux_2_17_x86_64.manylinux2014_x86_64.whl (7.6 MB)

     ━━━━━━━━━━━━━━━━━━━━━━━━━━━━━━━━━━━━━━━━ 7.6/7.6 MB 115.0 MB/s eta 0:00:00

Requirement already satisfied: huggingface-hub<1.0,>=0.11.0 in /usr/local/lib/python3.8/dist-packages (from transformers) (0.12.1)

Requirement already satisfied: packaging>=20.0 in /usr/local/lib/python3.8/dist-packages (from transformers) (23.0)

Requirement already satisfied: wcwidth>=0.2.5 in /usr/local/lib/python3.8/dist-packages (from ftfy) (0.2.6)

Requirement already satisfied: psutil in /usr/local/lib/python3.8/dist-packages (from accelerate) (5.4.8)

Requirement already satisfied: torch>=1.4.0 in /usr/local/lib/python3.8/dist-packages (from accelerate) (1.13.1+cu116)

Requirement already satisfied: typing-extensions>=3.7.4.3 in /usr/local/lib/python3.8/dist-packages (from huggingface-hub<1.0,>=0.11.0->transformers) (4.5.0)

Requirement already satisfied: urllib3<1.27,>=1.21.1 in /usr/local/lib/python3.8/dist-packages (from requests->transformers) (1.26.14)

Requirement already satisfied: idna<3,>=2.5 in /usr/local/lib/python3.8/dist-packages (from requests->transformers) (2.10)

Requirement already satisfied: certifi>=2017.4.17 in /usr/local/lib/python3.8/dist-packages (from requests->transformers) (2022.12.7)

Requirement already satisfied: chardet<5,>=3.0.2 in /usr/local/lib/python3.8/dist-packages (from requests->transformers) (4.0.0)

Installing collected packages: tokenizers, ftfy, accelerate, transformers

Successfully installed accelerate-0.16.0 ftfy-6.1.1 tokenizers-0.13.2 transformers-4.26.1
Stable Diffusion Pipeline
StableDiffusionPipeline is an end-to-end inference pipeline that you can use to generate images from text with just a few lines of code.
First, we load the pre-trained weights of all components of the model. In this notebook we use Stable Diffusion version 1.4 (CompVis/stable-diffusion-v1-4), but there are other variants that you may want to try:
- runwayml/stable-diffusion-v1-5
- stabilityai/stable-diffusion-2-1-base
- stabilityai/stable-diffusion-2-1. This version can produce images with a resolution of 768x768, while the others work at 512x512.
In addition to the model id CompVis/stable-diffusion-v1-4, we're also passing a specific revision and torch_dtype to the from_pretrained method.
We want to ensure that every free Google Colab can run Stable Diffusion, hence we're loading the weights from the half-precision branch fp16 and also tell diffusers to expect the weights in float16 precision by passing torch_dtype=torch.float16.
If you want to ensure the highest possible precision, please make sure to remove torch_dtype=torch.float16 at the cost of a higher memory usage.
import torch
from diffusers import StableDiffusionPipeline

pipe = StableDiffusionPipeline.from_pretrained("CompVis/stable-diffusion-v1-4", torch_dtype=torch.float16)
Next, let's move the pipeline to GPU to have faster inference.
pipe = pipe.to("cuda")
And we are ready to generate images:
prompt = "a photograph of an astronaut riding a horse"
image = pipe(prompt).images[0]  # image here is in [PIL format](https://pillow.readthedocs.io/en/stable/)

# Now to display an image you can either save it such as:
image.save(f"astronaut_rides_horse.png")

# or if you're in a google colab you can directly display it with
image
Running the above cell multiple times will give you a different image every time. If you want deterministic output you can pass a random seed to the pipeline. Every time you use the same seed you'll have the same image result.
import torch

generator = torch.Generator("cuda").manual_seed(1024)

image = pipe(prompt, generator=generator).images[0]

image
You can change the number of inference steps using the num_inference_steps argument. In general, results are better the more steps you use. Stable Diffusion, being one of the latest models, works great with a relatively small number of steps, so we recommend to use the default of 50. If you want faster results you can use a smaller number.
The following cell uses the same seed as before, but with fewer steps. Note how some details, such as the horse's head or the helmet, are less defin realistic and less defined than in the previous image:
import torch

generator = torch.Generator("cuda").manual_seed(1024)

image = pipe(prompt, num_inference_steps=15, generator=generator).images[0]

image
The other parameter in the pipeline call is guidance_scale. It is a way to increase the adherence to the conditional signal which in this case is text as well as overall sample quality. In simple terms classifier free guidance forces the generation to better match with the prompt. Numbers like 7 or 8.5 give good results, if you use a very large number the images might look good, but will be less diverse.
You can learn about the technical details of this parameter in the last section of this notebook.
To generate multiple images for the same prompt, we simply use a list with the same prompt repeated several times. We'll send the list to the pipeline instead of the string we used before.
Let's first write a helper function to display a grid of images. Just run the following cell to create the image_grid function, or disclose the code if you are interested in how it's done.
from PIL import Image

def image_grid(imgs, rows, cols):
    assert len(imgs) == rows*cols

    w, h = imgs[0].size
    grid = Image.new('RGB', size=(cols*w, rows*h))
    grid_w, grid_h = grid.size

    for i, img in enumerate(imgs):
        grid.paste(img, box=(i%cols*w, i//cols*h))
    return grid
Now, we can generate a grid image once having run the pipeline with a list of 3 prompts.
num_images = 3
prompt = ["a photograph of an astronaut riding a horse"] * num_images

images = pipe(prompt).images

grid = image_grid(images, rows=1, cols=3)
grid
And here's how to generate a grid of n × m images.
num_cols = 3
num_rows = 4

prompt = ["a photograph of an astronaut riding a horse"] * num_cols

all_images = []
for i in range(num_rows):
  images = pipe(prompt).images
  all_images.extend(images)

grid = image_grid(all_images, rows=num_rows, cols=num_cols)
grid
Generate non-square images
Stable Diffusion produces images of 512 × 512 pixels by default. But it's very easy to override the default using the height and width arguments, so you can create rectangular images in portrait or landscape ratios.
These are some recommendations to choose good image sizes:
- Make sure
heightandwidthare both multiples of8. - Going below 512 might result in lower quality images.
- Going over 512 in both directions will repeat image areas (global coherence is lost).
- The best way to create non-square images is to use
512in one dimension, and a value larger than that in the other one.
prompt = "a photograph of an astronaut riding a horse"

image = pipe(prompt, height=512, width=768).images[0]
image
2. What is Stable Diffusion
Now, let's go into the theoretical part of Stable Diffusion .
Stable Diffusion is based on a particular type of diffusion model called Latent Diffusion, proposed in High-Resolution Image Synthesis with Latent Diffusion Models.
General diffusion models are machine learning systems that are trained to denoise random gaussian noise step by step, to get to a sample of interest, such as an image. For a more detailed overview of how they work, check this colab.
Diffusion models have shown to achieve state-of-the-art results for generating image data. But one downside of diffusion models is that the reverse denoising process is slow. In addition, these models consume a lot of memory because they operate in pixel space, which becomes unreasonably expensive when generating high-resolution images. Therefore, it is challenging to train these models and also use them for inference.
Latent diffusion can reduce the memory and compute complexity by applying the diffusion process over a lower dimensional latent space, instead of using the actual pixel space. This is the key difference between standard diffusion and latent diffusion models: in latent diffusion the model is trained to generate latent (compressed) representations of the images.
There are three main components in latent diffusion.
- An autoencoder (VAE).
- A U-Net.
- A text-encoder, e.g. CLIP's Text Encoder.
1. The autoencoder (VAE)
The VAE model has two parts, an encoder and a decoder. The encoder is used to convert the image into a low dimensional latent representation, which will serve as the input to the U-Net model. The decoder, conversely, transforms the latent representation back into an image.
During latent diffusion training, the encoder is used to get the latent representations (latents) of the images for the forward diffusion process, which applies more and more noise at each step. During inference, the denoised latents generated by the reverse diffusion process are converted back into images using the VAE decoder. As we will see during inference we only need the VAE decoder.
2. The U-Net
The U-Net has an encoder part and a decoder part both comprised of ResNet blocks. The encoder compresses an image representation into a lower resolution image representation and the decoder decodes the lower resolution image representation back to the original higher resolution image representation that is supposedly less noisy. More specifically, the U-Net output predicts the noise residual which can be used to compute the predicted denoised image representation.
To prevent the U-Net from losing important information while downsampling, short-cut connections are usually added between the downsampling ResNets of the encoder to the upsampling ResNets of the decoder. Additionally, the stable diffusion U-Net is able to condition its output on text-embeddings via cross-attention layers. The cross-attention layers are added to both the encoder and decoder part of the U-Net usually between ResNet blocks.
3. The Text-encoder
The text-encoder is responsible for transforming the input prompt, e.g. "An astronout riding a horse" into an embedding space that can be understood by the U-Net. It is usually a simple transformer-based encoder that maps a sequence of input tokens to a sequence of latent text-embeddings.
Inspired by Imagen, Stable Diffusion does not train the text-encoder during training and simply uses an CLIP's already trained text encoder, CLIPTextModel.
Why is latent diffusion fast and efficient?
Since the U-Net of latent diffusion models operates on a low dimensional space, it greatly reduces the memory and compute requirements compared to pixel-space diffusion models. For example, the autoencoder used in Stable Diffusion has a reduction factor of 8. This means that an image of shape (3, 512, 512) becomes (3, 64, 64) in latent space, which requires 8 × 8 = 64 times less memory.
This is why it's possible to generate 512 × 512 images so quickly, even on 16GB Colab GPUs!
Stable Diffusion during inference
Putting it all together, let's now take a closer look at how the model works in inference by illustrating the logical flow.
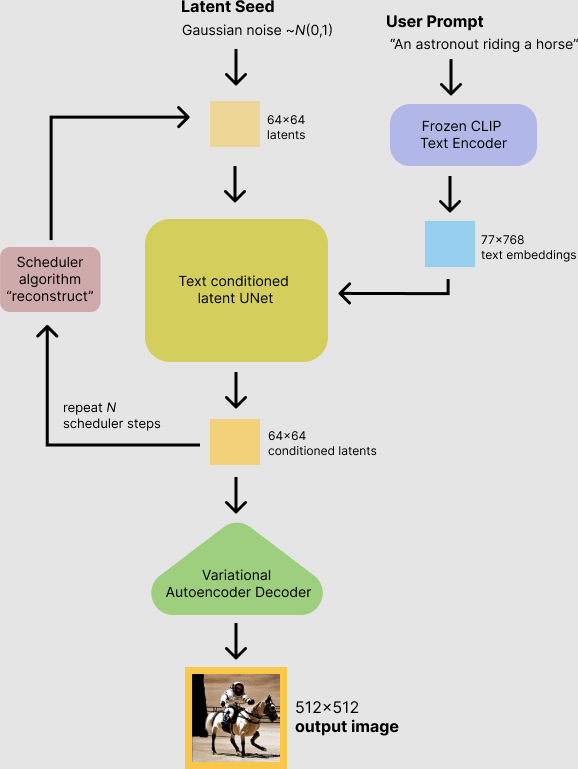
The stable diffusion model takes both a latent seed and a text prompt as an input. The latent seed is then used to generate random latent image representations of size 64×64 where as the text prompt is transformed to text embeddings of size 77×768 via CLIP's text encoder.
Next the U-Net iteratively denoises the random latent image representations while being conditioned on the text embeddings. The output of the U-Net, being the noise residual, is used to compute a denoised latent image representation via a scheduler algorithm. Many different scheduler algorithms can be used for this computation, each having its pros and cons. For Stable Diffusion, we recommend using one of:
- PNDM scheduler (used by default).
- K-LMS scheduler.
- Heun Discrete scheduler.
- DPM Solver Multistep scheduler. This scheduler is able to achieve great quality in less steps. You can try with 25 instead of the default 50!
Theory on how the scheduler algorithm function is out of scope for this notebook, but in short one should remember that they compute the predicted denoised image representation from the previous noise representation and the predicted noise residual. For more information, we recommend looking into Elucidating the Design Space of Diffusion-Based Generative Models
The denoising process is repeated ca. 50 times to step-by-step retrieve better latent image representations. Once complete, the latent image representation is decoded by the decoder part of the variational auto encoder.
After this brief introduction to Latent and Stable Diffusion, let's see how to make advanced use of Hugging Face Diffusers!
3. How to write your own inference pipeline with diffusers
Finally, we show how you can create custom diffusion pipelines with diffusers. This is often very useful to dig a bit deeper into certain functionalities of the system and to potentially switch out certain components.
In this section, we will demonstrate how to use Stable Diffusion with a different scheduler, namely Katherine Crowson's K-LMS scheduler that was added in this PR.
Let's go through the StableDiffusionPipeline step by step to see how we could have written it ourselves.
We will start by loading the individual models involved.
import torch
torch_device = "cuda" if torch.cuda.is_available() else "cpu"
The pre-trained model includes all the components required to setup a complete diffusion pipeline. They are stored in the following folders:
text_encoder: Stable Diffusion uses CLIP, but other diffusion models may use other encoders such asBERT.tokenizer. It must match the one used by thetext_encodermodel.scheduler: The scheduling algorithm used to progressively add noise to the image during training.unet: The model used to generate the latent representation of the input.vae: Autoencoder module that we'll use to decode latent representations into real images.
We can load the components by referring to the folder they were saved, using the subfolder argument to from_pretrained.
from transformers import CLIPTextModel, CLIPTokenizer
from diffusers import AutoencoderKL, UNet2DConditionModel, PNDMScheduler

# 1. Load the autoencoder model which will be used to decode the latents into image space.
vae = AutoencoderKL.from_pretrained("CompVis/stable-diffusion-v1-4", subfolder="vae")

# 2. Load the tokenizer and text encoder to tokenize and encode the text.
tokenizer = CLIPTokenizer.from_pretrained("openai/clip-vit-large-patch14")
text_encoder = CLIPTextModel.from_pretrained("openai/clip-vit-large-patch14")

# 3. The UNet model for generating the latents.
unet = UNet2DConditionModel.from_pretrained("CompVis/stable-diffusion-v1-4", subfolder="unet")
Now instead of loading the pre-defined scheduler, we'll use the K-LMS scheduler instead.
from diffusers import LMSDiscreteScheduler

scheduler = LMSDiscreteScheduler.from_pretrained("CompVis/stable-diffusion-v1-4", subfolder="scheduler")
Next we move the models to the GPU.
vae = vae.to(torch_device)
text_encoder = text_encoder.to(torch_device)
unet = unet.to(torch_device)
We now define the parameters we'll use to generate images.
Note that guidance_scale is defined analog to the guidance weight w of equation (2) in the Imagen paper. guidance_scale == 1 corresponds to doing no classifier-free guidance. Here we set it to 7.5 as also done previously.
In contrast to the previous examples, we set num_inference_steps to 100 to get an even more defined image.
prompt = ["a photograph of an astronaut riding a horse"]

height = 512                        # default height of Stable Diffusion
width = 512                         # default width of Stable Diffusion

num_inference_steps = 100            # Number of denoising steps

guidance_scale = 7.5                # Scale for classifier-free guidance

generator = torch.manual_seed(32)   # Seed generator to create the inital latent noise

batch_size = 1
First, we get the text_embeddings for the prompt. These embeddings will be used to condition the UNet model.
text_input = tokenizer(prompt, padding="max_length", max_length=tokenizer.model_max_length, truncation=True, return_tensors="pt")

with torch.no_grad():
  text_embeddings = text_encoder(text_input.input_ids.to(torch_device))[0]
We'll also get the unconditional text embeddings for classifier-free guidance, which are just the embeddings for the padding token (empty text). They need to have the same shape as the conditional text_embeddings (batch_size and seq_length)
max_length = text_input.input_ids.shape[-1]
uncond_input = tokenizer(
    [""] * batch_size, padding="max_length", max_length=max_length, return_tensors="pt"
)
with torch.no_grad():
  uncond_embeddings = text_encoder(uncond_input.input_ids.to(torch_device))[0]
For classifier-free guidance, we need to do two forward passes. One with the conditioned input (text_embeddings), and another with the unconditional embeddings (uncond_embeddings). In practice, we can concatenate both into a single batch to avoid doing two forward passes.
text_embeddings = torch.cat([uncond_embeddings, text_embeddings])
Generate the intial random noise.
latents = torch.randn(
  (batch_size, unet.in_channels, height // 8, width // 8),
  generator=generator,
)
latents = latents.to(torch_device)
latents.shape
torch.Size([1, 4, 64, 64])
Cool 64×64 is expected. The model will transform this latent representation (pure noise) into a 512 × 512 image later on.
Next, we initialize the scheduler with our chosen num_inference_steps. This will compute the sigmas and exact time step values to be used during the denoising process.
scheduler.set_timesteps(num_inference_steps)
The K-LMS scheduler needs to multiply the latents by its sigma values. Let's do this here
latents = latents * scheduler.init_noise_sigma
We are ready to write the denoising loop.
from tqdm.auto import tqdm
from torch import autocast

for t in tqdm(scheduler.timesteps):
  # expand the latents if we are doing classifier-free guidance to avoid doing two forward passes.
  latent_model_input = torch.cat([latents] * 2)

  latent_model_input = scheduler.scale_model_input(latent_model_input, t)

  # predict the noise residual
  with torch.no_grad():
    noise_pred = unet(latent_model_input, t, encoder_hidden_states=text_embeddings).sample

  # perform guidance
  noise_pred_uncond, noise_pred_text = noise_pred.chunk(2)
  noise_pred = noise_pred_uncond + guidance_scale * (noise_pred_text - noise_pred_uncond)

  # compute the previous noisy sample x_t -> x_t-1
  latents = scheduler.step(noise_pred, t, latents).prev_sample
We now use the vae to decode the generated latents back into the image.
# scale and decode the image latents with vae
latents = 1 / 0.18215 * latents

with torch.no_grad():
  image = vae.decode(latents).sample
And finally, let's convert the image to PIL so we can display or save it.
image = (image / 2 + 0.5).clamp(0, 1)
image = image.detach().cpu().permute(0, 2, 3, 1).numpy()
images = (image * 255).round().astype("uint8")
pil_images = [Image.fromarray(image) for image in images]
pil_images[0]
Now you have all the pieces to build your own pipelines or use diffusers components as you like .
10 秒完成时间:15:43
Stable Diffusion的更多相关文章
- AI绘画提示词创作指南:DALL·E 2、Midjourney和 Stable Diffusion最全大比拼 ⛵
作者:韩信子@ShowMeAI 深度学习实战系列:https://www.showmeai.tech/tutorials/42 自然语言处理实战系列:https://www.showmeai.tech ...
- 从 GPT2 到 Stable Diffusion:Elixir 社区迎来了 Hugging Face
上周,Elixir 社区向大家宣布,Elixir 语言社区新增从 GPT2 到 Stable Diffusion 的一系列神经网络模型.这些模型得以实现归功于刚刚发布的 Bumblebee 库.Bum ...
- 基于Docker安装的Stable Diffusion使用CPU进行AI绘画
基于Docker安装的Stable Diffusion使用CPU进行AI绘画 由于博主的电脑是为了敲代码考虑买的,所以专门买的高U低显,i9配核显,用Stable Diffusion进行AI绘画的话倒 ...
- 使用 LoRA 进行 Stable Diffusion 的高效参数微调
LoRA: Low-Rank Adaptation of Large Language Models 是微软研究员引入的一项新技术,主要用于处理大模型微调的问题.目前超过数十亿以上参数的具有强能力的大 ...
- Stable Diffusion魔法入门
写在前面 本文为资料整合,没有原创内容,方便自己查找和学习, 花费了一晚上把sd安装好,又花了大半天了解sd周边的知识,终于体会到为啥这些生成式AI被称为魔法了,魔法使用前要吟唱类比到AI上不就是那些 ...
- Window10环境下,Stable Diffusion的本地部署与效果展示
Diffusion相关技术最近也是非常火爆,看看招聘信息,岗位名称都由AI算法工程师变成了AIGC算法工程师,本周跟大家分享一些Diffusion算法相关的内容. Window10环境下,Stable ...
- Diffusers中基于Stable Diffusion的哪些图像操作
目录 辅助函数 Text-To-Image Image-To-Image In-painting Upscale Instruct-Pix2Pix 基于Stable Diffusion的哪些图像操作们 ...
- Stable Diffusion 关键词tag语法教程
提示词 Prompt Prompt 是输入到文生图模型的文字,不同的 Prompt 对于生成的图像质量有较大的影响 支持的语言Stable Diffusion, NovelAI等模型支持的输入语言为英 ...
- 最新版本 Stable Diffusion 开源AI绘画工具之部署篇
目录 AI绘画 本地环境要求 下载 Stable Diffusion 运行启动 AI绘画 关于 AI 绘画最近有多火,既然你有缘能看到这篇文章,那么相信也不需要我过多赘述了吧? 随着 AI 绘画技术的 ...
- 最新版本 Stable Diffusion 开源 AI 绘画工具之汉化篇
目录 汉化预览 下载汉化插件一 下载汉化插件二 下载汉化插件三 开启汉化 汉化预览 在上一篇文章中,我们安装好了 Stable Diffusion 开源 AI 绘画工具 但是整个页面都是英文版的,对于 ...
随机推荐
- CF1034D Intervals of Intervals
简要题意 给定 \(n\) 个区间组成的序列,定义它的一个连续段的价值为这个段内所有区间的并覆盖的长度.求价值前 \(k\) 大的段的价值和. 数据范围:\(1\le n\le 3\times 10^ ...
- 开发中MongoDB遇到的各种问题
目录 一.安装6版本以下 二.安装6版本及以上 三.安装6版本以下(解压版) 四.配置本地 Windows MongoGB 服务 五.navicat 连接远程mongodb数据库 六.ip不一致问题 ...
- playwright(十三) - PyTest基本使用
我们都知道,在做单元测试框架中有UnitTest和Pytest,前者是Python中自带无需安装,Pytest需要安装,今天我们来讲的就是Pytest,当然如果是做自动化,建议两个都要掌握一下,可 ...
- vue3中父组件与组件之间参数传递,使用(defineProps/defineEmits),涉及属性传递,对象传递,数组传递,以及事件传递
Vue3 中子父组件之间的通信 一.父组件传递参数到子组件 采用defineProps 传递属性 父组件: <template> <div> <h1>这是父组件&l ...
- ZEGO即构自建MSDN有序网络,为实时音视频传输极致顺畅!
由于疫情反扑,音视频云通讯的使用需求再次增加,跨机房环境经常遇到网络通信质量不佳的问题,比如延迟.卡顿.画质不清晰等.网络状况是影响用户体验最大因素之一,因此提升用户网络体验的需求被各家产品highl ...
- 【Python】从同步到异步多核:测试桩性能优化,加速应用的开发和验证
测试工作中常用到的测试桩mock能力 在我们的测试工作过程中,可能会遇到多个项目并行开发的时候,后端服务还没有开发完成,或者我们需要压测某个服务,这个服务测在试环境的依赖组件(如 MQ) 无法支撑我们 ...
- Mysql基础4-数据查询
一.DQL介绍 DQL全称:Data Query Language(数据查询语言),用来查询数据库中表的记录. 关键字:select 二.DQL语法 select 字段列表 from 表名列表 whe ...
- 轻松理解Java中的public、private、static和final
一.概念 1.public和private 两个都是访问权限修饰符,用于控制外界对类内部成员的访问. public:表明对象成员是完全共有的,外界可以随意访问.用public修饰的数据成员.成员函数是 ...
- mysql系列03---事务
一.事务简介 事务是一组操作的集合,它是一个不可分割的工作单位,事务会把所有的操作作为一个整体一起向系统提交或撤销 操作请求,即这些操作要么同时成功,要么同时失败. 二.事物的四大特性 一个事务具有A ...
- js: 获取Blob的值
this.ws.onmessage = async (msg) => { console.log('从服务端获取到了数据') // 从真正服务端发送过来的原始数据时在msg中的data字段 co ...