
android Fragment 笔记
Fragment多用于平板中,Fragment当成Activity的一个界面的一个组成部分,Fragment有自己的生命周期,但是必须依托在Activity中。
参考链接
https://developer.android.com/guide/components/fragments.html?hl=zh-cn
Fragment 生命周期如下

AndroidManifest.xml
<?xml version="1.0" encoding="utf-8"?>

<RelativeLayout xmlns:android="http://schemas.android.com/apk/res/android"

    xmlns:tools="http://schemas.android.com/tools"

    android:layout_width="match_parent"

    android:layout_height="match_parent"

    android:paddingBottom="@dimen/activity_vertical_margin"

    android:paddingLeft="@dimen/activity_horizontal_margin"

    android:paddingRight="@dimen/activity_horizontal_margin"

    android:paddingTop="@dimen/activity_vertical_margin"

    tools:context="com.example.fragmenttest.MainActivity">

    <LinearLayout

        android:layout_width="match_parent"

        android:layout_height="match_parent"

        android:orientation="vertical">

        <Button

            android:id="@+id/button1"

            android:layout_width="match_parent"

            android:layout_height="wrap_content"

            android:text="Fragment 1" />

        <Button

            android:id="@+id/button2"

            android:layout_width="match_parent"

            android:layout_height="wrap_content"

            android:text="Fragment 2" />

        <FrameLayout

            android:id="@+id/fragment_place"

            android:layout_width="match_parent"

            android:layout_height="match_parent"></FrameLayout>

    </LinearLayout>

</RelativeLayout>
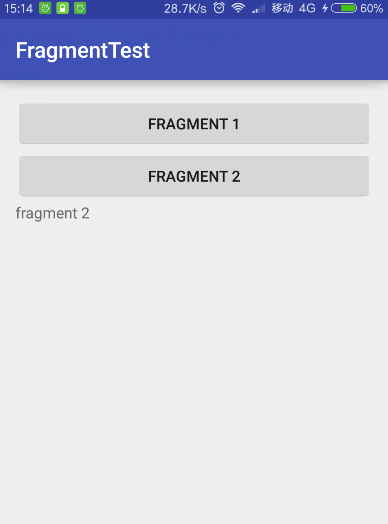
效果图如下:

创建Fragment1
Fragment1.java
package com.example.fragmenttest;

import android.app.Fragment;

import android.content.Context;

import android.net.Uri;

import android.os.Bundle;

import android.view.LayoutInflater;

import android.view.View;

import android.view.ViewGroup;

public class Fragment1 extends Fragment {

    @Override

    public void onCreate(Bundle savedInstanceState) {

        super.onCreate(savedInstanceState);

    }

    @Override

    public View onCreateView(LayoutInflater inflater, ViewGroup container,

                             Bundle savedInstanceState) {

        // Inflate the layout for this fragment

        return inflater.inflate(R.layout.fragment_fragment1, container, false);

    }

}
Fragment1布局
fragment_fragment1.xml
<FrameLayout xmlns:android="http://schemas.android.com/apk/res/android"

    xmlns:tools="http://schemas.android.com/tools"

    android:layout_width="match_parent"

    android:layout_height="match_parent"

    tools:context="com.example.fragmenttest.Fragment1">

    <TextView

        android:layout_width="match_parent"

        android:layout_height="match_parent"

        android:text="fragment 1" />

</FrameLayout>
创建Fragment
Fragment2.java
package com.example.fragmenttest;

import android.app.Fragment;

import android.os.Bundle;

import android.view.LayoutInflater;

import android.view.View;

import android.view.ViewGroup;

public class Fragment2 extends Fragment {

    @Override

    public void onCreate(Bundle savedInstanceState) {

        super.onCreate(savedInstanceState);

    }

    @Override

    public View onCreateView(LayoutInflater inflater, ViewGroup container,

                             Bundle savedInstanceState) {

        // Inflate the layout for this fragment

        return inflater.inflate(R.layout.fragment_fragment2, container, false);

    }

}
fragment_fragment2.xml
<FrameLayout xmlns:android="http://schemas.android.com/apk/res/android"

    xmlns:tools="http://schemas.android.com/tools"

    android:layout_width="match_parent"

    android:layout_height="match_parent"

    tools:context="com.example.fragmenttest.Fragment2">

    <TextView

        android:layout_width="match_parent"

        android:layout_height="match_parent"

        android:text="fragment 2" />

</FrameLayout>
MainActivity.java
package com.example.fragmenttest;

import android.app.Fragment;

import android.app.FragmentManager;

import android.app.FragmentTransaction;

import android.support.v7.app.AppCompatActivity;

import android.os.Bundle;

import android.view.View;

import android.widget.Button;

public class MainActivity extends AppCompatActivity {

    Button btn1, btn2;

    Fragment fr;

    @Override

    protected void onCreate(Bundle savedInstanceState) {

        super.onCreate(savedInstanceState);

        setContentView(R.layout.activity_main);

        btn1 = (Button) findViewById(R.id.button1);

        btn2 = (Button) findViewById(R.id.button2);

        btn1.setOnClickListener(listener);

        btn2.setOnClickListener(listener);

    }

    View.OnClickListener listener = new View.OnClickListener() {

        @Override

        public void onClick(View v) {

            switch (v.getId()) {

                case R.id.button1:

                    fr = new Fragment1();

                    break;

                case R.id.button2:

                    fr = new Fragment2();

                    break;

            }

            FragmentManager fm = getFragmentManager();

            FragmentTransaction fragmentTransaction = fm.beginTransaction();

			// 将activity_main中的fragment转换成fragment1或者fragment2

            fragmentTransaction.replace(R.id.fragment_place, fr);

            fragmentTransaction.commit();

        }

    };

}
管理fragment需要使用FragmentManager.使用getFragmentManager()获得。
操作fragemnt需要使用FragmentTransaction的api。使用beginTransaction()获得。
在用replace函数替换fragment.
应用到 Activity,您必须调用 commit()
运行情况,点击button1

点击button2
Activity通信
片段可以通过 getActivity() 访问 Activity 实例,并轻松地执行在 Activity 布局中查找视图等任务。
View listView = getActivity().findViewById(R.id.list);
Activity 也可以使用 findFragmentById() 或 findFragmentByTag(),通过从 FragmentManager 获取对 Fragment 的引用来调用片段中的方法。例如:
ExampleFragment fragment = (ExampleFragment) getFragmentManager().findFragmentById(R.id.example_fragment);
Tony Liu
2017-3-14, Shenzhen
android Fragment 笔记的更多相关文章
- 【转】 Pro Android学习笔记(四二):Fragment(7):切换效果
目录(?)[-] 利用setTransition 利用setCustomAnimations 通过ObjectAnimator自定义动态效果 程序代码的编写 利用fragment transactio ...
- 【转】 Pro Android学习笔记(四十):Fragment(5):适应不同屏幕或排版
目录(?)[-] 设置横排和竖排的不同排版风格 改写代码 对于fragment,经常涉及不同屏幕尺寸和不同的排版风格.我们在基础小例子上做一下改动,在横排的时候,仍是现实左右两个fragment,在竖 ...
- Android编程权威指南笔记3:Android Fragment讲解与Android Studio中的依赖关系,如何添加依赖关系
Android Fragment 当我在学习时,了解了Fragment词汇 Fragment是一种控制器对象,我就把所了解的简单说一下.activity可以派fragment完成一些任务,就是管理用户 ...
- Android Fragment使用(三) Activity, Fragment, WebView的状态保存和恢复
Android中的状态保存和恢复 Android中的状态保存和恢复, 包括Activity和Fragment以及其中View的状态处理. Activity的状态除了其中的View和Fragment的状 ...
- Fragment笔记整理
前言 一直在用Fragment,但是没有系统的整理过,Google了一下相关文章,看到了几篇,将几篇还不错的文章重点整理了下,很多是直接Copy的,只为做个笔记,以后翻来看比较方便,建议大家看一下下面 ...
- 【转】Android开发笔记(序)写在前面的目录
原文:http://blog.csdn.net/aqi00/article/details/50012511 知识点分类 一方面写写自己走过的弯路掉进去的坑,避免以后再犯:另一方面希望通过分享自己的经 ...
- [置顶] Android开发笔记(成长轨迹)
分类: 开发学习笔记2013-06-21 09:44 26043人阅读 评论(5) 收藏 Android开发笔记 1.控制台输出:called unimplemented OpenGL ES API ...
- 【转】 Pro Android学习笔记(五六):配置变化
目录(?)[-] Activity的destorycreate过程 Fragment的destorycreate过程 onSaveInstanceState saveFragmentInstanceS ...
- 【转】 Pro Android学习笔记(五一):ActionBar(4):标准和Tab模式
之前,我们学习的Action Bar是标准模式,Tab模式的如下图所示. 对于Tab,我们在Android学习笔记(二二): 多页显示-Tag的使用中学习过,但Action Bar的tab更适合fra ...
随机推荐
- linux write系统调用如何实现
在Linux下我们在使用设备的时候,都会用到write这个函数,通过这个函数我们可以象使用文件那样向设备传送数据.可是为什么用户使用write函数就可以把数据写到设备里面去,这个过程到底是怎么实现的呢 ...
- Excel操作类库最常用到的4种开源项目与MS Excel类库写操作对比分析性能
4种开源Excel读写类库与MS Excel类库写操作对比 软件开发过程中,经常需要将数据保存为.xls或.xlsx文件.之前发现微软提供的Microsoft.Office.Interop.Excel ...
- 微信H5支付.NET版本备忘
微信H5支付.NET版本备忘
- C++学习笔记16,C++11中的显式的默认构造函数以及显示删除默认构造函数
在早期的C++中.假设须要一些接受一些參数的构造函数,同一时候须要一个不接收不论什么參数的默认构造函数.就必须显示地编写空的默认构造函数.比如: //tc.h class A{ private: in ...
- version `GLIBC_2.14' not found 解决方法.
from http://blog.csdn.net/force_eagle/article/details/8684669 version `GLIBC_2.14' not found 解决方法. 一 ...
- 每日英语:March Remembers King's Dream
President Barack Obama on Wednesday said the entire world drew strength from the March on Washington ...
- Django---分页器、中间件
分页 Django的分页器(paginator) view from django.shortcuts import render,HttpResponse # Create your views ...
- Extjs combox的异步加载
很多朋友用 extjs 很多时候都要用到combo 而异步加载是用的最多的 今天我就举一个例子 了解combo的异步加载 Ext.onReady(function () { Ext.BLANK_IM ...
- LeetCode: Linked List Cycle 解题报告
Linked List Cycle Given a linked list, determine if it has a cycle in it. Follow up:Can you solve it ...
- mysql too many max_connections
debian 环境 mysql MySQL Community Server 5.6.27 首先修改 my.cnf文件 全局查找 find / -name my.cnf* [mysqld] 配置 ...