nim_duilib(6)之listbox
introduction
xml文件添加代码
基于上一篇, 继续向basic.xml中添加下面关于ListBox的代码。 xml完整源码在文末。
<HBox>

  <!-- List -->

  <VListBox class="list" name="list" padding="5,3,5,3">

  </VListBox>

  <VBox>

    <!-- Buttons -->

    <CheckBox class="checkbox_font12" name="list_checkbox_add_to_top" text="add to top" margin="0,5,0,10"/>

    <Button class="btn_global_blue_80x30" name="list_btn_add" text="add" />

    <CheckBox class="checkbox_font12" name="list_checkbox_remove_all" text="del all?" margin="0,5,0,10"/>

    <Button class="btn_global_white_80x30" name="list_btn_remove" text="remove"/>

  </VBox>

</HBox>
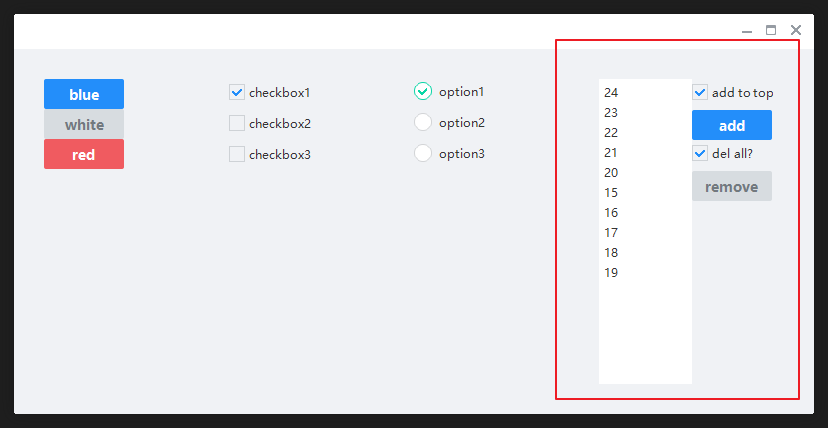
上面的代码创建了一个水平容器,容器从左往右分别是:listbox和一个垂直容器,垂直容器中从上到下是复选框和按钮。效果如下:
代码中关联
BasicForm.h
- 打开BasicForm.h,类中添加下面的代码用于关联界面控件。
	// list

	ui::ListBox	*plist_;

	// list的删除和添加按钮

	ui::Button	*plist_btn_arr_[2];

	// list 的复选框,

	ui::CheckBox	*plist_cb_arr_[2];
同时,类中再额外添加2个函数,用于监听Add和remove的点击。
	// list的删除和添加

	bool OnListBoxAddItem(ui::EventArgs* msg);

	bool OnListBoxRemoveItem(ui::EventArgs* msg);
BasicForm.cpp
InitWindow函数
- 转到BasicForm.cpp,找到 InitWindow 函数,向其增加下面的代码
void BasicForm::InitWindow()

{

  ......

	// 4.list控件

	//----------------------------------------------------------------------------------------

	plist_ = dynamic_cast<ui::ListBox*>(FindControl(L"list"));

	if (plist_)

	{

		for (auto i = 0; i < 15; ++i)

		{

			ui::ListContainerElement* pelement = new(std::nothrow) ui::ListContainerElement;

			if (pelement)

			{

				// 设置item显示的内容

				pelement->SetText(nbase::StringPrintf(L"%d", i));

				// 设置item的样式,可以在global.xml中找到

				pelement->SetClass(L"listitem");

				pelement->SetFixedHeight(20);

				plist_->Add(pelement);

			}

		}

	}

	// list关联的删除和添加按钮

	plist_btn_arr_[0] = dynamic_cast<ui::Button*>(FindControl(L"list_btn_add"));

	plist_btn_arr_[1] = dynamic_cast<ui::Button*>(FindControl(L"list_btn_remove"));

	if (plist_btn_arr_[0])

		plist_btn_arr_[0]->AttachClick(nbase::Bind(&BasicForm::OnListBoxAddItem, this, std::placeholders::_1));

	if (plist_btn_arr_[1])

		plist_btn_arr_[1]->AttachClick(nbase::Bind(&BasicForm::OnListBoxRemoveItem, this, std::placeholders::_1));

	// list 关联checkbox

	plist_cb_arr_[0] = dynamic_cast<ui::CheckBox*>(FindControl(L"list_checkbox_add_to_top"));

	plist_cb_arr_[1] = dynamic_cast<ui::CheckBox*>(FindControl(L"list_checkbox_remove_all"));

}
OnListBoxAddItem
函数体代码如下
bool BasicForm::OnListBoxAddItem(ui::EventArgs* msg)

{

	if (plist_)

	{

		static int count_start_15 = 15;

		ui::ListContainerElement* pelement = new(std::nothrow) ui::ListContainerElement;

		if (pelement)

		{

			// 设置item显示的内容

			pelement->SetText(nbase::StringPrintf(L"%d", count_start_15));

			// 设置item的样式,可以在global.xml中找到

			pelement->SetClass(L"listitem");

			pelement->SetFixedHeight(20);

			// 添加到最前面

			if (plist_cb_arr_[0]->IsSelected())

				plist_->AddAt(pelement, 0);

			else

				plist_->Add(pelement);

			++count_start_15;

		}

	}

	return false;

}
OnListBoxRemoveItem
OnListBoxRemoveItem函数体如下:
bool BasicForm::OnListBoxRemoveItem(ui::EventArgs* msg)

{

	if (plist_)

	{

		if (plist_cb_arr_[1])

		{

			if (plist_cb_arr_[1]->IsSelected())

			{

				int list_count = plist_->GetCount();

				if (0 < list_count)

					plist_->RemoveAll();

				else

					;

			}

			else

			{

				int index = plist_->GetCurSel();

				// 没有选中,将返回-1

				if (-1 != index)

				{

					plist_->RemoveAt(index);

				}

				else

				{

					;

				}

			}

		}

		else

		{

			;

		}

	}

	else

	{

		;

	}

	return false;

}
运行结果
xml完整源码
<?xml version="1.0" encoding="UTF-8"?>

<Window size="800,400" caption="0,0,0,35">

  <VBox bkcolor="bk_wnd_darkcolor">

    <HBox width="stretch" height="35" bkcolor="bk_wnd_lightcolor">

      <Control />

        <Button class="btn_wnd_min" name="minbtn" margin="4,6,0,0" />

        <Box width="21" margin="4,6,0,0">

          <Button class="btn_wnd_max" name="maxbtn"/>

          <Button class="btn_wnd_restore" name="restorebtn" visible="false"/>

        </Box>

      <Button class="btn_wnd_close" name="closebtn" margin="4,6,8,0"/>

    </HBox>

    <!--下面是中间的控件-->

    <VBox padding="30, 30, 30, 30" >

      <HBox>

        <VBox>

          <!-- Buttons -->

          <Button class="btn_global_blue_80x30" name="btn_blue" text="blue" />

          <Button class="btn_global_white_80x30" name="btn_white" text="white"/>

          <Button class="btn_global_red_80x30" name="btn_red" text="red"/>

        </VBox>

        <!--checkbox-->

        <VBox>

          <CheckBox class="checkbox_font12" name="checkbox1" text="checkbox1" margin="0,5,0,10" selected="true"/>

          <CheckBox class="checkbox_font12" name="checkbox2" text="checkbox2" margin="0,5,0,10"/>

          <CheckBox class="checkbox_font12" name="checkbox3" text="checkbox3" margin="0,5,0,10"/>

        </VBox>

        <!-- option-->

        <VBox>

          <Option class="circle_option_2" name="option1" group="option_group" text="option1" margin="0,3,0,10" selected="true"/>

          <Option class="circle_option_2" name="option2" group="option_group" text="option2" margin="0,3,0,10"/>

          <Option class="circle_option_2" name="option3" group="option_group" text="option3" margin="0,3,0,10"/>

        </VBox>

        <HBox>

          <!-- List -->

          <VListBox class="list" name="list" padding="5,3,5,3">

          </VListBox>

          <VBox>

            <!-- Buttons -->

            <CheckBox class="checkbox_font12" name="list_checkbox_add_to_top" text="add to top" margin="0,5,0,10"/>

            <Button class="btn_global_blue_80x30" name="list_btn_add" text="add" />

            <CheckBox class="checkbox_font12" name="list_checkbox_remove_all" text="del all?" margin="0,5,0,10"/>

            <Button class="btn_global_white_80x30" name="list_btn_remove" text="remove"/>

          </VBox>

        </HBox>

      </HBox>

    </VBox> <!--下面是中间的控件 结束-->

  </VBox>

</Window>
nim_duilib(6)之listbox的更多相关文章
- nim_duilib(13)之添加fmt库
introduction 习惯使用fmt库做字符串的格式化操作.尽管nim_duilib提供了类似的函数. 故项目demo_xml引入了外部库fmt framework.h中添加下面的以便使用fmt库 ...
- MVVM下listbox默认显示最后一行
原文地址:http://stackoverflow.com/questions/16866309/listbox-scroll-into-view-with-mvvm public class Scr ...
- WPF 自定义列表筛选 自定义TreeView模板 自定义ListBox模板
有很多项目,都有数据筛选的操作.下面提供一个案例,给大家做参考. 左侧是数据源,搜索框加TreeView控件,右侧是ListBox控件.在左侧数据列点击添加数据,然后点击确定,得到所筛选的数据. 下面 ...
- WPF制作的VS黑色风格的Listbox
最近写的一个玩具,WPF写出来的东西还是挺好看的 style.xaml <ResourceDictionary xmlns="http://schemas.microsoft.com/ ...
- jquery 双向select控件bootstrap Dual listbox
http://www.cnblogs.com/hangwei/p/5040866.html -->jquery 双向select控件bootstrap Dual listboxhtt ...
- C# 向listbox添加大量数据项的实践心得
使用 ListBox.Items.Add 方法添加项时,可以使用 BeginUpdate 方法,以防止每次向列表添加项时控件都重新绘制 ListBox.完成向列表添加项的任务后,调用 EndUpdat ...
- 实现一个纵向排列的 ListBox ,并具有操作按钮
需要实现的效果如下: 要想把 ListBox 的内容纵向显示很简单,只需把 ListBox 的内容控件为 WrapPanel 就可以了: <ListBox.ItemsPanel> < ...
- 背水一战 Windows 10 (33) - 控件(选择类): ListBox, RadioButton, CheckBox, ToggleSwitch
[源码下载] 背水一战 Windows 10 (33) - 控件(选择类): ListBox, RadioButton, CheckBox, ToggleSwitch 作者:webabcd 介绍背水一 ...
- WPF 显示文件列表中使用 ListBox 变到ListView 最后使用DataGrid
WPF 显示文件列表中使用 ListBox 变到ListView 最后使用DataGrid 故事背景: 需要检索某目录下文件,并列出来,提供选择和其他功能. 第一版需求: 列出文件供选择即可,代码如下 ...
随机推荐
- Codeforces Round #681 (Div. 1) Solution
A. Extreme Subtraction 把这个数组差分一下,发现操作一的作用是把 \(d_1\) 的大小分给 \(d_i\),而操作二的作用是把 \(d_i\) 减去任意值,目标是把 \(d\) ...
- tabix 操作VCF文件
tabix 可以对NGS分析中常见格式的文件建立索引,从而加快访问速度,不仅支持VCF文件,还支持BED, GFF,SAM等格式. 下载地址: 1 https://sourceforge.net/pr ...
- linux 两服务器之间的文件传输scp
Linux scp 命令用于 Linux 之间复制文件和目录. scp 是 secure copy 的缩写, scp 是 linux 系统下基于 ssh 登陆进行安全的远程文件拷贝命令. scp 是加 ...
- Linux运维工程师面试题整理
1. Nginx 反向代理,负载均衡,动静分离,工作原理及优化nginx配置反向代理. vim Nginx.confServer模块中配置Listen 80Server_name ip;在server ...
- socket编程:多路复用I/O服务端客户端之select
其实在之前的TCP之中,我们编程实现了多进程,多线程机制下的TCP服务器,但是对于这种的TCP服务器而言,存在太大的资源局限性.所以我们可以是用I/0模型中的多路复用I/O模型来进行编程. 他的具体思 ...
- phpexcel 另存Excel文件方式
$w = new PHPExcel_Writer_Excel5($e); $dir = 'path/title.xls'; $w->save($dir);
- Ubuntu16.04安装 2.8.5版本Ansible
wget https://bootstrap.pypa.io/pip/2.7/get-pip.py && python get-pip.py pip install --upgrade ...
- A Child's History of England.26
CHAPTER 9 ENGLAND UNDER WILLIAM THE SECOND, CALLED RUFUS William the Red, in breathless haste, secur ...
- Hive(十三)【Hive on Spark 部署搭建】
Hive on Spark 官网详情:https://cwiki.apache.org//confluence/display/Hive/Hive+on+Spark:+Getting+Started ...
- Spark(六)【RDD的血缘依赖】
RDD依赖关系 1. RDD血缘关系 RDD只支持粗粒度转换,即在大量记录上执行的单个操作.将创建RDD的一系列Lineage(血统)记录下来,以便恢复丢失的分区.RDD的Lineage会记录RD ...