『Python CoolBook』C扩展库_其五_C语言层面Python库之间调用API
一、C层面模块添加API
我们仍然操作如下结构体,
#include <math.h>

typedef struct Point {

    double x,y;

} Point;
本节目标是封装两个Point结构体的操作函数为sample库的C级API,可以被sample以外的C库调用,首先写出以下函数指针结构体实例,
/* pysample.c */

static PyObject *PyPoint_FromPoint(Point *p, int must_free) {

  /* 胶囊和C指针类似。在内部,它们获取一个通用指针和一个名称,可以使用

     PyCapsule_New() 函数很容易的被创建。 另外,一个可选的析构函数能被

     绑定到胶囊上,用来在胶囊对象被垃圾回收时释放底层的内存*/

  return PyCapsule_New(p, "Point", must_free ? del_Point : NULL);

}

/* Utility functions */

static Point *PyPoint_AsPoint(PyObject *obj) {

  return (Point *) PyCapsule_GetPointer(obj, "Point");

}

static _PointAPIMethods _point_api = {

  PyPoint_AsPoint,

  PyPoint_FromPoint

};
结构体定义如下,位于一个新的头函数中,
/* pysample.h */

/* Public API Table */

/* 这里最重要的部分是函数指针表 _PointAPIMethods.

   它会在导出模块时被初始化,然后导入模块时被查找到。 */

typedef struct {

  Point *(*aspoint)(PyObject *);

  PyObject *(*frompoint)(Point *, int);

} _PointAPIMethods;
修改初始化函数,将函数指针结构体注册为Capsule,并将之使用PyModule_AddObject,添加给模块对象,作为模块属性,
PyModule_AddObject(PyObject *module, const char *name, PyObject *value),其中module就是Py_InitModule()返回的对象,含义就是将py_point_api这个类加入m这个模块中,并简记为"_point_api"。
/* pysample.c */

/* Module initialization function */

PyMODINIT_FUNC

PyInit_sample(void) {

  PyObject *m;

  PyObject *py_point_api;

  m = PyModule_Create(&samplemodule);

  if (m == NULL)

    return NULL;

  /* Add the Point C API functions */

  py_point_api = PyCapsule_New((void *) &_point_api, "sample._point_api", NULL);  //<---pysample.h:23,name为全名

  if (py_point_api) {

    PyModule_AddObject(m, "_point_api", py_point_api);  //name略去模块名

  }

  return m;

}
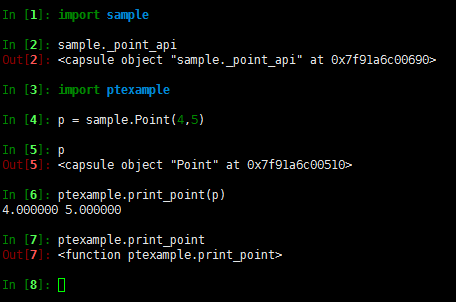
测试如下,

不过由于Python并不能解析Capsule对象,所以这个API实际上是留给其他C源代码调用的。
我们希望在调用这个Capsule对象时,并不直接导入这个C源文件,只是使用头文件,所以我们在pysample.h中再进行一次封装,
/* pysample.h */

/* Method table in external module */

static _PointAPIMethods *_point_api = 0;

/* Import the API table from sample, import_sample() 被用来指向胶囊导入并初始化这个指针 */

static int import_sample(void) {  //<---ptexample.c:46

	// 需提供属性名(比如sample._point_api),会一次性找到胶囊对象并提取出指针来。

  _point_api = (_PointAPIMethods *) PyCapsule_Import("sample._point_api",0);  //<---pysample.c:171

  return (_point_api != NULL) ? 1 : 0;

}

/* Macros to implement the programming interface */

#define PyPoint_AsPoint(obj) (_point_api->aspoint)(obj)

#define PyPoint_FromPoint(obj) (_point_api->frompoint)(obj)
PyCapsule_Import:从模块中的capsule属性导入指向C对象的指针。 name 参数应指定属性的全名,如 module.attribute 中所示。存储在胶囊中的 name 必须与该字符串完全匹配。
此时我们就已经封装好了pysample.c中的两个函数为PyPoint_AsPoint和PyPoint_FromPoint,可以接受任何导入了pysample.h的文件使用。
小结
- 将函数指针封装到结构体中
- 将结构体生成为Capsule,并将其作为属性绑定给模块
- 使用PyCapsule_Import根据模块名称检索到Capsule,由于该函数会直接返回C指针,直接使用一个空的结构体接受Capsule即可
二、C层面模块调用API
/* ptexample.c */

/* Include the header associated with the other module */

#include "pysample.h"

/* An extension function that uses the exported API */

static PyObject *print_point(PyObject *self, PyObject *args) {

  PyObject *obj;

  Point *p;

  if (!PyArg_ParseTuple(args,"O", &obj)) {

    return NULL;

  }

  /* Note: This is defined in a different module */

  p = PyPoint_AsPoint(obj);

  if (!p) {

    return NULL;

  }

  printf("%f %f\n", p->x, p->y);

  return Py_BuildValue("");

}

static PyMethodDef PtExampleMethods[] = {

  {"print_point", print_point, METH_VARARGS, "output a point"},

  { NULL, NULL, 0, NULL}

};

static struct PyModuleDef ptexamplemodule = {

  PyModuleDef_HEAD_INIT,

  "ptexample",           /* name of module */

  "A module that imports an API",  /* Doc string (may be NULL) */

  -1,                 /* Size of per-interpreter state or -1 */

  PtExampleMethods       /* Method table */

};

/* Module initialization function */

PyMODINIT_FUNC

PyInit_ptexample(void) {

  PyObject *m;

  m = PyModule_Create(&ptexamplemodule);

  if (m == NULL)

    return NULL;

  /* Import sample, loading its API functions */

  if (!import_sample()) {  //<---pysample.h:21

    return NULL;

  }

  return m;

}
这里面先初始化前面.h文件中的指针,然后接收调用。
测试如下,
『Python CoolBook』C扩展库_其五_C语言层面Python库之间调用API的更多相关文章
- 『Python CoolBook』C扩展库_其六_从C语言中调用Python代码
点击进入项目 一.C语言运行pyfun的PyObject对象 思路是在C语言中提供实参,传给python函数: 获取py函数对象(PyObject),函数参数(C类型) 获取GIL(PyGILStat ...
- 『Python CoolBook』C扩展库_其一_用法讲解
不依靠其他工具,直接使用Python的扩展API来编写一些简单的C扩展模块. 本篇参考PythonCookbook第15节和Python核心编程完成,值得注意的是,Python2.X和Python3. ...
- 『Python CoolBook』C扩展库_其三_简单数组操作
点击进入项目 这里的数组要点在于: 数组结构,array.array或者numpy.array 本篇的数组仅限一维,不过基础的C数组也是一维 一.分块讲解 源函数 /* Average values ...
- 『Python CoolBook』C扩展库_其六_线程
GIL操作 想让C扩展代码和Python解释器中的其他进程一起正确的执行, 那么你就需要去释放并重新获取全局解释器锁(GIL). 在Python接口封装中去释放并重新获取全局解释器锁(GIL),此时本 ...
- 『Python CoolBook』C扩展库_其二_demo演示
点击进入项目 C函数源文件 /* sample.c */ #include "sample.h" /* Compute the greatest common divisor */ ...
- 『Python CoolBook』C扩展库_其四_结构体操作与Capsule
点击进入项目 一.Python生成C语言结构体 C语言中的结构体传给Python时会被封装为胶囊(Capsule), 我们想要一个如下结构体进行运算,则需要Python传入x.y两个浮点数, type ...
- 『Python CoolBook』数据结构和算法_多变量赋值&“*”的两种用法
多变量赋值 a = [1,2,(3,4)] b,c,d = a print(b,c,d) b,c,(d,e) = a print(b,c,d,e) 1 2 (3, 4) 1 2 3 4 a = &qu ...
- 『Python CoolBook』数据结构和算法_字典比较&字典和集合
一.字典元素排序 dict.keys(),dict.values(),dict.items() 结合max.min.sorted.zip进行排序是个很好的办法,另外注意不使用zip时,字典的lambd ...
- 『Python CoolBook』Cython
github地址 使用Cython导入库的话,需要一下几个文件: .c:C函数源码 .h:C函数头 .pxd:Cython函数头 .pyx:包装函数 setup.py:python 本节示例.c和.h ...
随机推荐
- axios库的使用
axios是基于Promise 用于浏览器和 nodejs 的 HTTP 客户端:可以用在webpack + vuejs 的项目中 原文 https://github.com/axios/axios ...
- JAVA的值传递问题
为什么 Java 中只有值传递? 首先回顾一下在程序设计语言中有关将参数传递给方法(或函数)的一些专业术语.按值调用(call by value)表示方法接收的是调用者提供的值,而按引用调用(call ...
- protocol buffer简介
一.protocol buffer简介 protocol buffer(简称PB)是google开源的一个数据序列化与反序列化工具,由于其支持多种语言.各种平台,多被用于对象的存储,远程调用等方向.用 ...
- Bubble Sort (找规律)
通过模拟之后我们发现对于每一个位置上的数他都有一个规律,那就是先左移然后在右移.然后仔细发现可以知道,先右移的距离是前面比该数大的个数.右移就直接右移到目标位置了.然后用一个树状数组从左到右边扫边加就 ...
- Kubernetes代码解读-apiserver之list-watch
list-watch,作为k8s系统中统一的异步消息传递方式,对系统的性能.数据一致性起到关键性的作用.今天我想从代码这边探究一下list-watch的实现方式.并看是否能在后面的工作中优化这个过程. ...
- L2-026. 小字辈
本题给定一个庞大家族的家谱,要请你给出最小一辈的名单. 输入格式: 输入在第一行给出家族人口总数 N(不超过 100 000 的正整数) —— 简单起见,我们把家族成员从 1 到 N 编号.随后第二行 ...
- flutter popup
card ? Overlay https://docs.flutter.io/flutter/widgets/Overlay-class.html pending....
- php 把一个数组分成几个数组
<?php /* * * 把一个数组分成几个数组 * $arr 数组 * $num 获取的数量 * */ function sliceArr($arr, $num) { //数组的个数 $lis ...
- nginx 中 ulimit 使用修改文件句柄数
使用ulimit -a 可以查看当前系统的所有限制值, 使用ulimit -n<可以同时打开的文件数>设置用户可以同时打开的 最大文件数 linux系统默认的只要1024 当做负载较大的服 ...
- Linux 查看系统状态
查看系统状态 命令:vmstat 命令:vmsta 1 10 #每1秒钟1次显示10次. r:几个进程在占用cpu b:等待IO值 Swpd:多少交换内存 free:剩余内 ...