『Python CoolBook』C扩展库_其五_C语言层面Python库之间调用API
一、C层面模块添加API
我们仍然操作如下结构体,
#include <math.h>

typedef struct Point {

    double x,y;

} Point;
本节目标是封装两个Point结构体的操作函数为sample库的C级API,可以被sample以外的C库调用,首先写出以下函数指针结构体实例,
/* pysample.c */

static PyObject *PyPoint_FromPoint(Point *p, int must_free) {

  /* 胶囊和C指针类似。在内部,它们获取一个通用指针和一个名称,可以使用

     PyCapsule_New() 函数很容易的被创建。 另外,一个可选的析构函数能被

     绑定到胶囊上,用来在胶囊对象被垃圾回收时释放底层的内存*/

  return PyCapsule_New(p, "Point", must_free ? del_Point : NULL);

}

/* Utility functions */

static Point *PyPoint_AsPoint(PyObject *obj) {

  return (Point *) PyCapsule_GetPointer(obj, "Point");

}

static _PointAPIMethods _point_api = {

  PyPoint_AsPoint,

  PyPoint_FromPoint

};
结构体定义如下,位于一个新的头函数中,
/* pysample.h */

/* Public API Table */

/* 这里最重要的部分是函数指针表 _PointAPIMethods.

   它会在导出模块时被初始化,然后导入模块时被查找到。 */

typedef struct {

  Point *(*aspoint)(PyObject *);

  PyObject *(*frompoint)(Point *, int);

} _PointAPIMethods;
修改初始化函数,将函数指针结构体注册为Capsule,并将之使用PyModule_AddObject,添加给模块对象,作为模块属性,
PyModule_AddObject(PyObject *module, const char *name, PyObject *value),其中module就是Py_InitModule()返回的对象,含义就是将py_point_api这个类加入m这个模块中,并简记为"_point_api"。
/* pysample.c */

/* Module initialization function */

PyMODINIT_FUNC

PyInit_sample(void) {

  PyObject *m;

  PyObject *py_point_api;

  m = PyModule_Create(&samplemodule);

  if (m == NULL)

    return NULL;

  /* Add the Point C API functions */

  py_point_api = PyCapsule_New((void *) &_point_api, "sample._point_api", NULL);  //<---pysample.h:23,name为全名

  if (py_point_api) {

    PyModule_AddObject(m, "_point_api", py_point_api);  //name略去模块名

  }

  return m;

}
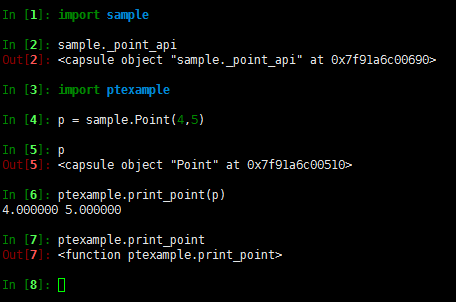
测试如下,

不过由于Python并不能解析Capsule对象,所以这个API实际上是留给其他C源代码调用的。
我们希望在调用这个Capsule对象时,并不直接导入这个C源文件,只是使用头文件,所以我们在pysample.h中再进行一次封装,
/* pysample.h */

/* Method table in external module */

static _PointAPIMethods *_point_api = 0;

/* Import the API table from sample, import_sample() 被用来指向胶囊导入并初始化这个指针 */

static int import_sample(void) {  //<---ptexample.c:46

	// 需提供属性名(比如sample._point_api),会一次性找到胶囊对象并提取出指针来。

  _point_api = (_PointAPIMethods *) PyCapsule_Import("sample._point_api",0);  //<---pysample.c:171

  return (_point_api != NULL) ? 1 : 0;

}

/* Macros to implement the programming interface */

#define PyPoint_AsPoint(obj) (_point_api->aspoint)(obj)

#define PyPoint_FromPoint(obj) (_point_api->frompoint)(obj)
PyCapsule_Import:从模块中的capsule属性导入指向C对象的指针。 name 参数应指定属性的全名,如 module.attribute 中所示。存储在胶囊中的 name 必须与该字符串完全匹配。
此时我们就已经封装好了pysample.c中的两个函数为PyPoint_AsPoint和PyPoint_FromPoint,可以接受任何导入了pysample.h的文件使用。
小结
- 将函数指针封装到结构体中
- 将结构体生成为Capsule,并将其作为属性绑定给模块
- 使用PyCapsule_Import根据模块名称检索到Capsule,由于该函数会直接返回C指针,直接使用一个空的结构体接受Capsule即可
二、C层面模块调用API
/* ptexample.c */

/* Include the header associated with the other module */

#include "pysample.h"

/* An extension function that uses the exported API */

static PyObject *print_point(PyObject *self, PyObject *args) {

  PyObject *obj;

  Point *p;

  if (!PyArg_ParseTuple(args,"O", &obj)) {

    return NULL;

  }

  /* Note: This is defined in a different module */

  p = PyPoint_AsPoint(obj);

  if (!p) {

    return NULL;

  }

  printf("%f %f\n", p->x, p->y);

  return Py_BuildValue("");

}

static PyMethodDef PtExampleMethods[] = {

  {"print_point", print_point, METH_VARARGS, "output a point"},

  { NULL, NULL, 0, NULL}

};

static struct PyModuleDef ptexamplemodule = {

  PyModuleDef_HEAD_INIT,

  "ptexample",           /* name of module */

  "A module that imports an API",  /* Doc string (may be NULL) */

  -1,                 /* Size of per-interpreter state or -1 */

  PtExampleMethods       /* Method table */

};

/* Module initialization function */

PyMODINIT_FUNC

PyInit_ptexample(void) {

  PyObject *m;

  m = PyModule_Create(&ptexamplemodule);

  if (m == NULL)

    return NULL;

  /* Import sample, loading its API functions */

  if (!import_sample()) {  //<---pysample.h:21

    return NULL;

  }

  return m;

}
这里面先初始化前面.h文件中的指针,然后接收调用。
测试如下,
『Python CoolBook』C扩展库_其五_C语言层面Python库之间调用API的更多相关文章
- 『Python CoolBook』C扩展库_其六_从C语言中调用Python代码
点击进入项目 一.C语言运行pyfun的PyObject对象 思路是在C语言中提供实参,传给python函数: 获取py函数对象(PyObject),函数参数(C类型) 获取GIL(PyGILStat ...
- 『Python CoolBook』C扩展库_其一_用法讲解
不依靠其他工具,直接使用Python的扩展API来编写一些简单的C扩展模块. 本篇参考PythonCookbook第15节和Python核心编程完成,值得注意的是,Python2.X和Python3. ...
- 『Python CoolBook』C扩展库_其三_简单数组操作
点击进入项目 这里的数组要点在于: 数组结构,array.array或者numpy.array 本篇的数组仅限一维,不过基础的C数组也是一维 一.分块讲解 源函数 /* Average values ...
- 『Python CoolBook』C扩展库_其六_线程
GIL操作 想让C扩展代码和Python解释器中的其他进程一起正确的执行, 那么你就需要去释放并重新获取全局解释器锁(GIL). 在Python接口封装中去释放并重新获取全局解释器锁(GIL),此时本 ...
- 『Python CoolBook』C扩展库_其二_demo演示
点击进入项目 C函数源文件 /* sample.c */ #include "sample.h" /* Compute the greatest common divisor */ ...
- 『Python CoolBook』C扩展库_其四_结构体操作与Capsule
点击进入项目 一.Python生成C语言结构体 C语言中的结构体传给Python时会被封装为胶囊(Capsule), 我们想要一个如下结构体进行运算,则需要Python传入x.y两个浮点数, type ...
- 『Python CoolBook』数据结构和算法_多变量赋值&“*”的两种用法
多变量赋值 a = [1,2,(3,4)] b,c,d = a print(b,c,d) b,c,(d,e) = a print(b,c,d,e) 1 2 (3, 4) 1 2 3 4 a = &qu ...
- 『Python CoolBook』数据结构和算法_字典比较&字典和集合
一.字典元素排序 dict.keys(),dict.values(),dict.items() 结合max.min.sorted.zip进行排序是个很好的办法,另外注意不使用zip时,字典的lambd ...
- 『Python CoolBook』Cython
github地址 使用Cython导入库的话,需要一下几个文件: .c:C函数源码 .h:C函数头 .pxd:Cython函数头 .pyx:包装函数 setup.py:python 本节示例.c和.h ...
随机推荐
- for循环中break与continue的区别
1.for循环 for循环是更加简洁的循环语句,大部分情况下,for循环可以代替while循环.do-while循环. for循环的格式为: for( 初始语句 ; 执行条件 ; 增量 ){循环体}执 ...
- 019-并发编程-java.util.concurrent之-Semaphore 信号量
一.概述 Semaphore是一个计数信号量.从概念上将,Semaphore包含一组许可证.如果有需要的话,每个acquire()方法都会阻塞,直到获取一个可用的许可证.每个release()方法都会 ...
- [OpenCV]直线拟合
OpenCV实现了直线的拟合. CV_IMPL void cvFitLine( const CvArr* array, int dist, double param, double reps, dou ...
- hadoop执行 报错
Error: java.io.IOException: Initialization of all the collectors failed. Error in last collector was ...
- 外网无法ip访问服务器解决方法 (原)
示例ip:119.75.1.1 windows server示例 一.检查网络是否通畅 打开dos窗口(windows+r , 输入cmd回车 )输入命令: ping 119.75 ...
- smartctl 检测磁盘信息
smartctl -i 指定设备 -d 指定设备类型,例如:ata, scsi, marvell, sat, 3ware,N -a 或A 显示所有信息 -l 指定日志的类型,例如:TYPE: err ...
- Django框架详细介绍---视图系统
Django视图系统 1.什么是视图 在Django中,一个视图函数/类,称为视图.实质就是一个用户自定义的简单函数,用来接收WEB请求并xing响应请求,响应的内容可以是一个HTML文件.重定向.一 ...
- 以选项卡的故事扯扯js面向对象
在现在的网页中,选项卡(我自己这样子叫)是非常普遍的,也是比较基础,学了原型实现选项卡也挺久了,最近在学ES6,学了用类实现选项卡,今天就在此做个总结,别的废话也不多说. 以"貌" ...
- pypi上传问题
pypi上传过程中报错403 windows 解决办法: 1.建一个新的记事本编辑内容 [distutils]index-servers = pypi [pypi]repository:https:/ ...
- Python+OpenCV图像处理(十五)—— 圆检测
简介: 1.霍夫圆变换的基本原理和霍夫线变换原理类似,只是点对应的二维极径.极角空间被三维的圆心和半径空间取代.在标准霍夫圆变换中,原图像的边缘图像的任意点对应的经过这个点的所有可能圆在三维空间用圆心 ...