【JavaFx教程】第二部分:Model 和 TableView
第二部分的主题
- 创建一个 模型 类。
- 在 ObservableList 使用模型类。
- 使用 Controllers 在 TableView 上显示数据。
创建 模型 类。
我们需要一个模型类来保存联系人信息到我们的通讯录中。在模型包中 (ch.makery.address.model) 添加一个叫 Person的类。Person 类将会有一些变量,名字,地址和生日。将以下代码添加到类。在代码后,我将解释一些 JavaFX 的细节。
Person.java
package ch.makery.address.model;

import java.time.LocalDate;

import javafx.beans.property.IntegerProperty;

import javafx.beans.property.ObjectProperty;

import javafx.beans.property.SimpleIntegerProperty;

import javafx.beans.property.SimpleObjectProperty;

import javafx.beans.property.SimpleStringProperty;

import javafx.beans.property.StringProperty;

/**

 * Model class for a Person.

 *

 * @author Marco Jakob

 */

public class Person {

    private final StringProperty firstName;

    private final StringProperty lastName;

    private final StringProperty street;

    private final IntegerProperty postalCode;

    private final StringProperty city;

    private final ObjectProperty<LocalDate> birthday;

    /**

     * Default constructor.

     */

    public Person() {

        this(null, null);

    }

    /**

     * Constructor with some initial data.

     *

     * @param firstName

     * @param lastName

     */

    public Person(String firstName, String lastName) {

        this.firstName = new SimpleStringProperty(firstName);

        this.lastName = new SimpleStringProperty(lastName);

        // Some initial dummy data, just for convenient testing.

        this.street = new SimpleStringProperty("some street");

        this.postalCode = new SimpleIntegerProperty(1234);

        this.city = new SimpleStringProperty("some city");

        this.birthday = new SimpleObjectProperty<LocalDate>(LocalDate.of(1999, 2, 21));

    }

    public String getFirstName() {

        return firstName.get();

    }

    public void setFirstName(String firstName) {

        this.firstName.set(firstName);

    }

    public StringProperty firstNameProperty() {

        return firstName;

    }

    public String getLastName() {

        return lastName.get();

    }

    public void setLastName(String lastName) {

        this.lastName.set(lastName);

    }

    public StringProperty lastNameProperty() {

        return lastName;

    }

    public String getStreet() {

        return street.get();

    }

    public void setStreet(String street) {

        this.street.set(street);

    }

    public StringProperty streetProperty() {

        return street;

    }

    public int getPostalCode() {

        return postalCode.get();

    }

    public void setPostalCode(int postalCode) {

        this.postalCode.set(postalCode);

    }

    public IntegerProperty postalCodeProperty() {

        return postalCode;

    }

    public String getCity() {

        return city.get();

    }

    public void setCity(String city) {

        this.city.set(city);

    }

    public StringProperty cityProperty() {

        return city;

    }

    public LocalDate getBirthday() {

        return birthday.get();

    }

    public void setBirthday(LocalDate birthday) {

        this.birthday.set(birthday);

    }

    public ObjectProperty<LocalDate> birthdayProperty() {

        return birthday;

    }

}
解释
- 在JavaFX中,对一个模型类的所有属性使用
Properties是很常见的. 一个Property允许我们, 打个比方, 当lastName或其他属性被改变时自动收到通知, 这有助于我们保持视图与数据的同步,阅读 Using JavaFX Properties and Binding 学习更多关于Properties的内容。 birthday, 我们使用了LocalDate类型, 这在 Date and Time API for JDK 8 中是一个新的部分.
人员列表
我们的应用主要管理的数据是一群人的信息.让我们在 MainApp 类里面创建一个 Person 对象的列表。稍后其他所有的控制器类将存取 MainApp 的核心列表。
ObservableList
我们处理JavaFX的view classes需要在人员列表发生任何改变时都被通知. 这是很重要的,不然视图就会和数据不同步.为了达到这个目的,JavaFX引入了一些新的集合类.
在这些集合中, 我们需要的是ObservableList. 将以下代码增加到MainApp类的开头去创建一个新的ObservableList. 我们也会增加一个构造器去创建一些样本数据和一个公共的getter方法:
MainApp.java
    // ... AFTER THE OTHER VARIABLES ...

    /**

     * The data as an observable list of Persons.

     */

    private ObservableList<Person> personData = FXCollections.observableArrayList();

    /**

     * Constructor

     */

    public MainApp() {

        // Add some sample data

        personData.add(new Person("Hans", "Muster"));

        personData.add(new Person("Ruth", "Mueller"));

        personData.add(new Person("Heinz", "Kurz"));

        personData.add(new Person("Cornelia", "Meier"));

        personData.add(new Person("Werner", "Meyer"));

        personData.add(new Person("Lydia", "Kunz"));

        personData.add(new Person("Anna", "Best"));

        personData.add(new Person("Stefan", "Meier"));

        personData.add(new Person("Martin", "Mueller"));

    }

    /**

     * Returns the data as an observable list of Persons.

     * @return

     */

    public ObservableList<Person> getPersonData() {

        return personData;

    }

    // ... THE REST OF THE CLASS ...
The PersonOverviewController
现在我们终于要将数据加入到表格中了,我们需要一个控制器为了PersonOverview.fxml,.
- 在view包下创建一个名为
PersonOverviewController.java的普通java类(我们需要将这个类放在和PersonOverview.fxml相同的包下, 不然SceneBuilder会找不到它 - 至少在当前的版本). - 我们需要增加一些实例变量来访问表格和在视图中的标签.这些属性和一些方法有一个特殊的
@FXML注解. 这对于fxml文件访问私有属性和私有方法来说是必需的. 当将一切都在fxml文件中设置好之后, 应用程序会在fxml文件被载入时自动地填充这些变量. 让我们添加以下的代码:
Note: 记住要使用 javafx imports, 而不是awt和swing!
PersonOverviewController.java
package ch.makery.address.view;

import javafx.fxml.FXML;

import javafx.scene.control.Label;

import javafx.scene.control.TableColumn;

import javafx.scene.control.TableView;

import ch.makery.address.MainApp;

import ch.makery.address.model.Person;

public class PersonOverviewController {

    @FXML

    private TableView<Person> personTable;

    @FXML

    private TableColumn<Person, String> firstNameColumn;

    @FXML

    private TableColumn<Person, String> lastNameColumn;

    @FXML

    private Label firstNameLabel;

    @FXML

    private Label lastNameLabel;

    @FXML

    private Label streetLabel;

    @FXML

    private Label postalCodeLabel;

    @FXML

    private Label cityLabel;

    @FXML

    private Label birthdayLabel;

    // Reference to the main application.

    private MainApp mainApp;

    /**

     * The constructor.

     * The constructor is called before the initialize() method.

     */

    public PersonOverviewController() {

    }

    /**

     * Initializes the controller class. This method is automatically called

     * after the fxml file has been loaded.

     */

    @FXML

    private void initialize() {

        // Initialize the person table with the two columns.

        firstNameColumn.setCellValueFactory(cellData -> cellData.getValue().firstNameProperty());

        lastNameColumn.setCellValueFactory(cellData -> cellData.getValue().lastNameProperty());

    }

    /**

     * Is called by the main application to give a reference back to itself.

     *

     * @param mainApp

     */

    public void setMainApp(MainApp mainApp) {

        this.mainApp = mainApp;

        // Add observable list data to the table

        personTable.setItems(mainApp.getPersonData());

    }

}
可能需要解释一下这段代码:
- 所有fxml文件需要访问的属性和方法必须加上
@FXML注解.实际上,只有在私有的情况下才需要, 但是让它们保持私有并且用注解标记的方式更好! initialize()方法在fxml文件完成载入时被自动调用. 那时, 所有的FXML属性都应已被初始化.- 我们在表格列上使用
setCellValueFactory(...)来确定为特定列使用Person对象的某个属性. 箭头->表示我们在使用Java 8的 Lambdas 特性. (另一个选择是使用 PropertyValueFactory, 但它不是类型安全的).
连接 MainApp 和 PersonOverviewController
setMainApp(...) 必须被 MainApp 类调用. 这让我们可以访问MainApp对象并得到Persons的列表和其他东西. 用以下代码替换showPersonOverview() 方法. 它包含了新增的两行:
MainApp.java - new showPersonOverview() method
/**

 * Shows the person overview inside the root layout.

 */

public void showPersonOverview() {

    try {

        // Load person overview.

        FXMLLoader loader = new FXMLLoader();

        loader.setLocation(MainApp.class.getResource("view/PersonOverview.fxml"));

        AnchorPane personOverview = (AnchorPane) loader.load();

        // Set person overview into the center of root layout.

        rootLayout.setCenter(personOverview);

        // Give the controller access to the main app.

        PersonOverviewController controller = loader.getController();

        controller.setMainApp(this);

    } catch (IOException e) {

        e.printStackTrace();

    }

}
将View与Controller挂钩
我们快要完成了! 但是有件小事被遗漏了: 至今没有告诉 PersonOverview.fxml使用的是哪个控制器以及元素与控制器中的属性的对应关系.
使用SceneBuilder 打开
PersonOverview.fxml.打开左边的 Controller 组选择
PersonOverviewController作为 controller class.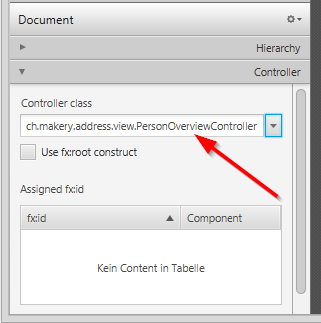
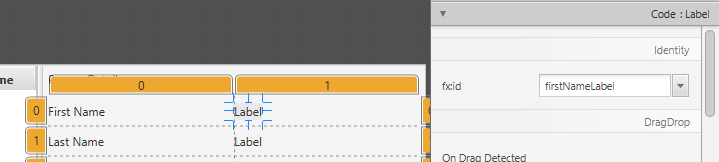
在 Hierarchy 组选择
TableView并选择 Code 组将personTable作为 fx:id.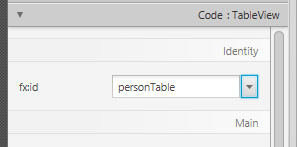
对列做相同的事并且将
firstNameColumnandlastNameColumn分别作为 fx:id .对在第二列的 each label , 选择对应的 fx:id.
重要事项: 回到eclipse并且 refresh the entire AddressApp project (F5). 这是必要的因为有时候eclipse并不知道在Scene Builder中作出的改变.
启动应用程序
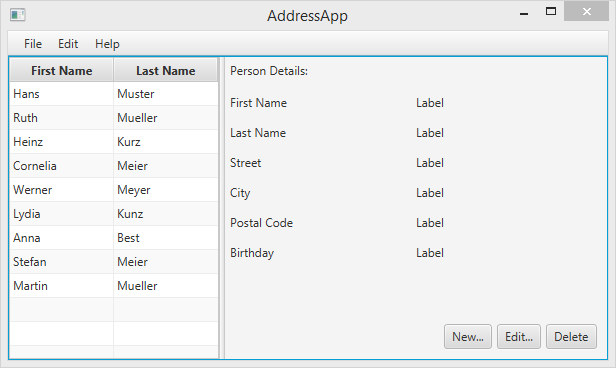
当你现在启动了你的应用,你应该看到了类似这篇博客开头的截图的程序界面.
恭喜!
---------------------
本文来自 jobbible 的CSDN 博客 ,全文地址请点击:https://blog.csdn.net/moshenglv/article/details/82869454?utm_source=copy
【JavaFx教程】第二部分:Model 和 TableView的更多相关文章
- 2017.2.15 开涛shiro教程-第二十一章-授予身份与切换身份(二) controller
原博客地址:http://jinnianshilongnian.iteye.com/blog/2018398 根据下载的pdf学习. 开涛shiro教程-第二十一章-授予身份与切换身份(二) 1.回顾 ...
- [ABP教程]第二章 图书列表页面
Web应用程序开发教程 - 第二章: 图书列表页面 关于本教程 在本系列教程中, 你将构建一个名为 Acme.BookStore 的用于管理书籍及其作者列表的基于ABP的应用程序. 它是使用以下技术开 ...
- Qt model和tableview的使用
QT中的model和tableview都是采用index索引 index含有两个成员变量一个是row 一个是column 对应该索引的行号.列号 model提供数据 view提供视图 ...
- 学习opencv中文版教程——第二章
学习opencv中文版教程——第二章 所有案例,跑起来~~~然而并没有都跑起来...我只把我能跑的都尽量跑了,毕竟看书还是很生硬,能运行能出结果,才比较好. 越着急,心越慌,越是着急,越要慢,越是陌生 ...
- 2017.2.15 开涛shiro教程-第二十一章-授予身份与切换身份(一) table、entity、service、dao
原博客地址:http://jinnianshilongnian.iteye.com/blog/2018398 根据下载的pdf学习. 第二十一章 授予身份与切换身份(一) 1.使用场景 某个领导因为某 ...
- javascript进阶教程第二章对象案例实战
javascript进阶教程第二章对象案例实战 一.学习任务 通过几个案例练习回顾学过的知识 通过案例练习补充几个之前没有见到或者虽然讲过单是讲的不仔细的知识点. 二.具体实例 温馨提示 面向对象的知 ...
- EnjoyingSoft之Mule ESB开发教程第二篇:Mule ESB基本概念
目录 1. 使用Anypoint Studio开发 2. Mule ESB Application Structure - Mule ESB应用程序结构 3. Mule ESB Application ...
- javafx将数据库内容输出到tableview表格
一 .创建Fxml文件,用Javafx Scene Builder 编辑页面,创建tableview(表格)和tablecolum(表格中的列),并为其设置fxid: 二.生成fxml文件的控制类: ...
- Spring cloud系列教程第二篇:支付项目父工程图文搭建
Spring cloud系列教程第二篇:支付项目父工程图文搭建 在讲解spring cloud相关的技术的时候,咱们就模拟订单支付这个流程来讲讲 在这个支付模块微服务搭建过程中,上面的这些技术,都会融 ...
随机推荐
- google breakpad for linux(2)
breakpad 是什么 breakpad 是一个包含了一系列库文件和工具的开源工具包,使用它可以帮助我们在程序崩溃后进行一系列的后续处理,如现场的保存(core dump),及事后分析(重建 cal ...
- Python 脚本利用adb 进行手机控制
相关参考:https://www.cnblogs.com/bravesnail/articles/5850335.html 一. adb 相关命令: 1. 关闭adb服务:adb kill-serv ...
- [Ynoi2015]此时此刻的光辉(莫队)
一道神题...自己写出来以后被卡常了...荣获洛谷最差解... 思路还是比较好想,对于每个数 \(\sqrt{n}\) 分块,对于 \(\sqrt{n}\) 以内的数,我们可以直接求出来.对于 \(\ ...
- [学习笔记]状压dp
状压 \(dp\) 1.[SDOI2009]Bill的挑战 \(f[i][j]\) 表示匹配到字符串的第 \(i\) 位状态为 \(j\) 的方案数 那么方程就很明显了,每次枚举第 \(i\) 位的字 ...
- python 数据类型一 (重点是字符串的各种操作)
一.python基本数据类型 1,int,整数,主要用来进行数学运算 2,bool,布尔类型,判断真假,True,False 3,str,字符串,可以保存少量数据并进行相应的操作(未来使用频率最高的一 ...
- python ftplib模块使用
Python中默认安装的ftplib模块定义了FTP类,可用来实现简单的ftp客户端,用于上传或下载文件. ftplib模块常用方法 ftp登陆连接 from ftplib import FTP #加 ...
- Vue项目打包常见问题整理
Vue 项目在开发时运行正常,打包发布后却出现各种报错,这里整理一下遇到的问题,以备忘. 1.js 路径问题 脚手架默认打包的路径为绝对路径,改为相对路径.修改 config/index.js 中 b ...
- 自定义 Scrapy 爬虫请求的 URL
之前使用 scrapy 抓取数据的时候 ,默认是在逻辑中判断是否执行下一次请求 def parse(self): # 获取所有的url,例如获取到urls中 for url in urls: yiel ...
- iOS Round Double value to 2 decimal digits and round 3rd decimal digit up
I have I double value like this one 17.125. It should be rounded up to 17.13 If I use the simple met ...
- Javac中的方法
例1: interface IA{ void m(int a); } abstract class AC implements IA{ // 这个抽象方法覆盖了 IA中的方法m public abst ...