基于nginx tomcat redis分布式web应用的session共享配置
一、前言
nginx 作为目前最流行的开源反向代理HTTP Server,用于实现资源缓存、web server负载均衡等功能,由于其轻量级、高性能、高可靠等特点在互联网项目中有着非常普遍的应用,相关概念网上有丰富的介绍。分布式web server集群部署后需要实现session共享,针对 tomcat 服务器的实现方案多种多样,比如 tomcat cluster session 广播、nginx IP hash策略、nginx sticky module等方案,本文主要介绍了使用 redis 服务器进行 session 统一存储管理的共享方案。
相关应用结构参照下图:

二、环境配置
测试环境基于 Linux CentOS 6.5,请先安装 tomcat、redis、nginx 相关环境,不作详细描述,本文测试配置如下:
| Version | IP_Port | |
| nginx | 1.6.2 | 10.129.221.70:80 |
| tomcat_1 | 7.0.54 | 10.129.221.70:8080 |
| tomcat_2 | 7.0.54 | 10.129.221.70:9090 |
| redis | 2.8.19 | 10.129.221.70:6379 |
三、构建 tomcat-redis-session-manager-master
1、由于源码构建基于 gradle,请先配置 gradle 环境。
2、从 github 获取 tomcat-redis-session-manager-master 源码,地址如下:
https://github.com/jcoleman/tomcat-redis-session-manager
3、找到源码中的 build.gradle 文件,由于作者使用了第三方仓库(sonatype),需要注册帐号,太麻烦,注释后直接使用maven中央仓库,同时注释签名相关脚本并增加依赖包的输出脚本 copyJars(dist目录),修改后的 build.gradle 文件如下:
apply plugin: 'java'

apply plugin: 'maven'

apply plugin: 'signing'

group = 'com.orangefunction'

version = '2.0.0'

repositories {

  mavenCentral()

}

compileJava {

  sourceCompatibility = 1.7

  targetCompatibility = 1.7

}

dependencies {

  compile group: 'org.apache.tomcat', name: 'tomcat-catalina', version: '7.0.27'

  compile group: 'redis.clients', name: 'jedis', version: '2.5.2'

  compile group: 'org.apache.commons', name: 'commons-pool2', version: '2.2'

  //compile group: 'commons-codec', name: 'commons-codec', version: '1.9'

  testCompile group: 'junit', name: 'junit', version: '4.+'

  testCompile 'org.hamcrest:hamcrest-core:1.3'

  testCompile 'org.hamcrest:hamcrest-library:1.3'

  testCompile 'org.mockito:mockito-all:1.9.5'

  testCompile group: 'org.apache.tomcat', name: 'tomcat-coyote', version: '7.0.27'

}

task javadocJar(type: Jar, dependsOn: javadoc) {

  classifier = 'javadoc'

  from 'build/docs/javadoc'

}

task sourcesJar(type: Jar) {

  from sourceSets.main.allSource

  classifier = 'sources'

}

artifacts {

  archives jar

  archives javadocJar

  archives sourcesJar

}

//signing {

//  sign configurations.archives

//}

task copyJars(type: Copy) {

  from configurations.runtime

  into 'dist'

}

uploadArchives {

  repositories {

    mavenDeployer {

      beforeDeployment { MavenDeployment deployment -> signing.signPom(deployment) }

      //repository(url: "https://oss.sonatype.org/service/local/staging/deploy/maven2/") {

      //  authentication(userName: sonatypeUsername, password: sonatypePassword)

      //}

      //repository(url: "https://oss.sonatype.org/content/repositories/snapshots") {

      //  authentication(userName: sonatypeUsername, password: sonatypePassword)

      //}

      pom.project {

        name 'tomcat-redis-session-manager'

        packaging 'jar'

        description 'Tomcat Redis Session Manager is a Tomcat extension to store sessions in Redis'

        url 'https://github.com/jcoleman/tomcat-redis-session-manager'

        issueManagement {

          url 'https://github.com:jcoleman/tomcat-redis-session-manager/issues'

          system 'GitHub Issues'

        }

        scm {

          url 'https://github.com:jcoleman/tomcat-redis-session-manager'

          connection 'scm:git:git://github.com/jcoleman/tomcat-redis-session-manager.git'

          developerConnection 'scm:git:git@github.com:jcoleman/tomcat-redis-session-manager.git'

        }

        licenses {

          license {

            name 'MIT'

            url 'http://opensource.org/licenses/MIT'

            distribution 'repo'

          }

        }

        developers {

          developer {

            id 'jcoleman'

            name 'James Coleman'

            email 'jtc331@gmail.com'

            url 'https://github.com/jcoleman'

          }

        }

      }

    }

  }

}
4、执行gradle命令构建源码,编译输出tomcat-redis-session-manager-master 及依赖jar包
gradle build -x test copyJars
所有输出列表文件如下:
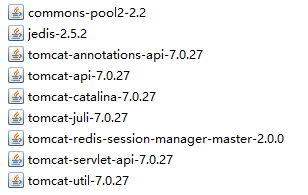
四、tomcat 配置
安装配置两台 tomcat web服务器,分别修改 Connector 端口号为8080和9090,并确保都能正常工作,当然如果分布在不同的主机则可以使用相同端口号。
五、编写测试页面
为了区别2台tomcat的访问,分别编写页面并打包部署:
1、为tomcat_1编写测试页面,显示 “ response from tomcat_1 ”,同时页面提供按钮显示当前session值,打包并发布到 tomcat_1 服务器;
2、为tomcat_2编写测试页面,显示 “ response from tomcat_2 ”,同时页面提供按钮显示当前session值,打包并发布到 tomcat_2 服务器;
此时分别访问 http://10.129.221.70:8080 和 http://10.129.221.70:9090 地址,因为访问的是不同web服务器,所以各自显示不同的页面内容及session值肯定不同。
六、tomcat session manager 配置
修改配置使用 tomcat-redis-session-manager-master 作为 tomcat session 管理器
1、分别将第三步生成的 tomcat-redis-session-manager-master 及依赖jar包覆盖到 tomcat 安装目录的 lib 文件夹
2、分别修改2台 tomcat 的 context.xml 文件,使 tomcat-redis-session-manager-master 作为session管理器,同时指定redis地址和端口。
context.xml 增加以下配置:
<Context>

      <Valve className="com.orangefunction.tomcat.redissessions.RedisSessionHandlerValve" />

      <Manager className="com.orangefunction.tomcat.redissessions.RedisSessionManager"

           host="localhost"

           port=""

           database=""

           maxInactiveInterval="" />

</Context>
3、分别重启2台 tomcat 服务器。
七、nginx 配置
1、修改 default.conf 配置文件,启用 upstream 负载均衡 tomcat Cluster,默认使用轮询方式。
upstream site {

    server localhost:8080;

    server localhost:9090;

}

server {

    listen       80;

    server_name  localhost;

    #charset koi8-r;

    #access_log  /var/log/nginx/log/host.access.log  main;

    location / {

        #root   /usr/share/nginx/html;

        #index  index.html index.htm;

        index  index_tel.jsp index.jsp index.html index.htm ;

        proxy_redirect          off;

        proxy_set_header        Host            $host;

        proxy_set_header        X-Real-IP       $remote_addr;

        proxy_set_header        X-Forwarded-For $proxy_add_x_forwarded_for;

        client_max_body_size    10m;

        client_body_buffer_size 128k;

        proxy_buffers           32 4k;

        proxy_connect_timeout   3;

        proxy_send_timeout      30;

        proxy_read_timeout      30;

            proxy_pass http://site;

    }

    #error_page  404              /404.html;

    # redirect server error pages to the static page /50x.html

    #

    error_page   500 502 503 504  /50x.html;

    location = /50x.html {

        root   /usr/share/nginx/html;

    }

    # proxy the PHP scripts to Apache listening on 127.0.0.1:80

    #

    #location ~ \.php$ {

    #    proxy_pass   http://127.0.0.1;

    #}

    # pass the PHP scripts to FastCGI server listening on 127.0.0.1:9000

    #

    #location ~ \.php$ {

    #    root           html;

    #    fastcgi_pass   127.0.0.1:9000;

    #    fastcgi_index  index.php;

    #    fastcgi_param  SCRIPT_FILENAME  /scripts$fastcgi_script_name;

    #    include        fastcgi_params;

    #}

    # deny access to .htaccess files, if Apache's document root

    # concurs with nginx's one

    #

    #location ~ /\.ht {

    #    deny  all;

    #}

}
2、nginx 重新加载配置
nginx -s reload
八、测试结果
1、访问 http://10.129.221.70:8080 直接请求到tomcat_1服务器,
显示 “ response from tomcat_1 ”, session 值为 ‘56E2FAE376A47F1C0961D722326B8423’;
2、访问 http://10.129.221.70:9090 直接请求到tomcat_2服务器,
显示 “ response from tomcat_2 ”, session 值为 ‘56E2FAE376A47F1C0961D722326B8423’;
3、访问 http://10.129.221.70 (默认80端口)请求到 nginx 反向代理到指定Web服务器,由于默认使用轮询负载方式,
反复刷新页面显示的内容在“ response from tomcat_1 ” 和 “ response from tomcat_2 ”之间切换,但 session 值保持为 ‘56E2FAE376A47F1C0961D722326B8423’;
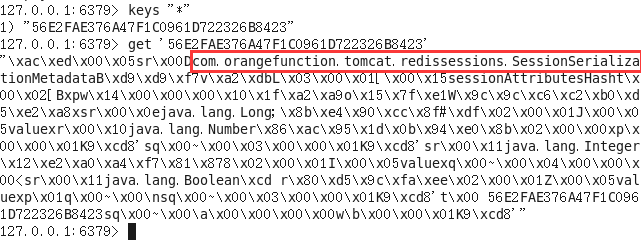
4、使用 redis-cli 连接 redis 服务器,查看会显示有 “56E2FAE376A47F1C0961D722326B8423” key的 session 数据,value为序列化数据。
九、至此实现了基于nginx负载均衡下 tomcat 集群的 session 一致性。
基于nginx tomcat redis分布式web应用的session共享配置的更多相关文章
- keepalived+nginx+tomcat+redis实现负载均衡和session共享(原创)
keepalived+nginx+tomcat+redis实现负载均衡和session共享 直接上链接,码了一天,就不再重写了,希望能帮到大家,有问题欢迎留言交流.
- nginx + tomcat + redis 部署项目,解决session共享问题。
最近自己搭了一套nginx的环境,集群部署了公司的一个项目,中间解决了session共享的问题.记录如下,以备日后查看. 1.环境 windows10 家庭中文版,jdk 7, tomcat 7.0. ...
- windows系统下nginx+tomcat+redis做负载均衡和session粘滞附整套解决方案
Nginx: 在nginx-1.8.0\conf目录下找到nginx.conf文件,打开文件修改文件中http{}中的内容,在http{}中加入 upstream localhost { serve ...
- Nginx+Tomcat+Memcache实现负载均衡及Session共享
第一部分 环境介绍 部署环境: Host1:Nginx.Memcached.Tomcat1 Host2:Tomcat2 Tomcat_version:8.0.38 第二部分 Nginx+Tomcat实 ...
- Nginx+Tomcat8+Memcached实现负载均衡及session共享
1> 基础环境 简易拓扑图: 2> 部署Tomcat [root@node01 ~]# ll -h ~ |egrep 'jdk|tomcat'-rw-r--r-- 1 root root ...
- Nginx+Tomcat+Redis实现负载均衡、资源分离、session共享
Nginx+Tomcat+Redis实现负载均衡.资源分离.session共享 CentOS安装Nginx http://centoscn.com/CentosServer/www/2013/0910 ...
- 通过Nginx+tomcat+redis实现反向代理 、负载均衡及session同步
一直对于负载均衡比较陌生,今天尝试着去了解了一下,并做了一个小的实验,对于这个概念有一些认识,在此做一个简单的总结 什么是负载均衡 负载均衡,英文 名称为Load Balance,指由多台服务器以对称 ...
- nginx+tomcat+redis的集群+session共享
nginx+tomcat+redis的集群+session共享 环境准备 1.tomcat版本:tomcat7 tomcat下载及安装,目前很多好的资源和步骤,此处省略. 2.jdk版本:jdk1.7 ...
- nginx之 nginx + tomcat + redis 负载均衡且session一致性
说明: 本文描述的是 nginx + tomcat + redis 实现应用负载均衡且满足session一致性,从安装到配置的全部过程,供大家学习!nginx 代理服务器ip: 10.219.24.2 ...
随机推荐
- 试试markdown
看看有没有wrapper... list first list second list third list fourth list in list 1 list list list > < ...
- ali2015校园招聘笔试大题
[本文链接] http://www.cnblogs.com/hellogiser/p/ali-2015-questions.html 1. 写一个函数,输入一个二叉树,树中每个节点存放了一个整数值,函 ...
- 在Xcode5和Android Studio添加工程间的依赖
正在编辑中,尚未完成 先看看ios的target是什么,请先参看http://www.cocoachina.com/bbs/read.php?tid-10884.html做个大概了解 这里有一篇文章, ...
- php 301
2013年7月1日 13:35:45 PHP在301跳转的时候,如果是跨域跳转,记着把要跳转到的URL添上"http://"
- Java for LeetCode 188 Best Time to Buy and Sell Stock IV【HARD】
Say you have an array for which the ith element is the price of a given stock on day i. Design an al ...
- codeforces A. Rook, Bishop and King 解题报告
题目链接:http://codeforces.com/problemset/problem/370/A 题目意思:根据rook(每次可以移动垂直或水平的任意步数(>=1)),bishop(每次可 ...
- codeforces A. Vasily the Bear and Triangle 解题报告
题目链接:http://codeforces.com/problemset/problem/336/A 好简单的一条数学题,是8月9日的.比赛中没有做出来,今天看,从pupil变成Newbie了,那个 ...
- ASP.Net和新对象之context.Server
描述 Server是一个HttpServerUtility类型的对象,不是一个类名 1.获取服务器上的绝对路径文件名tring ss = context.Server.MapPath("~/ ...
- swift复合类型
1.元组类型 (tuple) 元组就是多个元素的组合,是一个用圆括号括起来分号分隔的多个数据的一个集合体. 例如:定义一个学生变量,要求姓名 jim,年龄 19,性别 male 的元组变量为 // ...
- HTML CSS简单总结
1.css 的border属性改变hr颜色小示例 <hr style="border:0;background-color:#ff0000;height:1px;margin:0;pa ...