wxPython中菜单、按钮学习
---恢复内容开始---
wx.Window 是一个基类,许多构件从它继承。包括 wx.Frame 构件。技术上这意味着,我们可以在所有的
* SetToolTip( wx.ToolTip tip ) —— 为窗口添加提示。
* SetSize( wx.Size size ) —— 设置窗口的尺寸。
* SetPosition( wx.Point pos ) —— 设置窗口出现的位置。
* Show( show = True ) —— 显示或隐藏窗口。其中的参数可以为 True 或False。
* Move( wx.Point pos ) —— 将窗口移动到指定位置。
* SetCursor( wx.StockCursor id ) —— 设置窗口的鼠标指针样式。
import wx

app = wx.PySimpleApp()

frame = wx.Frame( None, -1, '' )

frame.SetToolTip( wx.ToolTip( 'This is a frame' ) )

frame.SetCursor( wx.StockCursor( wx.CURSOR_MAGNIFIER ) )

frame.SetPosition( wx.Point( 0, 0 ) )

frame.SetSize( wx.Size( 300, 250 ) )

frame.SetTitle( 'simple2.py' )

frame.Show()

app.MainLoop()
wx.CURSOR_RIGHT_ARROW
wx.CURSOR_BLANK
wx.CURSOR_BULLSEYE
wx.CURSOR_CHAR
wx.CURSOR_CROSS
wx.CURSOR_HAND
wx.CURSOR_IBEAM
wx.CURSOR_LEFT_BUTTON
wx.CURSOR_MAGNIFIER
wx.CURSOR_MIDDLE_BUTTON
wx.CURSOR_NO_ENTRY
wx.CURSOR_PAINT_BRUSH
wx.CURSOR_PENCIL
wx.CURSOR_POINT_LEFT
wx.CURSOR_POINT_RIGHT
wx.CURSOR_QUESTION_ARROW
wx.CURSOR_RIGHT_BUTTON
wx.CURSOR_SIZENESW
wx.CURSOR_SIZENS
wx.CURSOR_SIZENWSE
wx.CURSOR_SIZEWE
wx.CURSOR_SIZING
wx.CURSOR_SPRAYCAN
wx.CURSOR_WAIT
wx.CURSOR_WATCH
wx.CURSOR_ARROWWAIT
======================================================================
wx.Frame 是一个容器构件。这意味着它可以容纳其它构件。它有如下的构造器:
import wx

def main():

    app = wx.PySimpleApp()

    frame = wx.Frame(None,-1,'Icon',wx.DefaultPosition,wx.Size(350,300))

    frame.SetIcon(wx.Icon('Tipi.ico',wx.BITMAP_TYPE_ICO))

    frame.Center()

    frame.Show()

    app.MainLoop()

if __name__ == '__main__':

    main()
======================================================================
创建一个菜单栏在wxPython中相当简单。我们将讨论给菜单栏添加菜单、为已经存在的菜单添加子菜单。所有菜单都有菜单项组成。菜单项可以是常规项、复选项以及单选项。
edit = wx.Menu()
help = wx.Menu()
file.Append( 102, '&Save', 'Save the document' )
quit.SetBitmap(wx.Image('stock_exit-16.png', wx.BITMAP_TYPE_PNG).ConvertToBitmap())
file.AppendItem(quit)
menubar.Append( edit, '&Edit' )
menubar.Append( help, '&Help' )
#!/usr/bin/env python

# FileName: menu1.py

import wx

class MyMenu( wx.Frame ):

    def __init__(self,parent,ID,title):

        wx.Frame.__init__(self,parent,-1,title,wx.DefaultPosition,wx.Size(200, 150))

        menubar=wx.MenuBar()

        file=wx.Menu()

        edit=wx.Menu()

        help=wx.Menu()

        file.Append(101,'&Open','Open a new document')

        file.Append(102,'&Save','Save the document')

        file.AppendSeparator()

        quit=wx.MenuItem(file,105,'&Quit\tCtrl+Q','Quit the Application')

        quit.SetBitmap(wx.Image('stock_exit-16.png', wx.BITMAP_TYPE_PNG).ConvertToBitmap())

        file.AppendItem(quit)

        menubar.Append(file,'&File')

        menubar.Append(edit,'&Edit')

        menubar.Append(help,'&Help')

        self.SetMenuBar( menubar )

class MyApp(wx.App):

    def OnInit(self):

        frame=MyMenu(None,-1,'menu1.py')

        frame.Show(True)

        return True

app=MyApp(0)

app.MainLoop()
edit.Append( 202, 'check item2', '', kind=wx.ITEM_CHECK )
* wx.ITEM_CHECK —— 复选
* wx.ITEM_RADIO —— 单选
submenu.Append( 302, 'radio item2', kind=wx.ITEM_RADIO )
submenu.Append( 303, 'radio item3', kind=wx.ITEM_RADIO )
self.Close()
下面的脚本会展示上面说的各种菜单项、子菜单以及一个简单的事件处理。我讨厌程序窗口出现在角落里,所以加上了:
 #!/usr/bin/python

 # FileName: menu2.py

 import wx

 class MyMenu(wx.Frame):

     def __init__(self, parent, ID, title):

         wx.Frame.__init__(self, parent, -1, title,

         wx.DefaultPosition, wx.Size(380, 250))

         menubar = wx.MenuBar()

         file = wx.Menu()

         edit = wx.Menu()

         help = wx.Menu()

         file.Append(101, '&Open', 'Open a new document')

         file.Append(102, '&Save', 'Save the document')

         file.AppendSeparator()

         quit = wx.MenuItem(file, 105, '&Quit\tCtrl+Q', 'Quit the Application')

         quit.SetBitmap(wx.Image ('gtk-quit.png',

         wx.BITMAP_TYPE_PNG).ConvertToBitmap())

         file.AppendItem(quit)

         edit.Append(201, 'check item1', '', wx.ITEM_CHECK)

         edit.Append(202, 'check item2', kind= wx.ITEM_CHECK)

         submenu = wx.Menu()

         submenu.Append(301, 'radio item1', kind=wx.ITEM_RADIO)

         submenu.Append(302, 'radio item2', kind=wx.ITEM_RADIO)

         submenu.Append(303, 'radio item3', kind= wx.ITEM_RADIO)

         edit.AppendMenu(203, 'submenu', submenu)

         menubar.Append(file, '&File')

         menubar.Append(edit, '&Edit')

         menubar.Append(help, '&Help')

         self.SetMenuBar(menubar)

         self.Centre()

         wx.EVT_MENU(self, 105, self.OnQuit)

         def OnQuit(self, event):

         self.Close()

 class MyApp(wx.App):

     def OnInit(self):

         frame = MyMenu(None, -1, 'menu2.py')

         frame.Show(True)

         return True

         app = MyApp(0)

         app.MainLoop()
======================================================================
# FileName: toolbar.py

import wx

class MyToolBar( wx.Frame ):

    def __init__( self, parent, ID, title ):

        wx.Frame.__init__( self, parent, ID, title, wx.DefaultPosition, wx.Size( 350, 250 ) )

        vbox = wx.BoxSizer( wx.VERTICAL )

        toolbar = wx.ToolBar( self, -1, style=wx.TB_HORIZONTAL | wx.NO_BORDER )

        toolbar.AddSimpleTool( 1, wx.Image( 'stock_new.png', wx.BITMAP_TYPE_PNG ).ConvertToBitmap(), 'New', '' )

        toolbar.AddSimpleTool( 2, wx.Image( 'stock_open.png', wx.BITMAP_TYPE_PNG ).ConvertToBitmap(), 'Opne', '' )

        toolbar.AddSimpleTool( 3, wx.Image( 'stock_save.png', wx.BITMAP_TYPE_PNG ).ConvertToBitmap(), 'Save', '' )

        toolbar.AddSeparator()

        toolbar.AddSimpleTool( 4, wx.Image( 'stock_exit.png', wx.BITMAP_TYPE_PNG ).ConvertToBitmap(), 'Exit', '' )

        toolbar.Realize()

        vbox.Add( toolbar, 0, border=5 )

        self.SetSizer( vbox )

        self.statusbar = self.CreateStatusBar()

        self.Centre()

        wx.EVT_TOOL( self, 1, self.OnNew )

        wx.EVT_TOOL( self, 2, self.OnOpen )

        wx.EVT_TOOL( self, 3, self.OnSave )

        wx.EVT_TOOL( self, 4, self.OnExit )

        def OnNew( self, event ):

          self.statusbar.SetStatusText( 'New Command' )

        def OnOpen( self, event ):

           self.statusbar.SetStatusText( 'Open Command' )

        def OnSave( self, event ):

           self.statusbar.SetStatusText( 'Save Command' )

        def OnExit( self, event ):

           self.Close()

class MyApp( wx.App ):

    def OnInit( self ):

        frame = MyToolBar( None, -1, ' toolbar.py' )

        frame.Show( True )

        return True

app = MyApp( 0 )

app.MainLoop()
======================================================================
有两种基本的方法可以用来布置我们的构件。第一种是手工布置。我们通过在构造器中指定位置来摆放我们的构件。
import wx

class MyFrame(wx.Frame):

    def __init__(self,parent,ID,title):

        wx.Frame.__init__(self,parent,ID,title,wx.DefaultPosition,wx.Size(250,50))

        panel=wx.Panel(self,-1)

        wx.Button(panel,-1,'Button1',(0,0))

        wx.Button(panel,-1,'Button2',(80,0))

        wx.Button(panel,-1,'Button3',(160,0))

class MyApp(wx.App):

    def OnInit(self):

        frame=MyFrame(None,-1,'layout.py')

        frame.Show(True)

        frame.Centre()

app = MyApp(0)

app.MainLoop()
* wx.StaticBoxSizer
* wx.GridSizer
* wx.GridBagSizer
======================================================================
我们来写一个程序,它的窗口顶部的一行被三个按纽占据。这些按纽会随窗口的改变而改变。
import wx

class MyFrame(wx.Frame):

    def __init__(self,parent,ID,title):

        wx.Frame.__init__(self,parent,ID,title,(-1,-1),wx.Size(200,300))

        panel=wx.Panel(self,-1)

        box=wx.BoxSizer(wx.HORIZONTAL)

        box.Add( wx.Button( panel, -1, 'Button1' ), 0 )

        box.Add( wx.Button( panel, -1, 'Button2' ), 1 )

        box.Add( wx.Button( panel, -1, 'Button3' ), 2 )

        panel.SetSizer(box)

        self.Centre()

class MyApp(wx.App):

    def OnInit(self):

        frame = MyFrame( None, -1, 'wxboxsizer.py' )

        frame.Show(True)

        return True

app = MyApp(0)

app.MainLoop()

* wx.RIGHT
* wx.BOTTOM
* wx.TOP
* wx.ALL
* wx.ALIGN_RIGHT
* wx.ALIGN_TOP
* wx.ALIGN_BOTTOM
* wx.ALIGN_CENTER_VERTICAL
* wx.ALIGN_CENTER_HORIZONTAL
* wx.ALIGN_CENTER
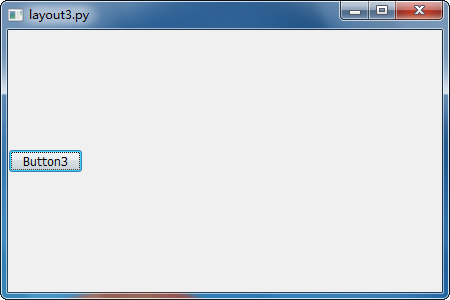
import wx

class MyFrame( wx.Frame ):

    def __init__( self, parent, ID, title ):

        wx.Frame.__init__(self,parent,ID,title,(-1,-1),wx.Size(450,300))

        panel = wx.Panel(self,-1)

        box = wx.BoxSizer( wx.HORIZONTAL )

        box.Add( wx.Button( panel, -1, 'Button1' ), 1, wx.ALL, 5 )

        box.Add( wx.Button( panel, -1, 'Button2' ), 0, wx.EXPAND )

        box.Add( wx.Button( panel, -1, 'Button3' ), 0, wx.ALIGN_CENTER )

        # box.Add( wx.Button( panel, -1, 'Button3' ), 0,  wx.ALIGN_CENTER )

        panel.SetSizer( box )

        self.Center()

class MyApp( wx.App ):

    def OnInit( self ):

        frame = MyFrame( None, -1, 'layout3.py' )

        frame.Show( True )

        return True

app = MyApp(0)

app.MainLoop()


import wx

class MyFrame( wx.Frame ):

    def __init__( self, parent, id, title ):

        wx.Frame.__init__( self, parent, id, title )

        vbox = wx.BoxSizer( wx.VERTICAL )

        hbox1 = wx.BoxSizer( wx.HORIZONTAL )

        hbox2 = wx.BoxSizer( wx.HORIZONTAL )

        pnl1 = wx.Panel( self, -1, style=wx.SIMPLE_BORDER )

        pnl2 = wx.Panel( self, -1, style=wx.RAISED_BORDER )

        pnl3 = wx.Panel( self, -1, style=wx.SUNKEN_BORDER )

        pnl4 = wx.Panel( self, -1, style=wx.DOUBLE_BORDER )

        pnl5 = wx.Panel( self, -1, style=wx.STATIC_BORDER )

        pnl6 = wx.Panel( self, -1, style=wx.NO_BORDER )

        hbox1.Add( pnl1, 1, wx.EXPAND | wx.ALL, 3 )

        hbox1.Add( pnl2, 1, wx.EXPAND | wx.ALL, 3 )

        hbox1.Add( pnl3, 1, wx.EXPAND | wx.ALL, 3 )

        hbox2.Add( pnl4, 1, wx.EXPAND | wx.ALL, 3 )

        hbox2.Add( pnl5, 1, wx.EXPAND | wx.ALL, 3 )

        hbox2.Add( pnl6, 1, wx.EXPAND | wx.ALL, 3 )

        vbox.Add( hbox1, 1, wx.EXPAND )

        vbox.Add( hbox2, 1, wx.EXPAND )

        self.SetSizer( vbox )

        self.Centre()

class MyApp( wx.App ):

    def OnInit( self ):

        frame = MyFrame( None, -1, 'borders.py' )

        frame.Show( True )

        return True

app = MyApp( 0 )

app.MainLoop()
运行结果:

* wx.RAISED_BORDER
* wx.SUNKEN_BORDER
* wx.DOUBLE_BORDER
* wx.STATIC_BORDER
* wx.NO_BORDER
======================================================================
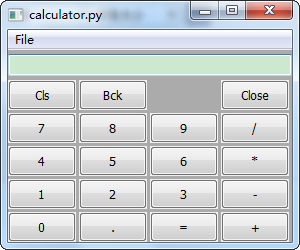
wx.GridSizer 使用两维的表格来布局它里面的东西。每个表格的宽度等于它里面最大那个构件的宽度,高度等于它里面高度最大的那个构件的高度。
import wx

class MyFrame( wx.Frame ):

    def __init__( self, parent, id, title ):

        wx.Frame.__init__(self,parent,id,title,wx.DefaultPosition,wx.Size(300, 250))

        self.formula = False

        menubar = wx.MenuBar()

        file = wx.Menu()

        file.Append( 22, '&Quit', 'Exit Calculator' )

        menubar.Append( file, '&File' )

        self.SetMenuBar( menubar )

        wx.EVT_MENU( self, 22, self.OnClose )

        sizer = wx.BoxSizer( wx.VERTICAL )

        self.display = wx.TextCtrl(self, -1, '', style=wx.TE_RIGHT)

        sizer.Add(self.display, 0, wx.EXPAND | wx.TOP | wx.BOTTOM, 4)

        gs = wx.GridSizer(4, 4, 3, 3)

        gs.AddMany([(wx.Button(self, 20, 'Cls'), 0, wx.EXPAND),

        (wx.Button(self, 21, 'Bck'), 0, wx.EXPAND),

        (wx.StaticText(self, -1, ''), 0, wx.EXPAND),

        (wx.Button(self, 22, 'Close'), 0, wx.EXPAND),

        (wx.Button(self, 1, '7'), 0, wx.EXPAND),

        (wx.Button(self, 2, '8'), 0, wx.EXPAND),

        (wx.Button(self, 3, '9'), 0, wx.EXPAND),

        (wx.Button(self, 4, '/'), 0, wx.EXPAND),

        (wx.Button(self, 5, '4'), 0, wx.EXPAND),

        (wx.Button(self, 6, '5'), 0, wx.EXPAND),

        (wx.Button(self, 7, '6'), 0, wx.EXPAND),

        (wx.Button(self, 8, '*'), 0, wx.EXPAND),

        (wx.Button(self, 9, '1'), 0, wx.EXPAND),

        (wx.Button(self, 10, '2'), 0, wx.EXPAND),

        (wx.Button(self, 11, '3'), 0, wx.EXPAND),

        (wx.Button(self, 12, '-'), 0, wx.EXPAND),

        (wx.Button(self, 13, '0'), 0, wx.EXPAND),

        (wx.Button(self, 14, '.'), 0, wx.EXPAND),

        (wx.Button(self, 15, '='), 0, wx.EXPAND),

        (wx.Button(self, 16, '+'), 0, wx.EXPAND)])

        sizer.Add(gs, 1, wx.EXPAND)

        self.SetSizer(sizer)

        self.Centre()

        wx.EVT_BUTTON(self, 20, self.OnClear)

        wx.EVT_BUTTON(self, 21, self.OnBackspace)

        wx.EVT_BUTTON(self, 22, self.OnClose)

        wx.EVT_BUTTON(self, 1, self.OnSeven)

        wx.EVT_BUTTON(self, 2, self.OnEight)

        wx.EVT_BUTTON(self, 3, self.OnNine)

        wx.EVT_BUTTON(self, 4, self.OnDivide)

        wx.EVT_BUTTON(self, 5, self.OnFour)

        wx.EVT_BUTTON(self, 6, self.OnFive)

        wx.EVT_BUTTON(self, 7, self.OnSix)

        wx.EVT_BUTTON(self, 8, self.OnMultiply)

        wx.EVT_BUTTON(self, 9, self.OnOne)

        wx.EVT_BUTTON(self, 10, self.OnTwo)

        wx.EVT_BUTTON(self, 11, self.OnThree)

        wx.EVT_BUTTON(self, 12, self.OnMinus)

        wx.EVT_BUTTON(self, 13, self.OnZero)

        wx.EVT_BUTTON(self, 14, self.OnDot)

        wx.EVT_BUTTON(self, 15, self.OnEqual)

        wx.EVT_BUTTON(self, 16, self.OnPlus)

    def OnClear(self, event):

        self.display.Clear()

    def OnBackspace(self, event):

        formula = self.display.GetValue()

        self.display.Clear()

        self.display.SetValue(formula[:-1])

    def OnClose(self, event):

        self.Close()

    def OnDivide(self, event):

        if self.formula:

            return

        self.display.AppendText('/')

    def OnMultiply(self, event):

        if self.formula:

            return

        self.display.AppendText('*')

    def OnMinus(self, event):

        if self.formula:

            return

        self.display.AppendText('-')

    def OnPlus(self, event):

        if self.formula:

            return

        self.display.AppendText('+')

    def OnDot(self, event):

        if self.formula:

            return

        self.display.AppendText('.')

    def OnEqual(self, event):

        if self.formula:

            return

        formula = self.display.GetValue()

        self.formula = True

        try:

            self.display.Clear()

            output = eval(formula)

            self.display.AppendText(str(output))

        except StandardError:

            self.display.AppendText("Error")

    def OnZero(self, event):

        if self.formula:

            self.display.Clear()

        self.formula = False

        self.display.AppendText('0')

    def OnOne(self, event):

        if self.formula:

            self.display.Clear()

        self.formula = False

        self.display.AppendText('1')

    def OnTwo(self, event):

        if self.formula:

            self.display.Clear()

        self.formula = False

        self.display.AppendText('2')

    def OnThree(self, event):

        if self.formula:

            self.display.Clear()

        self.formula = False

        self.display.AppendText('3')

    def OnFour(self, event):

        if self.formula:

            self.display.Clear()

        self.formula = False

        self.display.AppendText('4')

    def OnFive(self, event):

        if self.formula:

            self.display.Clear()

        self.formula = False

        self.display.AppendText('5')

    def OnSix(self, event):

        if self.formula:

            self.display.Clear()

        self.formula = False

        self.display.AppendText('6')

    def OnSeven(self, event):

        if self.formula:

            self.display.Clear()

        self.formula = False

        self.display.AppendText('7')

    def OnEight(self, event):

        if self.formula:

            self.display.Clear()

        self.formula = False

        self.display.AppendText('8')

    def OnNine(self, event):

        if self.formula:

            self.display.Clear()

        self.formula = False

        self.display.AppendText('9')

class MyApp(wx.App):

    def OnInit(self):

        frame = MyFrame(None, -1, "calculator.py")

        frame.Show(True)

        self.SetTopWindow(frame)

        return True

app = MyApp(0)

app.MainLoop()
运行结果:

wxPython中菜单、按钮学习的更多相关文章
- wxPython中基本控件学习
wxPython工具包提供了多种不同的窗口部件,包括了本章所提到的基本控件.我们涉及静态文本.可编辑的文本.按钮.微调.滑块.复选框.单选按钮.选择器.列表框.组合框和标尺.对于每种窗口部件,我们将提 ...
- Android4.3模拟器界面中右侧菜单按钮无法使用问题解决办法
开发环境:笔记本电脑Windows2008+MyEclipse 10+Android4.3 问题描述:运行或者调试Android项目时,发现模拟器中右侧Menu按钮无法点击,截图如下: 查看在Andr ...
- Android开发 ---代码创建选项菜单、隐藏菜单项、菜单的生命周期,菜单按钮图标设置、搜索框、xml中设置子菜单
1.activity_main.xml 描述: 定义了一个按钮 <?xml version="1.0" encoding="utf-8"?> < ...
- bootstrap学习笔记(菜单.按钮)
下拉菜单 <div class="dropdown"> <button class="btn btn-default dropdown-toggle&q ...
- Bootstrap学习-菜单-按钮-导航
1.下拉菜单(基本用法) 在使用Bootstrap框架的下拉菜单时,必须调用Bootstrap框架提供的bootstrap.js文件.当然,如果你使用的是未编译版本,在js文件夹下你能找到一个名为“d ...
- jQuery EasyUI API 中文文档 - 菜单按钮(menubutton)
<html> <head> <script src="jquery-easyui/jquery.min.js"></script> ...
- BootStrap学习(2)_下拉菜单&按钮组
一.下拉菜单 1.基本下拉菜单 如需使用下列菜单,只需要在class .dropdown 内加上下拉菜单即可.下面的实例演示了基本的下拉菜单: <!DOCTYPE html> <ht ...
- openerp学习笔记 视图(tree\form)中隐藏按钮( 创建、编辑、删除 ),tree视图中启用编辑
视图(tree\form)中隐藏按钮( 创建.编辑.删除 )create="false" edit="false" delete="false&quo ...
- 第二百三十七节,Bootstrap图标菜单按钮组件
Bootstrap图标菜单按钮组件 学习要点: 1.小图标组件 2.下拉菜单组件 3.按钮组组件 4.按钮式下拉菜单 本节课我们主要学习一下 Bootstrap 的三个组件功能:小图标组件.下拉菜单组 ...
随机推荐
- 使用Sidecar将Node.js引入Spring Cloud
网上看到的一篇文章,觉得写得挺好,现转载于此,以方便需要的网友查阅. 该文章介绍了非JAVA语言提供的应用集成到Spring Cloud的这样一个实现,以便我们使用其他语言作为参考. 感谢原作者分享, ...
- Oracle 的process和Session
Oracle 的process和Session 1.process 和session的概念:process:这个参数限制了能够连接到SGA的操作系统进程数(或者是Windows 系统中的线程数),这个 ...
- Centos7 & Docker & Jenkins & ASP.NET Core 2.0 自动化发布和部署
写在前面 Docker一直很火热,一直想把原本的Jenkins自动部署工具搬到Docker上面,无奈今年一直忙于各种事情,迟迟未实施这个事情,正好迎来了dotnet core 2.0 的正式发布,升级 ...
- select 标签选中 jquery
网上很多错误 的[text ='xxx'] ,我晕. option 标签没有 text 属性.所以[]选取不到. 正确的: $("#yearCardTypeState option:cont ...
- hibernate 事务理解
简介: Hibernate本身并不具备事务管理能力 .在事务管理层, Hibernate将其委托给底层的JDBC或者JTA ,以实现事务管理和调度功能. Hibernate的默认事务处理机制基于JDB ...
- python re group()
python group() 正则表达式中,group()用来提出分组截获的字符串,()用来分组 import re a = "123abc456" print re.search ...
- 团队作业4——第一次项目冲刺(Alpha版本)4th day
一.Daily Scrum Meeting照片 二.燃尽图 三.项目进展 计时功能已经完成,然后24点的代码如何在游戏界面与界面组件联系上正在进行. 四.困难与问题 1.在安卓框架与java代码的结合 ...
- 团队作业4——第一次项目冲刺(Alpha版本)4.24
·本次会议为第三次Scrum Meeting会议~ ·本次会议项目经理召开时间为15:00,在教学楼教室召开,召开时长约30分钟,探讨了昨日任务的进展.遇到的困难以及后续所要开展的工作. 1.站立式会 ...
- 201521123027 《JAVA程序设计》第四周学习总结
1.本周学习总结 1.1 尝试使用思维导图总结有关继承的知识点. 1.2 使用常规方法总结其他上课内容. ①多态:相同方法名,不同实现: ②instanceof运算符:判断父类引用所引用的对象实例的实 ...
- JAVA课设---五子棋
1.团队博客链接 JAVA课设-五子棋-团队博客 2.个人负责模块: ①对鼠标事件的处理 , 此模块需处理五子棋的放置问题.颜色转换问题.以及当五子连线时弹出窗口显示结果. ②对MainFrame中主 ...
