任务调度之持久化(基于Quartz.net)
上一篇我们了解了任务调度及他的远端管理方式,传送门:任务调度及远端管理(基于Quartz.net)
这篇我们要完成任务调度的持久化功能,即新增修改删除之类的功能,这必须得要有的,不然都不知道后台都有什么作业在跑
一、Job的CURD
1.1 、新建Job表
 CREATE TABLE [dbo].[Job](

     [Id] [uniqueidentifier] NOT NULL,

     [GroupName] [nvarchar](50) COLLATE Chinese_PRC_CI_AS NULL,

     [JobName] [nvarchar](50) COLLATE Chinese_PRC_CI_AS NULL,

     [TriggerName] [nvarchar](50) COLLATE Chinese_PRC_CI_AS NULL,

     [Cron] [varchar](50) COLLATE Chinese_PRC_CI_AS NULL,

     [TriggerState] [varchar](50) COLLATE Chinese_PRC_CI_AS NULL,

     [StartTime] [datetime] NULL,

     [EndTime] [datetime] NULL,

     [PreTime] [datetime] NULL,

     [NextTime] [datetime] NULL,

     [Description] [nvarchar](200) COLLATE Chinese_PRC_CI_AS NULL,

     [CreateTime] [datetime] NULL,

  CONSTRAINT [PK_Job] PRIMARY KEY CLUSTERED

 (

     [Id] ASC

 )WITH (PAD_INDEX  = OFF, IGNORE_DUP_KEY = OFF) ON [PRIMARY]

 ) ON [PRIMARY]

 GO
1.2、控制器还是用上一篇的HelloJobController,改一下
     public class HelloJobController : Controller

     {

         private IJobApplication jobApplication;

         public HelloJobController(IJobApplication jobApplication)

         {

             this.jobApplication = jobApplication;

         }

         [Route("Jobs/{PageIndex=1}")]

         public ActionResult Index(string PageIndex)

         {

             Page page = new Page();

             page.PageIndex = PageIndex.ToInt();

             var model = new JobPageViewModel();

             var soure = this.jobApplication.GetPage(page, t => t.CreateTime);

             model.Items = Mapper.Map<List<JobViewModel>>(soure.Item2);

             model.Total = soure.Item1;

             model.Page = page;

             return View(model);

         }

         [HttpPost]

         [ValidateAntiForgeryToken]

         public ActionResult Add(JobCURequest entity)

         {

             this.jobApplication.Add(new JobCURequest()

             {

                 Id = Guid.NewGuid(),

                 GroupName = entity.GroupName,

                 JobName = entity.JobName,

                 TriggerName = entity.TriggerName,

                 Cron = entity.Cron,

                 TriggerState = Quartz.TriggerState.None.ToString()

             });

             return RedirectToAction("Index");

         }

         [HttpGet]

         public ActionResult Delete(string id)

         {

             this.jobApplication.Delete(Guid.Parse(id));

             return RedirectToAction("Index");

         }

         [HttpGet]

         public ActionResult Edit(Guid id)

         {

             var soure = this.jobApplication.Get(id);

             return Json(soure, JsonRequestBehavior.AllowGet);

         }

         [HttpPost]

         [ValidateAntiForgeryToken]

         public ActionResult Edit(JobCURequest entity)

         {

             this.jobApplication.Update(new JobCURequest()

             {

                 Id = entity.Id,

                 GroupName = entity.GroupName,

                 JobName = entity.JobName,

                 TriggerName = entity.TriggerName,

                 Cron = entity.Cron,

                 TriggerState = Quartz.TriggerState.None.ToString()

             });

             return RedirectToAction("Index");

         }73     }
可以看到我们新加了IJobApplication的注入,以及Index、Add、Delete、Edit(2个)5个方法
至于里边的实现就是我们上一个系列写好的功能,详细情况请点击传送门:架构设计
1.3、 视图View也要改一下
@model Presentation.MVC.Models.JobPageViewModel
@{
ViewBag.Title = "Index";
Layout = "~/Views/Shared/_Bootstrap.cshtml";
} <br />
<div class="panel panel-default">
<div class="panel-heading">
<h4 class="panel-title">
<a data-toggle="collapse" data-parent="#accordion"
href="#collapseOne" id="actionType">
新增作业
</a>
</h4>
</div>
<div id="collapseOne" class="panel-collapse collapse">
<div class="panel-body">
@using (Html.BeginForm("Add", "HelloJob", null, FormMethod.Post, new { @id = "formHelloJob", @class = "form-horizontal", role = "form" }))
{
@Html.AntiForgeryToken() <div class="form-group">
<label for="LoginName" class="col-sm-2 control-label">群组</label>
<div class="col-sm-10">
<input type="text" class="form-control" name="GroupName" id="GroupName"
placeholder="请输入群组" />
</div>
</div>
<div class="form-group">
<label for="Password" class="col-sm-2 control-label">作业名称</label>
<div class="col-sm-10">
<input type="text" class="form-control" name="JobName" id="JobName"
placeholder="请输入作业名称" />
</div>
</div>
<div class="form-group">
<label for="Password" class="col-sm-2 control-label">触发器名称</label>
<div class="col-sm-10">
<input type="text" class="form-control" name="TriggerName" id="TriggerName"
placeholder="请输入触发器名称" />
</div>
</div>
<div class="form-group">
<label for="Password" class="col-sm-2 control-label">执行计划</label>
<div class="col-sm-10">
<input type="text" class="form-control" name="Cron" id="Cron"
placeholder="请输入执行计划" />
</div>
</div>
<div class="form-group">
<label for="Password" class="col-sm-2 control-label">描述</label>
<div class="col-sm-10">
<input type="text" class="form-control" name="Description" id="Description"
placeholder="请输入描述" />
</div>
</div>
<div class="form-group">
<div class="col-sm-offset-2 col-sm-10">
<input type="hidden" name="Id" id="Id" />
<button type="submit" class="btn btn-default">提交</button>
</div>
</div>
}
</div>
</div>
</div> <div style=" margin-bottom:5px;">
<a id="btnRun" class="btn btn-default" href="#" role="button">执行</a>
<a id="btnPause" class="btn btn-default" href="#" role="button">暂停</a>
<a id="btnResume" class="btn btn-default" href="#" role="button">恢复</a> <a id="btnEdit" class="btn btn-default" href="#" role="button" style=" margin-left:10px">修改</a>
<a id="btnDel" class="btn btn-default" href="#" role="button">删除</a>
</div>
<table id="list" class="table table-striped table-bordered table-hover table-condensed">
<thead>
<tr>
<th><input type="checkbox" class="chkAll" /></th>
<th>序号</th>
<th>群组</th>
<th>作业名称</th>
<th>触发器名称</th>
<th>执行计划</th>
<th>描述</th>
<th>开始时间</th>
<th>结束时间</th>
<th>上次执行</th>
<th>下次执行</th>
<th>状态</th>
</tr>
</thead>
<tbody>
@foreach (var item in Model.Items)
{
<tr>
<td><input type="checkbox" name="subBox" value="@item.Id" /></td>
<td>@item.RowNumber</td>
<td>@item.GroupName</td>
<td>@item.JobName</td>
<td>@item.TriggerName</td>
<td>@item.Cron</td>
<td>@item.Description</td>
<td>@item.StartTime</td>
<td>@item.EndTime</td>
<td>@item.PreTime</td>
<td>@item.NextTime</td>
<td>@item.TriggerState</td>
</tr>
}
</tbody>
</table> <ul class="pagination">
<li><a href="/HelloJob/@Model.PrePage">«</a></li>
@for (int index = 1; index <= Model.TotalPage; index++)
{
if (Model.Page.PageIndex == index)
{
<li class="active"><a href="/HelloJob/@index">@index</a></li>
}
else
{
<li><a href="/HelloJob/@index">@index</a></li>
}
}
<li><a href="/HelloJob/@Model.NextPage">»</a></li>
</ul> <script type="text/javascript">
$(function () {
$(".chkAll").click(function () {
if (this.checked) {
$('input[name="subBox"]').attr("checked", this.checked);
} else {
$('input[name="subBox"]').removeAttr("checked");
}
}); $("#btnEdit").click(function () {
var id = GetChooseIds();
if (id == undefined || id == null || id == "") return; $.ajax({
url: "/HelloJob/Edit/" + id,
type: "GET",
dataType: 'json',
success: function (result) {
$("#Id").val(result.Id);
$("#GroupName").val(result.GroupName);
$("#JobName").val(result.JobName);
$("#TriggerName").val(result.TriggerName);
$("#Cron").val(result.Cron);
$("#Description").val(result.Description); $('#collapseOne').collapse('show');
$("#formHelloJob").attr("action", "/HelloJob/Edit");
$("#actionType").html("修改作业");
},
error: function (e) {
alert(e);
}
});
}); $("#btnDel").click(function () {
var id = GetChooseIds();
if (id == undefined || id == null || id == "") return; CreateDeleteWindow(function () {
location.href = "/HelloJob/Delete/" + id;
});
}); $("#btnRun").click(function () {
var id = GetChooseIds();
if (id == undefined || id == null || id == "") return; CreateRunWindow(function () {
location.href = "/HelloJob/Run/" + id;
});
}); $("#btnPause").click(function () {
var id = GetChooseIds();
if (id == undefined || id == null || id == "") return; CreatePauseWindow(function () {
location.href = "/HelloJob/Pause/" + id;
});
}); $("#btnResume").click(function () {
var id = GetChooseIds();
if (id == undefined || id == null || id == "") return; CreateResumeWindow(function () {
location.href = "/HelloJob/Resume/" + id;
});
}); function GetChooseIds() {
var id = "";
$('input[name="subBox"]').each(function () {
id = $(this).attr("value");
}); return id;
}
});
</script>
1.4、界面代码就完成了,我们去看看


完全没问题,下面我们来完成 执行、暂停、恢复三个操作作业的按钮功能
二、作业管理
2.1、HelloJobHelper改一下,名称我也改了(JobHelper)

2.2、HelloJobController加入上边三个功能
         public ActionResult Run(Guid id)

         {

             var success = this.jobApplication.Update(new JobCURequest()

             {

                 Id = id,

                 TriggerState = Quartz.TriggerState.Normal.ToString()

             });

             if (success)

             {

                 var entity = this.jobApplication.Get(id);

                 JobHelper.Run(entity);

             }

             return RedirectToAction("Index", "HelloJob");

         }

         public ActionResult Pause(Guid id)

         {

             var success = this.jobApplication.Update(new JobCURequest()

             {

                 Id = id,

                 TriggerState = Quartz.TriggerState.Paused.ToString()

             });

             if (success)

             {

                 var entity = this.jobApplication.Get(id);

                 JobHelper.Pause(entity);

             }

             return RedirectToAction("Index", "HelloJob");

         }

         public ActionResult Resume(Guid id)

         {

             var success = this.jobApplication.Update(new JobCURequest()

             {

                 Id = id,

                 TriggerState = Quartz.TriggerState.Normal.ToString()

             });

             if (success)

             {

                 var entity = this.jobApplication.Get(id);

                 JobHelper.Resume(entity);

             }

             return RedirectToAction("Index", "HelloJob");

         }
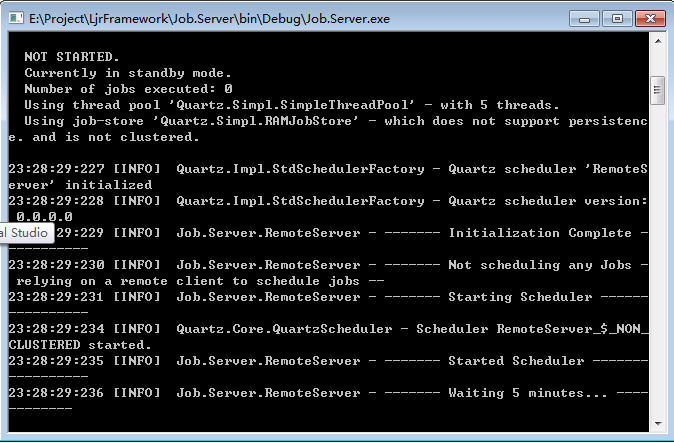
2.3、好了,现在开启服务端
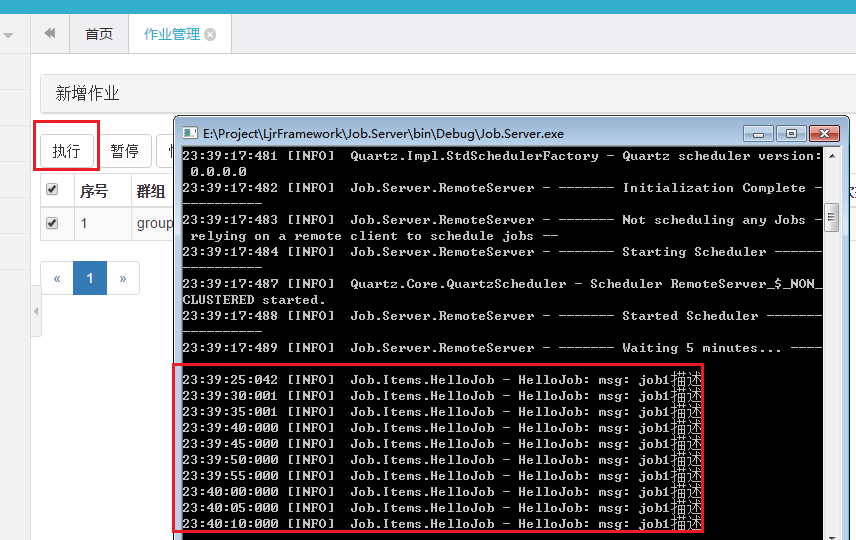
2.4、执行
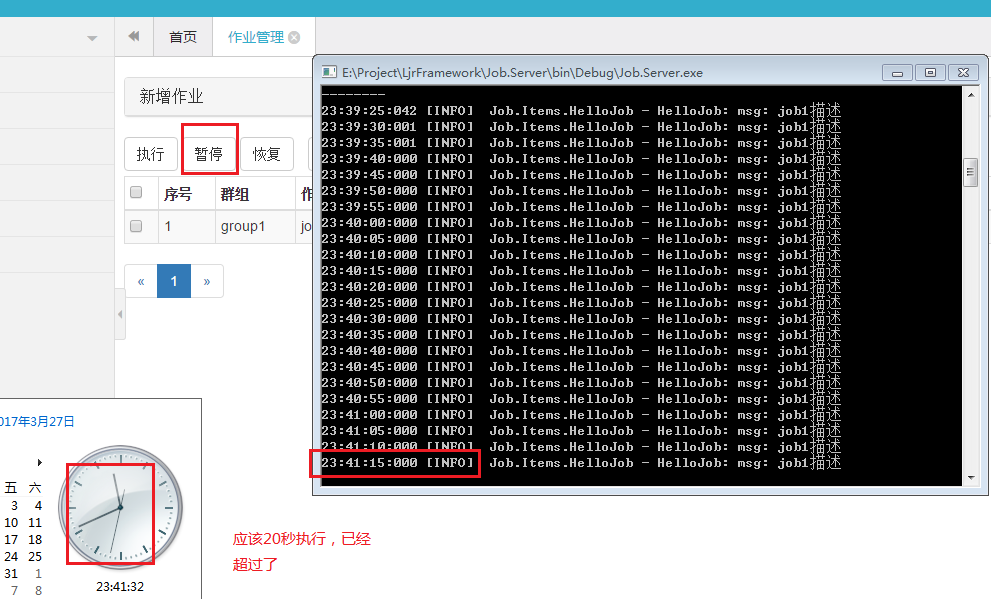
2.5、暂停
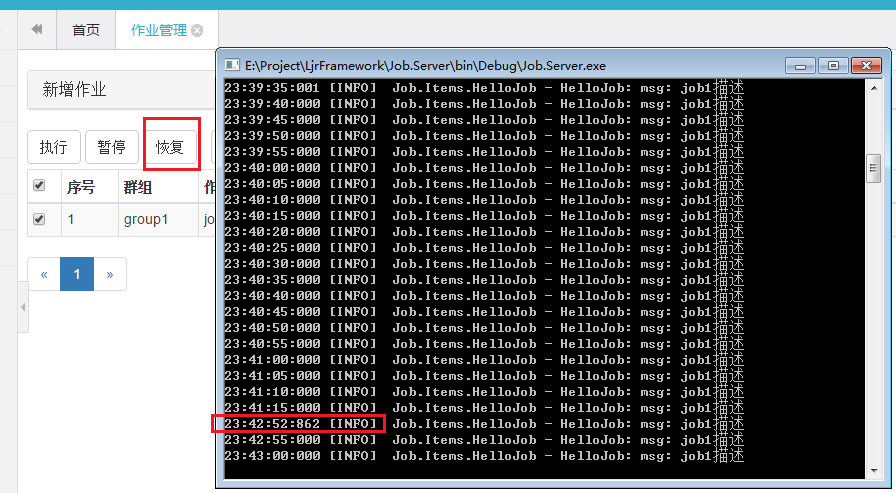
2.6、恢复
好了,基本上就是这些了
任务调度之持久化(基于Quartz.net)的更多相关文章
- 【Quartz】Quartz存储与持久化-基于quartz.properties的配置
林炳文Evankaka原创作品.转载请注明出处http://blog.csdn.net/evankaka 一. Quartz存储与持久化 Quartz提供两种基本作业存储类型.第一种类型叫做RAM ...
- 004-Quartz存储与持久化-基于quartz.properties的配置
一.概述 Quartz提供两种基本作业存储类型.第一种类型叫做RAMJobStore,第二种类型叫做JDBC作业存储.在默认情况下Quartz将任务调度的运行信息保存在内存中,这种方法提供了最佳的性能 ...
- 任务调度之集群(基于Quartz.net)
上一篇我们完成了任务调度的持久化,传送门:任务调度之持久化(基于Quartz.net) 这篇我们来完成Quartz.net的一个比较优秀的功能,即集群:集群可以提高任务调度服务的容灾性, 当一个节点宕 ...
- RDIFramework.NET框架基于Quartz.Net实现任务调度详解及效果展示
在上一篇Quartz.Net实现作业定时调度详解,我们通过实例代码详细讲解与演示了基于Quartz.NET开发的详细方法.本篇我们主要讲述基于RDIFramework.NET框架整合Quartz.NE ...
- Window服务基于Quartz.Net组件实现定时任务调度(二)
前言: 在上一章中,我们通过利用控制台实现定时任务调度,已经大致了解了如何基于Quartz.Net组件实现任务,至少包括三部分:job(作业),trigger(触发器),scheduler(调度器). ...
- 一行代码完成定时任务调度,基于Quartz的UI可视化操作组件 GZY.Quartz.MUI
前言 之前发布过第一个版本,有兴趣的可以去看看: NET Core 基于Quartz的UI可视化操作组件 GZY.Quartz.MUI 简介 GitHub开源地址:l2999019/GZY.Quart ...
- 基于Quartz实现简单的定时发送邮件
一.什么是Quartz Quartz 是一个轻量级任务调度框架,只需要做些简单的配置就可以使用:它可以支持持久化的任务存储,即使是任务中断或服务重启后,仍可以继续运行.Quartz既可以做为独立的应用 ...
- Quartz.NET总结(五)基于Quartz.net 的开源任务管理平台
前面总结了很多,关于Quartz.net 的文章,介绍了如何使用Quartz.net.不清楚的朋友,可以看我之前的系列文章,http://www.cnblogs.com/zhangweizhong/c ...
- Java 基于quartz实现定时 之二(XML方式配置)
<!-- 在spring核心配置文件中进行如下配置 --> <!-- Spring基于quartz定时任务 --> <bean id="triggerByBea ...
随机推荐
- C语言memset学习
#include <stdio.h> #include <memory.h> ]); //函数声明 void main(){ ]={{,,},{,,},{,,},{,,}};/ ...
- java 文件操作 读取txt文本(兄弟常开心)
测试一下读取文本的另一种方法:该方法只使用一个类读取了文件 注意:buffer和read方法中读取指定长度的一致 package com.swust; import java.io.*; /* * 数 ...
- jQuery的拾色器
代码如下 1.js <link href="css/farbtastic.css" rel="stylesheet" /> <script t ...
- java继承(一)
虽然说java中的面向对象的概念不多,但是具体的细节还是值得大家学习研究,java中的继承实际上就是子类拥有父类所有的内容(除私有信息外),并对其进行扩展.下面是我的笔记,主要包含以下一些内容点: 构 ...
- ArcGIS许可启动问题
前段时间,由于360常常删除重要文件终于发生在我身上.不得已换了电脑管家,清理后再次打开License Server Administrator时,发现启动项怎么也点不动了.而打开服务管理器,却发现A ...
- Dockerfile注意事项
准则 尽量将Dockerfile放在空目录中,如果目录中必须有其他文件,则使用.dockerignore文件. 避免安装不必须的包. 每个容器应该只关注一个功能点. 最小化镜像的层数. 多行参数时应该 ...
- 安卓的UI界面开发(初学者推荐)
一 随便扯扯 用户界面设计是程序开发的一项重要内容.在界面设计的过程中,需要考虑如何制作出UI界面,怎么样控制UI界面两大块. 任何有编程常识的人都知道:软件界面是开发者添加控件,编写控件控制逻辑, ...
- 动态添加删除网卡 - 每天5分钟玩转 OpenStack(156)
这是 OpenStack 实施经验分享系列的第 6 篇. 在项目实施过程中,经常会有添加删除网卡的需求.比如一个运行数据库的 instance,初始只有一个网卡,数据库服务和备份共用这块网卡,后来为提 ...
- 【PHP系列】PHP组件详解
缘起 枫爷之前做过几年的PHP的研发,大部分都是在开源框架的引导下,编写代码.现在依然,本能的会去让我使用某个PHP框架开发PHP应用,也是因为懒吧,没有好好的去研究研究除了框架之外的一些东西. 今天 ...
- 了解 : 多个Http请求设计方向 (batch)
之前都是一个restful的请求,每次只能ajax一个资源,但是遇到比较多个请求时,都是用RPC来完成,但是却让后台开了许多接口,代码开始不整齐!当然roll back只能交给RPC来负责. 游览器没 ...