vue全家桶安装以及修改webpack配置新增vue项目启动方式
一、安装node环境(自带npm)

二、替换下载源
// 淘宝 NPM 镜像

npm install -g cnpm --registry=https://registry.npm.taobao.org

三、全局安装vue-cli脚手架
npm install --global vue-cli
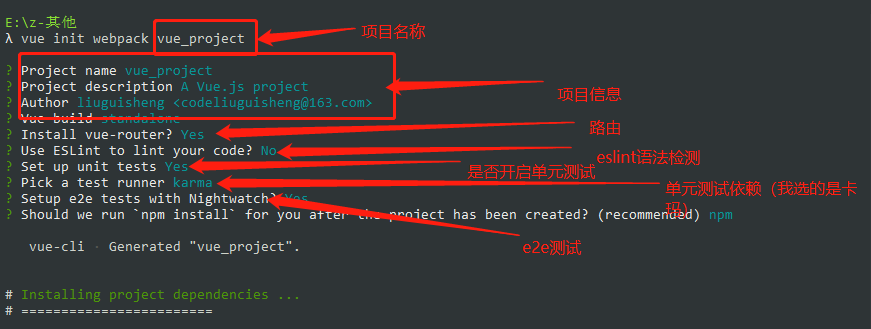
四、vue2.* webpack模板下载
vue init webpack vue_project
五、安装vuex
npm install vuex --save

在main.js中注入vuex
// vuex

import Vuex from 'vuex'

Vue.use(Vuex)
六、安装axios
npm install axios --save

在main.js导入并全局使用
// axios请求

import axios from "axios"

Vue.prototype.$axios = axios
七、安装elementUI
npm install element-ui --save

在main.js中引入elementUI
// element样式框架

import ElementUI from 'element-ui'
import 'element-ui/lib/theme-chalk/index.css'
Vue.use(ElementUI)
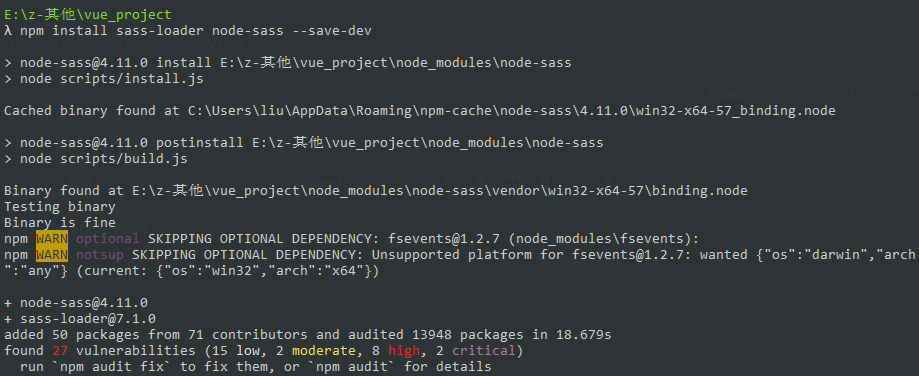
八、vue项目使用sass
npm install sass-loader --save-dev

npm install node-sass --save-dev

//连写
npm install sass-loader node-sass --save-dev
想要使用sass,需要修改build目录下的webpack.base.conf.js文件,增加以下规则:
{

  test: /\.sass$/,

  loaders: ['style', 'css', 'sass',"scss"]

}
在组件中使用sass语法
<style lang="scss">

  $size:50px;

  html {

    font-size: $size;

  }

</style>
或者外部引用:
<style lang="scss">

  @import "./main.scss"

  // 或者

  // @import url(./main.scss);

</style>
若出现:
Modele build failed: TypeError: this.getResolve is not a function at Object.loader...
是因为sass-loader版本过高,webpack编译不过去,降级即可
"sass-loader": "^8.0.0",更换成"sass-loader": "^7.3.1",
九、修改webpack配置,新增项目启动方式
以 pred 为例:
1,首先更改package.json配置

2,在build目录下增加pred.js,内容和build.js文件相同,更改以下三处变量即可

3.修改build目录下webpack.prod.conf.js配置,替换如下代码:
'use strict'

const path = require('path')

const utils = require('./utils')

const webpack = require('webpack')

const config = require('../config')

const merge = require('webpack-merge')

const baseWebpackConfig = require('./webpack.base.conf')

const CopyWebpackPlugin = require('copy-webpack-plugin')

const HtmlWebpackPlugin = require('html-webpack-plugin')

const ExtractTextPlugin = require('extract-text-webpack-plugin')

const OptimizeCSSPlugin = require('optimize-css-assets-webpack-plugin')

const UglifyJsPlugin = require('uglifyjs-webpack-plugin')

/** 删除内容

  const env = process.env.NODE_ENV === 'testing'

  ? require('../config/test.env')

  : require('../config/prod.env')

*/

// 替换成

  const ENV_MAP = {

    'testing': require('../config/test.env'),

    'production': require('../config/prod.env'),

    'pred': require('../config/pred.env')

  }

  const env = process.env.NODE_ENV = ENV_MAP[process.env.NODE_ENV];
4.在config目录新增 pred.env.js文件,内容如下
'use strict'

module.exports = {

  NODE_ENV: '"pred"'

}
5.修改config目录下的index.js,复制build对象并修改成pred
build: {

    // Template for index.html

    index: path.resolve(__dirname, '../dist/index.html'),

    // Paths

    assetsRoot: path.resolve(__dirname, '../dist'),

    assetsSubDirectory: 'static',

    assetsPublicPath: '/',

    /**

     * Source Maps

     */

    productionSourceMap: true,

    // https://webpack.js.org/configuration/devtool/#production

    devtool: '#source-map',

    // Gzip off by default as many popular static hosts such as

    // Surge or Netlify already gzip all static assets for you.

    // Before setting to `true`, make sure to:

    // npm install --save-dev compression-webpack-plugin

    productionGzip: false,

    productionGzipExtensions: ['js', 'css'],

    // Run the build command with an extra argument to

    // View the bundle analyzer report after build finishes:

    // `npm run build --report`

    // Set to `true` or `false` to always turn it on or off

    bundleAnalyzerReport: process.env.npm_config_report

  },

  pred: {

    // Template for index.html

    index: path.resolve(__dirname, '../dist/index.html'),

    // Paths

    assetsRoot: path.resolve(__dirname, '../dist'),

    assetsSubDirectory: 'static',

    assetsPublicPath: '/',

    /**

     * Source Maps

     */

    productionSourceMap: true,

    // https://webpack.js.org/configuration/devtool/#production

    devtool: '#source-map',

    // Gzip off by default as many popular static hosts such as

    // Surge or Netlify already gzip all static assets for you.

    // Before setting to `true`, make sure to:

    // npm install --save-dev compression-webpack-plugin

    productionGzip: false,

    productionGzipExtensions: ['js', 'css'],

    // Run the build command with an extra argument to

    // View the bundle analyzer report after build finishes:

    // `npm run build --report`

    // Set to `true` or `false` to always turn it on or off

    bundleAnalyzerReport: process.env.npm_config_report

  }
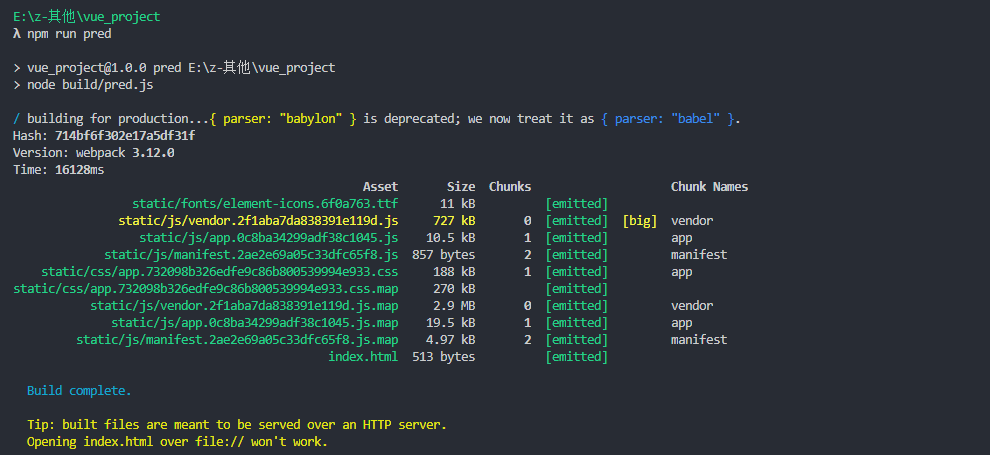
6,控制台输入 npm run pred,看到如下内容即成功:
vue全家桶安装以及修改webpack配置新增vue项目启动方式的更多相关文章
- 从零开始系列之vue全家桶(3)安装使用vuex
什么是vuex? vuex:Vue提供的状态管理工具,用于同一管理我们项目中各种数据的交互和重用,存储我们需要用到数据对象. 即data中属性同时有一个或几个组件同时使用,就是data中共用的属性. ...
- 用 Vue 全家桶二次开发 V2EX 社区
一.开发背景 为了全面的熟悉Vue+Vue-router+Vuex+axios技术栈,结合V2EX的开放API开发了这个简洁版的V2EX. 在线预览 (为了实现跨域,直接npm run dev部署的, ...
- Vue 全家桶 + Electron 开发的一个跨三端的应用
代码地址如下:http://www.demodashi.com/demo/11738.html GitHub Repo:vue-objccn Follow: halfrost · GitHub 利用 ...
- 【实战】Vue全家桶(vue + axios + vue-router + vuex)搭建移动端H5项目
使用Vue全家桶开发移动端页面. 本博文默认已安装node.js. github链接 一.准备工作 安装vue npm install vue 安装脚手架vue-cli npm install -g ...
- 使用vue全家桶制作博客网站
前面的话 笔者在做一个完整的博客上线项目,包括前台.后台.后端接口和服务器配置.本文将详细介绍使用vue全家桶制作的博客网站 概述 该项目是基于vue全家桶(vue.vue-router.vuex.v ...
- 转载: 使用vue全家桶制作博客网站 HTML5 移动网站制作的好教程
使用vue全家桶制作博客网站 前面的话 笔者在做一个完整的博客上线项目,包括前台.后台.后端接口和服务器配置.本文将详细介绍使用vue全家桶制作的博客网站 概述 该项目是基于vue全家桶(vue. ...
- Vue全家桶介绍
一直不清楚全家桶是什么玩意,上网搜了一下,才知道就是平时项目中使用的几个依赖包,下面分享一下 Vue 全家桶介绍 Vue有著名的全家桶系列,包含了vue-router(http://router.vu ...
- 升级vue全家桶过程记录
背景 如果你使用了element-ui的el-tabs组件,并且想要单独升级element-ui至2.10.0,你会发现,使用了el-tabs组件的页面只要打开就卡死.原因是element-ui~2. ...
- Vue全家桶高仿小米商城
大家好,我是河畔一角,时隔半年再次给大家带来一门重量级的实战课程:<Vue全家桶高仿小米商城>,现在很多公司都在参与到商城的构建体系当中,因此掌握一套商城的标准开发体系非常重要:商城的开始 ...
随机推荐
- MySQL触发器在PHP项目中用来做信息备份、恢复和清空的方法介绍
案例:通过PHP后台代码可以将员工的信息删除,将删除的员工信息进行恢复(类似于从回收站中恢复员工信息),并且还可以将已经删除的员工进行清空(类似于清空回复站的功能). 思路:要有一张员工表,还要有一张 ...
- 基于Kafka Connect框架DataPipeline在实时数据集成上做了哪些提升?
在不断满足当前企业客户数据集成需求的同时,DataPipeline也基于Kafka Connect 框架做了很多非常重要的提升. 1. 系统架构层面. DataPipeline引入DataPipeli ...
- mysql数据库死锁的产生原因及解决办法
这篇文章主要介绍了mysql数据库锁的产生原因及解决办法,需要的朋友可以参考下 数据库和操作系统一样,是一个多用户使用的共享资源.当多个用户并发地存取数据 时,在数据库中就会产生多个事务同时存取同 ...
- PAT1070:Mooncake
1070. Mooncake (25) 时间限制 100 ms 内存限制 65536 kB 代码长度限制 16000 B 判题程序 Standard 作者 CHEN, Yue Mooncake is ...
- java并发之ReentrantLock学习理解
简介 java多线程中可以使用synchronized关键字来实现线程间同步互斥,但在jdk1.5中新增加了ReentrantLock类也能实现同样的效果,并且在扩展功能上也更加强大,比如具有嗅探锁定 ...
- BufferedInputStream与BufferedOutputStream用法简介
BufferedInputStream是带缓冲区的输入流,默认缓冲区大小是8M,能够减少访问磁盘的次数,提高文件读取性能:BufferedOutputStream是带缓冲区的输出流,能够提高文件的写入 ...
- ansj构造最短路径
一.前言 上节介绍了ansj的原子切分和全切分.切分完成之后,就要构建最短路径,得到分词结果. 以"商品和服务"为例,调用ansj的标准分词: String str = " ...
- sql server 高可用故障转移(完结)
安装完二个sql server 节点后,对外的虚拟ip是192.168.2.105 测试将sql server转到另一节点 转移后连接sql 虚拟ip 测试 通过windows日志查看远行状态 总结 ...
- 让Virtualbox复制出的虚拟机联网
http://www.williamsang.com/archives/215.html vi /etc/udev/rules.d/70-persistent-net.rules 注释掉eth0的相关 ...
- git fatal: 远程 origin 已经存在。
不小心将git远程地址配错了,再次配置提示以下错误: fatal: 远程 origin 已经存在. 此时只需要将远程配置删除,重新添加即可: git remote rm origin git remo ...