自定义gradview
http://blog.csdn.net/jdsjlzx/article/details/7525724
虽然Android已自带了GridView,但是,却不够灵活,同时也不能自由添加控件,因此,本人通过需要进一步封装,来实现Android自定义GridView控件,达到自己需要的效果。
我们看一下最终所需要的效果图:
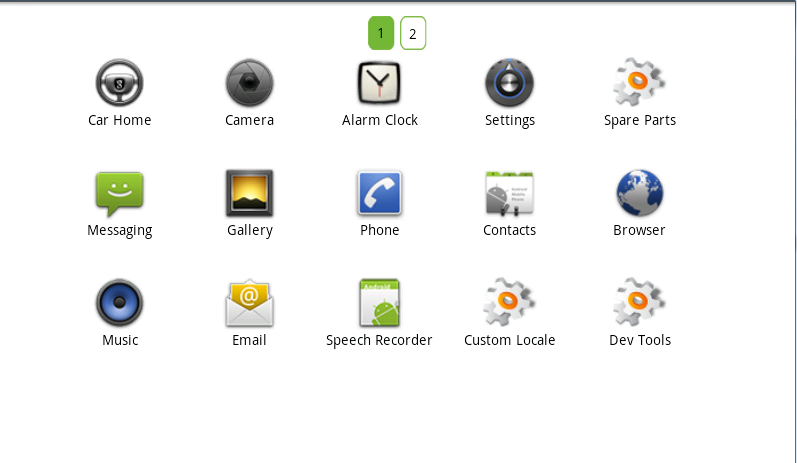
说明:
上图:这里先省去分页,只讲:Android GridView 控件实现自定义。
按照上面的图例需求,大致上可以把Android GridView 画成如下的方式:

思路如下:
默认将我们的组合控件设置为Orientation 是VERTICAL。 首先一行五个,那么一行以一个Orientation 为HORIZONTAL 的线性布局包起来。然后在一行结束后,将Orientation 的线性布局添加进组合控件里面来,不足五个则按需添加进来。
实现这一效果我们需要两个类,一个类用来表示Android GridView 的行,这里我们起名为TableRow,代码如下:
private TableCell[] cell;
public TableRow(TableCell[] cell) {
this.cell = cell;
}
public int getSize() {
return cell.length;
}
public TableCell getCellValue(int index) {
if (index >= getSize()) {
return null;
}
return cell[index];
}
public int getCellCount() {
return cell.length;
}
public int getLastCellCount() {
return lastRowCount;
}
}
另外一个类用来表示GridView 每行的列个,这里我们取名为TableCell,代码如下:
private Object value;
public TableCell(Object value) {
this.value = value;
}
public Object getValue() {
return value;
}
}
并且我们还需要为GridView 设置一个外部可添加数据的方法,代码如下:
this.adapter = appsAdapter;
this.setOrientation(LinearLayout.VERTICAL);
bindView();
}
其中,AppsAdapter 是一个自定义的BaseAdapter ,代码很简单,这里就不列出来了。关键的还是要看bindView ,这个方法是本篇GridView 显示数据的核心方法,代码如下:
removeAllViews();
int count = adapter.getCount();
TableCell[] cell = null;
;
LinearLayout layout;
tableRowsList = new ArrayList<HashMap<String, Object>>();
; i < count; i++) {
j++;
final int position = i;
) {
cell = new TableCell[getColumnCount()];
}
final View view = adapter.getView(i, null, null);
view.setOnTouchListener(new OnTouchListener() {
@Override
public boolean onTouch(View v, MotionEvent event) {
// TODO Auto-generated method stub
unCheckPressed();
checkRowID = -;
checkColumnID = -;
if (onItemClickEvent != null) {
onItemClickEvent.onItemClick(position, event, view);
}
return false;
}
});
view.setOnLongClickListener(new OnLongClickListener() {
@Override
public boolean onLongClick(View v) {
if (onLongPress != null) {
onLongPress.onLongPress(v);
}
return true;
}
});
cell[j - ] = new TableCell(view);
if (j == getColumnCount()) {
lastRowCount = j;
j = ;
HashMap<String, Object> map = new HashMap<String, Object>();
TableRow tr = new TableRow(cell);
map.put("tableRow", tr);
tableRowsList.add(map);
layout = new LinearLayout(getContext());
addLayout(layout, cell, tr.getSize(), tr);
} && j > ) {
lastRowCount = j;
HashMap<String, Object> map = new HashMap<String, Object>();
TableRow tr = new TableRow(cell);
map.put("tableRow", tr);
tableRowsList.add(map);
layout = new LinearLayout(getContext());
addLayout(layout, cell, j, tr);
}
}
}
getColumnCount()是一个属性,表示可以从xml或者从代码动态改变GridView 每列显示的个数,属性点的代码为如下:
super(context, attrs);
;
TypedArray typedArray = context.obtainStyledAttributes(attrs,
R.styleable.GridViewExt);
int N = typedArray.getIndexCount();
; i < N; i++) {
int attr = typedArray.getIndex(i);
switch (attr) {
case R.styleable.GridViewExt_ColumnCount:
resouceID = typedArray.getInt(
R.styleable.GridViewExt_ColumnCount, );
setColumnCount(resouceID);
break;
}
}
typedArray.recycle();
}
当然,你必须在res 创建属性xml ,这里不多讲,可以去我博客看看如何为 View 添加属性 。
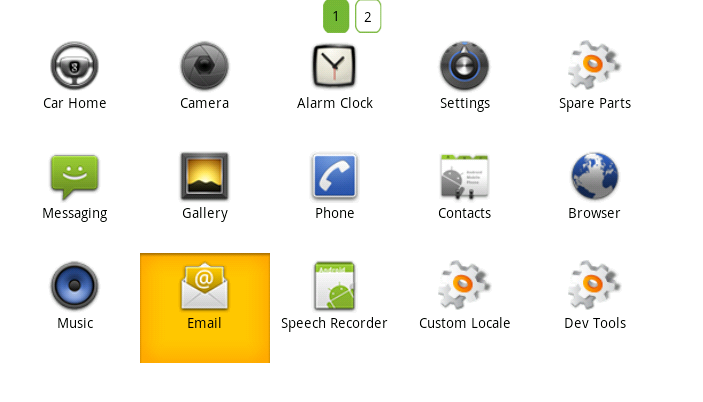
还有,还必须实现它的支持键盘的上下左右的焦点,下面的代码将会提供该功能,但还必须配合Activity 的操作,等下文再讲述。效果是这样的:
全部源码为:
import java.util.ArrayList;
import java.util.HashMap;
import java.util.List;
import android.content.Context;
import android.content.Intent;
import android.content.res.TypedArray;
import android.util.AttributeSet;
import android.view.Gravity;
import android.view.MotionEvent;
import android.view.View;
import android.view.ViewGroup;
import android.widget.LinearLayout;
import android.widget.TextView;
import com.yaomei.activity.adapter.AppsAdapter;
import com.yaomei.activity.info.R;
public class gridViewExt extends LinearLayout {
public List<HashMap<String, Object>> tableRowsList;
private List<HashMap<String, Object>> app = new ArrayList<HashMap<String, Object>>();
private AppsAdapter adapter;
onItemClickListener onItemClickEvent;
onLongPressExt onLongPress;
; // 选中行的下标
; // 选中列的下标
; // 最后一行的总数
private int ColumnCount; // 每列的总数
public void setColumnCount(int count) {
this.ColumnCount = count;
}
public int getColumnCount() {
return ColumnCount;
}
public interface onItemClickListener {
public boolean onItemClick(int position, MotionEvent event, View view);
}
public interface onLongPressExt {
public boolean onLongPress(View view);
}
public gridViewExt(Context context) {
this(context, null);
// TODO Auto-generated constructor stub
}
public gridViewExt(Context context, AttributeSet attrs) {
super(context, attrs);
;
TypedArray typedArray = context.obtainStyledAttributes(attrs,
R.styleable.GridViewExt);
int N = typedArray.getIndexCount();
; i < N; i++) {
int attr = typedArray.getIndex(i);
switch (attr) {
case R.styleable.GridViewExt_ColumnCount:
resouceID = typedArray.getInt(
R.styleable.GridViewExt_ColumnCount, );
setColumnCount(resouceID);
break;
}
}
typedArray.recycle();
}
public void setOnItemClickListener(onItemClickListener click) {
this.onItemClickEvent = click;
}
public void setOnLongPressListener(onLongPressExt longPress) {
this.onLongPress = longPress;
}
public void NotifyDataChange() {
removeAllViews();
}
void bindView() {
removeAllViews();
int count = adapter.getCount();
TableCell[] cell = null;
;
LinearLayout layout;
tableRowsList = new ArrayList<HashMap<String, Object>>();
; i < count; i++) {
j++;
final int position = i;
) {
cell = new TableCell[getColumnCount()];
}
final View view = adapter.getView(i, null, null);
view.setOnTouchListener(new OnTouchListener() {
@Override
public boolean onTouch(View v, MotionEvent event) {
// TODO Auto-generated method stub
unCheckPressed();
checkRowID = -;
checkColumnID = -;
if (onItemClickEvent != null) {
onItemClickEvent.onItemClick(position, event, view);
}
return false;
}
});
view.setOnLongClickListener(new OnLongClickListener() {
@Override
public boolean onLongClick(View v) {
if (onLongPress != null) {
onLongPress.onLongPress(v);
}
return true;
}
});
cell[j - ] = new TableCell(view);
if (j == getColumnCount()) {
lastRowCount = j;
j = ;
HashMap<String, Object> map = new HashMap<String, Object>();
TableRow tr = new TableRow(cell);
map.put("tableRow", tr);
tableRowsList.add(map);
layout = new LinearLayout(getContext());
addLayout(layout, cell, tr.getSize(), tr);
} && j > ) {
lastRowCount = j;
HashMap<String, Object> map = new HashMap<String, Object>();
TableRow tr = new TableRow(cell);
map.put("tableRow", tr);
tableRowsList.add(map);
layout = new LinearLayout(getContext());
addLayout(layout, cell, j, tr);
}
}
}
private void addLayout(LinearLayout layout, TableCell[] cell, int size,
TableRow tr) {
LinearLayout.LayoutParams ,
);
layout.setGravity(Gravity.LEFT);
layout.setOrientation(LinearLayout.HORIZONTAL);
; k < size; k++) {
View remoteView = (View) tr.getCellValue(k).getValue();
layout.addView(remoteView, k, params);
}
LinearLayout.LayoutParams firstParams = new LinearLayout.LayoutParams(
LayoutParams.WRAP_CONTENT, LayoutParams.WRAP_CONTENT);
firstParams.leftMargin = ;
addView(layout, firstParams);
}
public void setAdapter(AppsAdapter appsAdapter) {
this.adapter = appsAdapter;
this.setOrientation(LinearLayout.VERTICAL);
bindView();
}
public void checkPressed(int tableRowId, int tableRowColumnId) {
ViewGroup view = (ViewGroup) this.getChildAt(tableRowId);
checkColumnID = tableRowColumnId;
checkRowID = tableRowId;
changeImageState(view.getChildAt(tableRowColumnId), app);
}
public void onClick(int tableRowId, int tableRowColumnId, Context context) {
LinearLayout view = (LinearLayout) ((ViewGroup) this
.getChildAt(tableRowId)).getChildAt(tableRowColumnId);
TextView tv = (TextView) view.findViewById(R.id.folder);
final String[] name = tv.getText().toString().split("-");
Intent intent = null;
].toString().equals("com.android.contacts"))
{
].toString().equals(
"com.android.contacts.DialtactsActivity")) {
intent = new Intent(Intent.ACTION_DIAL);
}
].toString().equals(
"com.android.contacts.DialtactsContactsEntryActivity")) {
intent = new Intent(Intent.ACTION_CALL_BUTTON);
}
} else {
intent = getContext().getPackageManager()
.getLaunchIntentForPackage(name[].toString());
}
context.startActivity(intent);
}
/**
* 改变图片状态
*
* @param v
* @param list
*/
private void changeImageState(View v, List<HashMap<String, Object>> list) {
int size = list.size();
; i < size; i++) {
View view = (View) list.get(i).get("touch");
view.setPressed(false);
list.remove(i);
}
v.setPressed(true);
HashMap<String, Object> map = new HashMap<String, Object>();
map.put("touch", v);
list.add(map);
}
public void unCheckPressed() {
&& checkRowID != -) {
ViewGroup view = (ViewGroup) this.getChildAt(checkRowID);
view.getChildAt(checkColumnID).setPressed(false);
}
}
public class TableRow {
private TableCell[] cell;
public TableRow(TableCell[] cell) {
this.cell = cell;
}
public int getSize() {
return cell.length;
}
public TableCell getCellValue(int index) {
if (index >= getSize()) {
return null;
}
return cell[index];
}
public int getCellCount() {
return cell.length;
}
public int getLastCellCount() {
return lastRowCount;
}
}
static public class TableCell {
private Object value;
public TableCell(Object value) {
this.value = value;
}
public Object getValue() {
return value;
}
}
}
每行显示的LAYOUT文件:
android:background="@drawable/lessbtn" android:gravity="center"
android:layout_width="fill_parent" android:id="@+id/grid_layout"
android:layout_height="fill_parent" xmlns:android="http://schemas.android.com/apk/res/android">
<ImageView android:id="@+id/btn_appicon"
android:layout_width="55dip" android:layout_height="55dip"></ImageView>
<TextView android:id="@+id/tv_name" android:layout_width="wrap_content"
android:textColor="#030303" android:layout_height="wrap_content"></TextView>
<TextView android:id="@+id/folder" android:layout_width="wrap_content"
android:visibility="invisible" android:layout_height="wrap_content"></TextView>
</LinearLayout>
完成这一系列的编写后,你就可以在xml直接写或者在JAVA文件里面new 出来,但注意要设置它每列显示的个数。
如何,看到这里,是不是觉得自定义的GridView很强大呢?大也自己DIY一下Android GridView控件自定义吧
自定义gradview的更多相关文章
- 自定义ListView 、GradView 重写onMeasure方法让其正确显示
1 继承原始的 2 重写onMeasure方法 @Overrideprotected void onMeasure(int widthMeasureSpec, int heightMeasureSpe ...
- 关于Unity3D自定义编辑器的学习
被人物编辑器折腾了一个月,最终还是交了点成品上去(还要很多优化都还么做). 刚接手这项工作时觉得没概念,没想法,不知道.后来就去看<<Unity5.X从入门到精通>>中有关于 ...
- 一起学微软Power BI系列-使用技巧(5)自定义PowerBI时间日期表
1.日期函数表作用 经常使用Excel或者PowerBI,Power Pivot做报表,时间日期是一个重要的纬度,加上做一些钻取,时间日期函数表不可避免.所以今天就给大家分享一个自定义的做日期表的方法 ...
- JavaScript自定义浏览器滚动条兼容IE、 火狐和chrome
今天为大家分享一下我自己制作的浏览器滚动条,我们知道用css来自定义滚动条也是挺好的方式,css虽然能够改变chrome浏览器的滚动条样式可以自定义,css也能够改变IE浏览器滚动条的颜色.但是css ...
- ASP.NET Aries 入门开发教程8:树型列表及自定义右键菜单
前言: 前面几篇重点都在讲普通列表的相关操作. 本篇主要讲树型列表的操作. 框架在设计时,已经把树型列表和普通列表全面统一了操作,用法几乎是一致的. 下面介绍一些差距化的内容: 1:树型列表绑定: v ...
- ASP.NET Aries 入门开发教程5:自定义列表页工具栏区
前言: 抓紧时间,继续写教程,因为发现用户期待的内容,都在业务处理那一块. 不得不继续勤劳了. 这节主要介绍工具栏区的玩法. 工具栏的默认介绍: 工具栏默认包括5个按钮,根据不同的权限决定显示: 添加 ...
- UWP中实现自定义标题栏
UWP中实现自定义标题栏 0x00 起因 在UWP开发中,有时候我们希望实现自定义标题栏,例如在标题栏中加入搜索框.按钮之类的控件.搜了下资料居然在一个日文网站找到了一篇介绍这个主题的文章: http ...
- JavaScript 自定义对象
在Js中,除了Array.Date.Number等内置对象外,开发者可以通过Js代码创建自己的对象. 目录 1. 对象特性:描述对象的特性 2. 创建对象方式:对象直接量.new 构造函数.Objec ...
- 【WCF】自定义错误处理(IErrorHandler接口的用法)
当被调用的服务操作发生异常时,可以直接把异常的原始内容传回给客户端.在WCF中,服务器传回客户端的异常,通常会使用 FaultException,该异常由这么几个东东组成: 1.Action:在服务调 ...
随机推荐
- ●CodeForces 698C LRU
题链: http://codeforces.com/problemset/problem/698/C题解.1: 概率dp,状压dp 棒棒哒题解:https://www.cnblogs.com/liu- ...
- codevs3990:中国剩余定理2
好久没做codevs啦 #include<cstdio> #include<cstdlib> #include<algorithm> #include<cst ...
- jvm(三):对象
关于对象,我们需要面对的问题主要有对象的创建,对象在内存中的布局,对象的结构,对象的访问定位. 对象的创建 对象的创建过程如下图所示: 其主要步骤有:给对象分配内存,初始化对象,执行构造方法. 在对象 ...
- [坑况]饿了么你是这样的前端——vue+element ui 【this dependency was not found:'element-ui/lib/theme-chalk/index.css'】
element ui 坑况:今日pull代码,潇洒npm run dev ,被告知:this dependency was not found:'element-ui/lib/theme-chalk/ ...
- linux下磁盘分区详解 图文(fdisk;mkfs)
linux分区不同于windows,linux下硬盘设备名为(IDE硬盘为hdx(x为从a-d)因为IDE硬盘最多四个,SCSI,SATA,USB硬盘为sdx(x为a-z)),硬盘主分区最多为4个,不 ...
- RxSwift 系列(七) -- Connectable Operators
前言 本篇文章将要学习RxSwift中连接操作符. Connectable Observable在订阅时不发射事件消息,而是仅当调用它们的connect()方法时才发射消息,这样就可以等待所有我们想要 ...
- QRCode.js:使用 JavaScript 生成二维码
什么是 QRCode.js? QRCode.js 是一个用于生成二维码的 JavaScript 库.主要是通过获取 DOM 的标签,再通过 HTML5 Canvas 绘制而成,不依赖任何库. 基本用法 ...
- setuptools安装和错误解决
错误解决:ImportError No module named setuptools GitHub: https://github.com/pypa/setuptools 下载安装 wget htt ...
- 3.1 One-dim Vector Initialtization
vector<int> v(10, -1); //10个-1 v.size(); v.empty(); //is empty?
- 浅谈static其一之不死变量
在学习汇编的过程中,小有所悟,遂把自己所思所想记下,以便日后查阅. 首先说说我对这个关键字的理解.static字面上就是静止的.静态的.不变的之类的意思,所以在被它修饰之后,应该也会带有这样的一些特点 ...