Vue路由讲解
1>router-link和router-view组件
2>路由配置
a.动态路由
import Home from "@/views/Home.vue"; export default [
{
path: "/",
name: "home",
component: Home
},
{
path: "/about",
name: "about",
// route level code-splitting
// this generates a separate chunk (about.[hash].js) for this route
// which is lazy-loaded when the route is visited.
component: () => import(/* webpackChunkName: "about" */ "@/views/About.vue")
},
{
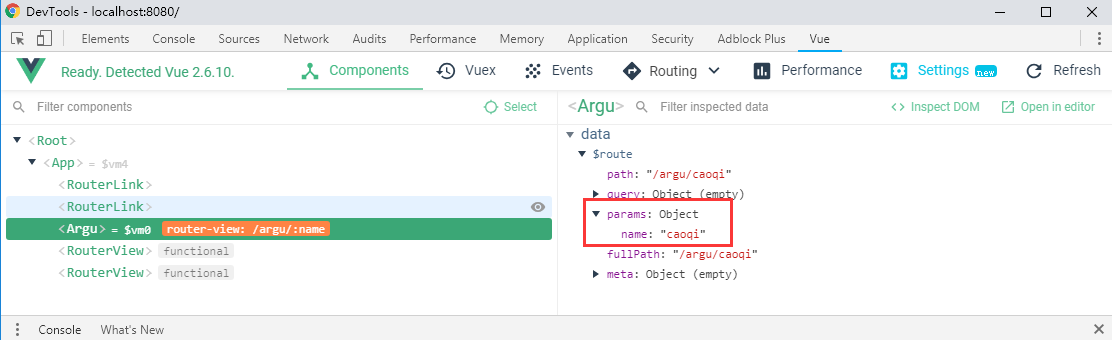
path: "/argu/:name",//动态路由
component: () => import("@/views/argu.vue")
}
];
<template>

  <div>

    <!-- 拿到动态路由的参数 $route:当前加载页面的路由对象 -->

    {{$route.params.name}}

  </div>

</template>

<script>

export default {

  //

};

</script>
b.嵌套路由
import Home from "@/views/Home.vue";
export default [
{
path: "/",
name: "home",
component: Home
},
{
path: "/about",
name: "about",
// route level code-splitting
// this generates a separate chunk (about.[hash].js) for this route
// which is lazy-loaded when the route is visited.
component: () => import(/* webpackChunkName: "about" */ "@/views/About.vue")
},
{
path: "/argu/:name",
component: () => import("@/views/argu.vue")
},
//嵌套路由的使用
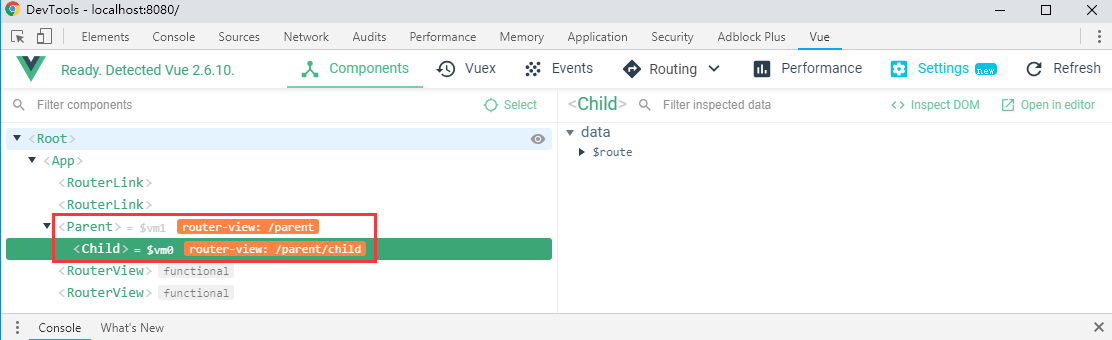
{
path: "/parent",
component: () => import("@/views/parent.vue"),
children: [
{
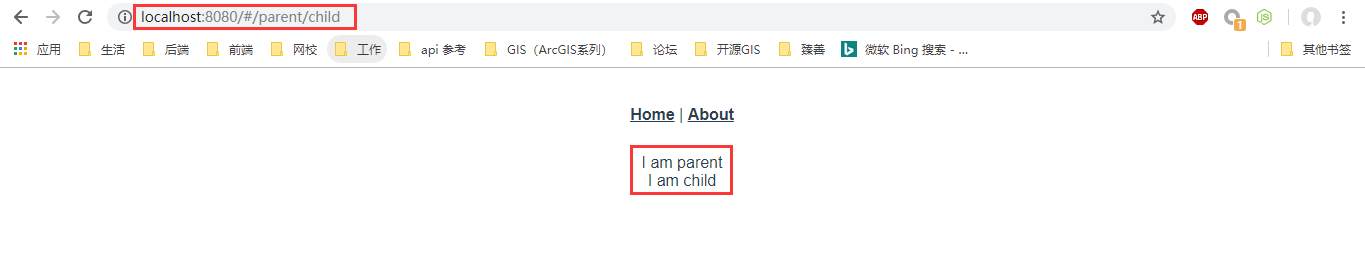
path: "child",//此处不能加/
component: () => import("@/views/child.vue")
}
]
}
];
child.vue:
<template>

  <div>I am child</div>

</template>
c.命名路由
import Home from "@/views/Home.vue";

export default [

  {

    path: "/",

    name: "home",//加上name属性  命名路由

    component: Home

  },

  {

    path: "/about",

    name: "about",

    // route level code-splitting

    // this generates a separate chunk (about.[hash].js) for this route

    // which is lazy-loaded when the route is visited.

    component: () => import(/* webpackChunkName: "about" */ "@/views/About.vue")

  },

  {

    path: "/argu/:name",

    component: () => import("@/views/argu.vue")

  },

  //嵌套路由的使用

  {

    path: "/parent",

    component: () => import("@/views/parent.vue"),

    children: [

      {

        path: "child",

        component: () => import("@/views/child.vue")

      }

    ]

  }

];
d.命名视图
import Home from "@/views/Home.vue"; export default [
{
path: "/",
name: "home",//加上name属性 命名路由
component: Home
},
{
path: "/about",
name: "about",
// route level code-splitting
// this generates a separate chunk (about.[hash].js) for this route
// which is lazy-loaded when the route is visited.
component: () => import(/* webpackChunkName: "about" */ "@/views/About.vue")
},
{
path: "/argu/:name",
component: () => import("@/views/argu.vue")
},
//嵌套路由的使用
{
path: "/parent",
component: () => import("@/views/parent.vue"),
children: [
{
path: "child",
component: () => import("@/views/child.vue")
}
]
},
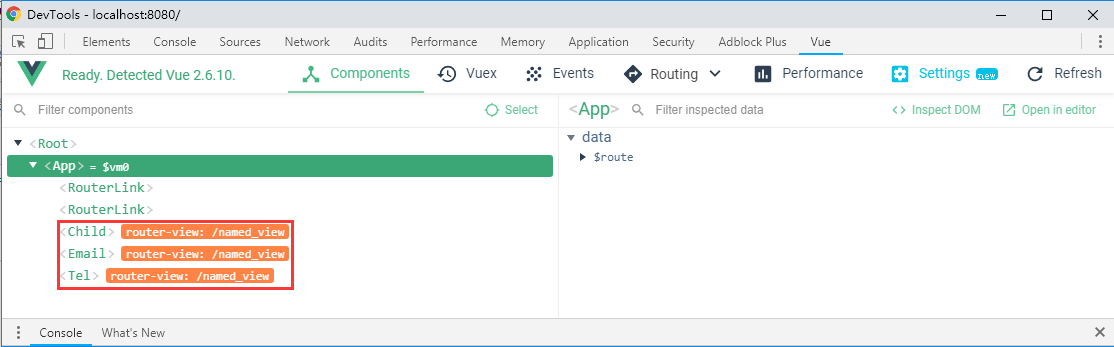
{
path: "/named_view",
//加载多个组件 用复数
components: {
default: () => import("@/views/child.vue"),
email: () => import("@/views/email.vue"),
tel:()=>import("@/views/tel.vue")
}
}
];
<template>

  <div id="app">

    <div id="nav">

      <router-link to="/">Home</router-link>|

      <!-- 命名路由 -->

      <router-link :to="{name:'about'}">About</router-link>

      <!-- <router-link to="/about">About</router-link> -->

    </div>

    <!-- 路由视图组件 -->

    <router-view/>

    <router-view name="email"/>

    <router-view name="tel"/>

  </div>

</template>
child.vue
<template>

  <div>I am child</div>

</template>
email.vue
<template>

  <div>email:07807958@qq.com</div>

</template>
tel.vue
<template>

  <div>tel:18976543210</div>

</template>
打开浏览器:http://localhost:8080/#/named_view

打开调试工具,可以直观的看出各路由:
3>JS操作路由(编程式导航)
4>重定向和别名
import Home from "@/views/Home.vue";

export default [

  {

    path: "/",

    name: "home", //加上name属性  命名路由

    component: Home

  },

  {

    path: "/main",

    // redirect: "/",

    // redirect: {

    //   name:"home"

    // }

    redirect: to => {

      //console.log(to);

      // return {

      //   name:"home"

      // }

      return '/'

    }

  }

];
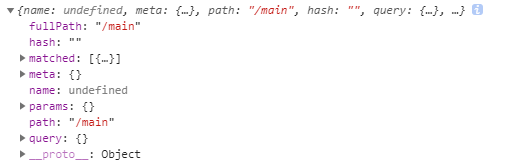
console.log(to)输出信息:
路由别名:
export default [

  {

    path: "/",

    alias:'/home_page',

    name: "home", //加上name属性  命名路由

    component: Home

  }]
Vue路由讲解的更多相关文章
- Vue路由(vue-router)详细讲解指南
中文文档:https://router.vuejs.org/zh/ Vue Router 是 Vue.js 官方的路由管理器.它和 Vue.js 的核心深度集成,让构建单页面应用变得易如反掌.路由实际 ...
- 「vue基础」一篇浅显易懂的 Vue 路由使用指南( Vue Router 上)
大家好,今天的内容,我将和大家一起聊聊 Vue 路由相关的知识,如果你以前做过服务端相关的开发,那你一定会对程序的URL结构有所了解,我没记错的话也是路由映射的概念,需要进行配置. 其实前端这些框架的 ...
- Vue路由实现之通过URL中的hash(#号)来实现不同页面之间的切换(图表展示、案例分析、附源码详解)
前言 本篇随笔主要写了Vue框架中路由的基本概念.路由对象属性.vue-router插件的基本使用效果展示.案例分析.原理图解.附源码地址获取. 作为自己对Vue路由进行页面跳转效果知识的总结与笔记. ...
- vue实例讲解之axios的使用
本篇来讲解一下axios插件的使用,axios是用来做数据交互的插件. 这篇将基于vue实例讲解之vue-router的使用这个项目的源码进行拓展. axios的使用步骤: 1.安装axios npm ...
- Vue路由vue-router
前面的话 在Web开发中,路由是指根据URL分配到对应的处理程序.对于大多数单页面应用,都推荐使用官方支持的vue-router.Vue-router通过管理URL,实现URL和组件的对应,以及通过U ...
- 攻克vue路由
先下手 路由是个好功能,但是每次都感觉没法开始下手,愣愣的看半天官方文档,所以做个快速开始教程. 首先先搭好HTML文件结构: <!--link和view在一个父元素下--> <di ...
- Vue路由学习心得
GoodBoy and GoodGirl~进来了就看完点个赞再离开,写了这么多也不容易的~ 一.介绍 1.概念:路由其实就是指向的意思,当我们点击home按钮时,页面中就要显示home的内容,点击l ...
- VUE路由新页面打开的方法总结
平常做单页面的场景比较多,所以大部分的业务是在同一个页面进行跳转.要通过VUE路由使用新页面打开且传递参数,可以采用以下两个方法: 1.router-link的target <router-li ...
- vue路由参数变化刷新数据
当路由到某个组件时,由于组件会复用,所以生命周期函数不会再次执行, 如果这个组件是模板组件,靠传入不同数据来显示的.那么,可能会发生参数变化了但页面数据却不变化. 问题 假如有个组件 info.vue ...
随机推荐
- java——数据结构
底层数据结构: 数组 ArrayList 链表 LinkedList 应用数据结构: 二分搜索树 BST 最大堆/最小堆 MaxHeap/MinHeap 线段树 SegmentTree 字典树 Tri ...
- VUE环境搭建及打包上线
1.vue2.0新手填坑攻略之使用vue-cli搭建vue项目开发环境到项目发布 https://blog.csdn.net/u010020858/article/details/72865101 2 ...
- python自学-day2(变量、if条件判断、运算符操作)
1.变量 变量只是用于保存内存位置,将变量存储在内存中的作用,方便后面调用,这意味着,在创建变量时会在内存中开辟一个空间. 变量命名规则: 由字母.数字.下划线(_)组成 不能以数字开头 不能使用 P ...
- Android中当前Activity跳转到当前Activity页面
步骤:先关闭自己,在跳转 case R.id.btn_copy:// 复制 Toast.makeText(mContext, "正在复制", Toast.LENGTH_SHORT) ...
- 为什么vue+webpack需要用到node,如何部署项目到服务器?
第一部分 之前一直不太理解为什么要使用vue+webapck,还有在使用了vue-cli之后会用到后台,即vue-cli自动帮我们安装了express服务器,在本地服务器上运行,因为我们希望可以模拟在 ...
- PHP 魔术方法__set() __get() 方法详解
__set() is run when writing data to inaccessible properties. __get() is utilized for reading data fr ...
- CSS伪类:first-child与:first-of-type的异同
CSS里关于元素匹配里面有两个非常类似却又不尽相同的选择器,伪类 :first-child 和 :first-of-type 两者在匹配方式上有很大差异,其实在一开始自己也没去注意这个细节,直到上次一 ...
- Gradient Boosting算法简介
最近项目中涉及基于Gradient Boosting Regression 算法拟合时间序列曲线的内容,利用python机器学习包 scikit-learn 中的GradientBoostingReg ...
- linux 编译安装php7
1.下载php7安装包: php7 2.解压 .tar.gzcd php-7.1.5 3.可能需要的扩展 yum install libmcrypt libmcrypt-devel mcrypt mh ...
- web相关知识
1,网络编程/网站编程:敲一个网站,别人可以访问 访问:在地址栏里面敲入地址,就可以访问了. 服务器如果放在公网,那么别人就可以通过IP地址进行访问 所以我们可以先在本地把我们的网站搭好,别人就可以来 ...