
Centos 6.8编译安装LNMP环境
Centos 6.8编译安装LNMP环境
参考资料:
http://www.jb51.net/article/107429.htm
https://phperzh.com/articles/1360
一 准备工作
环境介绍:
OS:Centos 6.8 最小化安装
Nginx:nginx-1.12.2.tar.gz
mysql:mysql-boost-5.7.20.tar.gz
php:php-7.2.0.tar.bz2
1.1、关闭SELINUX
# 修改配置文件,重启服务后永久生效。
sed -i 's/SELINUX=enforcing/SELINUX=disabled/g' /etc/selinux/config

# 命令行设置立即生效

setenforce

[root@localhost ~]# sed -i 's/SELINUX=enforcing/SELINUX=disabled/g' /etc/selinux/config

[root@localhost ~]# setenforce

[root@localhost ~]#
1.2、防火墙设置
cp /etc/sysconfig/iptables /root/iptables.bak

cat >/etc/sysconfig/iptables <<EOF

# Firewall configuration written by system-config-firewall

# Manual customization of this file is not recommended.

*filter

:INPUT DROP [:]

:FORWARD ACCEPT [:]

:OUTPUT ACCEPT [:]

-A INPUT -m state --state ESTABLISHED,RELATED -j ACCEPT

-A INPUT -p icmp -j ACCEPT

-A INPUT -i lo -j ACCEPT

-A INPUT -p tcp -m tcp --dport  -j ACCEPT

-A INPUT -p tcp -m tcp --dport  -j ACCEPT

-A INPUT -j REJECT --reject-with icmp-host-prohibited

-A FORWARD -j REJECT --reject-with icmp-host-prohibited

COMMIT

EOF

# 重启

/etc/init.d/iptables  restart
1.3、修改主机名称
hostname webserver

sed -i 's/HOSTNAME=localhost.localdomain/HOSTNAME=webserver/g' /etc/sysconfig/network

sed -n '/HOSTNAME/p' /etc/sysconfig/network

[root@localhost ~]# hostname webserver

[root@localhost ~]# sed -i 's/HOSTNAME=localhost.localdomain/HOSTNAME=webserver/g' /etc/sysconfig/network

[root@localhost ~]# sed -n '/HOSTNAME/p' /etc/sysconfig/network

HOSTNAME=webserver

[root@localhost ~]#
1.4、修改网卡ip信息
cat >/etc/sysconfig/network-scripts/ifcfg-eth0 <<EOF

TYPE=Ethernet

BOOTPROTO=static

NAME=eth0

DEVICE=eth0

ONBOOT=yes

IPADDR=172.16.210.126

NETMASK=255.255.255.0

GATEWAY=172.16.210.250

EOF

#  重启网卡服务

/etc/init.d/network restart
1.5、修改dns
#  修改dns

cat >/etc/resolv.conf <<EOF

nameserver 172.16.110.11

nameserver 8.8.8.8

EOF

[root@webserver ~]# cat >/etc/resolv.conf <<EOF

> nameserver 172.16.110.11

> nameserver 8.8.8.8

> EOF

[root@webserver ~]#
1.6、Centos最小化安装推荐常用依赖包
#    Centos最小化安装推荐常用依赖包

yum  clean all

yum -y update

yum -y install gcc-c++ gd libxml2-devel libjpeg-devel libpng-devel net-snmp-devel wget telnet

yum -y install curl-devel libxslt-devel pcre-devel libjpeg libpng libcurl4-openssl-dev

yum -y install libcurl-devel libcurl freetype-config freetype freetype-devel unixODBC libxslt

yum -y install gcc automake autoconf libtool openssl-devel bison vim gcc-g77

yum -y install perl-devel perl-ExtUtils-Embed libcurl-devel.x86_64 zip unzip

yum -y install cmake ncurses-devel.x86_64  openldap-devel.x86_64 lrzsz  openssh-clients

yum -y install libmcrypt libmcrypt-devel mhash mhash-devel bzip2 bzip2-devel

yum -y install ntpdate rsync svn  patch  iptables iptables-services

yum -y install libevent libevent-devel  cyrus-sasl cyrus-sasl-devel libcurl.x86_64

yum -y install gd-devel libmemcached-devel memcached git libssl-devel libyaml-devel auto make

yum -y install gcc.x86_64 libxml2.x86_64 libxml2-devel.x86_64 openssl.x86_64 openssl-devel.x86_64

yum -y install gd.x86_64 gd-devel.x86_64  gcc-c++.x86_64 readline.x86_64 readline-devel.x86_64

yum -y groupinstall "Server Platform Development" "Development tools"

yum -y groupinstall "Development tools"
1.7、时间同步服务
cat >/root/ntp.sh <<EOF

#!/bin/bash

# ntp.sh

#NTP服务器数组列表

ntpServer=(

[]=.cn.pool.ntp.org

[]=.cn.pool.ntp.org

[]=.cn.pool.ntp.org

[]=.cn.pool.ntp.org

)

#校验#

serverNum=`echo \${#ntpServer[*]}`

NUM=

for ((i=; i<=\$serverNum; i++)); do

    echo -n "正在和NTP服务器:\${ntpServer[\$NUM]}校验中..."

    /usr/sbin/ntpdate \${ntpServer[\$NUM]} >> /dev/null >&

    if [ \$? -eq  ]; then

        echo -e "\e[1;32m\t[成功]\e[0m"

        echo -e "\e[1;32m同步成功,退出......\e[0m"

        break

    else

        echo -e "\e[1;31m\t[失败]\e[0m"

        echo -e "\e[1;31m继续同步下一个!!!!!\e[0m"

        let NUM++

    fi

    sleep

done

EOF

chmod +x /root/ntp.sh

sh /root/ntp.sh
二、安装Nginx
2.1、下载源码包
# 上Nginx官网,复制最新稳定版的下载地址过来,然后用wget下载

cd /usr/local/src

wget https://nginx.org/download/nginx-1.12.2.tar.gz

[root@webserver ~]# cd /usr/local/src

[root@webserver src]# wget https://nginx.org/download/nginx-1.12.2.tar.gz
2.2、编译安装
tar xvf nginx-1.12..tar.gz

cd /usr/local/src/nginx-1.12.

./configure \

--prefix=/usr/local/nginx \

--sbin-path=/usr/sbin/nginx \

--conf-path=/etc/nginx/nginx.conf \

--error-log-path=/home/log/nginx/error.log \

--http-log-path=/home/log/nginx/access.log \

--pid-path=/var/run/nginx.pid \

--lock-path=/var/run/nginx.lock \

--http-client-body-temp-path=/home/tmp/nginx/client \

--http-proxy-temp-path=/home/tmp/nginx/proxy \

--http-fastcgi-temp-path=/home/tmp/nginx/fcgi \

--http-uwsgi-temp-path=/home/tmp/nginx/uwsgi \

--http-scgi-temp-path=/home/tmp/nginx/scgi \

--user=nginx \

--group=nginx \

--with-pcre \

--with-http_v2_module \

--with-http_ssl_module \

--with-http_realip_module \

--with-http_addition_module \

--with-http_sub_module \

--with-http_dav_module \

--with-http_flv_module \

--with-http_mp4_module \

--with-http_gunzip_module \

--with-http_gzip_static_module \

--with-http_random_index_module \

--with-http_secure_link_module \

--with-http_stub_status_module \

--with-http_auth_request_module \

--with-mail \

--with-mail_ssl_module \

--with-file-aio \

--with-http_v2_module \

--with-threads \

--with-stream \

--with-stream_ssl_module
#  完成后执行编译:

#  make && make install

make -j `grep processor /proc/cpuinfo | wc -l`

make -j `grep processor /proc/cpuinfo | wc -l`  install
2.3、创建相应的目录
mkdir -p /home/tmp/nginx/client

mkdir -p /home/log/nginx

chmod  /home/tmp/

chmod  /home/log/

[root@webserver nginx-1.12.]# mkdir -p /home/tmp/nginx/client

[root@webserver nginx-1.12.]# mkdir -p /home/log/nginx

[root@webserver nginx-1.12.]# chmod  /home/tmp/

[root@webserver nginx-1.12.]# chmod  /home/log/
2.4、启动nginx服务
cd /root/

useradd -s /sbin/nologin -M nginx

/usr/sbin/nginx

ps -ef|grep nginx

curl http://172.16.210.126

[root@webserver ~]# cd /root/

[root@webserver ~]# useradd -s /sbin/nologin -M nginx

[root@webserver ~]# /usr/sbin/nginx

[root@webserver ~]# ps -ef|grep nginx

root             : ?        :: nginx: master process /usr/sbin/nginx

nginx        : ?        :: nginx: worker process

root          : pts/    :: grep nginx

[root@webserver ~]#

[root@webserver ~]# curl http://172.16.210.126

<!DOCTYPE html>

<html>

<head>

<title>Welcome to nginx!</title>

<style>

    body {

        width: 35em;

        margin:  auto;

        font-family: Tahoma, Verdana, Arial, sans-serif;

    }

</style>

</head>

<body>

<h1>Welcome to nginx!</h1>

<p>If you see this page, the nginx web server is successfully installed and

working. Further configuration is required.</p>

<p>For online documentation and support please refer to

<a href="http://nginx.org/">nginx.org</a>.<br/>

Commercial support is available at

<a href="http://nginx.com/">nginx.com</a>.</p>

<p><em>Thank you for using nginx.</em></p>

</body>

</html>

[root@webserver ~]#
2.5、设置nginx快捷方式
alias nginx.start='/usr/sbin/nginx'

alias nginx.stop='/usr/sbin/nginx -s stop'

alias nginx.reload='/usr/sbin/nginx -s reload'

alias nginx.config_test='/usr/sbin/nginx -t'

cat >>/root/.bashrc <<EOF

alias nginx.start='/usr/sbin/nginx'

alias nginx.stop='/usr/sbin/nginx -s stop'

alias nginx.reload='/usr/sbin/nginx -s reload'

alias nginx.config_test='/usr/sbin/nginx -t'

EOF

cat /root/.bashrc

source  /root/.bash_profile

[root@webserver ~]# alias nginx.start='/usr/sbin/nginx'

[root@webserver ~]# alias nginx.stop='/usr/sbin/nginx -s stop'

[root@webserver ~]# alias nginx.reload='/usr/sbin/nginx -s reload'

[root@webserver ~]# alias nginx.config_test='/usr/sbin/nginx -t'

[root@webserver ~]# cat /root/.bashrc

# .bashrc

# User specific aliases and functions

alias rm='rm -i'

alias cp='cp -i'

alias mv='mv -i'

# Source global definitions

if [ -f /etc/bashrc ]; then

    . /etc/bashrc

fi

alias nginx.start='/usr/sbin/nginx'

alias nginx.stop='/usr/sbin/nginx -s stop'

alias nginx.reload='/usr/sbin/nginx -s reload'

alias nginx.config_test='/usr/sbin/nginx -t'

[root@webserver ~]#

[root@webserver ~]# source  /root/.bash_profile
二、安装mysql
3.1、版本选择
在安装之前必须明白一件事情,mysql有很多种安装方式,每种不一样,不要弄混了。比如源码编译安装和二进制安装这里我们用源码自己编译安装。
3.2、数据库存放目录及权限修改
mkdir -p /home/data/mysql

groupadd -r mysql

useradd -r -g mysql -s /sbin/nologin mysql

id mysql

# 更改数据目录权限。

chown -R mysql:mysql /home/data/mysql

[root@webserver ~]# mkdir -p /home/data/mysql

[root@webserver ~]# groupadd -r mysql

[root@webserver ~]# useradd -r -g mysql -s /sbin/nologin mysql

[root@webserver ~]# id mysql

uid=(mysql) gid=(mysql) groups=(mysql)

[root@webserver ~]# chown -R mysql:mysql /home/data/mysql
3.3、下载解压安装
下载并解压编译官网下载的稳定版的源码包。在下载的时候注意一下版本,下载对应的版本。我们源码编译,要下载长这样的安装包:同时在安装的时候我们需要boost库,5.7需要1.59版本的库;你可以下载boost库然后编译boost库,或者像我一样,下载带有boost库的mysql版本,再开始解压编译。
################# 报错处理说明开始################

## 报错信息,原因是网络问题,导致无法下载boost_1_59_0.tar.gz,可以手工下载,

# 然后拷贝到对应的目录下,重新解压mysql,进入目录编译

#  -- Packaging as: mysql-5.7.-Linux-x86_64

#  -- Downloading boost_1_59_0.tar.gz to /usr/local/mysql/boost/boost_1_59_0

#  -- Download failed, error: ;"HTTP response code said error"

#  CMake Error at cmake/boost.cmake: (MESSAGE):

#    You can try downloading

#    http://sourceforge.net/projects/boost/files/boost/1.59.0/boost_1_59_0.tar.gz

#    manually using curl/wget or a similar tool

#  Call Stack (most recent call first):

#    CMakeLists.txt: (INCLUDE)

#  [root@php1 ~]# wget http://sourceforge.net/projects/boost/files/boost/1.59.0/boost_1_59_0.tar.gz

#  [root@php1 ~]# cp boost_1_59_0.tar.gz /usr/local/mysql/boost/boost_1_59_0/

#  [root@php1 ~]# ll /usr/local/mysql/boost/boost_1_59_0/

#  total

#  drwx------  mysql mysql      Dec   : boost_1_59_0

#  -rw-r--r--  mysql mysql  Dec   : boost_1_59_0.tar.gz

#  [root@php1 ~]#

cd /usr/local/mysql/boost/boost_1_59_0/

wget http://sourceforge.net/projects/boost/files/boost/1.59.0/boost_1_59_0.tar.gz

# cp boost_1_59_0.tar.gz /usr/local/mysql/boost/boost_1_59_0

cd /usr/local/src/

rm -rf mysql-5.7./

tar xvf mysql-boost-5.7..tar.gz -C /usr/local/src

cd /usr/local/src/mysql-5.7.

cmake . -DCMAKE_INSTALL_PREFIX=/usr/local/mysql \

-DMYSQL_DATADIR=/home/data/mysql_3310  \

-DSYSCONFDIR=/etc \

-DWITH_INNOBASE_STORAGE_ENGINE= \

-DWITH_ARCHIVE_STORAGE_ENGINE= \

-DWITH_BLACKHOLE_STORAGE_ENGINE= \

-DWITH_READLINE= \

-DWITH_SSL=system \

-DWITH_ZLIB=system \

-DWITH_LIBWRAP= \

-DMYSQL_TCP_PORT= \

-DMYSQL_UNIX_ADDR=/usr/local/mysql/mysqld_3310.sock \

-DDEFAULT_CHARSET=utf8 \

-DWITH_EXTRA_CHARSETS=all \

-DDEFAULT_COLLATION=utf8_general_ci \

-DDOWNLOAD_BOOST= \

-DWITH_BOOST=/usr/local/mysql/boost/boost_1_59_0

#  make && make install

make -j `grep processor /proc/cpuinfo | wc -l` &&

make -j `grep processor /proc/cpuinfo | wc -l`  install

#  参考资料: https://my.oschina.net/Kilar/blog/540856

################# 报错处理说明结束################
cd /usr/local/src/

wget https://dev.mysql.com/get/Downloads/MySQL-5.7/mysql-boost-5.7.20.tar.gz

tar xvf mysql-boost-5.7..tar.gz -C /usr/local/src

cd /usr/local/src/mysql-5.7.

cmake . -DCMAKE_INSTALL_PREFIX=/usr/local/mysql \

-DMYSQL_DATADIR=/home/data/mysql \

-DSYSCONFDIR=/etc \

-DWITH_INNOBASE_STORAGE_ENGINE= \

-DWITH_ARCHIVE_STORAGE_ENGINE= \

-DWITH_BLACKHOLE_STORAGE_ENGINE= \

-DWITH_READLINE= \

-DWITH_SSL=system \

-DWITH_ZLIB=system \

-DWITH_LIBWRAP= \

-DMYSQL_TCP_PORT= \

-DMYSQL_UNIX_ADDR=/usr/local/mysql/mysqld_3310.sock \

-DDEFAULT_CHARSET=utf8 \

-DWITH_EXTRA_CHARSETS=all \

-DDEFAULT_COLLATION=utf8_general_ci \

-DDOWNLOAD_BOOST= \

-DWITH_BOOST=/usr/local/mysql/boost/boost_1_59_0

#  make && make install

make -j `grep processor /proc/cpuinfo | wc -l`

make -j `grep processor /proc/cpuinfo | wc -l`  install

#  参考资料: https://my.oschina.net/Kilar/blog/540856
3.4、修改目录权限
chown -R mysql:mysql /usr/local/mysql/

[root@webserver mysql-5.7.]# chown -R mysql:mysql /usr/local/mysql/
3.5、创建my.cnf配置文件
# 排除干扰因素

if [ -f "/etc/my.cnf" ]; then

    mv /etc/my.cnf /etc/my.cnf.bak

fi

cat > /usr/local/mysql/my_3310.cnf <<EOF

[client]

port =

socket=/usr/local/mysql/mysqld_3310.sock

#character_set_server = utf8

#default-character-set = utf8mb4

#default-character-set = utf8

[mysqld]

basedir=/usr/local/mysql

datadir=/home/data/mysql_3310/

socket=/usr/local/mysql/mysqld_3310.sock

user = mysql

port =

#character_set_server = utf8mb4

#init-connect = 'SET NAMES utf8'

character_set_server = utf8

init-connect = 'SET NAMES utf8'

#skip-name-resolve

#skip-networking

back_log =

max_connections =

max_connect_errors =

open_files_limit =

table_open_cache =

max_allowed_packet = 32M

binlog_cache_size = 32M

max_heap_table_size = 32M

tmp_table_size = 32M

read_buffer_size = 8M

read_rnd_buffer_size =32M

sort_buffer_size = 16M

join_buffer_size = 16M

key_buffer_size = 16M

thread_cache_size =

query_cache_type =

query_cache_size =

#query_cache_limit = 2M

server_id =

log-bin = /home/data/mysql_3310/mysql-bin

log_bin_index = /home/data/mysql_3310/binlog.index

binlog_format = row

expire_logs_days =

lower_case_table_names =

#binlog_ignore_db = mysql

#replicate-do-db = mysql

sql_mode="NO_ENGINE_SUBSTITUTION,STRICT_TRANS_TABLES"

performance_schema =

explicit_defaults_for_timestamp=

log_error = /home/data/mysql_3310/err_mysql_3310.log

slow_query_log =

long_query_time =

slow_query_log_file = /home/data/mysql_3310/mysql-slow.log

default_storage_engine = InnoDB

innodb_file_per_table =

innodb_open_files =

innodb_buffer_pool_size = 2G

innodb_write_io_threads =

innodb_read_io_threads =

innodb_thread_concurrency =

innodb_purge_threads =

innodb_flush_log_at_trx_commit =

innodb_log_buffer_size = 2M

innodb_log_file_size = 32M

innodb_log_files_in_group =

innodb_max_dirty_pages_pct =

innodb_lock_wait_timeout =

bulk_insert_buffer_size = 8M

myisam_sort_buffer_size = 8M

myisam_max_sort_file_size = 10G

myisam_repair_threads =

interactive_timeout =

wait_timeout =

[mysql.server]

character_set_server = utf8

socket=/usr/local/mysql/mysqld_3310.sock

[mysqld_safe]

log-error=/home/data/mysql_3310/err_mysql_3310.log

pid-file=/home/data/mysql_3310/mysql_3310.pid

character_set_server = utf8

[mysql]

socket=/usr/local/mysql/mysqld_3310.sock

default-character-set = utf8

[mysqldump]

socket=/usr/local/mysql/mysqld_3310.sock

default-character-set = utf8

[mysqladmin]

socket=/usr/local/mysql/mysqld_3310.sock

character_set_server = utf8"

EOF
# 具体执行如下

[root@webserver mysql-5.7.]# rm -rf /etc/my.cnf

[root@webserver mysql-5.7.]# cat /usr/local/mysql/my_3310.cnf

[client]

port =

socket=/usr/local/mysql/mysqld_3310.sock

#character_set_server = utf8

#default-character-set = utf8mb4

#default-character-set = utf8

[mysqld]

basedir=/usr/local/mysql

datadir=/home/data/mysql_3310/

socket=/usr/local/mysql/mysqld_3310.sock

user = mysql

port =

#character_set_server = utf8mb4

#init-connect = 'SET NAMES utf8'

character_set_server = utf8

init-connect = 'SET NAMES utf8'

#skip-name-resolve

#skip-networking

back_log =

max_connections =

max_connect_errors =

open_files_limit =

table_open_cache =

max_allowed_packet = 32M

binlog_cache_size = 32M

max_heap_table_size = 32M

tmp_table_size = 32M

read_buffer_size = 8M

read_rnd_buffer_size =32M

sort_buffer_size = 16M

join_buffer_size = 16M

key_buffer_size = 16M

thread_cache_size =

query_cache_type =

query_cache_size =

#query_cache_limit = 2M

server_id =

log-bin = /home/data/mysql_3310/mysql-bin

log_bin_index = /home/data/mysql_3310/binlog.index

binlog_format = row

expire_logs_days =

lower_case_table_names =

#binlog_ignore_db = mysql

#replicate-do-db = mysql

sql_mode="NO_ENGINE_SUBSTITUTION,STRICT_TRANS_TABLES"

performance_schema =

explicit_defaults_for_timestamp=

log_error = /home/data/mysql_3310/err_mysql_3310.log

slow_query_log =

long_query_time =

slow_query_log_file = /home/data/mysql_3310/mysql-slow.log

default_storage_engine = InnoDB

innodb_file_per_table =

innodb_open_files =

innodb_buffer_pool_size = 2G

innodb_write_io_threads =

innodb_read_io_threads =

innodb_thread_concurrency =

innodb_purge_threads =

innodb_flush_log_at_trx_commit =

innodb_log_buffer_size = 2M

innodb_log_file_size = 32M

innodb_log_files_in_group =

innodb_max_dirty_pages_pct =

innodb_lock_wait_timeout =

bulk_insert_buffer_size = 8M

myisam_sort_buffer_size = 8M

myisam_max_sort_file_size = 10G

myisam_repair_threads =

interactive_timeout =

wait_timeout =

[mysql.server]

character_set_server = utf8

socket=/usr/local/mysql/mysqld_3310.sock

[mysqld_safe]

log-error=/home/data/mysql_3310/err_mysql_3310.log

pid-file=/home/data/mysql_3310/mysql_3310.pid

character_set_server = utf8

[mysql]

socket=/usr/local/mysql/mysqld_3310.sock

default-character-set = utf8

[mysqldump]

socket=/usr/local/mysql/mysqld_3310.sock

default-character-set = utf8

[mysqladmin]

socket=/usr/local/mysql/mysqld_3310.sock

character_set_server = utf8"

[root@webserver mysql-5.7.]#
3.6、初始化数据库
#需要注意这里是mysql5.7的初始化命令,而5.7以下的都是用:
#/usr/local/mysql/scripts/mysql_install_db –user=mysql –datadir=/home/data/mysql_3310/
#在初始化成功之后,5.7的initial命令会产生一个随机的root登录密码,你要用这个密码登录,
#然后修改(必须修改生成的随机密码不然无法后续操作)。在最后有一个类似这样的密码:root@localhost : QAEwfe@dvs!
# /usr/local/mysql/bin/mysqld –-initialize –user=mysql –-basedir=/usr/local/mysql –-datadir=/home/data/mysql_3310/

# /usr/local/mysql/bin/mysqld --initialize-insecure –-user=mysql –-basedir=/usr/local/mysql –-datadir=/home/data/mysql_3310/ --defaults-file=/usr/local/mysql/my_3310.cnf

/usr/local/mysql/bin/mysqld --defaults-file=/usr/local/mysql/my_3310.cnf --initialize-insecure &

[root@webserver mysql-5.7.]# /usr/local/mysql/bin/mysqld --defaults-file=/usr/local/mysql/my_3310.cnf --initialize-insecure &

[]

[root@webserver mysql-5.7.]#
3.7、启动数据库
#  启动数据库

/usr/local/mysql/bin/mysqld_safe --defaults-file=/usr/local/mysql/my_3310.cnf &

ps -ef| grep -v 'grep' | grep mysql

[root@webserver mysql-5.7.]# #  启动数据库

[root@webserver mysql-5.7.]# /usr/local/mysql/bin/mysqld_safe --defaults-file=/usr/local/mysql/my_3310.cnf &

[]

[root@webserver mysql-5.7.]# ps -ef| grep -v 'grep' | grep mysql

root           : pts/    :: tail -f /home/data/mysql_3310/err_mysql_3310.log

root           : pts/    :: /bin/sh /usr/local/mysql/bin/mysqld_safe --defaults-file=/usr/local/mysql/my_3310.cnf

[root@webserver mysql-5.7.]#

[root@webserver mysql-5.7.]# --15T09::.906941Z mysqld_safe Logging to '/home/data/mysql_3310/err_mysql_3310.log'.

--15T09::.966304Z mysqld_safe Starting mysqld daemon with databases from /home/data/mysql_3310

[root@webserver mysql-5.7.]# ps -ef| grep -v 'grep' | grep mysql

root           : pts/    :: tail -f /home/data/mysql_3310/err_mysql_3310.log

root           : pts/    :: /bin/sh /usr/local/mysql/bin/mysqld_safe --defaults-file=/usr/local/mysql/my_3310.cnf

mysql          : pts/    :: /usr/local/mysql/bin/mysqld --defaults-file=/usr/local/mysql/my_3310.cnf --basedir=/usr/local/mysql --datadir=/home/data/mysql_3310 --plugin-dir=/usr/local/mysql/lib/plugin --user=mysql --log-error=/home/data/mysql_3310/err_mysql_3310.log --open-files-limit= --pid-file=/home/data/mysql_3310/mysql_3310.pid --socket=/usr/local/mysql/mysqld_3310.sock --port=

[root@webserver mysql-5.7.]#
3.8、登陆修改默认账号
#  登陆后修改默认账号

/usr/local/mysql/bin/mysql

alter user 'root'@'localhost' identified by 'mysql2017pwd';

delete from mysql.user where Host='::1';

delete from mysql.user where Host='localhost.localdomain';

delete from mysql.user where User='';

flush privileges;

exit;

[root@webserver mysql-5.7.]# /usr/local/mysql/bin/mysql

Welcome to the MySQL monitor.  Commands end with ; or \g.

Your MySQL connection id is

Server version: 5.7.-log Source distribution

Copyright (c) , , Oracle and/or its affiliates. All rights reserved.

Oracle is a registered trademark of Oracle Corporation and/or its

affiliates. Other names may be trademarks of their respective

owners.

Type 'help;' or '\h' for help. Type '\c' to clear the current input statement.

mysql> alter user 'root'@'localhost' identified by 'mysql2017pwd';

Query OK,  rows affected (0.00 sec)

mysql> delete from mysql.user where Host='::1';

Query OK,  rows affected (0.00 sec)

mysql> delete from mysql.user where Host='localhost.localdomain';

Query OK,  rows affected (0.00 sec)

mysql> delete from mysql.user where User='';

Query OK,  rows affected (0.00 sec)

mysql> flush privileges;

Query OK,  rows affected (0.01 sec)

mysql> exit;

Bye

[root@webserver mysql-5.7.]#
3.9、mysql快捷登陆方式
# 快捷登陆方式

alias mysql..start='/usr/local/mysql/bin/mysqld_safe --defaults-file=/usr/local/mysql/my_3310.cnf &'

alias mysql..stop='/usr/local/mysql/bin/mysqladmin -uroot -p'mysql2017pwd' shutdown'

alias mysql..login='/usr/local/mysql/bin/mysql -uroot -p'mysql2017pwd''

cat >>/root/.bashrc <<EOF

alias mysql..start='/usr/local/mysql/bin/mysqld_safe --defaults-file=/usr/local/mysql/my_3310.cnf &'

alias mysql..stop='/usr/local/mysql/bin/mysqladmin -uroot -p'mysql2017pwd' shutdown'

alias mysql..login='/usr/local/mysql/bin/mysql -uroot -p'mysql2017pwd''

EOF

source  /root/.bash_profile

[root@webserver mysql-5.7.]# # 快捷登陆方式

[root@webserver mysql-5.7.]# alias mysql..start='/usr/local/mysql/bin/mysqld_safe --defaults-file=/usr/local/mysql/my_3310.cnf &'

[root@webserver mysql-5.7.]# alias mysql..stop='/usr/local/mysql/bin/mysqladmin -uroot -p'mysql2017pwd' shutdown'

[root@webserver mysql-5.7.]# alias mysql..login='/usr/local/mysql/bin/mysql -uroot -p'mysql2017pwd''

[root@webserver mysql-5.7.]# alias mysql..all_dump='/usr/local/mysql/bin/mysqldump -uroot -p'mysql2017pwd' -P3312 -R -E --triggers -e --max_allowed_packet=16777216 --net_buffer_length=16384  --master-data=2 --single-transaction --all-databases --quick | gzip >/root/all_database_bak_`date +%Y-%m-%d_%H_%M_%S`.sql.gz'

[root@webserver mysql-5.7.]# cat /root/.bashrc

# .bashrc

# User specific aliases and functions

alias rm='rm -i'

alias cp='cp -i'

alias mv='mv -i'

# Source global definitions

if [ -f /etc/bashrc ]; then

    . /etc/bashrc

fi

alias nginx.start='/usr/sbin/nginx'

alias nginx.stop='/usr/sbin/nginx -s stop'

alias nginx.reload='/usr/sbin/nginx -s reload'

alias nginx.config_test='/usr/sbin/nginx -t'

alias mysql..start='/usr/local/mysql/bin/mysqld_safe --defaults-file=/usr/local/mysql/my_3310.cnf &'

alias mysql..stop='/usr/local/mysql/bin/mysqladmin -uroot -p'mysql2017pwd' shutdown'

alias mysql..login='/usr/local/mysql/bin/mysql -uroot -p'mysql2017pwd''

[root@webserver mysql-5.7.]#

[root@webserver mysql-5.7.]# source  /root/.bash_profile
3.10、全库备份脚本
vim /root/all_backup_db.sh

#!/bin/bash

'/usr/local/mysql/bin/mysqldump -uroot -p'mysql2017pwd' -P3312 -R -E --triggers -e --max_allowed_packet=16777216 --net_buffer_length=16384  --master-data=2 --single-transaction --all-databases --quick | gzip >/root/all_database_bak_`date +%Y-%m-%d_%H_%M_%S`.sql.gz'
四、安装php-fpm
4.1、到官网下载源码包后,开始编译安装
cd /usr/local/src/

wget http://cn2.php.net/distributions/php-7.2.0.tar.bz2

tar -xvf php-7.2..tar.bz2 -C /usr/local/src

cd /usr/local/src/php-7.2.

# 执行下面的配置文件:

./configure --prefix=/usr/local/php \

--with-config-file-scan-dir=/etc/php.d \

--with-config-file-path=/etc \

--with-mysqli=/usr/local/mysql/bin/mysql_config \

--enable-fpm \

--enable-opcache \

--disable-fileinfo \

--with-jpeg-dir \

--with-iconv-dir=/usr/local \

--with-freetype-dir \

--with-png-dir \

--with-zlib \

--with-libxml-dir=/usr \

--enable-xml \

--enable-bcmath \

--enable-shmop \

--enable-exif \

--with-curl \

--enable-sysvsem \

--enable-inline-optimization \

--enable-mbregex \

--enable-inline-optimization \

--enable-mbstring \

--with-gd \

--with-openssl \

--with-mhash \

--enable-pcntl \

--enable-sockets \

--with-xmlrpc \

--enable-ftp \

--with-gettext \

--enable-zip \

--enable-soap \

--with-bz2

make -j `grep processor /proc/cpuinfo | wc -l`

make -j `grep processor /proc/cpuinfo | wc -l`  install
# 执行以上的配置,如果出现下面这样的license,才是正确的,才可以开始编译,如果出问题,就解决,一般是少了什么库。

# 执行编译:configure: WARNING: unrecognized options: --with-mysql, --with-mcrypt, --enable-gd-native-ttf

# collect2: ld returned  exit status

# make: *** [sapi/cli/php] Error

# make && make install

#  出现上述错误的解决办法:

#  参考资料: http://www.ithov.net/linux/1127.html

ln -s /usr/local/lib/libiconv.so. /usr/lib64/

make ZEND_EXTRA_LIBS='-liconv'

make install

#make -j `grep processor /proc/cpuinfo | wc -l`  &&

#make -j `grep processor /proc/cpuinfo | wc -l`  install

# make test

[root@webserver ~]# cd /usr/local/src/

[root@webserver src]# wget http://cn2.php.net/distributions/php-7.2.0.tar.bz2

[root@webserver src]# tar -xvf php-7.2..tar.bz2 -C /usr/local/src

[root@webserver src]# cd /usr/local/src/php-7.2.

[root@webserver php-7.2.]# ./configure --prefix=/usr/local/php --with-config-file-scan-dir=/etc/php.d --with-config-file-path=/etc --with-mysqli=/usr/local/mysql/bin/mysql_config --enable-fpm --enable-opcache --disable-fileinfo --with-jpeg-dir --with-iconv-dir=/usr/local --with-freetype-dir --with-png-dir --with-zlib --with-libxml-dir=/usr --enable-xml --enable-bcmath --enable-shmop --enable-exif --with-curl --enable-sysvsem --enable-inline-optimization --enable-mbregex --enable-inline-optimization --enable-mbstring --with-gd --with-openssl --with-mhash --enable-pcntl --enable-sockets --with-xmlrpc --enable-ftp --with-gettext --enable-zip --enable-soap --with-bz2

[root@webserver php-7.2.]# ln -s /usr/local/lib/libiconv.so. /usr/lib64/

[root@webserver php-7.2.]# make ZEND_EXTRA_LIBS='-liconv'
4.2、添加php和php-fpm配置文件
cp  /usr/local/src/php-7.2./php.ini-production /etc/php.ini

cd /usr/local/php/etc/

cp php-fpm.conf.default php-fpm.conf

sed -i 's@;pid = run/php-fpm.pid@pid = /usr/local/php/var/run/php-fpm.pid@' php-fpm.conf
4.3、添加php-fpm启动脚本
cp /usr/local/src/php-7.2./sapi/fpm/init.d.php-fpm /etc/init.d/php-fpm

chmod +x /etc/init.d/php-fpm
4.4、添加php-fpm至服务列表并设置开机自启
chkconfig --add php-fpm

chkconfig --list php-fpm

chkconfig php-fpm on
4.5、创建web存放目录
useradd -s /sbin/nologin -M www

mkdir -p /var/www/html/

chown -R www.www/var/www/html/

chmod -R  /var/www/html/
4.6、添加nginx对fastcgi的支持
# 首先备份默认的配置文件。

cp /etc/nginx/nginx.conf /etc/nginx/nginx.confbak

rm -rf /etc/nginx/nginx.conf

cp /etc/nginx/nginx.conf.default /etc/nginx/nginx.conf

[root@webserver ~]# cat  /etc/nginx/nginx.conf

user  www;

worker_processes  ;

error_log  logs/error.log;

#error_log  logs/error.log  notice;

#error_log  logs/error.log  info;

#pid        logs/nginx.pid;

events {

    worker_connections  ;

}

http {

    include       mime.types;

    default_type  application/octet-stream;

    #log_format  main  '$remote_addr - $remote_user [] "$request" '

    #                  '$status $body_bytes_sent "$http_referer" '

    #                  '"$http_user_agent" "$http_x_forwarded_for"';

    #access_log  logs/access.log  main;

    sendfile        on;

    #tcp_nopush     on;

    #keepalive_timeout  ;

    keepalive_timeout  ;

    #gzip  on;

    server {

        listen       ;

        server_name  localhost;

        #charset koi8-r;

        #access_log  logs/host.access.log  main;

        location / {

            root   /usr/local/nginx/html;

            index index.php index.html index.htm;

        }

        #error_page                /.html;

        # redirect server error pages to the static page /50x.html

        #

        error_page        /50x.html;

        location = /50x.html {

            root   html;

        }

        # proxy the PHP scripts to Apache listening on 127.0.0.1:

        #

        #location ~ \.php$ {

        #    proxy_pass   http://127.0.0.1;

        #}

        # pass the PHP scripts to FastCGI server listening on 127.0.0.1:

        #

       # location ~ \.php$ {

       #     #root           html;

       #    try_files      $uri =;

       #   fastcgi_pass   127.0.0.1:;

       #   fastcgi_index  index.php;

       #   fastcgi_param  SCRIPT_FILENAME  $document_root$fastcgi_script_name;

       #   include        fastcgi_params;

       #}

        # deny access to .htaccess files, if Apache's document root

        # concurs with nginx's one

        #

        #location ~ /\.ht {

        #    deny  all;

        #}

    }

    # another virtual host using mix of IP-, name-, and port-based configuration

    #

    #server {

    #    listen       ;

    #    listen       somename:;

    #    server_name  somename  alias  another.alias;

    #    location / {

    #        root   html;

    #        index  index.html index.htm;

    #    }

    #}

    # HTTPS server

    #

    #server {

    #    listen        ssl;

    #    server_name  localhost;

    #    ssl_certificate      cert.pem;

    #    ssl_certificate_key  cert.key;

    #    ssl_session_cache    shared:SSL:1m;

    #    ssl_session_timeout  5m;

    #    ssl_ciphers  HIGH:!aNULL:!MD5;

    #    ssl_prefer_server_ciphers  on;

    #    location / {

    #        root   html;

    #        index  index.html index.htm;

    #    }

    #}

##################################

server{

     charset utf-;

     listen ;

        server_name localhost;

        autoindex on;

        autoindex_exact_size off;

        autoindex_localtime on;

        index index.php index.html index.htm ;

     location / {

            root /var/www/html/;

            #    allow 172.16.100.12;

            #   deny all;

                         }

    location ~ \.php$ {

            root           /var/www/html/;

            try_files      $uri =;

            fastcgi_pass   127.0.0.1:;

            fastcgi_index  index.php;

            fastcgi_param  SCRIPT_FILENAME  $document_root$fastcgi_script_name;

            include        fastcgi_params;

        }

    }

##################################

}

[root@webserver ~]#
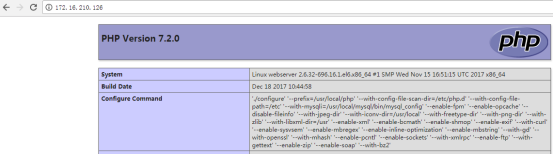
五、重启nginx服务测试
mkdir -p /usr/local/nginx/logs

chown -R nginx.nginx /usr/local/nginx/

chown -R  /usr/local/nginx/logs/

/usr/sbin/nginx -s reload

rm -rf /var/www/html/*

cat >/var/www/html/index.php <<EOF

<?php

phpinfo();

?>

EOF
5.1、多路径配置
在vim /etc/nginx/nginx.conf 增加如下内容

include  vhosts/*;
六、快捷方式
cat >> /etc/rc.local <<EOF

##### mysql快捷方式 #####

#alias mysql..start='/usr/local/mysql/bin/mysqld_safe --defaults-file=/usr/local/mysql/my_3310.cnf &'

#alias mysql..stop='/usr/local/mysql/bin/mysqladmin -uroot -p'mysql2017pwd' shutdown'

#alias mysql..login='/usr/local/mysql/bin/mysql -uroot -p'mysql2017pwd''

##### php快捷方式 ######

# alias php.start='/etc/init.d/php-fpm start'

# alias php.stop='/etc/init.d/php-fpm stop'

# alias php.restart='/etc/init.d/php-fpm restart'

# alias php.reload='/etc/init.d/php-fpm reload'

# alias php.status='/etc/init.d/php-fpm status'

# alias php.configtest='/etc/init.d/php-fpm  configtest'

##### nginx快捷方式 #####

# alias nginx.start='/usr/sbin/nginx'

# alias nginx.stop='/usr/sbin/nginx -s stop'

# alias nginx.reload='/usr/sbin/nginx -s reload'

# alias nginx.configtest='/usr/sbin/nginx -t'

EOF

source  /root/.bash_profile
七、多路径配置测试
7.1、主配置文件
[root@webserver ~]# cat /etc/nginx/nginx.conf

user  www;

worker_processes  ;

error_log  logs/error.log;

#error_log  logs/error.log  notice;

#error_log  logs/error.log  info;

#pid        logs/nginx.pid;

events {

    worker_connections  ;

}

http {

    include       mime.types;

    default_type  application/octet-stream;

    #log_format  main  '$remote_addr - $remote_user [] "$request" '

    #                  '$status $body_bytes_sent "$http_referer" '

    #                  '"$http_user_agent" "$http_x_forwarded_for"';

    #access_log  logs/access.log  main;

    sendfile        on;

    #tcp_nopush     on;

    #keepalive_timeout  ;

    keepalive_timeout  ;

    #gzip  on;

    server {

        listen       ;

        server_name  localhost;

        #charset koi8-r;

        #access_log  logs/host.access.log  main;

        location / {

            root   /usr/local/nginx/html;

            index index.php index.html index.htm;

        }

        #error_page                /.html;

        # redirect server error pages to the static page /50x.html

        #

        error_page        /50x.html;

        location = /50x.html {

            root   html;

        }

        # proxy the PHP scripts to Apache listening on 127.0.0.1:

        #

        #location ~ \.php$ {

        #    proxy_pass   http://127.0.0.1;

        #}

        # pass the PHP scripts to FastCGI server listening on 127.0.0.1:

        #

       # location ~ \.php$ {

       #     #root           html;

       #    try_files      $uri =;

       #   fastcgi_pass   127.0.0.1:;

       #   fastcgi_index  index.php;

       #   fastcgi_param  SCRIPT_FILENAME  $document_root$fastcgi_script_name;

       #   include        fastcgi_params;

       #}

        # deny access to .htaccess files, if Apache's document root

        # concurs with nginx's one

        #

        #location ~ /\.ht {

        #    deny  all;

        #}

    }

    # another virtual host using mix of IP-, name-, and port-based configuration

    #

    #server {

    #    listen       ;

    #    listen       somename:;

    #    server_name  somename  alias  another.alias;

    #    location / {

    #        root   html;

    #        index  index.html index.htm;

    #    }

    #}

    # HTTPS server

    #

    #server {

    #    listen        ssl;

    #    server_name  localhost;

    #    ssl_certificate      cert.pem;

    #    ssl_certificate_key  cert.key;

    #    ssl_session_cache    shared:SSL:1m;

    #    ssl_session_timeout  5m;

    #    ssl_ciphers  HIGH:!aNULL:!MD5;

    #    ssl_prefer_server_ciphers  on;

    #    location / {

    #        root   html;

    #        index  index.html index.htm;

    #    }

    #}

##################################

server{

     charset utf-;

     listen ;

        server_name localhost;

        autoindex on;

        autoindex_exact_size off;

        autoindex_localtime on;

        index index.php index.html index.htm ;

     location / {

            root /var/www/html/;

            #    allow 172.16.100.12;

            #   deny all;

                         }

    location ~ \.php$ {

            root           /var/www/html/;

            try_files      $uri =;

            fastcgi_pass   127.0.0.1:;

            fastcgi_index  index.php;

            fastcgi_param  SCRIPT_FILENAME  $document_root$fastcgi_script_name;

            include        fastcgi_params;

        }

    }

##################################

include  /usr/local/nginx/html/*;

}

[root@webserver ~]#
7.2、在/usr/local/nginx/html/目录下创建子配置文件
[root@webserver html]# pwd

/usr/local/nginx/html

[root@webserver html]# ll

total

-rw-r--r--  www www  Dec  : web1

-rw-r--r--  www www  Dec  : web2

-rw-r--r--  www www  Dec  : web3

[root@webserver html]#
7.2.1、web1的配置
[root@webserver html]# cat web1

server{

     charset utf-;

     listen ;

        server_name localhost;

        autoindex on;

        autoindex_exact_size off;

        autoindex_localtime on;

        index index.php index.html index.htm ;

     location / {

            root /var/www/html/web1/;

            #   allow172.16.100.;

            #  deny all;

                         }

    location ~ \.php$ {

            root           /var/www/html/web1;

            try_files      $uri =;

            fastcgi_pass   127.0.0.1:;

            fastcgi_index  index.php;

            fastcgi_param  SCRIPT_FILENAME  $document_root$fastcgi_script_name;

            include        fastcgi_params;

        }

    }

[root@webserver html]#
7.2.2、web2的配置
[root@webserver html]# cat web2

server{

     charset utf-;

     listen ;

        server_name localhost;

        autoindex on;

        autoindex_exact_size off;

        autoindex_localtime on;

        index index.php index.html index.htm ;

     location / {

            root /var/www/html/web2/;

            #   allow 172.16.100.12;

            #  deny all;

                         }

    location ~ \.php$ {

            root           /var/www/html/web2;

            try_files      $uri =;

            fastcgi_pass   127.0.0.1:;

            fastcgi_index  index.php;

            fastcgi_param  SCRIPT_FILENAME  $document_root$fastcgi_script_name;

            include        fastcgi_params;

        }

    }

[root@webserver html]#
7.2.3、web3的配置
[root@webserver html]# cat web3

server{

     charset utf-;

     listen ;

        server_name localhost;

        autoindex on;

        autoindex_exact_size off;

        autoindex_localtime on;

        index index.php index.html index.htm ;

     location / {

            root /var/www/html/web3/;

            #   allow 172.16.100.12;

            #  deny all;

                         }

    location ~ \.php$ {

            root           /var/www/html/web3;

            try_files      $uri =;

            fastcgi_pass   127.0.0.1:;

            fastcgi_index  index.php;

            fastcgi_param  SCRIPT_FILENAME  $document_root$fastcgi_script_name;

            include        fastcgi_params;

        }

    }

[root@webserver html]#
7.3、测试nginx的配置是否正确
[root@webserver html]# nginx.config_test

nginx: [warn] conflicting server name "localhost" on 0.0.0.0:, ignored

nginx: [warn] conflicting server name "localhost" on 0.0.0.0:, ignored

nginx: [warn] conflicting server name "localhost" on 0.0.0.0:, ignored

nginx: the configuration file /etc/nginx/nginx.conf syntax is ok

nginx: configuration file /etc/nginx/nginx.conf test is successful

[root@webserver html]#
7.4、修改网页测试内容
[root@webserver ~]# cd /var/www/html/

[root@webserver html]# ll

total

drwxr-xr-x  www www  Dec  : web1

drwxr-xr-x  www www  Dec  : web2

drwxr-xr-x  www www  Dec  : web3

[root@webserver html]#

[root@webserver html]# cat web1/index.php

<?php

echo "web1";

phpinfo();

?>

[root@webserver html]# cat web1/index.php >web2/index.php

[root@webserver html]# cat web1/index.php >web3/index.php

[root@webserver html]# sed -i 's/web1/web2/' web2/index.php

[root@webserver html]# sed -i 's/web1/web3/' web3/index.php

[root@webserver html]# cat web2/index.php

<?php

echo "web2";

phpinfo();

?>

[root@webserver html]# cat web3/index.php

<?php

echo "web3";

phpinfo();

?>

[root@webserver html]#
7.5、访问网页

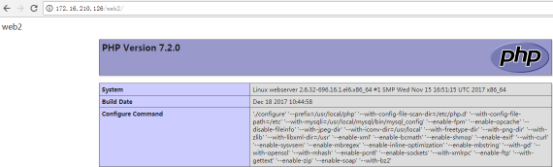
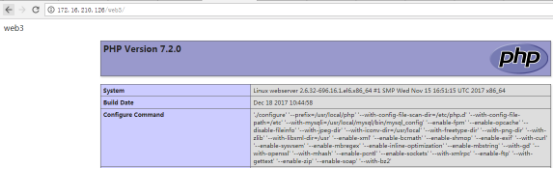
[root@webserver ~]# cat /etc/nginx/nginx.conf
user www;
worker_processes 8;
error_log logs/error.log;
#error_log logs/error.log notice;
#error_log logs/error.log info;
#pid logs/nginx.pid;
events {
worker_connections 1024;
}
http {
include mime.types;
default_type application/octet-stream;
#log_format main '$remote_addr - $remote_user [] "$request" '
# '$status $body_bytes_sent "$http_referer" '
# '"$http_user_agent" "$http_x_forwarded_for"';
#access_log logs/access.log main;
sendfile on;
#tcp_nopush on;
#keepalive_timeout 0;
keepalive_timeout 65;
#gzip on;
server {
listen 8123;
server_name localhost;
#charset koi8-r;
#access_log logs/host.access.log main;
location / {
root /usr/local/nginx/html;
index index.php index.html index.htm;
}
#error_page 404 /404.html;
# redirect server error pages to the static page /50x.html
#
error_page 500 502 503 504 /50x.html;
location = /50x.html {
root html;
}
# proxy the PHP scripts to Apache listening on 127.0.0.1:80
#
#location ~ \.php$ {
# proxy_pass http://127.0.0.1;
#}
# pass the PHP scripts to FastCGI server listening on 127.0.0.1:9000
#
# location ~ \.php$ {
# #root html;
# try_files $uri =404;
# fastcgi_pass 127.0.0.1:9000;
# fastcgi_index index.php;
# fastcgi_param SCRIPT_FILENAME $document_root$fastcgi_script_name;
# include fastcgi_params;
#}
# deny access to .htaccess files, if Apache's document root
# concurs with nginx's one
#
#location ~ /\.ht {
# deny all;
#}
}
# another virtual host using mix of IP-, name-, and port-based configuration
#
#server {
# listen 8000;
# listen somename:8080;
# server_name somename alias another.alias;
# location / {
# root html;
# index index.html index.htm;
# }
#}
# HTTPS server
#
#server {
# listen 443 ssl;
# server_name localhost;
# ssl_certificate cert.pem;
# ssl_certificate_key cert.key;
# ssl_session_cache shared:SSL:1m;
# ssl_session_timeout 5m;
# ssl_ciphers HIGH:!aNULL:!MD5;
# ssl_prefer_server_ciphers on;
# location / {
# root html;
# index index.html index.htm;
# }
#}
##################################
server{
charset utf-8;
listen 80;
server_name localhost;
autoindex on;
autoindex_exact_size off;
autoindex_localtime on;
index index.php index.html index.htm ;
location / {
root /var/www/html/;
# allow x.x.x.x;
# deny all;
}
location ~ \.php$ {
root /var/www/html/;
try_files $uri =404;
fastcgi_pass 127.0.0.1:9000;
fastcgi_index index.php;
fastcgi_param SCRIPT_FILENAME $document_root$fastcgi_script_name;
include fastcgi_params;
}
}
##################################
include /usr/local/nginx/html/*;
}
[root@webserver ~]#
Centos 6.8编译安装LNMP环境的更多相关文章
- CentOS 6.5 编译安装 LNMP环境
建立一个软件包目录存放 mkdir -p /usr/local/src/ 清理已经安装包 rpm -e httpd rpm -e mysql rpm -e php yum -y remove http ...
- CentOS编译安装LNMP环境
这里是教大家如何在centos下利用源码编译安装LNMP环境. 工具/原料 centos服务器一台 自用电脑一台 准备篇 配置好IP.DNS .网关,确保使用远程连接工具能够连接服务器 配置防火墙,开 ...
- SaltStack之编译安装LNMP环境
使用saltstack编译安装LNMP环境 一,系统版本查看 二,安装salt-master和salt-minion 安装配置过程参考SaltStack概述及安装 三,修改配置文件 /etc/salt ...
- CentOS 6.4 linux下编译安装 LNMP环境
1.nginx编译安装 2.PHP编译安装 3.mysql编译安装 4.NGINX配置模板 5.CentOS 6.4 php-fpm 添加service 添加平滑启动/重启
- CentOS 5.5编译安装lnmp
如果是安装Centos6.5记得Perl是必选的,否则无法安装VMWare Tools!!!!切记 如果出现make错误需要安装其他软件,装好后 make clean make install ...
- 源码编译安装lnmp环境
一.源码编译安装步骤 首先说明源码安装的好处 速度快,可自定义路径 主要有三步:1.配置 进入源码安装包 ./configure --prefix=/uer/local/nginx 可指定参数 ...
- 源码编译安装lnmp环境(nginx-1.14.2 + mysql-5.6.43 + php-5.6.30 )------踩了无数坑,重装了十几次服务器才会的,不容易啊!
和LAMP不同的是,LNMP中的N指的是Nginx(类似于Apache的一种web服务软件),并且php是作为一个独立服务存在的,这个服务叫做php-fpm,Nginx直接处理静态请求,动态请求会转发 ...
- CentOS 6.3编译安装LAMP环境笔记
转载地址:http://www.jb51.net/article/54969.htm 最近抽空在虚拟机上测试成功了LAMP各个最新版本的整合编译安装,算是把之前的博文整合精简,以下内容均在CENTOS ...
- CentOS 7 下编译安装lnmp之PHP篇详解
一.安装环境 宿主机=> win7,虚拟机 centos => 系统版本:centos-release-7-5.1804.el7.centos.x86_64 二.PHP下载 官网 http ...
随机推荐
- 数据库 -- mysql表操作
一,存储引擎介绍 存储引擎即表类型,mysql根据不同的表类型会有不同的处理机制 详见:https://www.cnblogs.com/peng104/p/9751738.html 二,表介绍 表相当 ...
- [NOIp2009] $Hankson$ 的趣味题
类型:数论 传送门:>Here< 题意:给出四个数$a_0,a_1,b_0,b_1$,求满足$gcd(x,a_0)=a_1,lcm(x,b_0)=b_1$的$x$的个数 解题思路 显然$a ...
- Codeforces510 C. Fox And Names
Codeforces题号:#510C 出处: Codeforces 主要算法:判环+拓扑 难度:4.2 思路分析: 要是把这道题联系到图上就很容易想了. 如何建图?由于最后要求名字满足字典序,所以不妨 ...
- appium 原理解析(转载雷子老师博客)
appium 原理解析 原博客地址:https://www.cnblogs.com/leiziv5/p/6427609.html Appium是 c/s模式的appium是基于 webdriver 协 ...
- Marriage Match III HDU - 3277(二分权值 + 拆点 建边)
题意: 只不过是hdu3081多加了k种选择 想一下,最多能玩x轮,是不是就是每个女生能最多选x个男生 现在题中的每个女生比3081多了k中选择 那就把女生拆点 i i‘ i --> i ...
- 【XSY2732】Decalcomania 可持久化线段树 分治
题目描述 有一个陶瓷瓶周围有\(n\)个可以印花的位置.第\(i\)个与第\(i+1\)个位置之间的距离为\(d_i\),在第\(i\)个位置印图案要\(t_i\)秒. 机器刚开始在\(0\)号位置, ...
- Ddos 分布式拒绝服务 (报告)
Ddos 译:分布式拒绝服务 两日之余的 Ddos 学习: 也看完了市场上(当时的我查到的市场)唯一 书<破坏之王>: 使用了些好找或不好找的攻击软件:几经测试与实践: 1.结果:最多造 ...
- NOIp 2018 游记
Day0 啥都没做,记了一下 vimrc 和配置,然后搞了一下午的颓. 然后头有点晕乎乎的,早点洗澡去睡觉,在床上想了很多,但还是强制自己大脑放空,早点睡着了. Day1 由于去年的教训,今年我决定先 ...
- Educational Codeforces Round 33 (Rated for Div. 2) F. Subtree Minimum Query(主席树合并)
题意 给定一棵 \(n\) 个点的带点权树,以 \(1\) 为根, \(m\) 次询问,每次询问给出两个值 \(p, k\) ,求以下值: \(p\) 的子树中距离 \(p \le k\) 的所有点权 ...
- Android RadioGroup 学习
Api 参考地址 博文地址 RadioGroup相关属性: //返回该单选按钮组中所选择的单选按钮的标识 ID,如果没有选中的单选按钮则返回 -1. RadioGroup.getCheckedRadi ...