
C#代码实现矢量画图
原文:C#代码实现矢量画图
要实现C#代码画矢量图,其基本原理是先创建一个容器作为画板,然后创建Line(直线)、PolyLine(多段线)、Rectangle(矩形)或者Ellipse(椭圆)基本绘图对象生成各种矢量图形,最后把这些图形对象添加到画板中即可,一般用Canvas容器作为画板。下面以在Canvas容器控件中绘制Line(直线)、PolyLine(多段线)、Rectangle(矩形)或者Ellipse(椭圆)等基本图形对矢量绘图进行简单的介绍,希望对大家有所帮助。
创建一个C#项目,在项目中添加Canvas并把Canvas属性的旋转角度设置为-90度,然后添加绘制各种基本图形的按钮
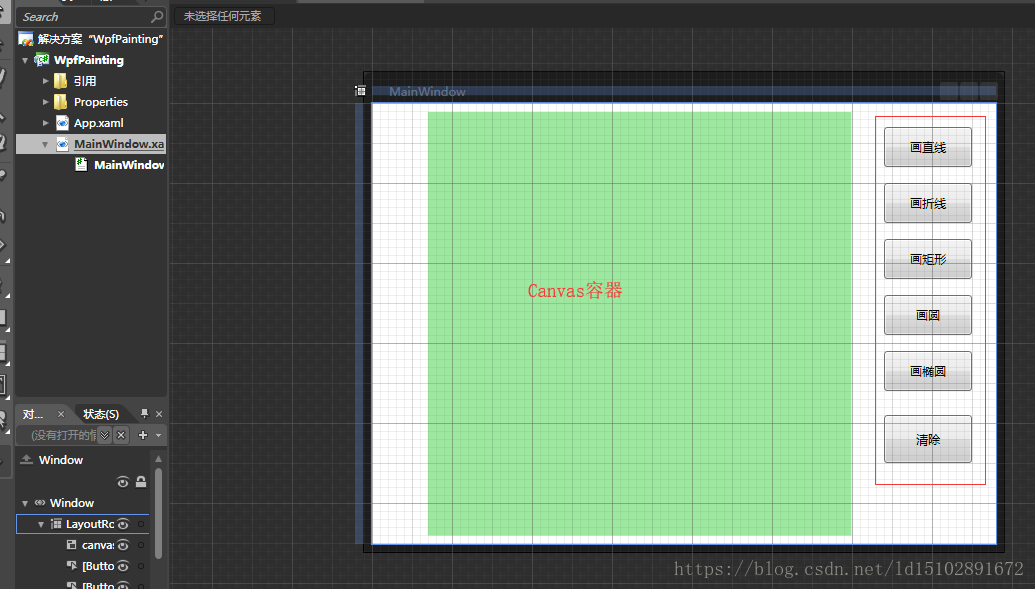
绘制坐标系效果图及代码
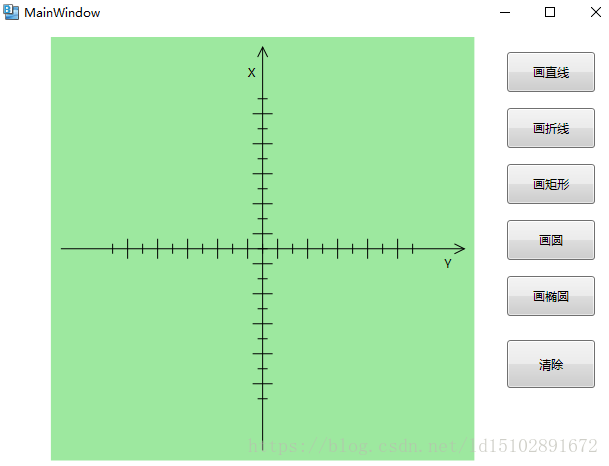
        private void PaintGrid()//画坐标系

		{

		    Line l=new Line();

			l.X1=0;

			l.Y1=10;

			l.X2=0;

			l.Y2=this.canvas.Height-10;

			l.StrokeThickness=1;

			l.Stroke=new SolidColorBrush(Color.FromRgb(0, 0, 0));

			Canvas.SetLeft(l,this.canvas.Width/2);

			this.canvas.Children.Add(l);

			l=new Line();

			l.X1=10;

			l.Y1=0;

			l.X2=this.canvas.Width-10;;

			l.Y2=0;

			l.StrokeThickness=1;

			l.Stroke=new SolidColorBrush(Color.FromRgb(0, 0, 0));

			Canvas.SetTop(l,this.canvas.Height/2);

			this.canvas.Children.Add(l);

			for(int i=-10;i<=10;i++)

			{

			  l=new Line();

			  Line ly=new Line();

			  l.X1=i*15;

			  l.X2=i*15;

			  ly.Y1=i*15;

			  ly.Y2=i*15;

			 if(i%2==0)

			  {

				l.Y1=-5;

				l.Y2=5;

				ly.X1=-5;

				ly.X2=5;

			   }

				else

			   {

			    l.Y1=-10;

				l.Y2=10;

				ly.X1=-10;

				ly.X2=10;

			    }

			  l.StrokeThickness=1;

			  l.Stroke=new SolidColorBrush(Color.FromRgb(0, 0, 0));

			  Canvas.SetLeft(l,this.canvas.Width/2);

			  Canvas.SetTop(l,this.canvas.Height/2);

			  ly.StrokeThickness=1;

			  ly.Stroke=new SolidColorBrush(Color.FromRgb(0, 0, 0));

			  Canvas.SetLeft(ly,this.canvas.Width/2);

			  Canvas.SetTop(ly,this.canvas.Height/2);

			  this.canvas.Children.Add(ly);

			  this.canvas.Children.Add(l);

			}

			 Label lb=new Label();

			  lb.Content="X";

			  RotateTransform rotateTransform = new RotateTransform(90);//90度

			  lb.RenderTransform=rotateTransform;

			  Canvas.SetRight(lb,5);

			  Canvas.SetTop(lb,canvas.Height/2-20);

			  this.canvas.Children.Add(lb);

			  lb=new Label();

			  lb.Content="Y";

			  lb.RenderTransform=rotateTransform;

			  Canvas.SetRight(lb,canvas.Width/2-15);

			  Canvas.SetBottom(lb,10);

			  this.canvas.Children.Add(lb);

			  Polyline pl=new Polyline();

			  pl.Points.Add(new Point(this.canvas.Width/2-20,-5));

			  pl.Points.Add(new Point(this.canvas.Width/2-10,0));

			  pl.Points.Add(new Point(this.canvas.Width/2-20,5));

			  pl.Stroke=new SolidColorBrush(Color.FromRgb(0,0,0));

			  pl.StrokeThickness=1;

			  Canvas.SetLeft(pl,this.canvas.Width/2);

			  Canvas.SetTop(pl,this.canvas.Height/2);

			   this.canvas.Children.Add(pl);

			  pl=new Polyline();

			  pl.Points.Add(new Point(-5,this.canvas.Height/2-20));

			  pl.Points.Add(new Point(0,this.canvas.Height/2-10));

			  pl.Points.Add(new Point(5,this.canvas.Height/2-20));

			  pl.Stroke=new SolidColorBrush(Color.FromRgb(0,0,0));

			  pl.StrokeThickness=1;

			  Canvas.SetLeft(pl,this.canvas.Width/2);

			  Canvas.SetTop(pl,this.canvas.Height/2);

			   this.canvas.Children.Add(pl);

		}
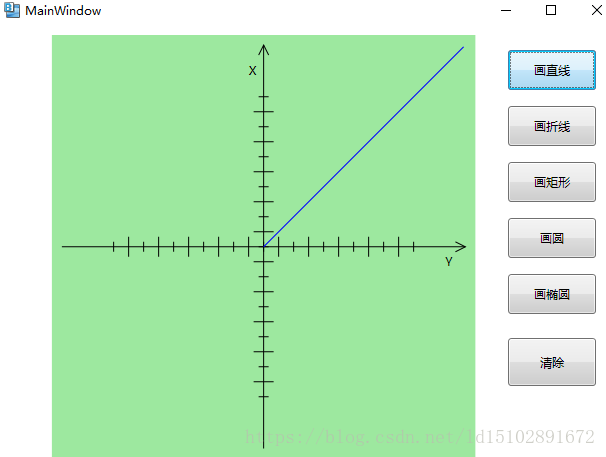
绘制直线代码
private void bth_paint_Line(object sender, System.Windows.RoutedEventArgs e)//画直线

		{

			this.canvas.Children.Clear();//清空画板

			this.PaintGrid();//画坐标系

			Line l=new Line();//直线

			l.X1=0;

			l.Y1=0;

			l.X2=200;

			l.Y2=200;

			l.StrokeThickness=1;//直线宽度

			l.Stroke=new SolidColorBrush(Color.FromRgb(0, 0, 255));//直线颜色(蓝色)

			Canvas.SetLeft(l,this.canvas.Width/2);//X的原点平移到canvas容器中间

			Canvas.SetTop(l,this.canvas.Height/2);//Y的原点平移到canvas容器中间

			this.canvas.Children.Add(l);//在容器中添加该直线

		}
效果图
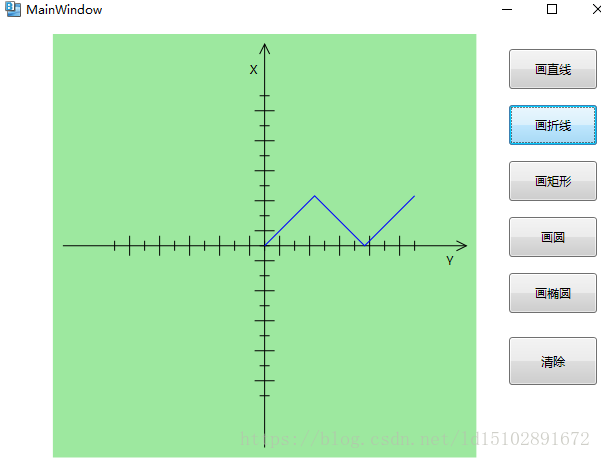
画多段线代码
		private void bth_paint_Polyline(object sender, System.Windows.RoutedEventArgs e)//画多段线

		{

			this.canvas.Children.Clear();//清空画板

			this.PaintGrid();//画坐标系

			Polyline pl=new Polyline();

			pl.Points.Add(new Point(0,0));

			pl.Points.Add(new Point(50,50));

			pl.Points.Add(new Point(0,100));

			pl.Points.Add(new Point(50,150));

			pl.Stroke=new SolidColorBrush(Color.FromRgb(0,0,255));

			pl.StrokeThickness=1;

			Canvas.SetLeft(pl,this.canvas.Width/2);//X的原点平移到canvas容器中间

			Canvas.SetTop(pl,this.canvas.Height/2);//Y的原点平移到canvas容器中间

			this.canvas.Children.Add(pl);//在容器中添加该多段线

		}
效果图
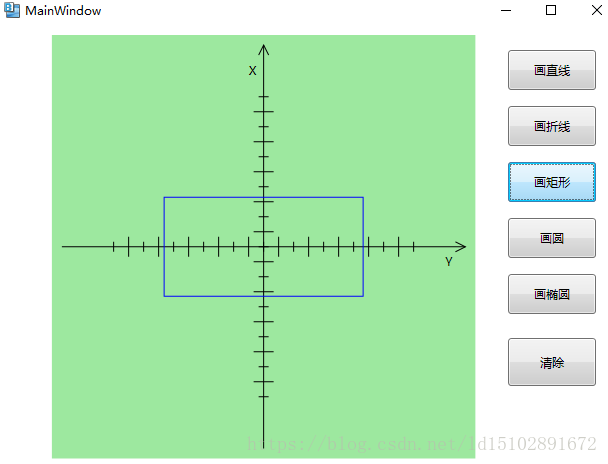
画矩形代码
		private void bth_paint_Rectangle(object sender, System.Windows.RoutedEventArgs e)//画矩形

		{

			this.canvas.Children.Clear();//清空画板

			this.PaintGrid();//画坐标系

            Rectangle rect=new Rectangle();

			rect.Width=100;

			rect.Height=200;

			rect.Stroke=new SolidColorBrush(Color.FromRgb(0,0,255));

			rect.StrokeThickness=1;

			Canvas.SetLeft(rect,this.canvas.Width/2-rect.Width/2);

			Canvas.SetTop(rect,this.canvas.Height/2-rect.Height/2);

			this.canvas.Children.Add(rect);

		}
效果图
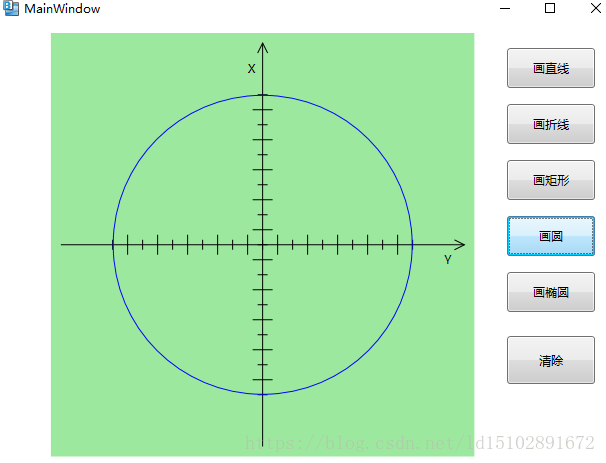
画圆代码
	private void bth_paint_Circle(object sender, System.Windows.RoutedEventArgs e)//画圆

		{

			this.canvas.Children.Clear();//清空画板

			this.PaintGrid();//画坐标系

			Ellipse ep=new Ellipse();

			ep.Height=300;

			ep.Width=300;

			ep.Stroke=new SolidColorBrush(Color.FromRgb(0, 0, 255));

			ep.StrokeThickness=1;

			Canvas.SetLeft(ep,this.canvas.Width/2-ep.Width/2);

			Canvas.SetTop(ep,this.canvas.Height/2-ep.Height/2);

			this.canvas.Children.Add(ep);

		}
效果图
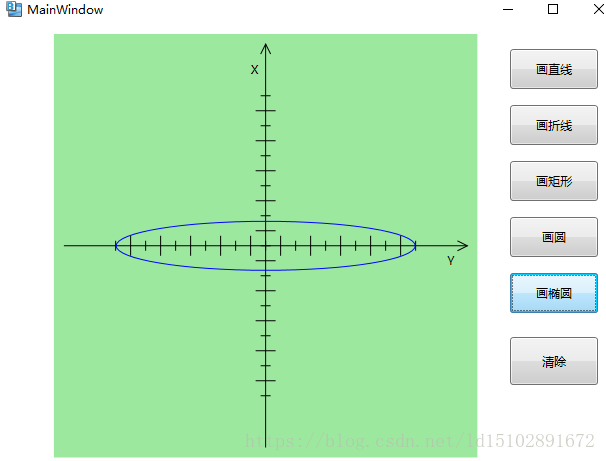
画椭圆代码
private void bth_paint_Ellipse(object sender, System.Windows.RoutedEventArgs e)//画椭圆

		{

			this.canvas.Children.Clear();//清空画板

			this.PaintGrid();//画坐标系

            Ellipse ep=new Ellipse();

			ep.Height=300;

			ep.Width=50;

			ep.Stroke=new SolidColorBrush(Color.FromRgb(0, 0, 255));

			ep.StrokeThickness=1;

			Canvas.SetLeft(ep,this.canvas.Width/2-ep.Width/2);

			Canvas.SetTop(ep,this.canvas.Height/2-ep.Height/2);

			this.canvas.Children.Add(ep);

		}
效果图
清空画板代码
private void btn_Clear(object sender, System.Windows.RoutedEventArgs e)

		{

			this.canvas.Children.Clear();//清空画板

			this.PaintGrid();//画坐标系

		}
本次矢量画图编程就介绍到这里,如果还有不明白的地方,可以加入扣扣群234035436进行技术交流,希望大家多多支持!
C#代码实现矢量画图的更多相关文章
- 100行代码实现HarmonyOS“画图”应用,eTS开发走起!
本期我们给大家带来的是"画图"应用开发者Rick的分享,希望能给你的HarmonyOS开发之旅带来启发~ 介绍 2021年的华为开发者大会(HDC2021)上,HarmonyOS ...
- [转CSDN多篇文章]WEB 3D SVG CAD 矢量 几种实现方案
WEB 3D SVG CAD 矢量 几种实现方案 原创 2014年10月24日 08:34:11 标签: WEB3D / CADSVG / 矢量 2665 一.全部自己开发,从底层开始 VML+SVG ...
- jquery实现动态添加html代码
先看下思导图,整体了解下,然后我们再来学习. 现在我们来看一下几段代码,然后根据这几段代码我们来学习一下如何正确的学习动态添加html. 一.html()方法 html函数的作用原理首先是移除目标元素 ...
- kNN算法基本原理与Python代码实践
kNN是一种常见的监督学习方法.工作机制简单:给定测试样本,基于某种距离度量找出训练集中与其最靠近的k各训练样本,然后基于这k个“邻居”的信息来进行预测,通常,在分类任务中可使用“投票法”,即选择这k ...
- PIE SDK矢量唯一值渲染
1. 功能简介 图层的唯一值渲染即是根据矢量图层的某一个数值字段的属性值,按照值的不同大小设置不同的显示符号.属性数值相等的所有要素归为同一种类,即同一符号. 2. 功能实现说明 2.1. 实现思路及 ...
- Android酷炫有用的开源框架
一.代码库 1.from 代码家 整理比較好的源代码连接 一.兼容类库 ActionBarSherlock : Action Bar是Android 3.0后才開始支持的,ActionBarSher ...
- Core Animation学习总结
文件夹: The Layer Beneath The Layer Tree(图层树) The Backing Image(寄宿层) Layer Geometry(图层几何学) Visual Effec ...
- C# GDI+技术
C# GDI+技术 GDI+概述 GDI+是GDI(即Windows早期版本号中附带的Graphics Device Interface)的后继者.它是一种构成Windows XP操作 ...
- OpenGl学习 glenable()函数理解
glEnable用于启用各种功能.功能由参数决定.与glDisable相对应.glDisable是用来关闭的.两个函数参数取值是一至的. 参数说明:void glEnable(GLenum cap)G ...
随机推荐
- 【UIL框架】Universal-Image-Loader全然解析(一)之介绍与使用具体解释
转载请标明出处: http://blog.csdn.net/developer_jiangqq/article/details/50439814 本文出自:[江清清的博客] (一).前言: [好消息] ...
- [RxJS] Use takeUntil instead of manually unsubscribing from Observables
Manually unsubscribing from subscriptions is safe, but tedious and error-prone. This lesson will tea ...
- Canvas基础知识总结之中的一个
canvas的HTML语法: <canvas> Canvas not supported </canvas> 上面这句代码中内容部分所含的文本,这种文本的叫法"后备内 ...
- jquery 无刷新上传的小function
function zll_up(click_id,up_url,text_id,show_id){ this.create = function(){} //当点击指定元素时,创建iframe for ...
- 【69.77%】【codeforces 723A】The New Year: Meeting Friends
time limit per test1 second memory limit per test256 megabytes inputstandard input outputstandard ou ...
- [Recompose] Set the HTML Tag of a Component via a Prop using Recompose
Learn how to user the ‘componentFromProp’ helper and ‘defaultProps’ higher order component to swap t ...
- [ES7] Await multi promises sequentially or concurrently
Somtime 'async await' can have a bad effect on code proferemence. Let's take a look the below exampl ...
- Bash玩转脚本1之自己的脚本安装程序
Bash之打造自己的脚本安装器 前言 还是理所当然的前言,我一直想找一套管理脚本的"框架",能让自己杂乱的脚本有点规整.无奈眼界尚浅,未能找到. 因此萌生自己写一点优化脚本的工具来 ...
- 在Excel中粘贴时怎样跳过隐藏行
http://www.excel123.cn/Article/exceljichu/201203/932.html 有时在筛选后需要将其他区域中的连续行数据复制粘贴到筛选区域,以替换筛选后的数据.由于 ...
- Session or Cookie?是否需要用Tomcat等Web容器的Session
Cookie是HTTP协议标准下的存储用户信息的工具,浏览器把用户信息存放到本地的文本文件中. Session是基于Cookie实现的. 2011年4月,武汉群硕面试的时候(实习生),面试官也问过这个 ...