
5、Spring Boot缓存
1.JSR107
Java Caching定义了5个核心接口,分别是CachingProvider、CacheManager、Cache、Entry、Expiry。
CachingProvider:定义了创建、配置、获取、管理和控制多个CacheManager。一个应用可以在运行期访问多个CachingProvider。
CacheManager:定义了创建、配置、获取、管理和控制多个唯一命名的Cache,这些Cache存在于CacheManager的上下文中。一个CacheManager仅被一个CachingProvider所拥有。
Cache:是一个类似Map的数据结构并临时存储以Key为索引的值。一个Cache仅被一个CacheManager所拥有。
Entry:是一个存储在Cache中的key-value对。
Expiry:每一个存储在Cache中的条目有一个定义的有效期。一旦超过这个时间,条目为过期的状态。一旦过期,条目将不可访问、更新和删除。缓存有效期可以通过ExpiryPolicy设置。

2.Spring缓存抽象
Spring从3.1开始定义了org.springframework.cache.Cache
和org.springframework.cache.CacheManager接口来统一不同的缓存技术;
并支持使用JCache(JSR-107)注解简化我们开发;
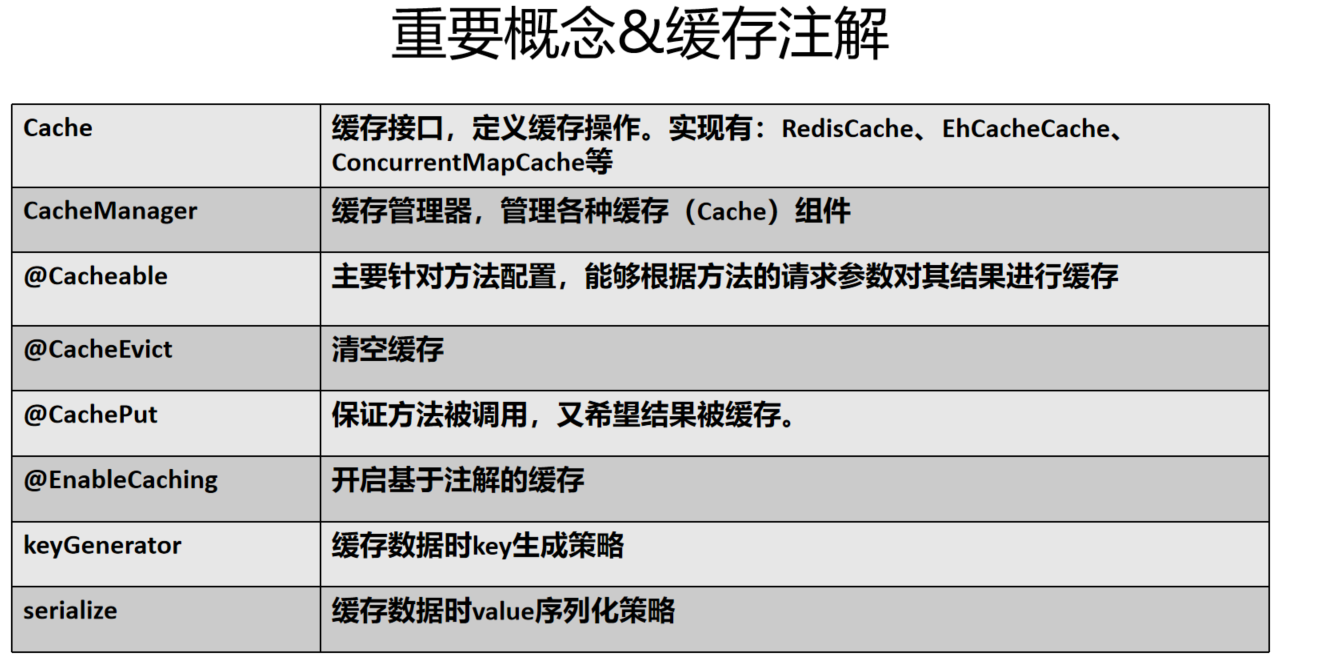
Cache接口为缓存的组件规范定义,包含缓存的各种操作集合;
Cache接口下Spring提供了各种xxxCache的实现;如RedisCache、EhCacheCache、ConcurrentMapCache等;
每次调用需要缓存功能的方法时,Spring会检查检查指定参数的指定的目标方法是否已经被调用过;如果有就直接从缓存中获取方法调用后的结果,如果没有就调用方法并缓存结果后返回给用户。下次调用直接从缓存中获取。
使用Spring缓存抽象时我们需要关注以下两点
确定方法需要被缓存以及他们的缓存策略
从缓存中读取之前缓存存储的数据
(1).搭建环境
1).导入数据库文件
com.hosystem.cache.bean.Department
|
package com.hosystem.cache.bean; import java.io.Serializable; public class Department implements Serializable { private Integer id; private String departmentName; public Department() { super(); // TODO Auto-generated constructor stub } public Department(Integer id, String departmentName) { super(); this.id = id; this.departmentName = departmentName; } public Integer getId() { return id; } public void setId(Integer id) { this.id = id; } public String getDepartmentName() { return departmentName; } public void setDepartmentName(String departmentName) { this.departmentName = departmentName; } @Override public String toString() { return "Department [id=" + id + ", departmentName=" + departmentName + "]"; } } |
com.hosystem.cache.bean.Employee
|
package com.hosystem.cache.bean; import java.io.Serializable; public class Employee implements Serializable{ private Integer id; private String lastName; private String email; private Integer gender; //性别 1男 0女 private Integer dId; public Employee() { super(); } public Employee(Integer id, String lastName, String email, Integer gender, Integer dId) { super(); this.id = id; this.lastName = lastName; this.email = email; this.gender = gender; this.dId = dId; } public Integer getId() { return id; } public void setId(Integer id) { this.id = id; } public String getLastName() { return lastName; } public void setLastName(String lastName) { this.lastName = lastName; } public String getEmail() { return email; } public void setEmail(String email) { this.email = email; } public Integer getGender() { return gender; } public void setGender(Integer gender) { this.gender = gender; } public Integer getdId() { return dId; } public void setdId(Integer dId) { this.dId = dId; } @Override public String toString() { return "Employee [id=" + id + ", lastName=" + lastName + ", email=" + email + ", gender=" + gender + ", dId=" + dId + "]"; } } |
(2).注解使用

com.hosystem.cache.service.EmployeeService
|
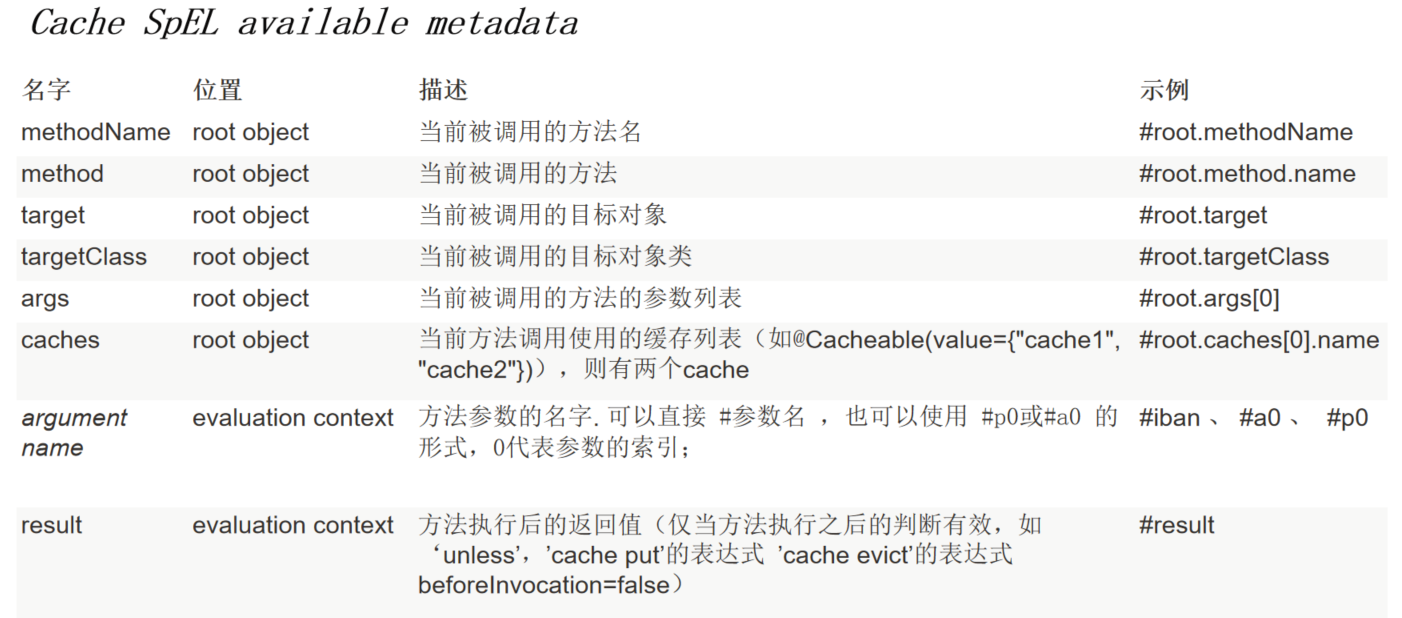
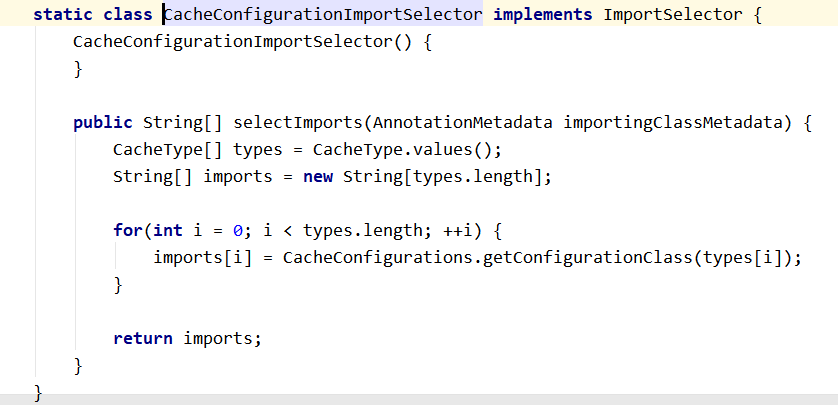
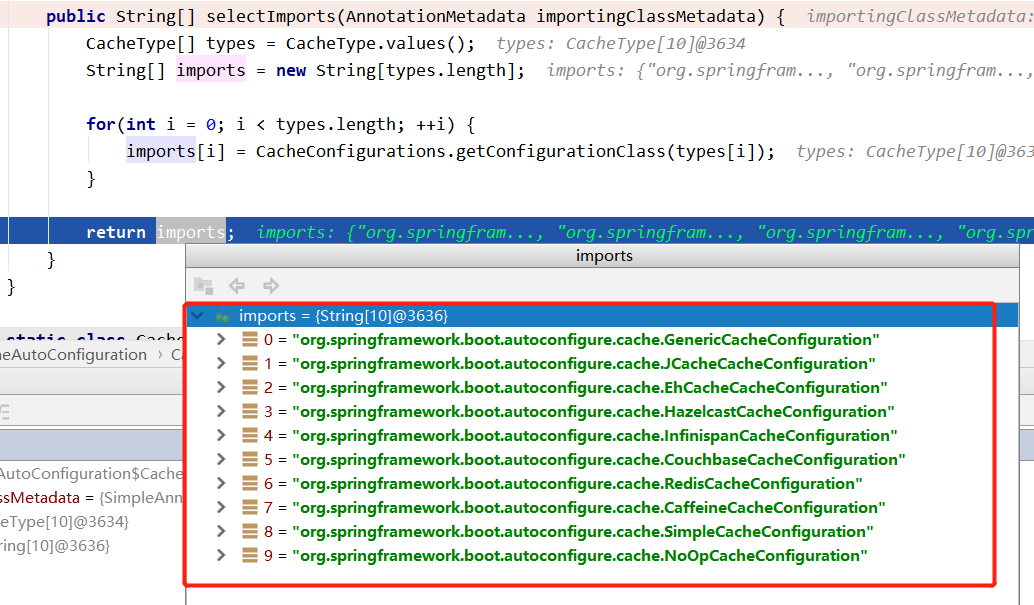
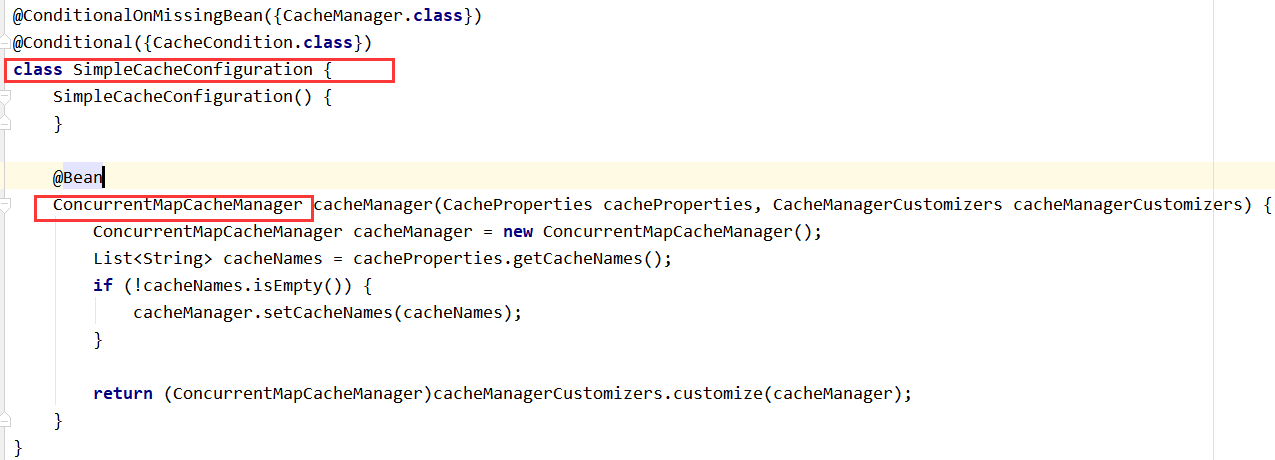
package com.hosystem.cache.service; import com.hosystem.cache.bean.Employee; import com.hosystem.cache.mapper.EmployeeMapper; import org.springframework.beans.factory.annotation.Autowired; import org.springframework.cache.annotation.*; import org.springframework.stereotype.Service; @Service @CacheConfig(cacheNames = "emp") public class EmployeeService { @Autowired EmployeeMapper employeeMapper; /** * 将方法的运行结果进行缓存;下次在调用相同的数据,直接从缓存中获取,不再调用方法; * * CacheManager管理多个cache组件,对缓存的真正CRUD操作在Cache组件中,每一个缓存组件有自己唯一一个名字 * 工作原理: * 1.自动配置类:CacheAutoConfiguration * 2.缓存配置类:GenericCacheConfiguration、JCacheCacheConfiguration、EhCacheCacheConfiguration、HazelcastCacheConfiguration、InfinispanCacheConfiguration、CouchbaseCacheConfiguration、RedisCacheConfiguration、CaffeineCacheConfiguration、SimpleCacheConfiguration、NoOpCacheConfiguration * org.springframework.boot.autoconfigure.cache.GenericCacheConfiguration * org.springframework.boot.autoconfigure.cache.JCacheCacheConfiguration * org.springframework.boot.autoconfigure.cache.EhCacheCacheConfiguration * org.springframework.boot.autoconfigure.cache.HazelcastCacheConfiguration * org.springframework.boot.autoconfigure.cache.InfinispanCacheConfiguration * org.springframework.boot.autoconfigure.cache.CouchbaseCacheConfiguration * org.springframework.boot.autoconfigure.cache.RedisCacheConfiguration * org.springframework.boot.autoconfigure.cache.CaffeineCacheConfiguration * org.springframework.boot.autoconfigure.cache.SimpleCacheConfiguration * org.springframework.boot.autoconfigure.cache.NoOpCacheConfiguration * 3.配置类默认生效:SimpleCacheConfiguration * 4.给容器中注册了一个cacheManager:ConcurrentMapCacheManager * 5.可以获取、创建ConcurrentMapCache类型的缓存组件;它的作用是将数据保存在ConcurrentMap中 * * @Cacheable 运行流程: * 1.方法运行之前,先去查找Cache(缓存组件),按照cacheNames指定的名字获取;(CacheManager先获取相应的缓存)第一次获取缓存如果没有该缓存则会自动创建 * 2.去Cache中查找缓存的内容,使用一个key,默认为方法的参数; * (1).key是按照某种策略生成的;默认是使用keyGenerator生成的,默认使用SimpleKeyGenerator生成key * (2).默认使用SimpleKeyGenerator生成key默认策略:若无参数,key = new SimpleKey();|如果有单个参数,key=参数值;|如果有多个参数,key = new SimpleKey(params); * 3.若为查找到缓存就调用方法 * 4.将方法返回的结果,放入缓存中 * @Cacheable 标注的方法执行之前先来检查缓存中有没有这个数据,默认按照参数的值作为key查找缓存,如果缓存不存在,则运行方法并将结果放入缓存 * 核心: * 1.使用CacheManager[ConcurrentMapCacheManager]按照名字获取cache[ConcurrentHashMapCache]组件 * 2.key使用keyGenerator生成,默认是SimpleKeyGenerator * * 属性:value、cacheNames、key、keyGenerator、cacheManager、cacheResolver、condition、unless、sync * value/cacheNames:指定缓存组件的名字 * key:缓存数据使用的key,可以用它指定参数。默认是使用方法参数的值 * SpEL: #id:参数id的值 #a0 #p0 #root.args[0] * keyGenerator:key生成器;可以指定key生成器组件id; * 注:keyGenerator和key只能二选一 * cacheManager:指定缓存管理器 * cacheResolver:指定获取解析器 * condition:指定符合条件情况下缓存 * unless:否定缓存;当unless指定条件为true时,方法返回值不会被缓存;可以获取结果进行判断 * sync:是否使用异步模式 */ //cacheNames = "emp": //condition = "#id>0":只有当id>0的时候再进行缓存 //condition = "#a0>1":只有当第一个参数>1时候才进行缓存 //unless = "#result==null":当返回结果为空时不进行缓存 //unless = "#a0==2":如果第一个参数的结果为2,则结果不缓存 //key = "#root.methodName+'['+#id+']'" //keyGenerator = "myKeyGenerator":自定义key @Cacheable(cacheNames = "emp"/*,condition = "#a0>1",unless = "#a0==2"*/) public Employee getEmp(Integer id){ System.out.println("查询"+id+"号员工"); Employee emp = employeeMapper.getEmpById(id); return emp; } /** * @CachePut:调用方法同时更新缓存数据 * 修改数据库某个数据 同时更新缓存 * * 运行时间: * 1.先调用方法 * 2.将方法的结果缓存起来 * * 测试步骤: * 1.查询1号员工;查询到的结果会放在缓存中 key:1 value:lastName:张三 * 2.查询结果照旧 * 3.更新1号员工信息[emp?id=1&lastName=zhangs&gender=0];将方法的返回值也放进缓存中 key:传入的employee对象 值:返回的employee对象 * 4.查询1号员工;查询结果为未更新前的数据[1号员工的信息没有在缓存中更新] * key = "#employee.id":使用传入参数的员工id进行更新 * key = "#result.id":使用返回后的id * 注:@Cacheable的key是不能够使用#result */ @CachePut(value = "emp",key = "#result.id") public Employee updateEmp(Employee employee){ System.out.println("update" + employee); employeeMapper.updateEmp(employee); return employee; } /** * @CacheEvict:缓存清除 */ //key = "#id":指定key删除缓存 //allEntries = true:删除缓存中所有数据 默认参数为false //beforeInvocation=false:缓存的清除是否在方法之前执行 默认是false,即清除缓存操作在方法执行之后执行 如果方法出现异常缓存就不会清除 //beforeInvocation = true:清除缓存操作在方法执行之前执行 如果方法出现异常缓存也会清除 @CacheEvict(value = "emp"/*,key = "#id"*//*,allEntries = true*/,beforeInvocation = true) public void deleteEmp(Integer id){ System.out.println("delete"+id); // employeeMapper.deleteEmpById(id); int i = 10/0; } @Caching( cacheable = { @Cacheable(value="emp",key="#lastName") }, put = { @CachePut(value = "emp",key = "#result.id"), @CachePut(value = "emp",key = "#result.email") } ) public Employee getEmpByLastName(String lastName){ return employeeMapper.getEmpByLastName(lastName); } } |
com.hosystem.cache.service.DeptService
|
package com.hosystem.cache.service; import com.hosystem.cache.bean.Department; import com.hosystem.cache.mapper.DepartmentMapper; import org.springframework.beans.factory.annotation.Autowired; import org.springframework.cache.annotation.Cacheable; import org.springframework.stereotype.Service; @Service public class DeptService { @Autowired DepartmentMapper departmentMapper; /** * 缓存的数据能存入redis * 第二次从缓存中查询就不能恢复反序列化 * 存的是dept的json;cachemanager默认使用RedisTemplate<Object, Employee>操作Redis * * @param id * @return */ @Cacheable(cacheNames = "dept") public Department getDeptById(Integer id){ System.out.println("查询部门"+id); Department mapper = departmentMapper.getDeptById(id); return mapper; } } |


com.hosystem.cache.controller.EmployeeController
|
package com.hosystem.cache.controller; import com.hosystem.cache.bean.Employee; import com.hosystem.cache.service.EmployeeService; import org.springframework.beans.factory.annotation.Autowired; import org.springframework.web.bind.annotation.GetMapping; import org.springframework.web.bind.annotation.PathVariable; import org.springframework.web.bind.annotation.RestController; @RestController public class EmployeeController { @Autowired EmployeeService employeeService; @GetMapping("/emp/{id}") public Employee getEmployee(@PathVariable("id") Integer id){ Employee employee = employeeService.getEmp(id); return employee; } @GetMapping("/emp") public Employee update(Employee employee){ Employee emp = employeeService.updateEmp(employee); return emp; } @GetMapping("/delemp") public String deleteEmp(Integer id){ employeeService.deleteEmp(id); return "success"; } @GetMapping("/emp/lastname/{lastName}") public Employee getEmpByLastName(@PathVariable("lastName") String lastName){ return employeeService.getEmpByLastName(lastName); } } |
com.hosystem.cache.Springboot01CacheApplication
|
package com.hosystem.cache; import org.mybatis.spring.annotation.MapperScan; import org.springframework.boot.SpringApplication; import org.springframework.boot.autoconfigure.SpringBootApplication; import org.springframework.cache.annotation.EnableCaching; /** * 搭建环境 * 1. 导入数据库文件 创建department和employee表 * 2. 创建javaBean封装数据 * 3. 整合mybatis操作数据库 * 1).配置数据源 * 2).使用注解版mybatis * (1).@MapperScan指定需要扫描的mapper接口所在的包 * * 使用缓存 * 1. 开启注解缓存 @EnableCaching * 2. 标注缓存注解 * @Cacheable:针对方法配置,能够根据方法的请求参数对其结果进行缓存 * @CacheEvict:清空缓存 * @CachePut:保证方法被调用,又希望结果被缓存 * * 默认使用的ConcurrentMapCacheManager--->ConcurrentMapCache 将数据保存在ConcurrentMap<Object,Object>中 * 开发中常使用其它缓存中间件:Redis、memcahced * * 整合Redis作为缓存 * Redis 是一个开源(BSD许可)的,内存中的数据结构存储系统,它可以用作数据库、缓存和消息中间件。 * 1.安装docker:https://www.cnblogs.com/HOsystem/p/13789551.html * 2.安装Redis(通过docker):https://www.cnblogs.com/HOsystem/p/13850049.html * 3.配置Redis * 4.测试缓存 * 原理:CacheManager===Cache 缓存组件来实际给缓存中存储数据 * (1).引入redis的starter,容器中保存的是org.springframework.data.redis.cache.RedisCacheManager * (2).org.springframework.data.redis.cache.RedisCacheManager帮忙创建org.springframework.data.redis.cache.RedisCache作为缓存组件; * org.springframework.data.redis.cache.RedisCache通过操作redis缓存数据的 * (3).默认保存数据k-v都是object 利用序列化保存;如何保存为json; * 1).引入了redis的starter,cachemanager变为RedisCacheManage * 2).默认创建RedisCacheManage操作redis的时候使用的是RedisTemplate<Object,Object> * 3).RedisTemplate<Object,Object>默认使用jdk的序列化机制 * (4).自定义CacheManager * */ @MapperScan("com.hosystem.cache.mapper") @EnableCaching @SpringBootApplication public class Springboot01CacheApplication { public static void main(String[] args) { SpringApplication.run(Springboot01CacheApplication.class, args); } } |
(3).docker
1).安装docker
|
https://www.cnblogs.com/HOsystem/p/13789551.html |
2).安装redis
|
https://www.cnblogs.com/HOsystem/p/13850049.html |
3).测试Redis
com.hosystem.cache.Springboot01CacheApplicationTests
|
package com.hosystem.cache; import com.hosystem.cache.bean.Employee; import com.hosystem.cache.mapper.EmployeeMapper; import com.sun.xml.internal.ws.api.ha.StickyFeature; import org.junit.jupiter.api.Test; import org.springframework.beans.factory.annotation.Autowired; import org.springframework.boot.test.context.SpringBootTest; import org.springframework.data.redis.core.RedisTemplate; import org.springframework.data.redis.core.StringRedisTemplate; import org.springframework.data.redis.serializer.RedisSerializer; import org.springframework.lang.Nullable; @SpringBootTest class Springboot01CacheApplicationTests { @Autowired EmployeeMapper employeeMapper; @Autowired StringRedisTemplate stringRedisTemplate; //操作k-v是字符串形式 @Autowired RedisTemplate redisTemplate; //k-v都是对象 @Autowired RedisTemplate<Object,Employee> empRedisTemplate; /** * Redis常见五大数据类型 * String(字符串)、List(列表)、Hash(散列)、Set(集合)、ZSet(有序集合) * stringRedisTemplate.opsForValue():String(字符串) * stringRedisTemplate.opsForList():List(列表) * stringRedisTemplate.opsForHash():Hash(散列) * stringRedisTemplate.opsForSet():Set(集合) * stringRedisTemplate.opsForZSet():ZSet(有序集合) */ @Test public void test01(){ //redis保存数据 // stringRedisTemplate.opsForValue().append("msg","hello"); String msg = stringRedisTemplate.opsForValue().get("msg"); System.out.println(msg); // stringRedisTemplate.opsForList().leftPush("mylist","1"); // stringRedisTemplate.opsForList().leftPush("mylist","2"); } //测试保存对象 @Test public void test02(){ Employee empById = employeeMapper.getEmpById(1); //默认保存对象,使用jdk序列化机制,序列化后的数据保存到redis中 // redisTemplate.opsForValue().set("emp-01",empById); //1.将数据以json的方式保存 //(1).将对象转为json //(2).redisTemplate默认序列化规则;自定义默认序列化规则 // private RedisSerializer keySerializer = null; // private RedisSerializer valueSerializer = null; // private RedisSerializer hashKeySerializer = null; // private RedisSerializer hashValueSerializer = null; // private RedisSerializer<String> stringSerializer = RedisSerializer.string(); empRedisTemplate.opsForValue().set("emp-01",empById); } @Test public void contextLoads() { Employee empById = employeeMapper.getEmpById(1); System.out.println(empById); } } |
docker启动redis失败
|
Error response from daemon: Cannot start container 53fe1fcb2e05214c6f853ef2fe9f65539e69fdc7d6a454bfb073c10c2fba82dd: iptables failed: iptables -t nat -A DOCKER -p tcp -d 0/0 --dport 6379 -j DNAT --to-destination 172.17.0.3:6379 ! -i docker0: iptables: No chain/target/match by that name. |
我们首先对iptables进行防火墙规则配置 允许6379端口可以访问
docker启动redis失败
|
[root@pluto sysconfig]# docker run -d -p 6379:6379 --name myredis redis Error response from daemon: Conflict. The name "myredis" is already in use by container 53fe1fcb2e05. You have to delete (or rename) that container to be able to reuse that name. |
|
[root@pluto sysconfig]# docker ps -a CONTAINER ID IMAGE COMMAND CREATED STATUS PORTS NAMES 53fe1fcb2e05 redis "docker-entrypoint.s 2 minutes ago myredis [root@pluto sysconfig]# docker rm 53fe1fcb2e05 |
(4).自定义CacheManager
|
* 整合Redis作为缓存 * Redis 是一个开源(BSD许可)的,内存中的数据结构存储系统,它可以用作数据库、缓存和消息中间件。 * 1.安装docker:https://www.cnblogs.com/HOsystem/p/13789551.html * 2.安装Redis(通过docker):https://www.cnblogs.com/HOsystem/p/13850049.html * 3.配置Redis * 4.测试缓存 * 原理:CacheManager===Cache 缓存组件来实际给缓存中存储数据 * (1).引入redis的starter,容器中保存的是org.springframework.data.redis.cache.RedisCacheManager * (2).org.springframework.data.redis.cache.RedisCacheManager帮忙创建org.springframework.data.redis.cache.RedisCache作为缓存组件; * org.springframework.data.redis.cache.RedisCache通过操作redis缓存数据的 * (3).默认保存数据k-v都是object 利用序列化保存;如何保存为json; * 1).引入了redis的starter,cachemanager变为RedisCacheManage * 2).默认创建RedisCacheManage操作redis的时候使用的是RedisTemplate<Object,Object> * 3).RedisTemplate<Object,Object>默认使用jdk的序列化机制 * (4).自定义CacheManager |
@Autowired
StringRedisTemplate stringRedisTemplate;

@Autowired
RedisTemplate redisTemplate;

pom.xml
|
<?xml version="1.0" encoding="UTF-8"?> <project xmlns="http://maven.apache.org/POM/4.0.0" xmlns:xsi="http://www.w3.org/2001/XMLSchema-instance" xsi:schemaLocation="http://maven.apache.org/POM/4.0.0 https://maven.apache.org/xsd/maven-4.0.0.xsd"> <modelVersion>4.0.0</modelVersion> <parent> <groupId>org.springframework.boot</groupId> <artifactId>spring-boot-starter-parent</artifactId> <version>2.3.4.RELEASE</version> <relativePath <!-- lookup parent from repository --> |
5、Spring Boot缓存的更多相关文章
- Spring boot缓存初体验
spring boot缓存初体验 1.项目搭建 使用MySQL作为数据库,spring boot集成mybatis来操作数据库,所以在使用springboot的cache组件时,需要先搭建一个简单的s ...
- Spring Boot缓存Ehcache
Spring Boot 整合 Ehcache 修改 pom 文件 <!-- Spring Boot 缓存支持启动器 --> <dependency> <groupId ...
- 3步轻松搞定Spring Boot缓存
作者:谭朝红 前言 本次内容主要介绍基于Ehcache 3.0来快速实现Spring Boot应用程序的数据缓存功能.在Spring Boot应用程序中,我们可以通过Spring Caching来快速 ...
- Spring Boot缓存应用实践
缓存是最直接有效提升系统性能的手段之一.个人认为用好用对缓存是优秀程序员的必备基本素质. 本文结合实际开发经验,从简单概念原理和代码入手,一步一步搭建一个简单的二级缓存系统. 一.通用缓存接口 1.缓 ...
- Spring Boot缓存源码分析
前言 项目里面要增加一个应用缓存,原本想着要怎么怎么来整合ehcache和springboot,做好准备配置这个配置那个,结果只需要做三件事: pom依赖 写好一个ehcache的配置文件 在boot ...
- Spring Boot 缓存的基本用法
目录 一.目的 二.JSR-107 缓存规范 三.Spring 缓存抽象 四.Demo 1.使用 IDEA 创建 Spring Boot 项目 2.创建相应的数据表 3.创建 Java Bean 封装 ...
- Spring Boot 缓存应用 Ehcache 入门教程
Ehcache 小巧轻便.具备持久化机制,不用担心JVM和服务器重启的数据丢失.经典案例就是著名的Hibernate的默认缓存策略就是用Ehcache,Liferay的缓存也是依赖Ehcache. 本 ...
- Spring Boot 缓存应用 Memcached 入门教程
本章学习 Mmecached 在 Spring Boot 中的使用教程.Memcached 与 Redis 各有好处.本文主要学习 Spring Boot 中如何应用集成 Mmecached spri ...
- Spring Boot缓存注解@Cacheable、@CacheEvict、@CachePut使用
从3.1开始,Spring引入了对Cache的支持.其使用方法和原理都类似于Spring对事务管理的支持.Spring Cache是作用在方法上的,其核心思想是这样的:当我们在调用一个缓存方法时会把该 ...
随机推荐
- wifi - 攻击环境准备
1.Windows 环境准备 对于Windows系统,只需要Windows XP SP2以上就行了,安装对应网卡驱动 2.Linux 环境准备 绝大多数黑客会选择Linux作为测试平台,因为绝大多数无 ...
- MySQL 主从复制原理不再难
上篇我们分析过 Binlog 日志的作用以及存储原理,感兴趣的可以翻阅: 一文带你了解 Binlog 日志 Binlog 日志主要作用是数据恢复和主从复制.本身就是二进制格式的日志文件,网络传输无需进 ...
- BCE和CE交叉熵损失函数的区别
首先需要说明的是PyTorch里面的BCELoss和CrossEntropyLoss都是交叉熵,数学本质上是没有区别的,区别在于应用中的细节. BCE适用于0/1二分类,计算公式就是 " - ...
- 不同系统执行相同shell脚本,出现Syntax error: "(" unexpected错误解决
例如shell脚本在centos系统中能正常执行,而在ubuntu系统中执行会出现类似Syntax error: "(" unexpected的错误,一般这种是因为sh与bash有 ...
- Linux入门到放弃之六《磁盘和文件系统管理二》
上一篇博客写到了如何创建卷组和创建逻辑卷,但是有一个问题,需要更大逻辑卷空间怎么办呢? 要求:使用lvextend命令为逻辑卷 mail扩充容量,从卷组 mail_store 上再 划出5GB给逻辑卷 ...
- 一份超全的Python学习资料汇总
一.学习Python必备技能图谱二.0基础如何系统学习Python?一.Python的普及入门1.1 Python入门学习须知和书本配套学习建议1.2 Python简史1.3 Python的市场需求及 ...
- h5 返回上一页面方法
//以下方法仅供参考1.返回上一页,不刷新history.html window.history.go(-1); javascript:window.history.go(-1) 2.返回上一页并刷 ...
- Javascript中this作用域以及bind方法的重写
这是一个最近遇到的笔试题,出于尊重,不会说出该公司的名字,源于自身比较少,笔试题是将bind方法用ES3重写,使用bind这个方法,导致一时半会懵了,只记得bind可以改变this的作用域. 作为查漏 ...
- git下载线上分支到本地分支
首先执行 'git branch -r' 查看线上的所有分支 例如像要拷贝线上分支 'origin/online' 到本地本地分支 'online',则执行 'git checkout -b onli ...
- 【总结】rabbitmq
一.rabbitmq基础 1.简介 RabbitMQ是使用Erlang语言来编写的,并且RabbitMQ是基于AMQP协议的.Erlang语言在数据交互方面性能优秀,有着和原生Socket一样的延迟, ...