
TinyFrame续篇:整合Spring IOC实现依赖注入
上一篇主要讲解了如何搭建基于CodeFirst的ORM,并且在章节末我们获取了上下文对象的实例:BookContext。这节主要承接上一篇,来讲解如何整合Spring IOC容器实现控制反转,依赖注入功能。
首先,我们来定义一个接口IBookRepository,用于描述所有的元数据操作集合,所谓元数据操作集合,是指不含有任何业务逻辑的操作集合,只是针对单表操作:
1: public interface IBookRepository
2: {
3: IQueryable<Book> GetAllBooks();
4: Book GetBook(int bookID);
5: bool InsertBook(Book book);
6: bool UpdateBook(Book originalBook, Book updatedBook);
7: bool DeleteBook(int id);
8: //==============================
9: IQueryable<BookLend> GetAllBookLends();
10: BookLend GetBookLend(int bookLendID);
11: bool InsertBookLend(BookLend bookLend);
12: bool UpdateBookLend(BookLend originalBookLend, BookLend updatedBookLend);
13: bool DeleteBookLend(int id);
14: //==============================
15: IQueryable<BookType> GetAllBookTypes();
16: BookType GetBookType(int bookTypeID);
17: bool InsertBookType(BookType bookType);
18: bool UpdateBookType(BookType originalBookType, BookType updatedBookType);
19: bool DeleteBookType(int id);
20: //==============================
21: IQueryable<BookPlace> GetAllBookPlaces();
22: BookPlace GetBookPlace(int bookPlaceID);
23: bool InsertBookPlace(BookPlace bookPlace);
24: bool UpdateBookPlace(BookPlace originalBookPlace, BookPlace updatedBookPlace);
25: bool DeleteBookPlace(int id);
26: //==============================
27: IQueryable<Student> GetAllStudents();
28: Student GetStudent(int studentID);
29: bool InsertStudent(Student student);
30: bool UpdateStudent(Student originalStudent, Student updatedStudent);
31: bool DeleteStudent(int id);
32:
33: //=====================================
34: IQueryable<Student> GetStudentsByBookLend(int bookLendID);
35: IQueryable<Book> GetBooksByBookLend(int bookLendID);
36: IQueryable<Book> GetBookByType(int bookTypeID);
37: IQueryable<Book> GetBookByPlace(int bookPlaceID);
38: }
然后新建一个BookRepository类,用于提供其实现,由于这里篇幅有限,我就只实现GetAllBooks方法和GetBook(int bookID)方法:
1: public class BookRepository:IBookRepository
2: {
3: public BookRepository()
4: {
5: this.context = new BookContext();
6: }
7:
8: private BookContext context;
9:
10: public IQueryable<Book> GetAllBooks()
11: {
12: return context.Books.AsQueryable();
13: }
14:
15: public Book GetBook(int bookID)
16: {
17: return context.Books.Where(c => c.ID == bookID).FirstOrDefault();
18: }
19:
20: //comment here...
21: }
建立好以后,我们新建一个基于WCF REST Service Application模板的Web项目项目,并命名为BookStore.RestService,用来消费刚刚创建的操作:
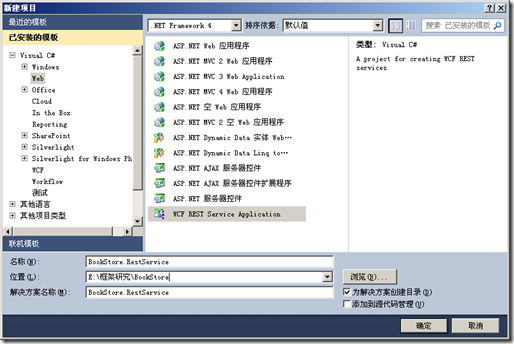
当这个项目创建好以后,我们首先需要添加对Spring的引用:
Common.Logging.dll
Spring.Aop.dll
Spring.Core.dll
然后新建一个ServiceBase类,用于初始化IOC容器:
1: using System;
2: using System.Collections.Generic;
3: using System.Linq;
4: using System.Web;
5: using Spring.Context.Support;
6: using Spring.Context;
7:
8: namespace BookStore.RestService
9: {
10: public class ServiceBase
11: {
12: public ServiceBase()
13: {
14: applicationContext = ContextRegistry.GetContext();
15: }
16: protected IApplicationContext applicationContext = null;
17: }
18: }
创建完毕后,新建一个BookService类,继承自ServiceBase类:
1: namespace BookStore.RestService
2: {
3: [ServiceContract]
4: [AspNetCompatibilityRequirements(RequirementsMode = AspNetCompatibilityRequirementsMode.Allowed)]
5: [ServiceBehavior(InstanceContextMode = InstanceContextMode.Single)]
6: public class BookService:ServiceBase
7: {
8: public BookService()
9: : base()
10: {
bookRepository = (IBookRepository)applicationContext["BookRepository"];
12: }
13:
14: private IBookRepository bookRepository;
15:
16: [WebInvoke(
17: Method = "GET",
18: ResponseFormat = WebMessageFormat.Xml,
19: BodyStyle = WebMessageBodyStyle.Bare,
20: UriTemplate = "/GetAllBooks/")]
21: public List<Book> GetAllBooks()
22: {
23: return bookRepository.GetAllBooks().ToList();
24: }
25:
26: [WebInvoke(
27: Method = "GET",
28: ResponseFormat = WebMessageFormat.Xml,
29: BodyStyle = WebMessageBodyStyle.Bare,
30: UriTemplate = "/GetBookByID/?id={id}")]
31: public Book GetBookByID(int id)
32: {
33: return bookRepository.GetBook(id);
34: }
35: }
36: }
大家可以参看我之前的文章来了解如何创建基于WCF 的Restful Service,这里我就不细讲了。
需要注意的是,首先我们初始化了一个IBookRepository 接口,然后在其构造函数中,我们从Spring容器中去拿继承自IBookRepository接口的操作实例。其中,applicationContext["BookRepository"]代码段表明我们是要去web.config配置文件中去取BookRepository的节点声明。下面是配置节点部分:
首先是configSections节点声明,用于引入Spring类库配置:
1: <configSections>
2: <sectionGroup name="spring">
3: <section name="context" type="Spring.Context.Support.ContextHandler, Spring.Core"/>
4: <section name="objects" type="Spring.Context.Support.DefaultSectionHandler, Spring.Core"/>
5: </sectionGroup>
其次是<spring>节点,用于容器配置:
1: <spring>
2: <context>
3: <resource uri="config://spring/objects"/>
4: </context>
5:
6: <objects xmlns="http://www.springframework.net">
7: <object name="BookRepository" type="BookStore.Data.BookRepository, BookStore.Data" singleton="false"/>
8: </objects>
9: </spring>
由于配置比较简单,我这里就不多说了。这样进行依赖注入后的好处就是,当以后业务需求变更,无论是增加新的功能,还是更换现有的功能,无需将整个项目编译,只需要将更改的部分编译过,然后将dll在配置文件中指定一下,就可以轻松实现业务追加或者更新了,非常便于维护。
配置完成后,当我们运行之后,就可以看到正确的浏览效果了:
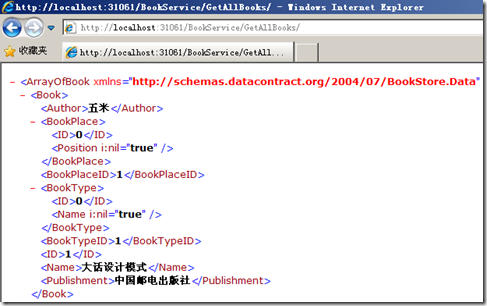
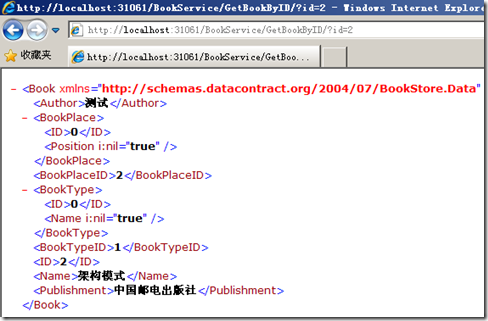
这节就到这里,下节准备讲解如何实现日志拦截和用户认证拦截。
TinyFrame续篇:整合Spring IOC实现依赖注入的更多相关文章
- 【Spring IoC】依赖注入DI(四)
平常的Java开发中,程序员在某个类中需要依赖其它类的方法.通常是new一个依赖类再调用类实例的方法,这种开发存在的问题是new的类实例不好统一管理. Spring提出了依赖注入的思想,即依赖类不由程 ...
- Spring Ioc和依赖注入
总结一下近来几天的学习,做个笔记 以下是Spring IoC相关内容: IoC(Inversion of Control):控制反转: 其主要功能可简单概述为:将 用 new 去创建实例对象,转换为让 ...
- SSM框架之Spring(3)IOC及依赖注入(基于注解的实现)
Spring(3)IOC及依赖注入(基于注解的实现) 学习基于注解的 IoC 配置,大家脑海里首先得有一个认知,即注解配置和 xml 配置要实现的功能都是一样 的,都是要降低程序间的耦合.只是配置的形 ...
- Ioc容器依赖注入-Spring 源码系列(2)
Ioc容器依赖注入-Spring 源码系列(2) 目录: Ioc容器beanDefinition-Spring 源码(1) Ioc容器依赖注入-Spring 源码(2) Ioc容器BeanPostPr ...
- Spring学习-理解IOC和依赖注入
最近刚买了一本介绍ssm框架的书,里面主要对Mybatis.spring.springmvc和redis做了很多的讲解,个人觉得虽然有的内容我看不懂,但是整体上还是不错的.最近正在学习中,一边学习一边 ...
- SSM框架之Spring(2)IOC及依赖注入
Spring(2)IOC及依赖注入 基于xml配置文件的实现 1.IOC (控制反转-Inversion Of Control) 控制反转(Inversion of Control,缩写为IoC),是 ...
- Spring源码之IOC容器创建、BeanDefinition加载和注册和IOC容器依赖注入
总结 在SpringApplication#createApplicationContext()执行时创建IOC容器,默认DefaultListableBeanFactory 在AbstractApp ...
- spring ioc三种注入方式
spring ioc三种注入方式 IOC ,全称 (Inverse Of Control) ,中文意思为:控制反转 什么是控制反转? 控制反转是一种将组件依赖关系的创建和管理置于程序外部的技术. 由容 ...
- Spring Framework------>version4.3.5.RELAESE----->Reference Documentation学习心得----->Spring Framework的依赖注入和控制反转
Dependency Injection and Inversion of Control 1.概述: 1.1相关概念 bean:由IoC容器所管理的对象,也即各个类实例化所得对象都叫做bean 控制 ...
随机推荐
- 2.4 CMMI2级——需求管理(Requirements Management)
人是会死的,需求是会变的.相信大家都经历了很多需求变更的痛苦,项目被拖延,成本高涨,十有七八是需求管理没有做好导致的.有哪一些需求管理方面的常见问题呢,这里列举一下: 1.因为项目进度赶等原因,在很多 ...
- 十大广泛使用的Linux发行版
回到上世纪90年代,Mandrake Linux还是唯一的Linux发行版:而今天,Linux发行版的数量变得数不胜数.本文为大家整理出了十大广泛使用的Linux发行版,希望能帮助大家在选择合适的Li ...
- 哭瞎!360云盘将关停,你的几十T照片和文件该怎么办
IDO老徐刚得到了一个非常不开心的消息,360云盘将停止个人云盘服务...进行业务转型,在网盘存储.传播内容的合法性和安全性得到彻底解决之前不再考虑恢复,之后转型企业云服务. 而且之前共享的所有资料, ...
- iBatis 中 Like 的写法实现模糊查询
iBatis 开发指南告诉我们,当 Person 对象的 name 属性不为 null 时启用 name 查询条件在映射文件 person.xml 中的配置为 <select id=" ...
- PHP读取mssql,json数据中文乱码
PHP及网页使用UTF-8编码,数据库是sql server2008,使用默认编码(936,即GBK编码) 当读取数据库数据时,使用php自带的json_encode()返回到前端,结果中文不显示. ...
- 烂泥:源码安装apache
本文由秀依林枫提供友情赞助,首发于烂泥行天下. 最近要开始学习nagios监控方面的知识了,但是nagios与apache结合的比较紧密,所以本篇文章就先把apache的源码安装学习下. 我们现在分以 ...
- GNU C 内联汇编介绍
GNU C 内联汇编介绍 简介 1.很早之前就听说 C 语言能够直接内嵌汇编指令.但是之前始终没有去详细了解过.最近由于某种需求,看到了相关的 C 语言代码.也就自然去简单的学习了一下如何在 C 代码 ...
- @RestController注解下返回到jsp视图页面
spring4.1中添加了@RestController注解很方便,集成了@ResponseBody注解,无需再在每个方法前添加了..但是却发现个问题..之前用@Controller注解的时候经常会如 ...
- SSH 整合及注意事项
Spring 整合 hibernate 配置 1. spring 配置管理datasource 及 sessionFactory 1) 引入相关jdbc配置文件. <context:proper ...
- 分布式系统理论之Quorum机制
一,Quorum机制介绍 在分布式系统中有个CAP理论,对于P(分区容忍性)而言,是实际存在 从而无法避免的.因为,分布系统中的处理不是在本机,而是网络中的许多机器相互通信,故网络分区.网络通信故障问 ...