开发ActiveX控件调用另一个ActiveX系列1——开发一个MFC ActiveX控件
ActiveX开发的教程有很多,我也从中受益匪浅,例如以下这几篇:
基本教程:http://www.cnblogs.com/guenli/articles/1629915.html
注意事项:http://jon-lt.iteye.com/blog/1676272
属性、方法开发:http://blog.csdn.net/waxgourd0/article/details/7652478
但是由于我的目的是开发一个身份证识别仪的ActiveX控件,因此我就要先仿照识别仪ActiveX开发一个ActiveX。
本文讲述如何模仿开发一个ActiveX控件,如果对此不感兴趣请阅读系列后续文章。
我用vs2012,win8操作系统。
新建MFC ActiveX控件工程
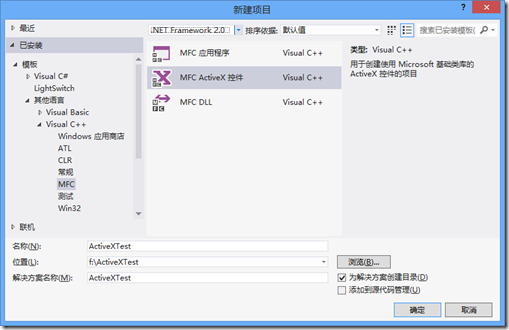
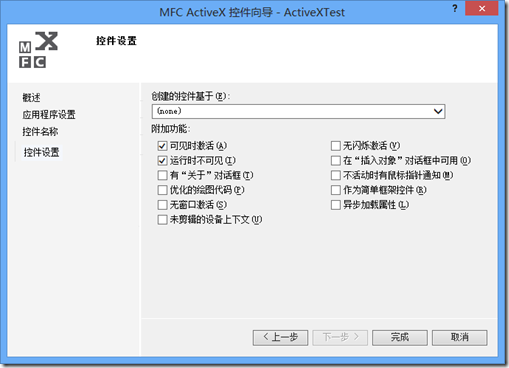
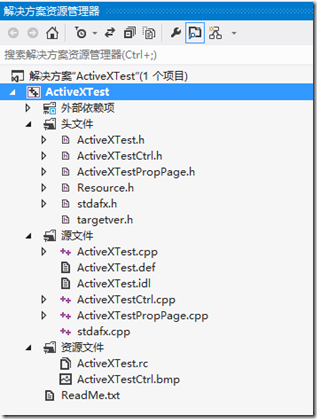
我们选择ActiveX“运行时不可见”,“关于对话框随”便选不选都可以。项目生成后结构
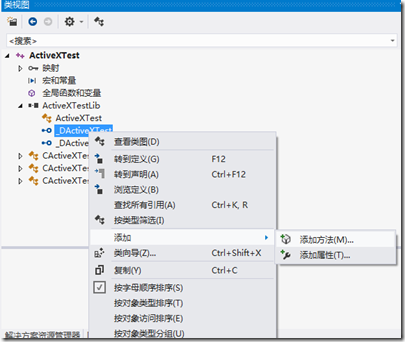
建属性和方法
根据身份证识别仪的测试页面,我们知道身份证的识别仪ActiveX必须有以下属性和方法
var CVR_IDCard = document.getElementById("CVR_IDCard");

var strReadResult = CVR_IDCard.ReadCard();

if(strReadResult == "0"{

    ClearForm();

    document.all['Name'].value = CVR_IDCard.Name;

    document.all['Sex'].value = CVR_IDCard.Sex;

    document.all['Nation'].value = CVR_IDCard.Nation;

    document.all['Born'].value = CVR_IDCard.Born;

    document.all['Address'].value = CVR_IDCard.Address;

    document.all['CardNo'].value = CVR_IDCard.CardNo;

    document.all['IssuedAt'].value = CVR_IDCard.IssuedAt;

    document.all['EffectedDate'].value = CVR_IDCard.EffectedDate;

    document.all['ExpiredDate'].value = CVR_IDCard.ExpiredDate;

    document.all['SAMID'].value = CVR_IDCard.SAMID;

    document.all['pic'].src = CVR_IDCard.Pic;

    document.all['Picture'].value = CVR_IDCard.Picture;

    document.all['PictureLen'].value = CVR_IDCard.PictureLen

}
我们先建方法ReadCard,从方法上看,输入参数应该为空,返回值应该是个string。在“类视图”中选择如下路径,添加方法
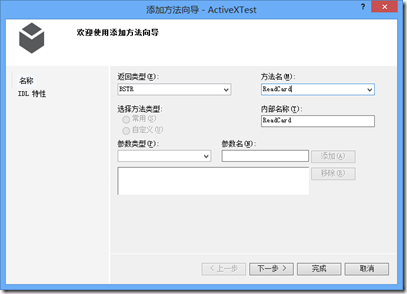
对于返回字符串的,我们选择BSTR类型,输入方法名,直接点完成即可。
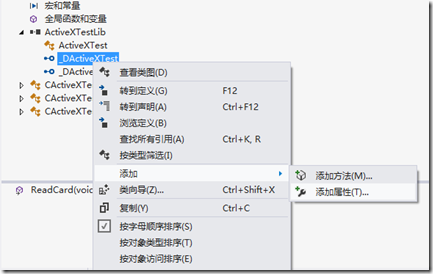
然后需要建Name、Nation、Born等方法,看来都是字符串类型即可。同样的路径,选择“添加属性”
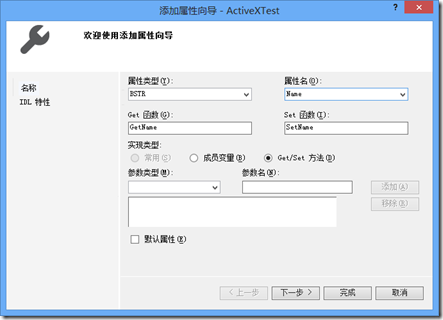
类型仍然选择字符串BSTR,选择Get/Set方法,输入属性名Name
这时在ActiveXTestCtrl.cpp中就会有对应的属性和方法实现代码
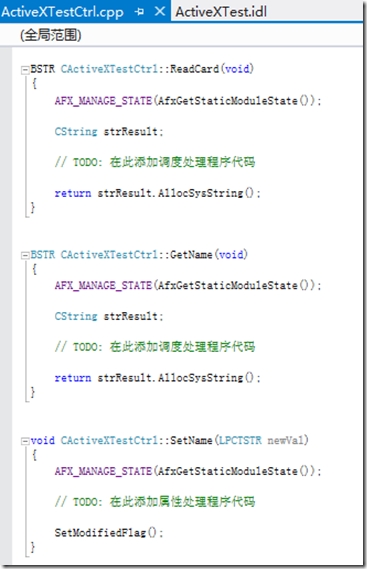
我们在这里做一个最简单的实现,ReadCard直接返回0,GetName返回“Hello World”
BSTR CActiveXTestCtrl::ReadCard(void)

{

    AFX_MANAGE_STATE(AfxGetStaticModuleState());

    CString strResult;

    strResult = "";

    return strResult.AllocSysString();

}

BSTR CActiveXTestCtrl::GetName(void)

{

    AFX_MANAGE_STATE(AfxGetStaticModuleState());

    CString strResult;

    strResult = "Hello World";

    return strResult.AllocSysString();

}

void CActiveXTestCtrl::SetName(LPCTSTR newVal)

{

    AFX_MANAGE_STATE(AfxGetStaticModuleState());

    SetModifiedFlag();

}
生成测试
打开ActiveXTest.idl文件,这个相当于dll中的def文件那样,会有很多控件的关键信息。包括接口、classid
通过coclass是ActiveXTest,找到对应的classid是“AF7E1FF8-E4DC-47B8-BAC9-F06832ABB5F2”
//  CActiveXTestCtrl 的类信息

    [

        uuid(AF7E1FF8-E4DC-47B8-BAC9-F06832ABB5F2)

    ]

    coclass ActiveXTest

    {

        [default] dispinterface _DActiveXTest;

        [default, source] dispinterface _DActiveXTestEvents;

    };
那么我们可以用原来识别仪驱动中带的测试页面,修改其中的classid为“AF7E1FF8-E4DC-47B8-BAC9-F06832ABB5F2”,就成为我们ActiveX控件的测试页了,代码如下
<!DOCTYPE html PUBLIC "-//W3C//DTD XHTML 1.0 Transitional//EN" "http://www.w3.org/TR/xhtml1/DTD/xhtml1-transitional.dtd">
<!-- saved from url=(0027)http://www.chinaidcard.com/ --> <html xmlns="http://www.w3.org/1999/xhtml" >
<head>
<title>华视电子CVR100B/S测试页</title>
</head>
<body style="text-align: center">
<form id="form1" runat="server">
<OBJECT classid="clsid:AF7E1FF8-E4DC-47B8-BAC9-F06832ABB5F2"
id="CVR_IDCard" name="CVR_IDCard" width="0" height="0" >
</OBJECT> <script language="javascript" type ="text/javascript"> function ClearForm() {
document.all['Name'].value = "";
document.all['Sex'].value = "";
document.all['Nation'].value = "";
document.all['Born'].value = "";
document.all['Address'].value = "";
document.all['CardNo'].value = "";
document.all['IssuedAt'].value = "";
document.all['EffectedDate'].value = "";
document.all['ExpiredDate'].value = "";
document.all['SAMID'].value = "";
document.all['pic'].src = "";
document.all['Picture'].value = "";
document.all['PictureLen'].value = "";
return true;
}
function Button1_onclick() {
var CVR_IDCard = document.getElementById("CVR_IDCard");
var strReadResult = CVR_IDCard.ReadCard();
if(strReadResult == "0")
{
ClearForm();
document.all['Name'].value = CVR_IDCard.Name;
document.all['Sex'].value = CVR_IDCard.Sex;
document.all['Nation'].value = CVR_IDCard.Nation;
document.all['Born'].value = CVR_IDCard.Born;
document.all['Address'].value = CVR_IDCard.Address;
document.all['CardNo'].value = CVR_IDCard.CardNo;
document.all['IssuedAt'].value = CVR_IDCard.IssuedAt;
document.all['EffectedDate'].value = CVR_IDCard.EffectedDate;
document.all['ExpiredDate'].value = CVR_IDCard.ExpiredDate;
document.all['SAMID'].value = CVR_IDCard.SAMID;
document.all['pic'].src = CVR_IDCard.Pic;
document.all['Picture'].value = CVR_IDCard.Picture;
document.all['PictureLen'].value = CVR_IDCard.PictureLen
}
else
{
ClearForm();
alert(strReadResult);
} } function Button3_onclick() {
var CVR_IDCard = document.getElementById("CVR_IDCard");
CVR_IDCard.AboutBox(); } </script>
华视电子CVR100 B/S 测试程序<table style="width: 638px; height: 273px; border-top-style: groove; border-right-style: groove; border-left-style: groove; background-color: transparent; border-bottom-style: groove;">
<tr>
<td style="width: 98px">
姓名:</td>
<td style="text-align: left" colspan="3">
<input id="Text1" type="text" style="width: 155px" name="Name" /></td>
<td style="width: 138px; text-align: left;" rowspan="3">
<img src="" style="width: 91px; height: 108px" name="pic"/></td>
</tr>
<tr>
<td style="width: 98px">
性别:</td>
<td style="width: 80px">
<input id="Text2" type="text" name="Sex" style="width: 154px" /></td>
<td style="width: 58px">
民族:</td>
<td style="width: 59px">
<input id="Text3" type="text" name="Nation" style="width: 94px" /></td>
</tr>
<tr>
<td style="width: 98px">
出生日期:</td>
<td style="text-align: left;" colspan="3">
<input id="Text4" type="text" style="width: 151px" name="Born" /></td>
</tr>
<tr>
<td style="width: 98px">
地址:</td>
<td colspan="4" style="text-align: left">
<input id="Text5" style="width: 505px" type="text" name="Address" /></td>
</tr>
<tr>
<td style="width: 98px">
身份号码:</td>
<td colspan="4" style="text-align: left">
<input id="Text6" style="width: 506px" type="text" name="CardNo" /></td>
</tr>
<tr>
<td style="width: 98px">
签发机关:</td>
<td colspan="4" style="text-align: left">
<input id="Text7" style="width: 505px" type="text" name="IssuedAt" /></td>
</tr>
<tr>
<td style="width: 98px">
有效期限:</td>
<td colspan="4" style="text-align: left">
<input id="Text8" style="width: 163px" type="text" name="EffectedDate" />至<input id="Text10" style="width: 163px" type="text" name="ExpiredDate" /></td>
</tr>
<tr>
<td style="width: 98px; text-align: left;">
模块号码:</td>
<td colspan="4" style="text-align: left">
<input id="Text9" style="width: 506px" type="text" name="SAMID" /></td>
</tr>
<tr>
<td style="width: 98px; text-align: left; height: 136px;">
照片编码:</td>
<td colspan="4" style="text-align: left; height: 136px;">
<textarea id="TextArea1" name="Picture" style="width: 509px; height: 115px"></textarea></td>
</tr>
<tr>
<td style="width: 98px; text-align: left">
编码长度:</td>
<td colspan="4" style="text-align: left">
<input id="Text11" style="width: 508px" type="text" name="PictureLen"/></td>
</tr>
</table> </form>
<input id="Button1" type="button" value="读 卡" onclick="return Button1_onclick()" />
<input id="Button3" type="button" value="关 于" onclick="return Button3_onclick()" />
</body>
</html>
编译项目,如果出现以下错误,别担心,不是代码问题,是因为VS没有权限注册ActiveX控件到注册表
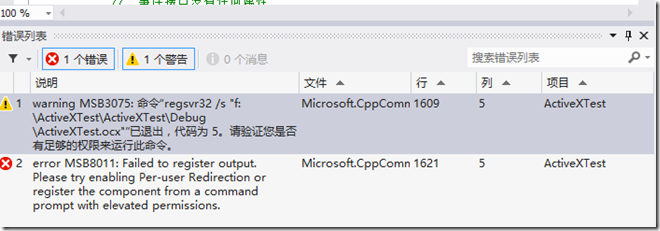
| 警告 1 warning MSB3075: 命令“regsvr32 /s "f:\ActiveXTest\ActiveXTest\Debug\ActiveXTest.ocx"”已退出,代码为 5。请验证您是否有足够的权限来运行此命令。 C:\Program Files (x86)\MSBuild\Microsoft.Cpp\v4.0\V110\Microsoft.CppCommon.targets 1609 5 ActiveXTest |
|
错误 2 error MSB8011: Failed to register output. Please try enabling Per-user Redirection or register the component from a command prompt with elevated permissions. C:\Program Files (x86)\MSBuild\Microsoft.Cpp\v4.0\V110\Microsoft.CppCommon.targets 1621 5 ActiveXTest |
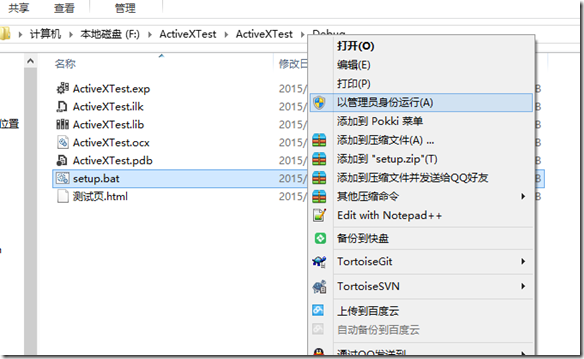
我们访问生成目录
新建一个脚本setup.bat
cd /d "%~dp0"

regsvr32.exe ActiveXTest.ocx
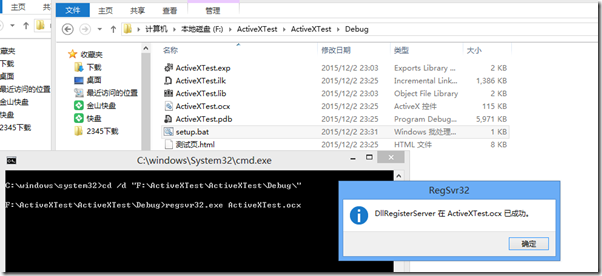
然后右键,以管理员身份运行
这样就注册成功了
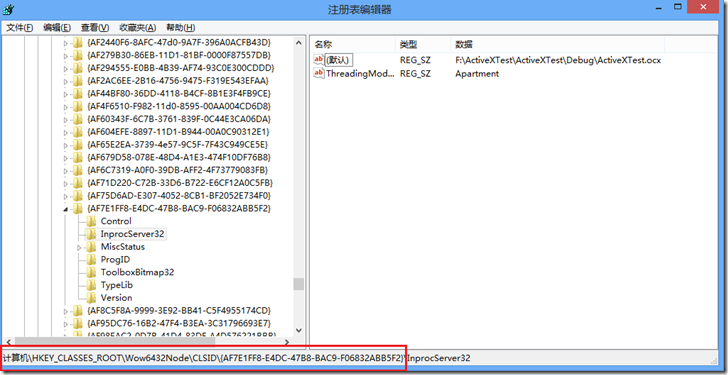
我们还可以进入注册表regedit.exe,查看HKEY+CLASSES_ROOT\Wow6432Node(不同操作系统这里不一样)\CLSID\
{AF7E1FF8-E4DC-47B8-BAC9-F06832ABB5F2}中,看到这个ID已经对应磁盘上对应路径的ocx文件了。
运行
如果是VS2010开发,则至此可以运行测试。但是VS2012开发的项目,仍需要做一些加工——在代码中实现IObjectSafety接口,参见如下:
用VS2012做MFC ActiveX控件并使用html、c#、c++测试容器:http://blog.csdn.net/zengraoli/article/details/17019513
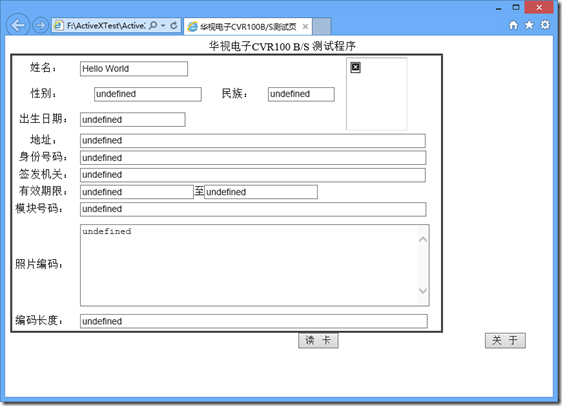
编译后,打开上面准备好的“测试页.html”,点击“读卡”按钮后则显示了Hello World,用同样的方式实现其他属性。
至此,我们就实现了一个高仿的身份证识别仪读取ActiveX控件。
如果要伪造身份证识别仪读取结果,欺骗业务系统说数据是身份证识别仪读入的,只需要修改相关GUID。后面再说就太危险了,怕查水表,就不深入了。
附代码:代码
开发ActiveX控件调用另一个ActiveX系列1——开发一个MFC ActiveX控件的更多相关文章
- OCX控件在IE中无法侦测到键盘消息( MFC ActiveX Control in IE Doesn't Detect Keystrokes)
症状描述: Accelerator keys, such as ARROW keys, are first received by the message pump of the ActiveX co ...
- VC2005从开发MFC ActiveX ocx控件到发布到.net网站的全部过程
开篇语:最近在弄ocx控件发布到asp.net网站上使用,就是用户在使用过程中,自动下载安装ocx控件.(此文章也是总结了网上好多人写的文章,我只是汇总一下,加上部分自己的东西,在这里感谢所有在网 ...
- VS2010开发MFC ActiveX,摄像头拍照上传Webservice(1)
最近工作项目,BS中需要用到摄像头拍照,需要存储本地,同时上传到服务器,尝试使用vc++做ActiveX来实现. 完全没有使用过vc,上网搜索各种知识,初步完成.在这里记录下有帮助的资料. 第一步:编 ...
- 【VS开发】使用VS2010创建MFC ActiveX工程项目
1.ActiveX的基本概念 ActiveX控件可以看作是一个极小的服务器应用程序,它不能独立运行,必须嵌入到某个容器程序中,与该容器一起运行.这个容器包括WEB网页,应用程序窗体等... Activ ...
- C++ 使用VS2010创建MFC ActiveX工程项目
1.ActiveX的基本概念 ActiveX控件可以看作是一个极小的服务器应用程序,它不能独立运行,必须嵌入到某个容器程序中,与该容器一起运行.这个容器包括WEB网页,应用程序窗体等... Activ ...
- c++ ActiveX基础1:使用VS2010创建MFC ActiveX工程项目
1.ActiveX的基本概念 ActiveX控件可以看作是一个极小的服务器应用程序,它不能独立运行,必须嵌入到某个容器程序中,与该容器一起运行.这个容器包括WEB网页,应用程序窗体等... Activ ...
- [ActiveX]使用VS2010创建MFC ActiveX工程项目
ActiveX的基本概念 ActiveX控件可以看作是一个极小的服务器应用程序,它不能队列运行,必须嵌入到某个容器程序中,与该容器一起运行.这个容器包括web网页,应用程序窗体等等. ActiveX控 ...
- 开发ActiveX控件调用另一个ActiveX系列0——身份证识别仪驱动的问题
程序员要从0下表开始,这篇是介绍这个系列的背景的,没有兴趣的人可以直接跳过. 为什么要开发ActiveX控件 由于工作需要,我们开发了一个网站,使用了一款身份证识别仪的网页ActiveX(OCX)插件 ...
- vs2010开发activex(MFC)控件/ie插件(一)
原文:http://blog.csdn.net/yhhyhhyhhyhh/article/details/50782904 vs2010开发activex(MFC)控件: 第一步:生成ac ...
随机推荐
- Java EE 学习(9):IDEA + maven + spring 搭建 web(5)- 博客文章管理
转载:Gaussic(一个致力于AI研究却不得不兼顾项目的研究生) . 注:在阅读本文前,请先阅读: Java EE 学习(5):IDEA + maven + spring 搭建 web(1) Jav ...
- 【11】vue router 之导航钩子
导航钩子 vue-router 提供的导航钩子主要用来拦截导航,让它完成跳转或取消.有多种方式可以在路由导航发生时执行钩子:全局的, 单个路由独享的, 或者组件级的.http://www.jiansh ...
- linux之awk手册
awk 手册 原文 Table of Contents 1. awk简介 2. awk命令格式和选项 2.1. awk的语法有两种形式 2.2. 命令选项 3. 模式和操作 3.1. 模式 3.2 ...
- AtCoder Regular Contest 075 C D E (暂时)
C - Bugged 题意 给\(n\)个数,找其中的一个子集,使得其和最大,且不是\(10\)的整数倍. 思路 先对\(n\)个数求和, 如果本身即不被\(10\)整除,则即为答案. 否则,如果本身 ...
- Scrapy学习-25-Scrapyd部署spider
Scrapyd部署爬虫项目 github项目 https://github.com/scrapy/scrapyd 官方文档 http://scrapyd.readthedocs.org/ ...
- DB2时间函数 实现 时间加减
时间加减:后边记得跟上时间类型如day.HOUR TIMESTAMP ( TIMESTAMP(DEF_TIME)+1 day)+18 HOUR DB2时间函数是我们最常见的函数之一,下面就为您介绍 ...
- ASP.NET MVC 利用Razor引擎生成静态页
实现原理及步骤: 1.通过ViewEngines.Engines.FindView查找到对应的视图,如果是部分视图,则用:ViewEngines.Engines.FindPartialView: 2. ...
- K皇后问题递归解法
#include<iostream> #include<cmath> #include<ctime> using namespace std; bool che ...
- 使用证书登陆Linux服务器
CentOS 7 SSH使用证书登录 https://blog.csdn.net/long690276759/article/details/53535464 切记: 0.私钥放在client,公钥放 ...
- Longest Valid Parentheses - LeetCode
Given a string containing just the characters '(' and ')', find the length of the longest valid (wel ...