C#操作XML方法:新增、修改和删除节点与属性
一 前言
先来了解下操作XML所涉及到的几个类及之间的关系 如果大家发现少写了一些常用的方法,麻烦在评论中指出,我一定会补上的!谢谢大家
* 1 XMLElement 主要是针对节点的一些属性进行操作
* 2 XMLDocument 主要是针对节点的CUID操作
* 3 XMLNode 为抽象类,做为以上两类的基类,提供一些操作节点的方法
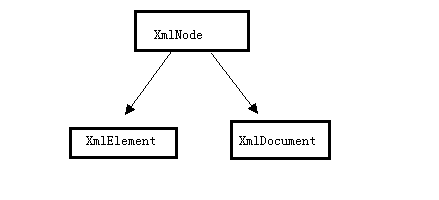
清楚了以上的关系在操作XML时会更清晰一点
二 具体操作
以下会对Xml的结点与属性做增 删 改 查的操作也满足了实际工作中的大部分情况
先构造一棵XML树如下,其中也涉及到了写入xml文档的操作
 1         public void CreatXmlTree(string xmlPath)

 2         {

 3             XElement xElement = new XElement(

 4                 new XElement("BookStore",

 5                     new XElement("Book",

 6                         new XElement("Name", "C#入门", new XAttribute("BookName", "C#")),

 7                         new XElement("Author", "Martin", new XAttribute("Name", "Martin")),

 8                         new XElement("Adress", "上海"),

 9                         new XElement("Date", DateTime.Now.ToString("yyyy-MM-dd"))

10                         ),

11                     new XElement("Book",

12                         new XElement("Name", "WCF入门", new XAttribute("BookName", "WCF")),

13                         new XElement("Author", "Mary", new XAttribute("Name", "Mary")),

14                         new XElement("Adress", "北京"),

15                         new XElement("Date", DateTime.Now.ToString("yyyy-MM-dd"))

16                         )

17                         )

18                 );

19

20             //需要指定编码格式,否则在读取时会抛:根级别上的数据无效。 第 1 行 位置 1异常

21             XmlWriterSettings settings = new XmlWriterSettings();

22             settings.Encoding = new UTF8Encoding(false);

23             settings.Indent = true;

24             XmlWriter xw = XmlWriter.Create(xmlPath,settings);

25             xElement.Save(xw);

26             //写入文件

27             xw.Flush();

28             xw.Close();

29         }
然后得到如下的XML树
 1 <?xml version="1.0" encoding="utf-8"?>

 2 <BookStore>

 3     <Book>

 4         <Name BookName="C#">C#入门</Name>

 5         <Author Name="Martin">Martin</Author>

 6         <Date>2013-10-11</Date>

 7         <Adress>上海</Adress>

 8         <Date>2013-10-11</Date>

 9     </Book>

10     <Book>

11         <Name BookName="WCF">WCF入门</Name>

12         <Author Name="Mary">Mary</Author>

13         <Adress>北京</Adress>

14         <Date>2013-10-11</Date>

15     </Book>

16 </BookStore>
以下操作都是对生成的XML树进行操作
2.1 新增节点与属性
新增节点NewBook并增加属性Name="WPF"
 1         public void Create(string xmlPath)

 2         {

 3             XmlDocument xmlDoc = new XmlDocument();

 4             xmlDoc.Load(xmlPath);

 5

 6             var root = xmlDoc.DocumentElement;//取到根结点

 7             XmlNode newNode = xmlDoc.CreateNode("element", "NewBook", "");

 8             newNode.InnerText = "WPF";

 9

10             //添加为根元素的第一层子结点

11             root.AppendChild(newNode);

12             xmlDoc.Save(xmlPath);

13         }
开篇有写操作xml节点属性主要用XmlElement对象所以取到结点后要转类型
 1         //属性

 2         public void CreateAttribute(string xmlPath)

 3         {

 4             XmlDocument xmlDoc = new XmlDocument();

 5             xmlDoc.Load(xmlPath);

 6             var root = xmlDoc.DocumentElement;//取到根结点

 7             XmlElement node = (XmlElement)xmlDoc.SelectSingleNode("BookStore/NewBook");

 8             node.SetAttribute("Name", "WPF");

 9             xmlDoc.Save(xmlPath);

10

11         }
效果如下

2.2 删除节点与属性
 1         public void Delete(string xmlPath)

 2         {

 3             XmlDocument xmlDoc = new XmlDocument();

 4             xmlDoc.Load(xmlPath);

 5             var root = xmlDoc.DocumentElement;//取到根结点

 6

 7             var element = xmlDoc.SelectSingleNode("BookStore/NewBook");

 8             root.RemoveChild(element);

 9             xmlDoc.Save(xmlPath);

10         }
删除属性
 1         public void DeleteAttribute(string xmlPath)

 2         {

 3             XmlDocument xmlDoc = new XmlDocument();

 4             xmlDoc.Load(xmlPath);

 5             XmlElement node = (XmlElement)xmlDoc.SelectSingleNode("BookStore/NewBook");

 6             //移除指定属性

 7             node.RemoveAttribute("Name");

 8             //移除当前节点所有属性,不包括默认属性

 9             //node.RemoveAllAttributes();

10             xmlDoc.Save(xmlPath);

11         }
2.3 修改节点与属性
xml的节点默认是不允许修改的,本文也就不做处理了
修改属性代码如下
1         public void ModifyAttribute(string xmlPath)

2         {

3             XmlDocument xmlDoc = new XmlDocument();

4             xmlDoc.Load(xmlPath);

5             XmlElement element = (XmlElement)xmlDoc.SelectSingleNode("BookStore/NewBook");

6             element.SetAttribute("Name", "Zhang");

7             xmlDoc.Save(xmlPath);

8         }
效果如下

2.4 获取节点与属性
 1         public void Select(string xmlPath)

 2         {

 3             XmlDocument xmlDoc = new XmlDocument();

 4             xmlDoc.Load(xmlPath);

 5             //取根结点

 6             var root = xmlDoc.DocumentElement;//取到根结点

 7             //取指定的单个结点

 8             XmlNode oldChild = xmlDoc.SelectSingleNode("BookStore/NewBook");

 9

10             //取指定的结点的集合

11             XmlNodeList nodes = xmlDoc.SelectNodes("BookStore/NewBook");

12

13             //取到所有的xml结点

14             XmlNodeList nodelist = xmlDoc.GetElementsByTagName("*");

15         }
属性
1         public void SelectAttribute(string xmlPath)

2         {

3             XmlDocument xmlDoc = new XmlDocument();

4             xmlDoc.Load(xmlPath);

5             XmlElement element = (XmlElement)xmlDoc.SelectSingleNode("BookStore/NewBook");

6             string name = element.GetAttribute("Name");

7             Console.WriteLine(name);

8         }
三 linq to XML 操作
Linq to Xml 也没什么变化只操作对象改变了主要涉及的几个对象如下 注:我并没有用linq的语法去操作元素。
XDocument:用于创建一个XML实例文档
XElement:用于一些节点与节点属性的基本操作
以下是对Xml的 一些简单的操作
3.1 新增节点与属性
1         public void Create(string xmlPath)

2         {

3             XDocument xDoc = XDocument.Load(xmlPath);

4             XElement xElement = xDoc.Element("BookStore");

5             xElement.Add(new XElement("Test", new XAttribute("Name", "Zery")));

6             xDoc.Save(xmlPath);

7         }
属性
 1         public void CreateAttribute(string xmlPath)

 2         {

 3             XDocument xDoc = XDocument.Load(xmlPath);

 4             IEnumerable<XElement> xElement = xDoc.Element("BookStore").Elements("Book");

 5             foreach (var element in xElement)

 6             {

 7                 element.SetAttributeValue("Name", "Zery");

 8             }

 9             xDoc.Save(xmlPath);

10         }
3.2 删除节点与属性
1         public void Delete(string xmlPath)

2         {

3             XDocument xDoc = XDocument.Load(xmlPath);

4             XElement element = (XElement)xDoc.Element("BookStore").Element("Book");

5             element.Remove();

6             xDoc.Save(xmlPath);

7         }
属性
1         public void DeleteAttribute(string xmlPath)

2         {

3             XDocument xDoc = XDocument.Load(xmlPath);

4             //不能跨级取节点

5             XElement element = xDoc.Element("BookStore").Element("Book").Element("Name");

6             element.Attribute("BookName").Remove();

7             xDoc.Save(xmlPath);

8         }
3.3 修改节点属性
节点.net没提供修改的方法本文也不做处理
修改属性与新增实质是同一个方法
1         public void ModifyAttribute(string xmlPath)

2         {

3             XDocument xDoc = XDocument.Load(xmlPath);

4             XElement element = xDoc.Element("BookStore").Element("Book");

5             element.SetAttributeValue("BookName","ZeryTest");

6             xDoc.Save(xmlPath);

7         }
四 总结
把文章写完时,又扫去了自己的一个盲区,虽然都是些简单的操作,但在实际的开中,又何尝不是由简单到复杂呢。我觉得身为程序员就应该遇到自己的盲区时,立马花时间去了解,不说要了解多深入,但至少基本的还是要知道,等到工作中真需时,只要稍微花点时间就可以了。
C#操作XML方法:新增、修改和删除节点与属性的更多相关文章
- .net操作xml文件(新增.修改,删除,读取) 转
今天有个需求需要操作xml节点.突然见遗忘了许多.上网看了些资料.才整出来.脑袋真不够用.在这里把我找到的资料共享一下.方便以后使用.本文属于网摘/ 1 一.简单介绍2 using System.Xm ...
- .net操作xml文件(新增.修改,删除,读取)---datagridview与xml文件
参考网址: http://www.cnblogs.com/liguanghui/archive/2011/11/10/2244199.html 很详细的,相信能给你一定的帮助.
- C#操作XML方法集合
一 前言 先来了解下操作XML所涉及到的几个类及之间的关系 如果大家发现少写了一些常用的方法,麻烦在评论中指出,我一定会补上的!谢谢大家 * 1 XMLElement 主要是针对节点的一些属性进行操 ...
- 摘:通过ICursor对Table进行操作(添加、修改、删除)
通过ICursor对Table进行操作(添加.修改.删除) 连接上数据表的目的就是对其进行包括浏览.添加.修改.删除等基本操作. 浏览功能,之前文章中一提到,就是将Itable转换为DataTable ...
- 通过ICursor对Table进行操作(添加、修改、删除)
通过ICursor对Table进行操作(添加.修改.删除) 2010-03-16 16:07:37| 分类: 工作|举报|字号 订阅 来自:http://blog.163.com/liuyang12 ...
- JS 对象API之修改、删除对象的属性
无论是修改还是删除对象的属性,我们首先要清楚:自有属性.共有属性的处理方法肯定是不同的: 先创建一个对象实例 var obj = { name: '小马扎', age: }; Object.proto ...
- C#操作XML方法详解
using System.Xml; //初始化一个xml实例 XmlDocument xml=new XmlDocument(); //导入指定xml文件 xml.Load(path); xml. ...
- PHP操作XML方法之SimpleXML
SimpleXML简介 SimpleXML 扩展提供了一个非常简单和易于使用的工具集,能将XML转换成一个带有一般属性选择器和数组迭代器的对象. 举例XML XML结构部分引用自<<深入理 ...
- C#.Net操作XML方法二
上面那篇博客,在上面那面博客中是通过System.Xml命名空间中的类来实现对XML文件的创建.删除和改动等操作.接下来再介绍一种方法,在整个的操作过程中,仅仅只是换了个类而已,没什么大惊小怪的. D ...
随机推荐
- HDU 1027 Ignatius and the Princess II[DFS/全排列函数next_permutation]
Ignatius and the Princess II Time Limit: 2000/1000 MS (Java/Others) Memory Limit: 65536/32768 K ( ...
- 手动编译高速扫描器MasScan
常见的端口扫描器有NMAP,ZMAP,superScan等,我们使用后各有千秋,ZMAP号称44分钟扫全球ip,那么有没有比ZMAP更快的端口扫描器呢,今天我们来研究下masscan,这款扫描器号称3 ...
- Linux内核中等待队列的几种用法
Linux内核里的等待队列机制在做驱动开发时用的非常多,多用来实现阻塞式访问,下面简单总结了等待队列的四种用法,希望对读者有所帮助. 1. 睡眠等待某个条件发生(条件为假时睡眠): 睡眠方式:wait ...
- 使用Jsoup解决网页中图片链接问题
在做Facebook和WhatsApp分享的时候,分享出去的谷歌短链,Facebook获取不到大图,和竞品展示的不一样,WhatsApp分享出去的短链没有图片和描述. WhatsApp: 分析竞品UC ...
- context:exclude-filter spring事宜【经典-转】
context:exclude-filter spring事务 如果带上事务,那么用annotation方式的事务注解和bean配置,事务会失效,要将service bean配置到xml文件中才行. ...
- Centos7/RedHat7 下 python3使用cx-freeze打包matplotlib程序遇到的问题和解决办法
折腾了一天遇到了几个头疼的问题,还好回去前解决掉了 第一个:执行cxfreeze打包好的程序遇到 tkinter 和 _tkinter的缺失问题 首先终端:python tkinter python ...
- mysql 导入sql文件时编码报错
1.命令行导入 mysql -uroot -pnewpwd --default-character-set=utf8 databasename < xxx.sql 2.使用source导入 进入 ...
- 从头開始写项目Makefile(五):嵌套运行
[版权声明:转载请保留出处:blog.csdn.net/gentleliu.Mail:shallnew at 163 dot com] 在大一些的项目里面,全部源码不会仅仅放在同一个文件夹,一般各个功 ...
- Centos7 安装 Maven 3.5.*
下载 Apache Maven 访问 Maven官方网站,打开后找到下载链接,如下: 解压 tar zxvf apache-maven-3.5.3-bin.tar.gz 添加环境变量 打开 /etc/ ...
- intel电源管理技术中I2C和SVID
1.I2C总线架构图: 2.Gemini Lake平台所支持的PMIC 是哪种类型? POR 是SVID PMIC, i2c PMIC 会影响性能. 3.SerialVID, 总共有三个信号线 时钟( ...