ActionMQ集群部署
ActiveMQ集群部署
一、应用场景
消息中间件是分布式系统中重要的组件,主要解决应用耦合,异步消息,流量削锋等问题。实现高性能,高可用,可伸缩和最终一致性架构。是大型分布式系统不可缺少的中间件。
目前在生产环境,使用较多的消息队列有ActiveMQ,RabbitMQ,ZeroMQ,Kafka,MetaMQ,RocketMQ等。
以下介绍消息队列在实际应用中常用的使用场景。异步处理,应用解耦,流量削锋和消息通讯四个场景。
1.1. 异步处理
场景说明:用户注册后,需要发注册邮件和注册短信。传统的做法有两种:
(1)串行方式:将注册信息写入数据库成功后,发送注册邮件,再发送注册短信。以上三个任务全部完成后,返回给客户端。
(2)并行方式:将注册信息写入数据库成功后,发送注册邮件的同时,发送注册短信以上三个任务完成后,返回给客户端。与串行的差别是,并行的方式可以提高处理的时间。
假设三个业务节点每个使用50毫秒钟,不考虑网络等其他开销,则串行方式的时间是150毫秒,并行的时间可能是100毫秒。因为CPU在单位时间内处理的请求数是一定的,假设CPU1秒内吞吐量是100次。则串行方式1秒内CPU可处理的请求量是7次(1000/150)。并行方式处理的请求量是10次(1000/100)。
如以上案例描述,传统的方式系统的性能(并发量,吞吐量,响应时间)会有瓶颈。如何解决这个问题呢?引入消息队列,将不是必须的业务逻辑,异步处理。改造后的架构如下:
按照以上约定,用户的响应时间相当于是注册信息写入数据库的时间,也就是50毫秒。注册邮件,发送短信写入消息队列后,直接返回,因此写入消息队列的速度很快,基本可以忽略,因此用户的响应时间可能是50毫秒。因此架构改变后,系统的吞吐量提高到每秒20 QPS。比串行提高了3倍,比并行提高了两倍。
1.2. 应用解耦
场景说明:用户下单后,订单系统需要通知库存系统。传统的做法是,订单系统调用库存系统的接口。传统模式的缺点:
1) 假如库存系统无法访问,则订单减库存将失败,从而导致订单失败;
2) 订单系统与库存系统耦合;
如何解决以上问题呢?引入消息队列后的方案,如下:
订单系统:用户下单后,订单系统完成持久化处理,将消息写入消息队列,返回用户订单下单成功。
库存系统:订阅下单的消息,采用拉/推的方式,获取下单信息,库存系统根据下单信息,进行库存操作。
假如:在下单时库存系统不能正常使用。也不影响正常下单,因为下单后,订单系统写入消息队列就不再关心其他的后续操作了。实现订单系统与库存系统的应用解耦。
1.3. 流量削峰
流量削锋也是消息队列中的常用场景,一般在秒杀、团抢活动中使用广泛,主要应用在突发性的流量激增场景
应用场景:秒杀活动,一般会因为流量过大,导致流量暴增,应用挂掉。为解决这个问题,一般需要在应用前端加入消息队列。
1. 可以控制活动的人数;
2. 可以缓解短时间内高流量压垮应用;
引入消息队列后的方案,如下:
1. 用户的请求,服务器接收后,首先写入消息队列。假如消息队列长度超过最大数量,则直接抛弃用户请求或跳转到错误页面;
2. 秒杀业务根据消息队列中的请求信息,再做后续处理。
1.4. 日志处理
日志处理是指将消息队列用在日志处理中,比如Kafka的应用,解决大量日志传输的问题。架构简化如下:
- 日志采集客户端,负责日志数据采集,定时写入Kafka队列;
- Kafka消息队列,负责日志数据的接收,存储和转发;
- 日志处理应用:订阅并消费kafka队列中的日志数据;
以下是新浪kafka日志处理应用案例:
(1)Kafka:接收用户日志的消息队列。
(2)Logstash:做日志解析,统一成JSON输出给Elasticsearch。
(3)Elasticsearch:实时日志分析服务的核心技术,一个schemaless,实时的数据存储服务,通过index组织数据,兼具强大的搜索和统计功能。
(4)Kibana:基于Elasticsearch的数据可视化组件,超强的数据可视化能力是众多公司选择ELK stack的重要原因。
二、集群方式部署
单点的ActiveMQ作为企业应用无法满足高可用和集群的需求,所以ActiveMQ提供了master-slave、broker cluster等多种部署方式,但通过分析多种部署方式之后我认为需要将两种部署方式相结合才能满足公司分布式和高可用的需求,所以后面就重点将解如何将两种部署方式相结合
2.1 Master-Slave(主从)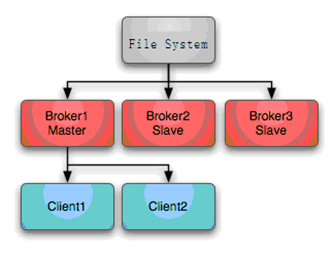
主要是通过共享存储目录来实现master和slave的热备,大概原理是,你设置N个broker,并且你们都用同一个文件目录保存信息,那么就有第一次获得文件的broker 作为master 提供服务,并对文件持有lock,其他broker 只能监听等待,等master 挂掉了,另外的broker 能立马补充上去。这种方式主要是让各实例持久化文件目录一致,具体配置如下:
修改配置文件/fs01/apache-activemq-5.15.0/conf/activemq.xml
在<beans></beans>全局标签里添加数据源连接
    <!-- Oracle DataSource Master Slave -->

    <bean id="oracle-ds" class="org.apache.commons.dbcp.BasicDataSource" destroy-method="close">

        <property name="driverClassName" value="oracle.jdbc.driver.OracleDriver"/>

        <property name="url" value="jdbc:oracle:thin:@172.90.12.44:1521/pdbcm"/>

        <property name="username" value="root"/>

        <property name="password" value="123456"/>

        <property name="maxActive" value="30"/>

        <property name="poolPreparedStatements" value="true"/>

    </bean>
在<broker></broker>标签里添加持久化
        <persistenceAdapter>

            <!--

            <kahaDB directory="${activemq.data}/kahadb"/>

            -->

            <jdbcPersistenceAdapter

                dataDirectory="${activemq.base}/activemq-data"

                dataSource="#oracle-ds" useDatabaseLock="true"/>

        </persistenceAdapter>
注意这里要把数据库连接驱动放在lib目录下:
[root@MQ4 lib]# pwd

/fs01/apache-activemq-5.15.0/lib

[root@ lib]# ll ojdbc7.jar

-rw-r--r-- 1 root root 3397734 12月 18 17:03 ojdbc7.jar
附上oracle建用户语句:
--tablespace

create tablespace tbs_activemq datafile '+DATA/PDJGORCL/DATAFILE/activemq1.dbf' size 2g AUTOEXTEND ON  MAXSIZE UNLIMITED;

--库的路径要先通过select * from dba_data_files;查出来

--user

CREATE USER activemq IDENTIFIED BY "activemqdb2018"

DEFAULT TABLESPACE tbs_activemq

TEMPORARY TABLESPACE temp;

--授权(以此为最新标准)

GRANT

CONNECT,

ALTER SESSION,

CREATE JOB,

CREATE TABLE,

CREATE VIEW,

CREATE CLUSTER,

CREATE DATABASE LINK,

CREATE INDEXTYPE,

CREATE OPERATOR,

CREATE PROCEDURE,

CREATE SEQUENCE,

CREATE SESSION,

CREATE SYNONYM,

CREATE TRIGGER,

CREATE TYPE,

DEBUG ANY PROCEDURE,

DEBUG CONNECT SESSION,

EXECUTE ANY PROCEDURE,

SELECT ANY DICTIONARY,

UNLIMITED TABLESPACE

--UPDATE ANY TABLE

TO activemq;
客户端连接地址修改:
failover:(tcp://broker1:61616,tcp://broker2:61616,tcp://broker3:61616)
完整xml文件:
<!--

    Licensed to the Apache Software Foundation (ASF) under one or more

    contributor license agreements.  See the NOTICE file distributed with

    this work for additional information regarding copyright ownership.

    The ASF licenses this file to You under the Apache License, Version 2.0

    (the "License"); you may not use this file except in compliance with

    the License.  You may obtain a copy of the License at

    http://www.apache.org/licenses/LICENSE-2.0

    Unless required by applicable law or agreed to in writing, software

    distributed under the License is distributed on an "AS IS" BASIS,

    WITHOUT WARRANTIES OR CONDITIONS OF ANY KIND, either express or implied.

    See the License for the specific language governing permissions and

    limitations under the License.

-->

<!-- START SNIPPET: example -->

<beans

  xmlns="http://www.springframework.org/schema/beans"

  xmlns:xsi="http://www.w3.org/2001/XMLSchema-instance"

  xsi:schemaLocation="http://www.springframework.org/schema/beans http://www.springframework.org/schema/beans/spring-beans.xsd

  http://activemq.apache.org/schema/core http://activemq.apache.org/schema/core/activemq-core.xsd">

    <!-- Allows us to use system properties as variables in this configuration file -->

    <bean class="org.springframework.beans.factory.config.PropertyPlaceholderConfigurer">

        <property name="locations">

            <value>file:${activemq.conf}/credentials.properties</value>

        </property>

    </bean>

    <!-- Allows accessing the server log -->

    <bean id="logQuery" class="io.fabric8.insight.log.log4j.Log4jLogQuery"

          lazy-init="false" scope="singleton"

          init-method="start" destroy-method="stop">

    </bean>

	<!-- Oracle DataSource Master Slave -->

	<bean id="oracle-ds" class="org.apache.commons.dbcp.BasicDataSource" destroy-method="close">

		<property name="driverClassName" value="oracle.jdbc.driver.OracleDriver"/>

		<property name="url" value="jdbc:oracle:thin:@192.90.2.32:1521/pdbcm"/>

		<property name="username" value="root"/>

		<property name="password" value="123456"/>

		<property name="maxActive" value="30"/>

		<property name="poolPreparedStatements" value="true"/>

	</bean>

    <!--

        The <broker> element is used to configure the ActiveMQ broker.

    -->

    <broker xmlns="http://activemq.apache.org/schema/core" brokerName="localhost" dataDirectory="${activemq.data}">

        <destinationPolicy>

            <policyMap>

              <policyEntries>

                <policyEntry topic=">" >

                    <!-- The constantPendingMessageLimitStrategy is used to prevent

                         slow topic consumers to block producers and affect other consumers

                         by limiting the number of messages that are retained

                         For more information, see:

                         http://activemq.apache.org/slow-consumer-handling.html

                    -->

                  <pendingMessageLimitStrategy>

                    <constantPendingMessageLimitStrategy limit="1000"/>

                  </pendingMessageLimitStrategy>

                </policyEntry>

              </policyEntries>

            </policyMap>

        </destinationPolicy>

        <!--

            The managementContext is used to configure how ActiveMQ is exposed in

            JMX. By default, ActiveMQ uses the MBean server that is started by

            the JVM. For more information, see:

            http://activemq.apache.org/jmx.html

        -->

        <managementContext>

            <managementContext createConnector="false"/>

        </managementContext>

        <!--

            Configure message persistence for the broker. The default persistence

            mechanism is the KahaDB store (identified by the kahaDB tag).

            For more information, see:

            http://activemq.apache.org/persistence.html

        -->

        <persistenceAdapter>

		    <!--

            <kahaDB directory="${activemq.data}/kahadb"/>

			-->

			<jdbcPersistenceAdapter

			    dataDirectory="${activemq.base}/activemq-data"

				dataSource="#oracle-ds" useDatabaseLock="true"/>

        </persistenceAdapter>

          <!--

            The systemUsage controls the maximum amount of space the broker will

            use before disabling caching and/or slowing down producers. For more information, see:

            http://activemq.apache.org/producer-flow-control.html

          -->

          <systemUsage>

            <systemUsage>

                <memoryUsage>

                    <memoryUsage percentOfJvmHeap="70" />

                </memoryUsage>

                <storeUsage>

                    <storeUsage limit="100 gb"/>

                </storeUsage>

                <tempUsage>

                    <tempUsage limit="50 gb"/>

                </tempUsage>

            </systemUsage>

        </systemUsage>

        <!--

            The transport connectors expose ActiveMQ over a given protocol to

            clients and other brokers. For more information, see:

            http://activemq.apache.org/configuring-transports.html

        -->

        <transportConnectors>

            <!-- DOS protection, limit concurrent connections to 1000 and frame size to 100MB -->

            <transportConnector name="openwire" uri="tcp://10.90.2.86:61618?maximumConnections=1000&wireFormat.maxFrameSize=104857600"/>

            <transportConnector name="amqp" uri="amqp://0.0.0.0:5672?maximumConnections=1000&wireFormat.maxFrameSize=104857600"/>

            <transportConnector name="stomp" uri="stomp://0.0.0.0:61613?maximumConnections=1000&wireFormat.maxFrameSize=104857600"/>

            <transportConnector name="mqtt" uri="mqtt://0.0.0.0:1883?maximumConnections=1000&wireFormat.maxFrameSize=104857600"/>

            <transportConnector name="ws" uri="ws://0.0.0.0:61614?maximumConnections=1000&wireFormat.maxFrameSize=104857600"/>

        </transportConnectors>

        <!-- destroy the spring context on shutdown to stop jetty -->

        <shutdownHooks>

            <bean xmlns="http://www.springframework.org/schema/beans" class="org.apache.activemq.hooks.SpringContextHook" />

        </shutdownHooks>

    </broker>

    <!--

        Enable web consoles, REST and Ajax APIs and demos

        The web consoles requires by default login, you can disable this in the jetty.xml file

        Take a look at ${ACTIVEMQ_HOME}/conf/jetty.xml for more details

    -->

    <import resource="jetty.xml"/>

</beans>

<!-- END SNIPPET: example -->
2.2 混合部署方式(集群)
这里以Broker-A + Broker-B建立cluster,Broker-C作为Broker-B的slave,Broker-D作为Broker-A的slave。。
1) 修改Broker-A节点中的服务提供端口为61616:
 <transportConnectors>

   <transportConnectorname="openwire"uri="tcp://0.0.0.0:61616?maximumConnections=1000&wireFormat.maxFrameSize=104857600"/>

 </transportConnectors>
2) 修改Broker-B节点中的服务提供端口为61617:
<transportConnectors>

    <transportConnectorname="openwire"uri="tcp://0.0.0.0:61617?maximumConnections=1000&wireFormat.maxFrameSize=104857600"/>

</transportConnectors>
3) 修改Broker-C节点中的服务提供端口为61618:
<transportConnectors>

    <transportConnectorname="openwire"uri="tcp://0.0.0.0:61618?maximumConnections=1000&wireFormat.maxFrameSize=104857600"/>

</transportConnectors>
4) 修改Broker-D节点中的服务提供端口为61619:
<transportConnectors>

    <transportConnectorname="openwire"uri="tcp://0.0.0.0:61619?maximumConnections=1000&wireFormat.maxFrameSize=104857600"/>

</transportConnectors>
5) 在Broker-A节点中添加networkConnector节点:
<networkConnectors>

    <networkConnector uri="masterslave:(tcp://0.0.0.0:61617,tcp:// 0.0.0.0:61618)" duplex="false"/>

</networkConnectors>
6) 在Broker-B节点中添加networkConnector节点:
<networkConnectors>

    <networkConnector uri="masterslave:(tcp://0.0.0.0:61616,tcp:// 0.0.0.0:61619)" duplex="false"/>

</networkConnectors>
7) 在Broker-C节点中添加networkConnector节点:
<networkConnectors>

    <networkConnector uri="masterslave:(tcp://0.0.0.0:61616,tcp:// 0.0.0.0:61619)" duplex="false"/>

</networkConnectors>
8) 在Broker-D节点中添加networkConnector节点:
<networkConnectors>

    <networkConnector uri="masterslave:(tcp://0.0.0.0:61617,tcp:// 0.0.0.0:61618)" duplex="false"/>

</networkConnectors>
9) 修改Broker-A节点中的持久化方式:
<persistenceAdapter>

    <kahaDB directory="/localhost/kahadb_1"/>

</persistenceAdapter>
10) 修改Broker-B节点中的持久化方式:
<persistenceAdapter>

    <kahaDB directory="/localhost/kahadb_2"/>

</persistenceAdapter>
11) 修改Broker-C节点中的持久化方式:
<persistenceAdapter>

    <kahaDB directory="/localhost/kahadb_2"/>

</persistenceAdapter>
12) 修改Broker-D节点中的持久化方式:
<persistenceAdapter>

    <kahaDB directory="/localhost/kahadb_1"/>

</persistenceAdapter>
13) 分别启动broker-A、broker-B、broker-C、broker-D
完成的配置文件:
<!--

    Licensed to the Apache Software Foundation (ASF) under one or more

    contributor license agreements.  See the NOTICE file distributed with

    this work for additional information regarding copyright ownership.

    The ASF licenses this file to You under the Apache License, Version 2.0

    (the "License"); you may not use this file except in compliance with

    the License.  You may obtain a copy of the License at

    http://www.apache.org/licenses/LICENSE-2.0

    Unless required by applicable law or agreed to in writing, software

    distributed under the License is distributed on an "AS IS" BASIS,

    WITHOUT WARRANTIES OR CONDITIONS OF ANY KIND, either express or implied.

    See the License for the specific language governing permissions and

    limitations under the License.

-->

<!-- START SNIPPET: example -->

<beans

  xmlns="http://www.springframework.org/schema/beans"

  xmlns:xsi="http://www.w3.org/2001/XMLSchema-instance"

  xsi:schemaLocation="http://www.springframework.org/schema/beans http://www.springframework.org/schema/beans/spring-beans.xsd

  http://activemq.apache.org/schema/core http://activemq.apache.org/schema/core/activemq-core.xsd">

    <!-- Allows us to use system properties as variables in this configuration file -->

    <bean class="org.springframework.beans.factory.config.PropertyPlaceholderConfigurer">

        <property name="locations">

            <value>file:${activemq.conf}/credentials.properties</value>

        </property>

    </bean>

   <!-- Allows accessing the server log -->

    <bean id="logQuery" class="io.fabric8.insight.log.log4j.Log4jLogQuery"

          lazy-init="false" scope="singleton"

          init-method="start" destroy-method="stop">

    </bean>

    <!--

        The <broker> element is used to configure the ActiveMQ broker.

    -->

    <broker xmlns="http://activemq.apache.org/schema/core" brokerName="localhost" dataDirectory="${activemq.data}">

        <destinationPolicy>

            <policyMap>

              <policyEntries>

                <policyEntry topic=">" >

                    <!-- The constantPendingMessageLimitStrategy is used to prevent

                         slow topic consumers to block producers and affect other consumers

                         by limiting the number of messages that are retained

                         For more information, see:

                         http://activemq.apache.org/slow-consumer-handling.html

                    -->

                  <pendingMessageLimitStrategy>

                    <constantPendingMessageLimitStrategy limit="1000"/>

                  </pendingMessageLimitStrategy>

                </policyEntry>

              </policyEntries>

            </policyMap>

        </destinationPolicy>

        <!--

            The managementContext is used to configure how ActiveMQ is exposed in

            JMX. By default, ActiveMQ uses the MBean server that is started by

            the JVM. For more information, see:

            http://activemq.apache.org/jmx.html

        -->

        <managementContext>

            <managementContext createConnector="false"/>

        </managementContext>

        <!--

            Configure message persistence for the broker. The default persistence

            mechanism is the KahaDB store (identified by the kahaDB tag).

            For more information, see:

            http://activemq.apache.org/persistence.html

        -->

        <persistenceAdapter>

            <kahaDB directory="${activemq.data}/kahadb"/>

        </persistenceAdapter>

          <!--

            The systemUsage controls the maximum amount of space the broker will

            use before disabling caching and/or slowing down producers. For more information, see:

            http://activemq.apache.org/producer-flow-control.html

          -->

          <systemUsage>

            <systemUsage>

                <memoryUsage>

                    <memoryUsage percentOfJvmHeap="70" />

                </memoryUsage>

                <storeUsage>

                    <storeUsage limit="100 gb"/>

                </storeUsage>

                <tempUsage>

                    <tempUsage limit="50 gb"/>

                </tempUsage>

            </systemUsage>

        </systemUsage>

        <!--

            The transport connectors expose ActiveMQ over a given protocol to

            clients and other brokers. For more information, see:

            http://activemq.apache.org/configuring-transports.html

        -->

        <transportConnectors>

            <!-- DOS protection, limit concurrent connections to 1000 and frame size to 100MB -->

            <transportConnector name="openwire" uri="tcp://0.0.0.0:61619?maximumConnections=1000&wireFormat.maxFrameSize=104857600"/>

            <transportConnector name="amqp" uri="amqp://0.0.0.0:5672?maximumConnections=1000&wireFormat.maxFrameSize=104857600"/>

            <transportConnector name="stomp" uri="stomp://0.0.0.0:61613?maximumConnections=1000&wireFormat.maxFrameSize=104857600"/>

            <transportConnector name="mqtt" uri="mqtt://0.0.0.0:1883?maximumConnections=1000&wireFormat.maxFrameSize=104857600"/>

            <transportConnector name="ws" uri="ws://0.0.0.0:61614?maximumConnections=1000&wireFormat.maxFrameSize=104857600"/>

        </transportConnectors>

        <!-- destroy the spring context on shutdown to stop jetty -->

        <shutdownHooks>

            <bean xmlns="http://www.springframework.org/schema/beans" class="org.apache.activemq.hooks.SpringContextHook" />

        </shutdownHooks>

	<networkConnectors>

		<networkConnector uri="masterslave:(tcp://0.0.0.0:61617,tcp:// 0.0.0.0:61618)" duplex="false"/>

	</networkConnectors>

	<persistenceAdapter>

		<kahaDB directory="/localhost/kahadb_1"/>

	</persistenceAdapter>

    </broker>

    <!--

        Enable web consoles, REST and Ajax APIs and demos

        The web consoles requires by default login, you can disable this in the jetty.xml file

        Take a look at ${ACTIVEMQ_HOME}/conf/jetty.xml for more details

    -->

    <import resource="jetty.xml"/>

</beans>

<!-- END SNIPPET: example -->
登录activemq的web界面:http://10.90.6.153:8161/默认账号及密码:admin/admin
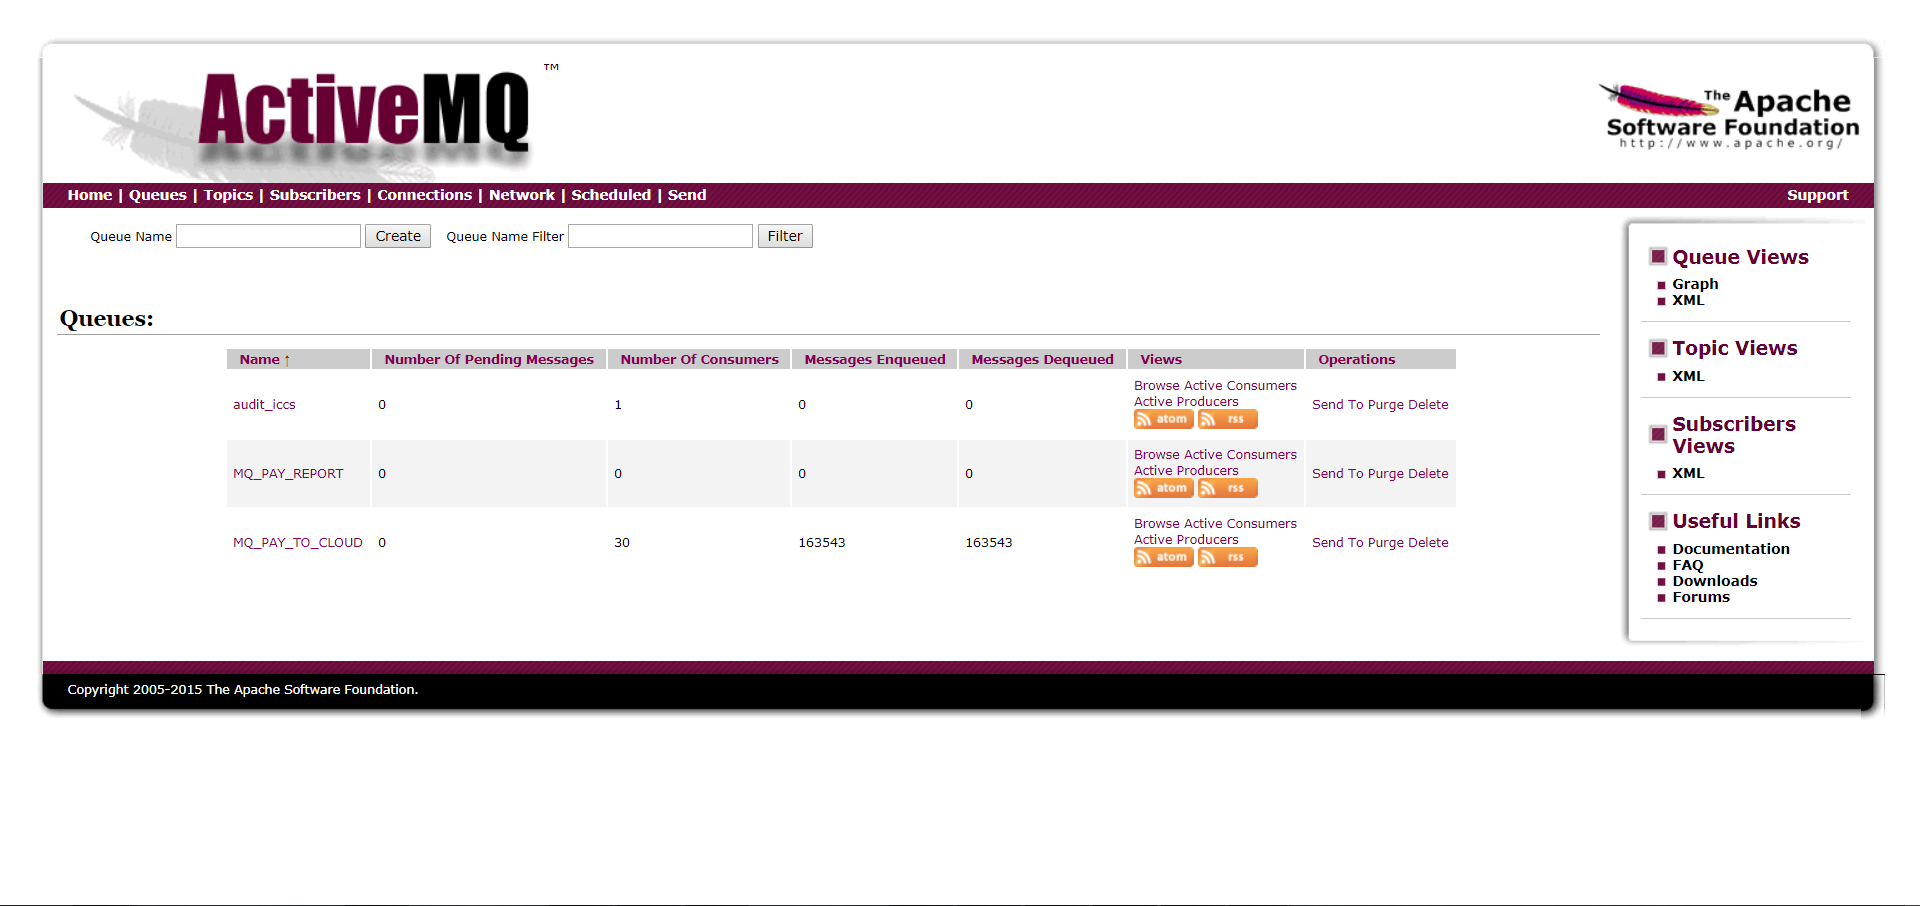
【简要描述】
Number Of Consumers 消费者 “这个是消费者端的消费者数量”
Number Of Pending Messages 等待消费的消息 “这个是当前未出队列的数量。可以理解为总接收数-总出队列数”
Messages Enqueued 进入队列的消息 “进入队列的总数量,包括出队列的。 这个数量只增不减”
Messages Dequeued 出了队列的消息 “可以理解为是消费这消费掉的数量”
ActionMQ集群部署的更多相关文章
- Quartz.net持久化与集群部署开发详解
序言 我前边有几篇文章有介绍过quartz的基本使用语法与类库.但是他的执行计划都是被写在本地的xml文件中.无法做集群部署,我让它看起来脆弱不堪,那是我的罪过. 但是quart.net是经过许多大项 ...
- Openfire 集群部署和负载均衡方案
Openfire 集群部署和负载均衡方案 一. 概述 Openfire是在即时通讯中广泛使用的XMPP协议通讯服务器,本方案采用Openfire的Hazelcast插件进行集群部署,采用Hapro ...
- 基于Tomcat的Solr3.5集群部署
基于Tomcat的Solr3.5集群部署 一.准备工作 1.1 保证SOLR库文件版本相同 保证SOLR的lib文件版本,slf4j-log4j12-1.6.1.jar slf4j-jdk14-1.6 ...
- jstorm集群部署
jstorm集群部署下载 Install JStorm Take jstorm-0.9.6.zip as an example unzip jstorm-0.9.6.1.zip vi ~/.bashr ...
- CAS 集群部署session共享配置
背景 前段时间,项目计划搞独立的登录鉴权中心,由于单独开发一套稳定的登录.鉴权代码,工作量大,最终的方案是对开源鉴权中心CAS(Central Authentication Service)作适配修改 ...
- Windows下ELK环境搭建(单机多节点集群部署)
1.背景 日志主要包括系统日志.应用程序日志和安全日志.系统运维和开发人员可以通过日志了解服务器软硬件信息.检查配置过程中的错误及错误发生的原因.经常分析日志可以了解服务器的负荷,性能安全性,从而及时 ...
- 理解 OpenStack + Ceph (1):Ceph + OpenStack 集群部署和配置
本系列文章会深入研究 Ceph 以及 Ceph 和 OpenStack 的集成: (1)安装和部署 (2)Ceph RBD 接口和工具 (3)Ceph 物理和逻辑结构 (4)Ceph 的基础数据结构 ...
- HBase集成Zookeeper集群部署
大数据集群为了保证故障转移,一般通过zookeeper来整体协调管理,当节点数大于等于6个时推荐使用,接下来描述一下Hbase集群部署在zookeeper上的过程: 安装Hbase之前首先系统应该做通 ...
- SolrCloud-5.2.1 集群部署及测试
一. 说明 Solr5内置了Jetty服务,所以不用安装部署到Tomcat了,网上部署Tomcat的资料太泛滥了. 部署前的准备工作: 1. 将各主机IP配置为静态IP(保证各主机可以正常通信,为避免 ...
随机推荐
- Python学习的相关文件链接
1.如何用 Python 模糊搜索文件 用循环来实现逐个比对,素材链接:https://files.cnblogs.com/files/Lamfai/script_project1_files. ...
- pycharm的list中clear的应用
#清空的意思 li = [11,22,33,44] li.clear() print(li) #输出[],就是把列表清空
- Vue-Router动态路由匹配
//重点在于路由出口 <p> <!-- 使用 router-link 组件来导航. --> <!-- 通过传入 `to` 属性指定链接. --> <!-- & ...
- 从零开始学python
自从20世纪90年代初Python语言诞生至今,它已被广泛应用于系统管理任务的处理和Web编程.今天就来给大家看看学Python的五大优势吧! NO.1 全球三大主流编程语言之一 python是一种面 ...
- C# 0xC0000005 捕获
[HandleProcessCorruptedStateExceptions]//捕获c++异常 [SecurityCritical]//捕获c++异常 public void xxx() { try ...
- altiumdesigner的基本你操作
一:中英文切换 DXP ->Preferences ->System ->General ->Localization(使用本地资源) 本地资源对应的是汉语
- AppImage格式安装包使用
AppImage(以及前身klik和portablelinuxapps)不会安装传统意义上的软件(即它不会将文件放在系统中的所有位置). 它每个应用程序使用一个文件.每个都是自包含的:它包括应用程序所 ...
- MongoDB 用Robomong可视化工具操作的 一些简单语句
一.数据更新 db.getCollection('表名').update({ "字段":{$in:["值"]} }, //更新条件 {$set:{ " ...
- VUE-利用OSS BrowserJS-SDK实现阿里OSS前端上传
项目中遇到利用阿里OSS上传文件,线上很多示例用到了各种SDK,却没有看到OSS BrowserJS-SDK相关示例,鉴于脑子不好使,记一下. 封装upload相关组件  使用npm安装SDK的开发 ...
- django 源码报错
启动django ,一直提示一个 AttributeError: 'str' object has no attribute 'decode' 哥,查了一下午google,就怕是自己判断错了,最后在一 ...