Blend 2015 教程 (三) 模板
前一篇讲述了一些基本样式的修改方法,并搭建了Style层的基本框架,本篇将进一步修改ListBox的样式。
1. 首先选中ListBox控件,在美工板导航栏中点击ListBox,选择 编辑其他模板-编辑项的布局-编辑副本,起名为PeopleListItemsPanelTemplate,选择该文档选项,点击确定,进入项布局编辑模式。
此时,美工板导航栏变为

2. 在文档大纲面板中选择VirtualizingStackPanel,右键点击,选择 更改布局类型-WrapPanel,点击返回上一层,退出项布局编辑模式。
3. 选择ListBox控件,在属性面板中,点击布局组的展开更多按钮,展开更多属性后,把ScrollViewer.HorizontalScrollBarVisibility改为Disabled。
4. 选择ListBox控件,点击美工板导航栏中的ListBox,选择 编辑其他模板-编辑生成的项-编辑当前项。在文档大纲面板中选择Grid,在属性面板中把Width和Height改为200和100。在文档大纲面板中,在Grid上点击右键,选择 分组-Grid。可以看到树中变为两层Grid,选择外层Grid,在属性面板中,点击RowDefinitions属性的...按钮,在弹出的对话框中点击两次添加按钮,把Grid改为两行,把第一行的Height属性改为Auto,第二行的Height属性保留Star,如下图所示,
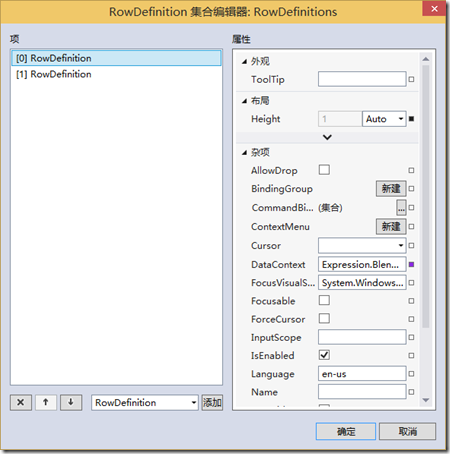
美工板如下图所示,
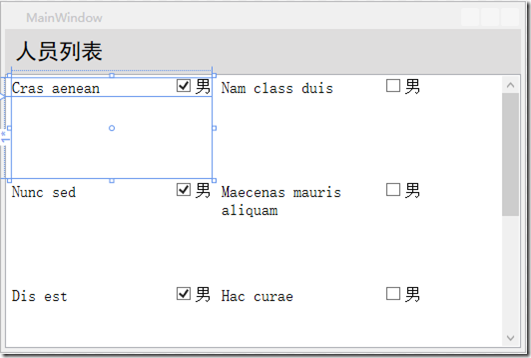
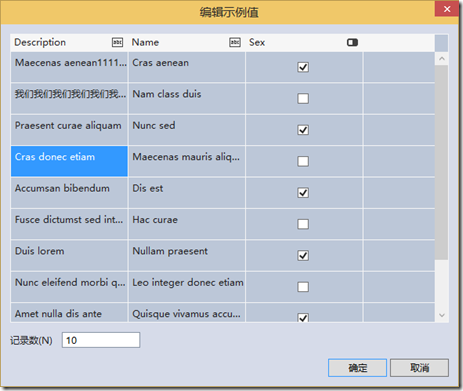
5. 在美工板中按T键,选择TextBlock工具,在Grid的第二行的位置上绘制一个TextBlock并重置其布局。在数据面板中,点击树中的Persons项的加号按钮,看到新添加了一个属性,起名为Description。在美工板中选择刚才添加的TextBlock,在属性面板中,点击Text属性的小方块,选择 创建数据绑定,选择Description属性。在数据面板中,点击Persons项的编辑示例值按钮,弹出如下对话框,把某些Description改长点。
6. 在文档大纲面板中,在内层Grid上右键点击,选择 分组-Border。在文档大纲面板中的Border上右键点击,选择 编辑样式-创建空样式,起名为SubtitleStyle。在属性面板中把背景色改为浅蓝色,Padding改为5,5,5,5。 在文档大纲面板中,点击返回上一层按钮,退出样式编辑模式。
7. 在美工板中选择第二行的TextBlock控件,修改Margin为5,5,5,5。在文档大纲面板中,点击返回上一层按钮,退出模板编辑模式。
8. 在选择ListBox控件的条件下,点击美工板导航栏的ListBox,选择 编辑其他模板-编辑生成的项目容器-编辑副本,起名为PeopleListItemStyle,进入模板编辑模式。点击美工板导航栏中间的画板图标按钮,进入样式编辑模式,如下图。

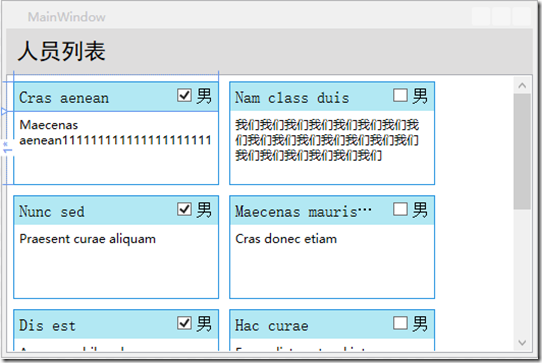
在属性面板中把Padding修改为0,0,0,0。Margin修改为5,5,5,5。BorderBrush改为蓝色。效果如下图,
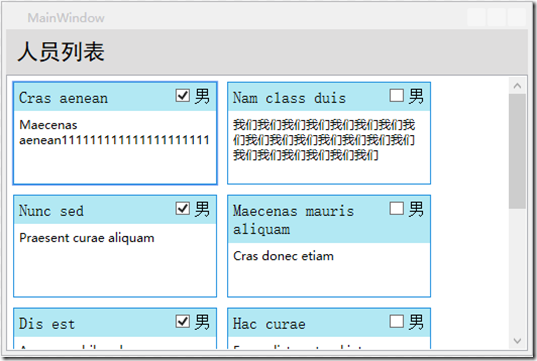
列表项的标题不应该有换行。点击美工板导航栏的ListBox部分,再点击一次,选择 编辑其他模板-编辑生成的项-编辑当前项。选择标题部分的TextBlock,在属性面板中把文本组展开,把TextWrapping属性改为NoWrap,把TextTrimming属性改为WordEllipsis。点击ToolTip属性的小方块,选择创建数据绑定,选择Name属性。效果如下图。
此时完整的代码如下,
<Window

        xmlns="http://schemas.microsoft.com/winfx/2006/xaml/presentation"

        xmlns:x="http://schemas.microsoft.com/winfx/2006/xaml"

        xmlns:d="http://schemas.microsoft.com/expression/blend/2008"

        xmlns:mc="http://schemas.openxmlformats.org/markup-compatibility/2006"

        xmlns:local="clr-namespace:BlendDemo"

        xmlns:System="clr-namespace:System;assembly=mscorlib" x:Class="BlendDemo.MainWindow"

        mc:Ignorable="d"

        Title="MainWindow" Height="350" Width="525" d:DataContext="{d:DesignData /SampleData/SampleDataSource/SampleDataSource.xaml}">

    <Window.Resources>

        <DataTemplate x:Key="PeopleListDataTemplate">

            <Grid Height="100" Width="200">

                <Grid.RowDefinitions>

                    <RowDefinition Height="Auto"/>

                    <RowDefinition/>

                </Grid.RowDefinitions>

                <Border Style="{DynamicResource SubtitleStyle}">

                    <Grid>

                        <Grid.ColumnDefinitions>

                            <ColumnDefinition Width="*"/>

                            <ColumnDefinition Width="Auto"/>

                        </Grid.ColumnDefinitions>

                        <TextBlock Height="Auto" TextWrapping="NoWrap" Text="{Binding Name}" Width="Auto" Style="{DynamicResource CoreTextStyle}" TextTrimming="WordEllipsis" ToolTip="{Binding Name}"/>

                        <CheckBox Content="男" Grid.Column="1" Height="Auto" Width="Auto" IsChecked="{Binding Sex}" Style="{DynamicResource CheckBoxBaseStyle}"/>

                    </Grid>

                </Border>

                <TextBlock Grid.Row="1" TextWrapping="Wrap" Text="{Binding Description}" Margin="5"/>

            </Grid>

        </DataTemplate>

        <Style x:Key="TitleStyle" TargetType="{x:Type Border}">

            <Setter Property="Padding" Value="10"/>

            <Setter Property="Background" Value="#FFDEDDDD"/>

        </Style>

        <ItemsPanelTemplate x:Key="PeopleListItemsPanelTemplate">

            <WrapPanel IsItemsHost="True"/>

        </ItemsPanelTemplate>

        <Style x:Key="SubtitleStyle" TargetType="{x:Type Border}">

            <Setter Property="Background" Value="#FFB2E8F3"/>

            <Setter Property="Padding" Value="5"/>

        </Style>

        <Style x:Key="FocusVisual">

            <Setter Property="Control.Template">

                <Setter.Value>

                    <ControlTemplate>

                        <Rectangle Margin="2" SnapsToDevicePixels="true" Stroke="{DynamicResource {x:Static SystemColors.ControlTextBrushKey}}" StrokeThickness="1" StrokeDashArray="1 2"/>

                    </ControlTemplate>

                </Setter.Value>

            </Setter>

        </Style>

        <SolidColorBrush x:Key="Item.MouseOver.Background" Color="#1F26A0DA"/>

        <SolidColorBrush x:Key="Item.MouseOver.Border" Color="#a826A0Da"/>

        <SolidColorBrush x:Key="Item.SelectedInactive.Background" Color="#3DDADADA"/>

        <SolidColorBrush x:Key="Item.SelectedInactive.Border" Color="#FFDADADA"/>

        <SolidColorBrush x:Key="Item.SelectedActive.Background" Color="#3D26A0DA"/>

        <SolidColorBrush x:Key="Item.SelectedActive.Border" Color="#FF26A0DA"/>

        <Style x:Key="PeopleListItemStyle" TargetType="{x:Type ListBoxItem}">

            <Setter Property="SnapsToDevicePixels" Value="True"/>

            <Setter Property="Padding" Value="0"/>

            <Setter Property="HorizontalContentAlignment" Value="{Binding HorizontalContentAlignment, RelativeSource={RelativeSource AncestorType={x:Type ItemsControl}}}"/>

            <Setter Property="VerticalContentAlignment" Value="{Binding VerticalContentAlignment, RelativeSource={RelativeSource AncestorType={x:Type ItemsControl}}}"/>

            <Setter Property="Background" Value="Transparent"/>

            <Setter Property="BorderBrush" Value="#FF2391DE"/>

            <Setter Property="BorderThickness" Value="1"/>

            <Setter Property="FocusVisualStyle" Value="{StaticResource FocusVisual}"/>

            <Setter Property="Template">

                <Setter.Value>

                    <ControlTemplate TargetType ="{x:Type ListBoxItem}">

                        <Border x:Name="Bd" BorderBrush="{TemplateBinding BorderBrush}" BorderThickness="{TemplateBinding BorderThickness}" Background="{TemplateBinding Background}" Padding="{TemplateBinding Padding}" SnapsToDevicePixels="true">

                            <ContentPresenter HorizontalAlignment="{TemplateBinding HorizontalContentAlignment}" SnapsToDevicePixels="{TemplateBinding SnapsToDevicePixels}" VerticalAlignment="{TemplateBinding VerticalContentAlignment}"/>

                        </Border>

                        <ControlTemplate.Triggers>

                            <MultiTrigger>

                                <MultiTrigger.Conditions>

                                    <Condition Property="IsMouseOver" Value="True"/>

                                </MultiTrigger.Conditions>

                                <Setter Property="Background" TargetName="Bd" Value="{StaticResource Item.MouseOver.Background}"/>

                                <Setter Property="BorderBrush" TargetName="Bd" Value="{StaticResource Item.MouseOver.Border}"/>

                            </MultiTrigger>

                            <MultiTrigger>

                                <MultiTrigger.Conditions>

                                    <Condition Property="Selector.IsSelectionActive" Value="False"/>

                                    <Condition Property="IsSelected" Value="True"/>

                                </MultiTrigger.Conditions>

                                <Setter Property="Background" TargetName="Bd" Value="{StaticResource Item.SelectedInactive.Background}"/>

                                <Setter Property="BorderBrush" TargetName="Bd" Value="{StaticResource Item.SelectedInactive.Border}"/>

                            </MultiTrigger>

                            <MultiTrigger>

                                <MultiTrigger.Conditions>

                                    <Condition Property="Selector.IsSelectionActive" Value="True"/>

                                    <Condition Property="IsSelected" Value="True"/>

                                </MultiTrigger.Conditions>

                                <Setter Property="Background" TargetName="Bd" Value="{StaticResource Item.SelectedActive.Background}"/>

                                <Setter Property="BorderBrush" TargetName="Bd" Value="{StaticResource Item.SelectedActive.Border}"/>

                            </MultiTrigger>

                            <Trigger Property="IsEnabled" Value="False">

                                <Setter Property="TextElement.Foreground" TargetName="Bd" Value="{DynamicResource {x:Static SystemColors.GrayTextBrushKey}}"/>

                            </Trigger>

                        </ControlTemplate.Triggers>

                    </ControlTemplate>

                </Setter.Value>

            </Setter>

            <Setter Property="Margin" Value="5"/>

        </Style>

    </Window.Resources>

    <Grid>

        <Grid.RowDefinitions>

            <RowDefinition Height="Auto"/>

            <RowDefinition/>

        </Grid.RowDefinitions>

        <Border Style="{DynamicResource TitleStyle}" >

            <TextBlock Text="人员列表" Style="{DynamicResource TitleTextStyle}"/>

        </Border>

        <ListBox Grid.Row="1" ItemsSource="{Binding Persons}" ItemTemplate="{DynamicResource PeopleListDataTemplate}" HorizontalContentAlignment="Stretch" ItemsPanel="{DynamicResource PeopleListItemsPanelTemplate}" ScrollViewer.HorizontalScrollBarVisibility="Disabled" ItemContainerStyle="{DynamicResource PeopleListItemStyle}"/>

    </Grid>

</Window>
9. 设计视图可以显示设计的效果,但观察动态效果较难。
解决方法是,在文档大纲面板中,退出样式或模板编辑模式,选择Window,在属性面板中找到DataContext属性,点击小方块,选择 本地资源-SampleDataSource。这时运行程序,可以看到效果。
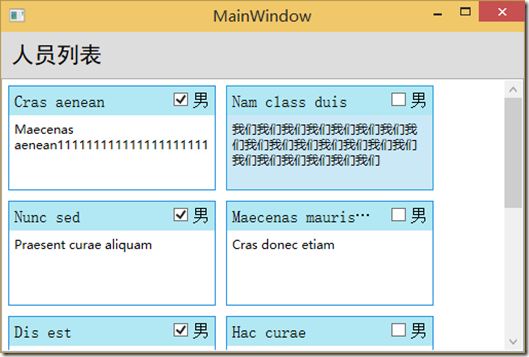
这时鼠标移动到ListBox中的项目上时,或点击选中时,是有交互效果的。
10. 如果不满意动态交互效果,可以到触发器面板中编辑。选中ListBox控件,点击美工板导航栏中的ListBox,选择 编辑其他模板-编辑生成的项目容器-编辑当前项,在触发器面板中选择第三项,如下图。
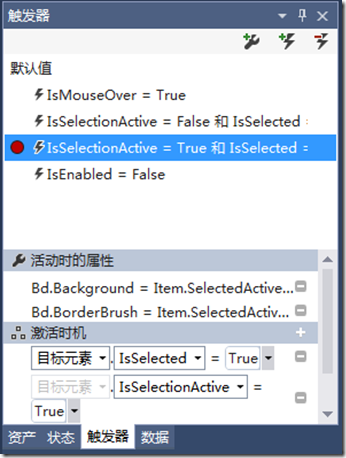
在属性面板中把Background改为其他颜色。修改的方法为,在属性面板中找到Background属性,此时小方块是绿色的,表面是引用的资源。点击小方块,选择编辑资源,在弹出的对话框中编辑新的颜色即可。
完成后别忘了重置Window的DataContext属性,为下一步后端开发人员开发留出余地。
下一篇将修改性别显示那一部分的样式,重点演示控件模板的修改方法,敬请关注。
Blend 2015 教程 (三) 模板的更多相关文章
- Blend 2015 教程 (四)控件模板
前一篇讲述了修改ListBox样式的方法,本篇将修改性别显示区域的样式. 1. 选择ListBox控件,编辑ItemTemplate的当前项,选择CheckBox控件,在美工板导航栏中点击CheckB ...
- Blend 2015 教程 (一) 基础
微软公司在Visual Studio 2015产品套件中作出了许多革命性的变更,包括.NET开源,.NET服务器端部分跨平台,推出向个人和小团队免费的社区版,移动应用开发部分跨平台支持,商店应用支持C ...
- Blend 2015 教程 (二) 样式
前一篇讲述了如何在新Blend中完成一个简单的带数据绑定的界面小例子,本篇将讲述一下,把View层和Style层分开,并搭建Style层框架的方法,并进行细节样式修改. 1. 在解决方案资源管理器面板 ...
- Blend 2015 教程 (五) 自定义状态
本篇再补充一块内容,就是自定义状态的介绍. 自定义状态用于封装用户控件在各种状态之间切换时的外观变化及其动画效果,方便调用.比如有个用户控件用于实现类似舞台幕布打开和关闭切换的效果,可以创建幕布关闭和 ...
- python Django教程 之模板渲染、循环、条件判断、常用的标签、过滤器
python3.5 manage.py runserver python Django教程 之模板渲染.循环.条件判断.常用的标签.过滤器 一.Django模板渲染模板 1. 创建一个 zqxt_tm ...
- CocoStudio教程三:认识并利用CocoStudio的果实 运行2.2.1版本
原文:CocoStudio教程三:认识并利用CocoStudio的果实 原文用的老版,用2.21搞起来好像有些问题,然后自己摸索了下,有的都是乱找的方法,只求能运行... 1,原文的CCJsonRea ...
- Laravel教程 三:视图变量传递和Blade
Laravel教程 三:视图变量传递和Blade 此文章为原创文章,未经同意,禁止转载. Blade 上一篇我们简单地说了Router,Views和Controllers的工作流程,这一次我就按照上一 ...
- RMAN详细教程(三):备份脚本的组件和注释
RMAN详细教程(一):基本命令代码 RMAN详细教程(二):备份.检查.维护.恢复 RMAN详细教程(三):备份脚本的组件和注释 RMAN详细教程(四):备份脚本实战操作 一.基本组件: 1.Ser ...
- Elasticsearch入门教程(三):Elasticsearch索引&映射
原文:Elasticsearch入门教程(三):Elasticsearch索引&映射 版权声明:本文为博主原创文章,遵循CC 4.0 BY-SA版权协议,转载请附上原文出处链接和本声明. 本文 ...
随机推荐
- Linux字符串截取和处理命令 cut、printf、awk、sed、sort、wc
1. cut [选项] 文件名 -f 列号 #提取第几列(分隔符默认为\t) -d 分隔符 #指定分隔符 例如:cut -f 2 a.txt #截取文件a.txt内容的第二列(列号从1开始) cu ...
- Archlinux 上 Nginx + PHP + Mariadb + DiscuzX2.5 安装小记
因为不好找下载集成服务器工具,而且他们自己又打包了一份 php 之类的程序,本身系统就已经有 php 还有数据库什么的了再搞一份受不了,最后选择了手动配置…… 这是一个在 Archlinux 上手动从 ...
- C++使用继承时子对象的内存布局
C++使用继承时子对象的内存布局 // */ // ]]> C++使用继承时子对象的内存布局 Table of Contents 1 示例程序 2 对象的内存布局 1 示例程序 class ...
- 海量数据相似度计算之simhash和海明距离
通过 采集系统 我们采集了大量文本数据,但是文本中有很多重复数据影响我们对于结果的分析.分析前我们需要对这些数据去除重复,如何选择和设计文本的去重算法?常见的有余弦夹角算法.欧式距离.Jaccard相 ...
- virtual 修饰符 C# .NET
virtual 关键字用于修饰方法.属性.索引器或事件声明,并且允许在派生类中重写这些对象. 例如,此方法可被任何继承它的类重写. (C#参考) public virtual double Area( ...
- HTTP协议-----小白
HTTP是一个属于应用层的面向对象的协议. ***OSI的7层从上到下分别是 7 应用层 6 表示层 5 会话层 4 传输层 3 网络层 2 数据链路层 1 物理层 HTTP协议的主要特点可概括如下: ...
- C++基础知识易错点总结(1)
1. 在C++中,不能被重载的运算符有: sizeof . 成员运算符 .* 成员指针运算符 :: 作用域运算符 ?: 条件运算符 2. C++语言多态性:编译时多态和运行时多态: 编译时多态可通过函 ...
- 给自己立下一个巨大的flag
[BZOJ1861][BZOJ3224] [BZOJ2733][BZOJ1056] [BZOJ2120][BZOJ3673] [BZOJ1833][BZOJ1026] [BZOJ3209][BZOJ1 ...
- jquery选择器总结 转自(永远的麦子)
jQuery选择器总结 阅读目录 1, 基本选择器? 2, 层次选择器? 3, 过滤选择器? 4, 表单选择器? jQuery选择器共有四大类,分别为基本选择器,层次选择器,过滤选择器和表单选择器.下 ...
- Swift - mutating关键字的使用
转载自:http://www.jianshu.com/p/14cc9d30770a 感谢作者:此ID想了很久 Swift中protocol的功能比OC中强大很多,不仅能再class中实现,同时也适用 ...