Centos7桥接设置网络并使用xrdp+tigervnc实现桌面远程访问

最近用到了虚拟机,之前虚拟机的网络配置使用的NAT配置好了,但是无论怎样设置都无法使用局域网内的其它主机访问虚拟机的服务。经过了一天的折腾,远程主机仍然连接不上虚拟机服务,后来找到原因,NAT连接模式下局域网内的其它主机通过无线网卡连接虚拟机的映射,但是虚拟机从有线网卡中传递信号返回故局域网内其它主机实现对宿主主机的虚拟机的访问使用NAT模式是不可行的,看到有些人写的NAT的配置中将虚拟机的网络适配器ip地址修改为与宿主机ip同频段的地址,这种方法虽然实现了宿主机对虚拟机的访问但是此时的虚拟机是ping不到互联网络的(因为此时虚拟机的ip是NAT模式下分发的子网ip地址,与宿主机的ip不在一个网络内,故不可以实现网络访问)。
折腾了一天的时间后断然改用桥接的方式实现局域网内主机对虚拟机的访问设置。桥接的模式就是使虚拟机和宿主机在同一ip网络内,即给虚拟机一个物理地址共享主机的无线网卡。
使用桥接配置网络###
下面主要是桥接的设置步骤。
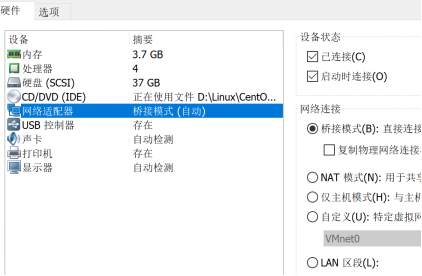
步骤一####
首先在虚拟机配置中更改网络模式为 桥接
步骤二####
查看虚拟网络编辑器:(注意我们在NAT模式时需要设置网络编辑器,而在桥接模式上我们不需要对它进行更改,并且要确保模式中只有一种本地模式)
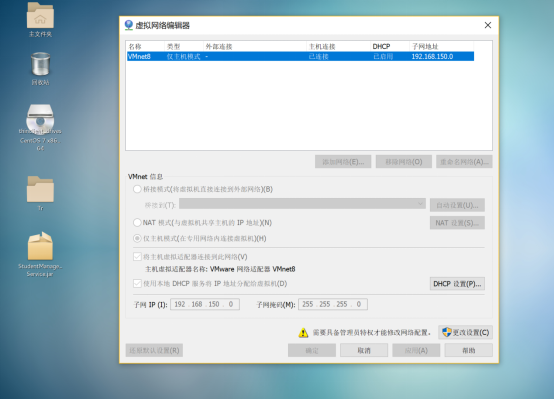
步骤三####
打开宿主机的网络配置,对Vmnet8(对应上图中的适配器名称)进行配置Ipv4,要保证ip地址与宿主机的ip在同一个ip频段上,但不要与宿主机ip相同,网关一定要与宿主机的网关一样,子网掩码也要与宿主机相同,一般子网掩码为255.255.255.0

步骤四####
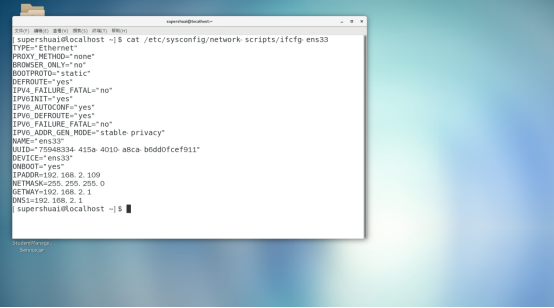
在Centos的虚拟机上设置网络,由于我是从NAT切换成桥接模式的所以我这是在NAT模式上进行的修改,BOOTPROTO=“static”静态获取ip (ip对应宿主机的ip频段但与宿主机ip地址不能一样,网关以及子网掩码与宿主机相同),当然可以设置成 BOOTPROTO=“dhcp”动态获取,并且将IPADDR及以下的设置删除掉。
另外ONBOOT要为yes。有些人的电脑中不存在ifcfg-ens33文件,使用命令cd /etc/sysconfig/network-scripts进入network-scripts文件夹内使用ls查看ifcfg-ensxxxx文件并进行如下设置。
执行命令 sudo vi /etc/sysconfig/network 点击i键进入修改模式后设置GATEWAY(网关)与主机网关相同,HOSTNAME随意设置。修改完成后Esc并使用:wq保存。

执行命令 sudo vi /etc/resolv.conf 进入后点击i键进行修改操作。内容如下:
其中nameserver与网关地址一致。修改完成后Esc并使用:wq保存。

至此所有设置完成,在终端执行ping 主机ip 可以查看通讯。
xrdp+tigervnc实现远程桌面设置###
安装步骤####
首先安装xrdp:
执行命令:yun install epel-release 这个软件包会自动配置yum的软件仓库。如果你也可以不安装这个包,自行配置软件仓库也是一样的
执行命令:yun install xrdp 实现对xrdp的安装
执行命令:yum install tigervnc tigervnc-server 实现tigervnc的安装(远程桌面的一种实现方式)
执行命令:chcon -t bin_t /usr/sbin/xrdp
执行命令: chcon -t bin_t /usr/sbin/xrdp-sesman 实现对xrdp服务的设置
执行命令:systemctl start xrdp 启动xrdp服务
执行命令:systemctl enable xrdp 通过systemctl enable实现xrdp服务的开机自启的设置
执行命令:netstat -antup|grep xrdp 查看xrdp与xrdp-sesman的启动情况
接下来就是为防火墙添加3389的访问接口( Server远程桌面的服务端口)
执行命令:firewall-cmd --permanent --zone=public --add-port=3389/tcp
执行命令:firewall-cmd --reload
至此实现远程桌面的设置,连接远程桌面时地址为 : 你的虚拟机的ip地址:3389 输入用户名和密码登录远程桌面。
安装记录####
以下是安装记录打印可供参考:
[root@localhost superme]# yum install epel-release

已加载插件:fastestmirror, langpacks

Loading mirror speeds from cached hostfile

 * base: mirrors.cn99.com

 * extras: mirrors.zju.edu.cn

 * updates: mirrors.cn99.com

正在解决依赖关系

There are unfinished transactions remaining. You might consider running yum-complete-transaction, or "yum-complete-transaction --cleanup-only" and "yum history redo last", first to finish them. If those don't work you'll have to try removing/installing packages by hand (maybe package-cleanup can help).

--> 正在检查事务

---> 软件包 epel-release.noarch.0.7-11 将被 安装

--> 解决依赖关系完成

依赖关系解决

================================================================================

 Package                架构             版本            源                大小

================================================================================

正在安装:

 epel-release           noarch           7-11            extras            15 k

事务概要

================================================================================

安装  1 软件包

总下载量:15 k

安装大小:24 k

Is this ok [y/d/N]: y

Downloading packages:

警告:/var/cache/yum/x86_64/7/extras/packages/epel-release-7-11.noarch.rpm: 头V3 RSA/SHA256 Signature, 密钥 ID f4a80eb5: NOKEY

epel-release-7-11.noarch.rpm 的公钥尚未安装

epel-release-7-11.noarch.rpm                               |  15 kB   00:05

从 file:///etc/pki/rpm-gpg/RPM-GPG-KEY-CentOS-7 检索密钥

导入 GPG key 0xF4A80EB5:

 用户ID     : "CentOS-7 Key (CentOS 7 Official Signing Key) <security@centos.org>"

 指纹       : 6341 ab27 53d7 8a78 a7c2 7bb1 24c6 a8a7 f4a8 0eb5

 软件包     : centos-release-7-5.1804.el7.centos.x86_64 (@anaconda)

 来自       : /etc/pki/rpm-gpg/RPM-GPG-KEY-CentOS-7

是否继续?[y/N]:y

Running transaction check

Running transaction test

Transaction test succeeded

Running transaction

  正在安装    : epel-release-7-11.noarch                                    1/1

  验证中      : epel-release-7-11.noarch                                    1/1

已安装:

  epel-release.noarch 0:7-11

完毕!

[root@localhost superme]# yum install xrdp

已加载插件:fastestmirror, langpacks

Loading mirror speeds from cached hostfile

epel/x86_64/metalink                                     | 4.9 kB     00:00

 * base: mirrors.cn99.com

 * epel: ftp.yz.yamagata-u.ac.jp

 * extras: mirrors.zju.edu.cn

 * updates: mirrors.cn99.com

epel                                                     | 5.4 kB     00:00

epel/x86_64/updateinfo         FAILED

http://ftp.riken.jp/Linux/fedora/epel/7/x86_64/repodata/f9261eaff5918473af07052ec939c36c94dba4243ba8aab79c58d4fde90d6ae7-updateinfo.xml.bz2: [Errno 14] HTTP Error 404 - Not Found

正在尝试其它镜像。

To address this issue please refer to the below wiki article

https://wiki.centos.org/yum-errors

If above article doesn't help to resolve this issue please use https://bugs.centos.org/.

(1/3): epel/x86_64/group_gz                                |  90 kB   00:00

epel/x86_64/updateinfo         FAILED

http://epel.dionipe.id/7/x86_64/repodata/f9261eaff5918473af07052ec939c36c94dba4243ba8aab79c58d4fde90d6ae7-updateinfo.xml.bz2: [Errno 14] HTTP Error 404 - Not Found

正在尝试其它镜像。

(2/3): epel/x86_64/updateinfo                              | 1.0 MB   00:02

(3/3): epel/x86_64/primary_db                              | 6.7 MB   01:37

正在解决依赖关系

There are unfinished transactions remaining. You might consider running yum-complete-transaction, or "yum-complete-transaction --cleanup-only" and "yum history redo last", first to finish them. If those don't work you'll have to try removing/installing packages by hand (maybe package-cleanup can help).

--> 正在检查事务

---> 软件包 xrdp.x86_64.1.0.9.12-4.el7 将被 安装

--> 解决依赖关系完成

依赖关系解决

================================================================================

 Package        架构             版本                      源              大小

================================================================================

正在安装:

 xrdp           x86_64           1:0.9.12-4.el7            epel           427 k

事务概要

================================================================================

安装  1 软件包

总下载量:427 k

安装大小:2.1 M

Is this ok [y/d/N]: y

Downloading packages:

警告:/var/cache/yum/x86_64/7/epel/packages/xrdp-0.9.12-4.el7.x86_64.rpm: 头V3 RSA/SHA256 Signature, 密钥 ID 352c64e5: NOKEY

xrdp-0.9.12-4.el7.x86_64.rpm 的公钥尚未安装

xrdp-0.9.12-4.el7.x86_64.rpm                               | 427 kB   00:08

从 file:///etc/pki/rpm-gpg/RPM-GPG-KEY-EPEL-7 检索密钥

导入 GPG key 0x352C64E5:

 用户ID     : "Fedora EPEL (7) <epel@fedoraproject.org>"

 指纹       : 91e9 7d7c 4a5e 96f1 7f3e 888f 6a2f aea2 352c 64e5

 软件包     : epel-release-7-11.noarch (@extras)

 来自       : /etc/pki/rpm-gpg/RPM-GPG-KEY-EPEL-7

是否继续?[y/N]:y

Running transaction check

Running transaction test

Transaction test succeeded

Running transaction

  正在安装    : 1:xrdp-0.9.12-4.el7.x86_64                                  1/1

  验证中      : 1:xrdp-0.9.12-4.el7.x86_64                                  1/1

已安装:

  xrdp.x86_64 1:0.9.12-4.el7

完毕!

[root@localhost superme]# yum install tigervnc tigervnc-server

已加载插件:fastestmirror, langpacks

Loading mirror speeds from cached hostfile

 * base: mirrors.cn99.com

 * epel: ftp.riken.jp

 * extras: mirrors.zju.edu.cn

 * updates: mirrors.cn99.com

正在解决依赖关系

There are unfinished transactions remaining. You might consider running yum-complete-transaction, or "yum-complete-transaction --cleanup-only" and "yum history redo last", first to finish them. If those don't work you'll have to try removing/installing packages by hand (maybe package-cleanup can help).

--> 正在检查事务

---> 软件包 tigervnc.x86_64.0.1.8.0-17.el7 将被 安装

--> 正在处理依赖关系 tigervnc-icons,它被软件包 tigervnc-1.8.0-17.el7.x86_64 需要

--> 正在处理依赖关系 libfltk_images.so.1.3()(64bit),它被软件包 tigervnc-1.8.0-17.el7.x86_64 需要

--> 正在处理依赖关系 libfltk.so.1.3()(64bit),它被软件包 tigervnc-1.8.0-17.el7.x86_64 需要

---> 软件包 tigervnc-server.x86_64.0.1.8.0-17.el7 将被 安装

--> 正在检查事务

---> 软件包 fltk.x86_64.0.1.3.4-1.el7 将被 安装

---> 软件包 tigervnc-icons.noarch.0.1.8.0-17.el7 将被 安装

--> 解决依赖关系完成

依赖关系解决

================================================================================

 Package                 架构           版本                 源            大小

================================================================================

正在安装:

 tigervnc                x86_64         1.8.0-17.el7         base         241 k

 tigervnc-server         x86_64         1.8.0-17.el7         base         215 k

为依赖而安装:

 fltk                    x86_64         1.3.4-1.el7          base         560 k

 tigervnc-icons          noarch         1.8.0-17.el7         base          39 k

事务概要

================================================================================

安装  2 软件包 (+2 依赖软件包)

总下载量:1.0 M

安装大小:2.6 M

Is this ok [y/d/N]: y

Downloading packages:

(1/4): tigervnc-icons-1.8.0-17.el7.noarch.rpm              |  39 kB   00:00

(2/4): tigervnc-1.8.0-17.el7.x86_64.rpm                    | 241 kB   00:00

(3/4): fltk-1.3.4-1.el7.x86_64.rpm                         | 560 kB   00:02

(4/4): tigervnc-server-1.8.0-17.el7.x86_64.rpm             | 215 kB   00:05

--------------------------------------------------------------------------------

总计                                               172 kB/s | 1.0 MB  00:06

Running transaction check

Running transaction test

Transaction test succeeded

Running transaction

  正在安装    : fltk-1.3.4-1.el7.x86_64                                     1/4

  正在安装    : tigervnc-icons-1.8.0-17.el7.noarch                          2/4

  正在安装    : tigervnc-1.8.0-17.el7.x86_64                                3/4

  正在安装    : tigervnc-server-1.8.0-17.el7.x86_64                         4/4

  验证中      : tigervnc-server-1.8.0-17.el7.x86_64                         1/4

  验证中      : tigervnc-icons-1.8.0-17.el7.noarch                          2/4

  验证中      : fltk-1.3.4-1.el7.x86_64                                     3/4

  验证中      : tigervnc-1.8.0-17.el7.x86_64                                4/4

已安装:

  tigervnc.x86_64 0:1.8.0-17.el7      tigervnc-server.x86_64 0:1.8.0-17.el7

作为依赖被安装:

  fltk.x86_64 0:1.3.4-1.el7         tigervnc-icons.noarch 0:1.8.0-17.el7

完毕!

[root@localhost superme]# chcon -t bin_t /usr/sbin/xrdp

[root@localhost superme]# chcon -t bin_t /usr/sbin/xrdp-sesman

[root@localhost superme]# systemctl start xrdp

[root@localhost superme]# systemctl enable xrdp

Created symlink from /etc/systemd/system/multi-user.target.wants/xrdp.service to /usr/lib/systemd/system/xrdp.service.

[root@localhost superme]# systemctl status xrdp.service

● xrdp.service - xrdp daemon

   Loaded: loaded (/usr/lib/systemd/system/xrdp.service; enabled; vendor preset: disabled)

   Active: active (running) since 六 2020-02-15 14:12:21 CST; 32s ago

     Docs: man:xrdp(8)

           man:xrdp.ini(5)

 Main PID: 4480 (xrdp)

   CGroup: /system.slice/xrdp.service

           └─4480 /usr/sbin/xrdp --nodaemon

2月 15 14:12:21 localhost.localdomain systemd[1]: Started xrdp daemon.

2月 15 14:12:21 localhost.localdomain systemd[1]: Starting xrdp daemon...

2月 15 14:12:22 localhost.localdomain xrdp[4480]: (4480)(140549388200384)[IN...

2月 15 14:12:22 localhost.localdomain xrdp[4480]: (4480)(140549388200384)[IN...

2月 15 14:12:22 localhost.localdomain xrdp[4480]: (4480)(140549388200384)[IN...

2月 15 14:12:22 localhost.localdomain xrdp[4480]: (4480)(140549388200384)[IN...

Hint: Some lines were ellipsized, use -l to show in full.

[root@localhost superme]# netstat -antup|grep xrdp

tcp        0      0 0.0.0.0:3389            0.0.0.0:*               LISTEN      4480/xrdp

tcp        0      0 127.0.0.1:3350          0.0.0.0:*               LISTEN      4479/xrdp-sesman

[root@localhost superme]# firewill -cmd --permanent --zone=public --add-port=3389/tcp

bash: firewill: 未找到命令...

[root@localhost superme]# firewall -cmd --permanent --zone=public --add-port=3389/tcp

bash: firewall: 未找到命令...

[root@localhost superme]# firewall-cmd --permanent --zone=public --add-port=3389/tcp

success

[root@localhost superme]# firewall-cmd --reload

success
Centos7桥接设置网络并使用xrdp+tigervnc实现桌面远程访问的更多相关文章
- Oracle VM VirtualBox CentOS7桥接设置问题解决
我遇到的问题是不能选择桥接网络选项,处理步骤: 1.重装 VirtualBox(安装DockerToolBox带的VirtualBox). 2.下面是存在的缺少驱动问题和解决方法: 注意 :缺少桥接驱 ...
- CentOS7虚拟机桥接设置及问题
转载请注明出处:jiq•钦's technical Blog 今天在VMWare WorkStation9中安装了CentOS7虚拟机. 虚拟机与宿主机网络连接有三种方式:桥接模式.NAT模式和Ho ...
- centos 桥接配置 设置网络代理 lnmp搭建
一.桥接配置 centos设置 编辑->虚拟网络编辑器->桥接模式->还原默认设置 虚拟机->设置->网络适配器->桥接 cd /etc/sysconfig/ne ...
- [转帖]CentOS7安装xrdp(windows远程桌面连接linux)
CentOS7安装xrdp(windows远程桌面连接linux) https://blog.csdn.net/sgrrmswtvt/article/details/81869208 You Konw ...
- virtual box设置网络,使用nat网络和仅主机(Host Only)网络进行连接
virtual box设置网络,使用nat网络和仅主机(Host Only)网络进行连接 前言 作为程序员难免要在本机电脑安装虚拟机,最近在用virtual box安装虚拟机的时候遇到了点问题. 对于 ...
- VMware Centos7 桥接 DHCP无法获得IP
问题描述 VMware Centos7 桥接模式下,虚拟机无法获得IP,无法联网 解决方案 网络设置为DHCP自动获取IP 查看主机(不是虚拟机)的相关服务是否打开,主要是VMware DHCP 这个 ...
- CentOS7桥接模式上不了外网的配置
电脑VM10装了CentOS7后用NAT模式可以上网,但我想要的是桥接模式,因为我要用Xshell5进行远程访问.所以要 ifconfig 找到ip .那么为什么桥接模式上不了外网呢? 首先参考了 h ...
- mac里vmware fusion桥接设置
1 桥接模式网络连接:选择以太网 2 在虚拟机操作系统里设置好ip,手动设置,将虚拟机当成一台存在的物理机设置 3 在宿主MAC偏好设置-网络-以太网-高级-硬件, 配置:自动改为 手工, 速度:选择 ...
- centos7 无法启动网络(service network restart)错误解决办法
centos7 无法启动网络(service network restart)错误解决办法: (以下方法均为网上COPY,同时感谢原博主分享) systemctl status network.ser ...
随机推荐
- antDeaign-form-getFieldDecorator 使用注意事项
2020-01-06 antDeaign-form-getFieldDecorator 使用注意事项 一.使用getFieldDecorator之前,必须先使用 Form.create({ })(Fo ...
- HBase学习笔记(四)—— 架构模型
在逻辑上,HBase 的数据模型同关系型数据库很类似,数据存储在一张表中,有行有列. 但从 HBase 的底层物理存储结构(K-V)来看,HBase 更像是一个 multi-dimensional m ...
- Prometheus基础应用
简介 Prometheus使用扫盲,包含基础的概念和操作说明,基于官网和个人测试. versoin: 2.14 官网 GitHub 安装 prometheus安装运行非常方便,下载后解压,运行根目录下 ...
- day3(if和for)
if if <条件判断 1>: <执行 1>elif <条件判断 2>: <执行 2>elif <条件判断 3>: <执行 3> ...
- Class 'org.apache.tomcat.jdbc.pool.DataSource' not found
把项目移动到新的运行环境时,明明包都导入了,项目也放进tomcat里面了,但是还会找不到该类 解决方法:项目右键选择底下的Properties ->project facets ->jav ...
- Windows系统下批处理快速创建WIFI
为什么要用cmd这种古老的东西创建wifi呢,电脑管家.360安全卫士都有这种插件,一键开启关闭,多方便啊! 开始用的也是电脑管家的免费wifi插件,但是我越来越不能忍它极慢的启动关闭过程,每一次看着 ...
- Tensorflow内存暴涨问题
1.目前只总结出两条 创建saver实例saver = tf.train.Saver()放在循环外面 不循环初始化变量 sess.run(tf.global_variables_initializer ...
- 在浏览器窗口内移动的div
------------今天研究了一个最简单的屏保效果----------- 效果图如下:效果很神奇,就是这个div在浏览器窗口不断的灵活移动 代码却很简单 <!DOCTYPE html> ...
- windows服务搭建(VS2019创建Windows服务不显示安装组件)
1.创建windows服务应用 2.右键查看代码 3.写个计时器Timer using System.Timers; 如上图,按tab键快速操作 会自动创建一个委托 改为下边的方式,打印日志来记录 ...
- Ubuntu18.04 安装配置mongodb
一.安装 # 1. 更新 sudo apt-get update # 2. 安装 sudo apt-get install -y mongodb # 3. 查看是否安装成功 # a. 服务状态 sud ...