
QT QcustomPlot的简单使用
第一步、QcustomPlot是QT提供的一个第三方库,在使用前需要在QcustomPlot官网上进行下载。
第二步、把解压完的QcustomPlot压缩包中的qcustomplot.h和qcustomplot.cpp文件添加到工程文件中来。使用时应先在源文件处点击添加现有文件,把这两个文件添加进来。
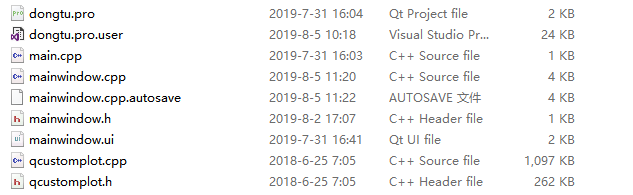
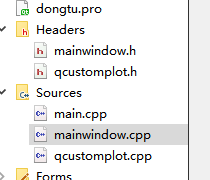
第三步、打开UI界面,把weiget控件添加到界面里,然后右键点击控件,选择提升
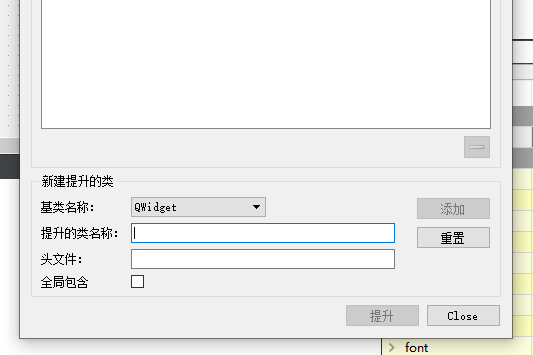
在提升的类名上写QcustomPlot,最后点击提升即可。
这样QcustomPlot这个第三方库就可以使用了。
以下是一简单的曲线代码。
.cpp文件
#include "mainwindow.h"

#include "ui_mainwindow.h"

#include <QTime>

#include <QDebug>

MainWindow::MainWindow(QWidget *parent) :

    QMainWindow(parent),

    ui(new Ui::MainWindow)

{

    ui->setupUi(this);

    //设置鼠标点击精度

    ui->customPlot->setSelectionTolerance();

    for(int i=;i<;i++)

    {

        num[i]=;

    }

    n=;

    QTimer *t = new QTimer(this);

    t->start();

    connect(t,SIGNAL(timeout()),this,SLOT(graph_show()));

    connect(ui->customPlot,SIGNAL(mouseRelease(QMouseEvent*)),this,SLOT(mouseReleaseEvent(QMouseEvent*)));

    //connect(tracer,SIGNAL(mouseMove(QMouseEvent*)),this,SLOT(mouseMoveEvent(QMouseEvent*)));

}

MainWindow::~MainWindow()

{

    delete ui;

}

void MainWindow::graph_show()

{

    n += PI/;

    graph_show(ui->customPlot);

}

void MainWindow::graph_show(QCustomPlot *customPlot)

{

    QVector<double> x(),y();

    for(int i=;i<;i++)

    {

        num[i]=num[i+];

    }

    num[]=n;

    for(int i=;i<;i++)

    {

        x[i] = i;

        y[i] = sin(num[i]);

    }

    //添加一条曲线

    customPlot->addGraph();

    //设置曲线的颜色

    customPlot->graph()->setPen(QPen(Qt::red));

    //给曲线传递两个参数

    customPlot->graph()->setData(x,y);

    //给曲线的横纵坐标命名

    customPlot->xAxis->setLabel("x");

    customPlot->yAxis->setLabel("y");

    //设置横纵坐标的范围

    customPlot->xAxis->setRange(,);

    customPlot->yAxis->setRange(-,);

    //进行曲线重画

    customPlot->replot();

    /*

    customPlot->setInteraction(QCP::iRangeZoom,true);

    customPlot->axisRect()->setRangeDrag(Qt::Vertical);

    customPlot->setInteraction(QCP::iRangeDrag,true);

    */

}

void MainWindow::mouseReleaseEvent(QMouseEvent *e)

{

    //排除非左鼠标键

    if (e->button() != Qt::LeftButton)

    {

        return;

    }

    //获取点击的点坐标

    QPointF ChickedPoint = e->pos();

    //排除区间外鼠标点

    if(!ui->customPlot->viewport().contains(e->pos()))

    {

        return;

    }

    //将像素坐标转换为轴值

    double currentx = ui->customPlot->xAxis->pixelToCoord(ChickedPoint.x());

    double currenty = ui->customPlot->yAxis->pixelToCoord(ChickedPoint.y());

    //使用QToolTip输出值,

    QToolTip::showText(mapToGlobal(e->pos()),QString("当前点值为:x=%1,y=%2").arg(currentx).arg(currenty),this);

}
.h文件
#ifndef MAINWINDOW_H

#define MAINWINDOW_H

#include <QMainWindow>

#include "ui_mainwindow.h"

#include <QMouseEvent>

#define PI 3.1415926

namespace Ui {

class MainWindow;

}

class MainWindow : public QMainWindow

{

    Q_OBJECT

public:

    explicit MainWindow(QWidget *parent = );

    ~MainWindow();

    //设置一容器

    double num[];

    double n=;

    void graph_show(QCustomPlot *customPlot);

public slots:

    void graph_show();

    void mouseReleaseEvent(QMouseEvent *e);

//     void mouseMoveEvent(QMouseEvent *e);

private:

    Ui::MainWindow *ui;

};

#endif // MAINWINDOW_H
静态曲线的命名方法可以选用:
    customPlot->legend->setVisible(true);

    customPlot->graph()->setName("sin");
此处是对第一条曲线进行命名为“sin“。
QT QcustomPlot的简单使用的更多相关文章
- QT 选择对话框简单示例
QT 选择对话框简单示例 部分代码: pDialog->addSeparator(); QAction *pmb2 = pDialog->addAction(QString::fromLo ...
- 使用QT实现一个简单的登陆对话框(纯代码实现C++)
使用QT实现一个简单的登陆对话框(纯代码实现C++) 效果展示 使用的QT控件 控件 描述 QLable 标签 QLineEdit 行文本框 QPushButton 按扭 QHBoxLayout 水平 ...
- 使用qt制作一个简单的计算器
前言:今天使用qt制作了一个很简单的计算器,觉得挺有意思的,所以在这里跟大家分享一下. 这里先跟大家说说使用到的函数: 一.槽连接函数 connect(信号发送者,发送的信号,信号接收者,信号接收者的 ...
- 9、Qt Project之简单的数据库接口
简单的数据库接口 Step1:首先完成整个UI界面的额设计: <?xml version="1.0" encoding="UTF-8"?> < ...
- 如何用Qt Python创建简单的桌面条形码应用
Qt for Python可以快速跨平台的GUI应用.这篇文章分享下如何结合Dynamsoft Barcode Reader SDK来创建一个简单的读码应用. 安装Qt for Python 官方站点 ...
- 使用qt写的简单的图片浏览器
功能特别简单,支持png,jpg,bmp,gif文件,支持自适应窗口大小,支持放大缩小,旋转功能还有点问题,支持上下按键选择图片 因为初学qt,所以很多东西都不太会,而且c++学的不是太好,没有怎么使 ...
- Qt实现一个简单的TextEditor
使用QT实现简单的TextEditor: 首先在窗口添加部件TextEditor,并设置中文字符 MainWindow::MainWindow(QWidget *parent) : QMainWind ...
- QT QcustomPlot的使用(二)
在QcustomPlot中,给横纵坐标添加箭头的方法 //在末尾添加箭头 customPlot->xAxis->setUpperEnding(QCPLineEnding::esSpikeA ...
- 用Qt写的简单屏保程序
近日老大提别人家产品都有屏保程序,貌似我们也该有,简单在qtcn.org请教了一下,写了个小程序! 晕倒,半天没找到上传功能!我已经上传到qtcn上了,地址如下: http://www.qtcn.or ...
随机推荐
- jmeter接口上传图片功能
图片上传需要选择Files Upload 输入下列参数: File Path:方法一,把图片放在bin目录下,直接输入图片名称:方法二,点击下图“Browse”按钮,选择一张需要上传的图片,地址将会自 ...
- OpenJudge 1.5.36:计算多项式的值
描述 假定多项式的形式为xn+xn-1+…+x2+x+1,请计算给定单精度浮点数x和正整数n值的情况下这个多项式的值. 输入输入仅一行,包括x和n,用单个空格隔开.x在float范围内,n <= ...
- Java基础系列 - equals和==的区别
package com.test7; public class test7 { public static void main(String[] args) { /** * 1.equals()比较的 ...
- IDEA启动Tomcat服务器时某些端口(如1099端口)被占用的解决办法
启动Tomcat服务器时,出现1099端口被其它进程占用了解决办法: 1.找出占用1099端口的进程,进入windows命令,查看什么进程占用了1099端口,使用命令:netstat -aon|fin ...
- git 和conding.net 超详细超简单安装
在做一下操作前,希望你能知道 1.什么是git? 可以参考https://blog.csdn.net/a909301740/article/details/81636662 如果还想多了解一下还可以参 ...
- 自然语言处理基础与实战(8)- 主题模型LDA理解与应用
本文主要用于理解主题模型LDA(Latent Dirichlet Allocation)其背后的数学原理及其推导过程.本菇力求用简单的推理来论证LDA背后复杂的数学知识,苦于自身数学基础不够,因此文中 ...
- Python数据预处理(sklearn.preprocessing)—归一化(MinMaxScaler),标准化(StandardScaler),正则化(Normalizer, normalize)
关于数据预处理的几个概念 归一化 (Normalization): 属性缩放到一个指定的最大和最小值(通常是1-0)之间,这可以通过preprocessing.MinMaxScaler类实现. 常 ...
- 解决跨操作系统平台JSON中文乱码问题
解决跨操作系统平台JSON中文乱码问题 LINUX统一使用utf-8编码,WINDOWS却不是. LINUX中间件,传输JSON给WINDOWS程序,会乱码. 解决办法: 对JSON字段是字符串类型的 ...
- 批量转换Excel转CSV文件
本文为Excel VBA代码,可以实现将某一文件夹内的Excel文件(xls或者xlsx)另存为“逗号分隔的csv文件”. 使用条件: 1. Windows系统: 2. 已安装 MS 2007或以 ...
- python使用redis实现协同控制的分布式锁
python使用redis实现协同控制的分布式锁 上午的时候,有个腾讯的朋友问我,关于用zookeeper分布式锁的设计,他的需求其实很简单,就是节点之间的协同合作. 我以前用redis写过一个网络锁 ...