Mybatis在IDEA中使用generator逆向工程生成pojo,mapper
使用mybatis可以逆向生成pojo和mapper文件有很多种方式,我以前用的是mybtais自带的generator包来生成,连接如下:mybatis自己生成pojo
今天我用了IDEA上使用maven项目来生成pojo和mapper,具体步骤如下
1,先配置pom.xml文件,先配置插件plugin
配置文件如下
    <build>

        <plugins>

            <!-- mybatis逆向工程 -->

            <plugin>

                <groupId>org.mybatis.generator</groupId>

                <artifactId>mybatis-generator-maven-plugin</artifactId>

                <version>1.3.2</version>

                <configuration>

                    <!--配置文件的位置-->

                    <configurationFile>src/main/resources/Personal-GeneratorConfig.xml</configurationFile>

                    <verbose>true</verbose>

                    <overwrite>true</overwrite>

                </configuration>

              </plugin>

         </plugins>

    </build>
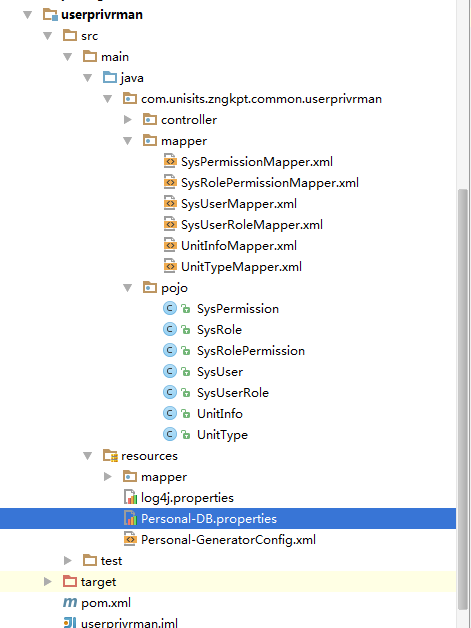
2,项目中添加配置文件,如上面所示的配置文件目录位置,在添加personal-generatorconfig.xml文件,然后添加配置文件personal-db.properties,位置结构如图所示:

其中personal-generator.xml的代码如下
<?xml version="1.0" encoding="UTF-8"?>

<!DOCTYPE generatorConfiguration

        PUBLIC "-//mybatis.org//DTD MyBatis Generator Configuration 1.0//EN"

        "http://mybatis.org/dtd/mybatis-generator-config_1_0.dtd">

<generatorConfiguration>

    <properties resource="Personal-DB.properties"></properties>

    <classPathEntry location="${jdbc.driverLocation}" />

    <!--classPathEntry location="D:\zngkpt\m2\repository\mysql\mysql-connector-java\5.1.40\mysql-connector-java-5.1.40.jar" /-->

    <context id="context1" targetRuntime="MyBatis3">

        <commentGenerator>

            <!-- 去除自动生成的注释 -->

            <property name="suppressAllComments" value="true" />

        </commentGenerator>

        <!-- 数据库连接配置 -->

        <jdbcConnection driverClass="${jdbc.driverClass}"

            connectionURL="${jdbc.connectionURL}"

            userId="${jdbc.userId}"

            password="${jdbc.password}" />

        <!--jdbcConnection driverClass="com.mysql.jdbc.Driver"

                        connectionURL="jdbc:mysql://localhost:3306/test"

                        userId="root"

                        password="mysql" /-->

 <!-- 非必需,类型处理器,在数据库类型和java类型之间的转换控制-->

        <javaTypeResolver>

            <property name="forceBigDecimals" value="false"/>

        </javaTypeResolver>

        <!--配置生成的实体包

            targetPackage:生成的实体包位置,默认存放在src目录下

            targetProject:目标工程名

         -->

        <javaModelGenerator targetPackage="com.unisits.zngkpt.common.userprivrman.pojo"

            targetProject="src/main/java" />

        <!-- 实体包对应映射文件位置及名称,默认存放在src目录下 -->

        <sqlMapGenerator targetPackage="com.unisits.zngkpt.common.userprivrman.mapper" targetProject="src/main/java" />

        <!-- 配置表

            schema:不用填写

            tableName: 表名

            enableCountByExample、enableSelectByExample、enableDeleteByExample、enableUpdateByExample、selectByExampleQueryId:

            去除自动生成的例子

        -->

        <table schema="" tableName="sys_role" enableCountByExample="false" enableSelectByExample="false"

            enableDeleteByExample="false" enableUpdateByExample="false" selectByExampleQueryId="false" >

        </table>

        <table schema="" tableName="sys_permission" enableCountByExample="false" enableSelectByExample="false"

               enableDeleteByExample="false" enableUpdateByExample="false" selectByExampleQueryId="false" >

        </table>

        <table schema="" tableName="sys_role_permission" enableCountByExample="false" enableSelectByExample="false"

               enableDeleteByExample="false" enableUpdateByExample="false" selectByExampleQueryId="false" >

        </table>

        <table schema="" tableName="sys_user" enableCountByExample="false" enableSelectByExample="false"

               enableDeleteByExample="false" enableUpdateByExample="false" selectByExampleQueryId="false" >

        </table>

        <table schema="" tableName="sys_user_role" enableCountByExample="false" enableSelectByExample="false"

        enableDeleteByExample="false" enableUpdateByExample="false" selectByExampleQueryId="false" >

        </table>

        <table schema="" tableName="unit_info" enableCountByExample="false" enableSelectByExample="false"

               enableDeleteByExample="false" enableUpdateByExample="false" selectByExampleQueryId="false" >

        </table>

        <table schema="" tableName="unit_type" enableCountByExample="false" enableSelectByExample="false"

               enableDeleteByExample="false" enableUpdateByExample="false" selectByExampleQueryId="false" >

        </table>

    </context>

</generatorConfiguration>
personal-db.properties的代码如下
jdbc.driverLocation=D:\\zngkpt\\m2\\repository\\com\\microsoft\\sqlserver\\sqljdbc4\\4.0\\sqljdbc4-4.0.jar

jdbc.driverClass=com.microsoft.sqlserver.jdbc.SQLServerDriver

jdbc.connectionURL=jdbc:sqlserver://127.0.0.1:1434;DatabaseName=db_zngkpt

jdbc.userId=sa

jdbc.password=123456
3,到现在为止,所有的mybatis配置工作已经结束了,开始配置idea来运行生成pojo吧
点击菜单Run->Edit Configuration,然后在弹出窗体的左上角,点击+->maven,会出现下面窗体
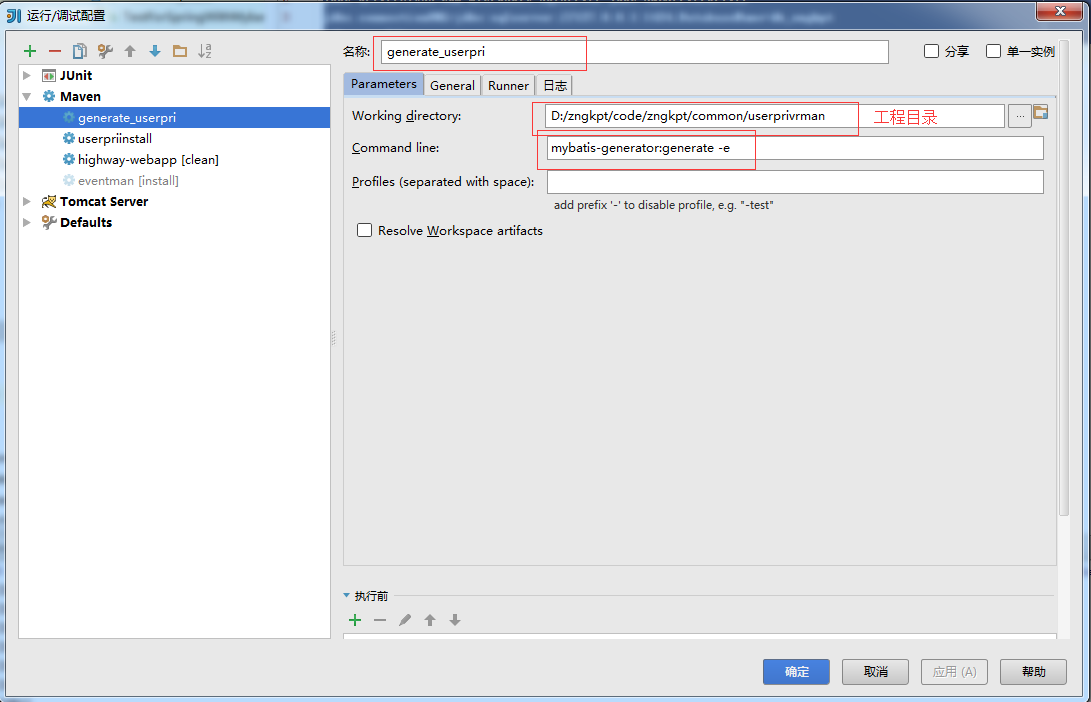
然后点击apply,确定,然后run刚才新建的那个maven即可,最后生成的结构如下
指令为:
mybatis-generator:generate -e
Mybatis在IDEA中使用generator逆向工程生成pojo,mapper的更多相关文章
- IDEA 使用generator逆向工程生成pojo,mapper
1.新建立一个MAVEN项目 2.在pom.xml增加配置 <project xmlns="http://maven.apache.org/POM/4.0.0" xmlns: ...
- 在IDEA中使用MyBatis Generator逆向工程生成代码
本文介绍一下用Maven工具如何生成Mybatis的代码及映射的文件. 一.配置Maven pom.xml 文件 在pom.xml增加以下插件: <build> <finalName ...
- Mybatis Generator自动生成的mapper只有insert方法
– Mybatis Generator 生成的mapper只有insert方法 – 首先检查generatorConfig.xml中table项中的属性 enableSelectByPrimaryKe ...
- java web(七): mybatis的动态sql和mybatis generator自动生成pojo类和映射文件
前言: MyBatis 的强大特性之一便是它的动态 SQL.如果你有使用 JDBC 或其它类似框架的经验,你就能体会到根据 不同条件拼接 SQL 语句的痛苦.例如拼接时要确保不能忘记添加必要的空格,还 ...
- Mybatis根据数据库中的表自动生成Bean对象与Mapper文件 (小白式教程)
示例IDE采用 IDEA //**********************华丽的分割线****************// 1.新建一个java项目-->在Src目录下创建3个包(Package ...
- 逆向工程生成的Mapper.xml以及*Example.java详解
逆向工程生成的接口中的方法详解 在我上一篇的博客中讲解了如何使用Mybayis逆向工程针对单表自动生成mapper.java.mapper.xml.实体类,今天我们先针对mapper.java接口中的 ...
- 整合mybaties 逆向生成 pojo mapper.xml
第一步:配置properties 第二步:放入generatorConfig.xml文件 在总目录下 这个是生成工具 第三步:放入工具类,自动生成用的, pom里面要加入6个依赖 第四步:运行u ...
- idea 中使用Mybatis Generator逆向工程生成代码
通过MAVEN完成 Mybatis 逆向工程 1. POM文件中添加插件 在 pom 文件的build 标签中 添加 plugin 插件和 数据库连接 jdbc 的依赖. <build> ...
- 2019-04-28 Mybatis generator逆向工程生成的Example代码分析
今天主要对Mybatis generator生成的DAO层等进行分析,讲解Example类的使用和扩展 1.先在数据库建表 CREATE TABLE `department` ( `fid` ) NO ...
随机推荐
- Android获取屏幕的宽度和高度(dp)
public void getAndroiodScreenProperty() { WindowManager wm = (WindowManager) this.getSystemService(C ...
- Asp.Net生命周期和Http管道技术
本篇主要介绍一下内容: 1.ASP.NET生命周期 2.Http运行时 3.Http管道技术 a)inetinfo.exe b)asp.net_isapi.dll c)aspnet_wp.exe d) ...
- java实现发送邮件功能
项目中实现发送邮件功能,先书写一个小Demo,记录如下: POM.XML中导入依赖 <!-- start java 提供的支持邮件发送相关业务的类 --> <dependency&g ...
- 设计工作-Axure
1,百度百科 http://baike.baidu.com/view/3332366.htm?fromtitle=axure&fromid=5056136&type=syn 2,官方网 ...
- Gitlab系列九之取消用户注册页面和删除用户
一.取消用户注册页面 Admin Area--->Settings--->Sign-up enabled(取消前面的勾)---save 二.删除用户 Users----Destroy(点他 ...
- 好未来AI Lab 思考下面的问题
好未来AI Lab和科赛联合举办的TAIL CAMP——AI实战训练营 图像识别: 卷积层是所有CNN网络中必不可少的模块,请解释为什么3X3的卷积是最为常用的卷积核大小?小尺寸卷积核(1x1)和大尺 ...
- POJO百度百科
POJO(Plain Ordinary Java Object)简单的Java对象,实际就是普通JavaBeans,是为了避免和EJB混淆所创造的简称. 使用POJO名称是为了避免和EJB混淆起来, ...
- POJ1037 A decorative fence 【动态规划】
A decorative fence Time Limit: 1000MS Memory Limit: 10000K Total Submissions: 6489 Accepted: 236 ...
- HTML ui ol dl
<!-- 超链接target的属性 _blank 在新窗体中打开被链接文档. _self 默认. 在同样的框架中打开被链接文档. _parent 在父框架集中打开被链接文档. _top 在整个窗 ...
- SVN学习(二)——SVN 提交、更新、解决冲突等操作步骤
1. 纳入版本控制 ①新建文件abc.txt ②在文件上点右键 ③添加后文件图标发生变化 2. 提交 ①使用TortoiseSVN可以提交具体某一个文件,或某一个目录下的所有改变.方法就是在想要提交的 ...