Linux配置Nginx+Tomcat负载均衡
cd /usr/local/tomcat1/webapps/ROOT/
tar -zxvf nginx-1.14.2.tar.gz -C /usr/local
一、Linux配置Nginx
一、下载Nginx
方式1:从http://nginx.org/en/download.html上下载稳定版,解压安装

方式2:直接在Linux上用命令下载: wget http://nginx.org/download/nginx-1.10.2.tar.gz
-bash: wget: command not found
安装wget:
yum -y install wget
再执行下载nginx
二、解压安装包&重命名
tar -zxvf nginx-1.14.2.tar.gz -C /usr/local
mv nginx-1.14.2 nginx
三、编译
1、cd 到nginx目录下

2、安装相关组件
yum install -y pcre pcre-devel
yum install -y zlib zlib-devel
yum install -y openssl openssl-devel
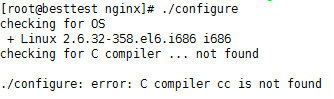
这是提示缺少c++环境 ,用 yum install gcc-c++ 安装一下,再执行 ./configure,然后又报错了:
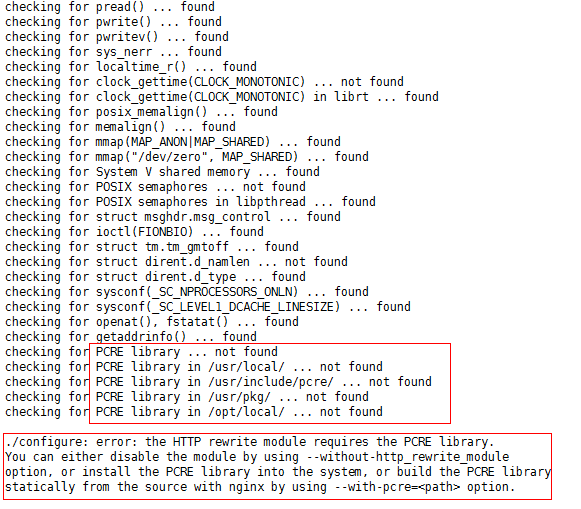
./configure: error: the HTTP rewrite module requires the PCRE library.
You can either disable the module by using –without-http_rewrite_module
option, or install the PCRE library into the system, or build the PCRE library
statically from the source with nginx by using –with-pcre= option.
没装伪静态模块需要pcre库
解决方法:
yum install -y pcre pcre-devel
还有可能出现:
错误提示:./configure: error: the HTTP cache module requires md5 functions
from OpenSSL library. You can either disable the module by using
–without-http-cache option, or install the OpenSSL library into the system,
or build the OpenSSL library statically from the source with nginx by using
–with-http_ssl_module –with-openssl= options.
解决办法:
yum -y install openssl openssl-devel
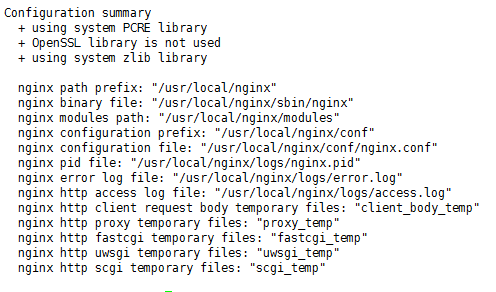
最后 ./configure
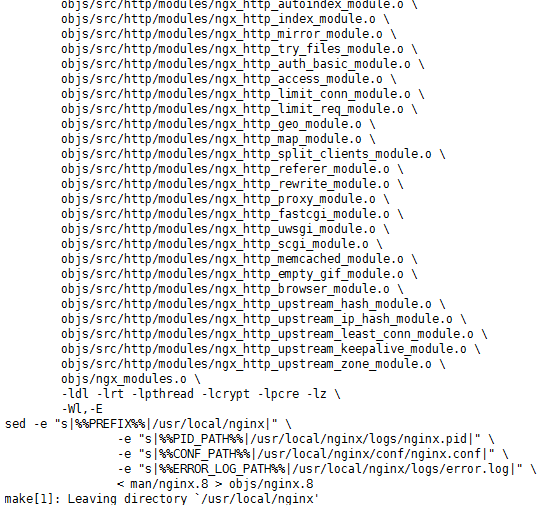
执行make 编译:
然后:make install 报错:
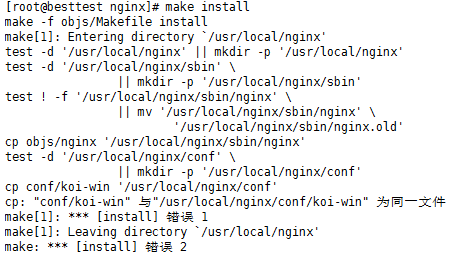
问题原因: 直接把安装包重命名成nginx了,安装文件没有路径了。
解决办法如下:
删除nginx 文件夹
rm -rf nginx
重新解决源码
tar -zxvf nginx-1.10.2.tar.gz
cd /usr/local/nginx-1.10.2
生成Makefile文件
./configure --prefix=/usr/local/nginx
编译源码
make
安装
make install
这里不必要太纠结,只要 /usr/local/ 下出现了 /nagix文件就ok,进入 cd /usr/local/nginx/sbin 下,启动 ./nginx
问题1:出现端口占用,nginx一般是80端口,要么把其他的kill掉,要么更改nginx的端口
1、kill掉其他的之前,要知道哪个占用了:用 lsof -i:80可以查看,这里是之前的lamp占用了

2、我们可以修改nginx自身的监听端口,vi /usr/local/nginx/conf/nginx.conf ,将listen 80,改为自己要的就行,我们这里改81
server {

        listen       ;

        server_name  localhost;

        #charset koi8-r;

        #access_log  logs/host.access.log  main;

        location / {

            root   html;

            index  index.html index.htm;

        }
之后进入我们的ip:81就可以访问:

二、Linux配置Tomcat
1、下载
下载地址:https://tomcat.apache.org/download-90.cgi
这里我们用tomcat 9 吧,下载后,一样放到 /usr/local 下,解压两份,一份作为 tomcat1 , 一份为 tomcat 2 这两份,用来做负载均衡
解压: tar -zxvf apache-tomcat-9.0.13.tar.gz -C /usr/local
重命名: mv apache-tomcat-9.0.13 tomcat1

2、配置:
修改其中一个tomcat2 的端口信息,tomcat1则不需要修改
cd /usr/local/tomcat2/conf
vi server.xml
改以下三个端口为:8006,8081,8099
<Server port="" shutdown="SHUTDOWN">

<Connector port="" protocol="HTTP/1.1"

<Connector port="" protocol="AJP/1.3" redirectPort="" />
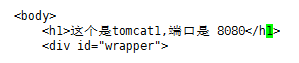
3、分别更改两个 tomcat下默认的jsp页面
cd /usr/local/tomcat1/webapps/ROOT/
vi index.jsp
在body中添加一行html 代码,用于区分是哪个tomcat下的页面。
4、启动两个tomcat
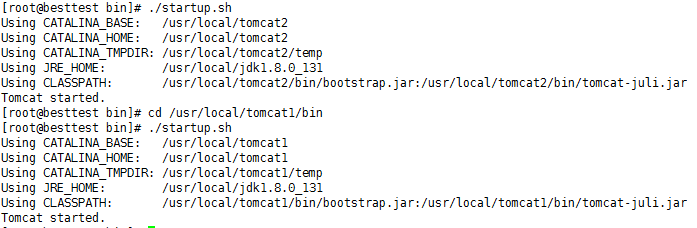
cd /usr/local/tomcat1/bin
./startup.sh
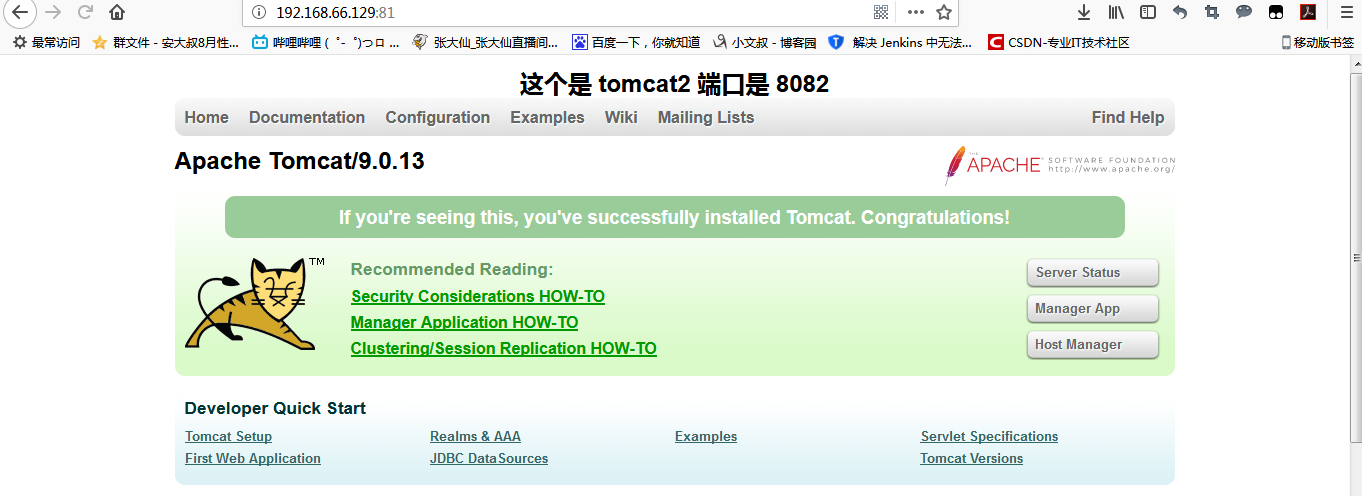
打开本地的ip:8080和ip:8081可以看到,两个页面都有提示信息:
但是8080 被占用,我们用8081和8082:8081

8082
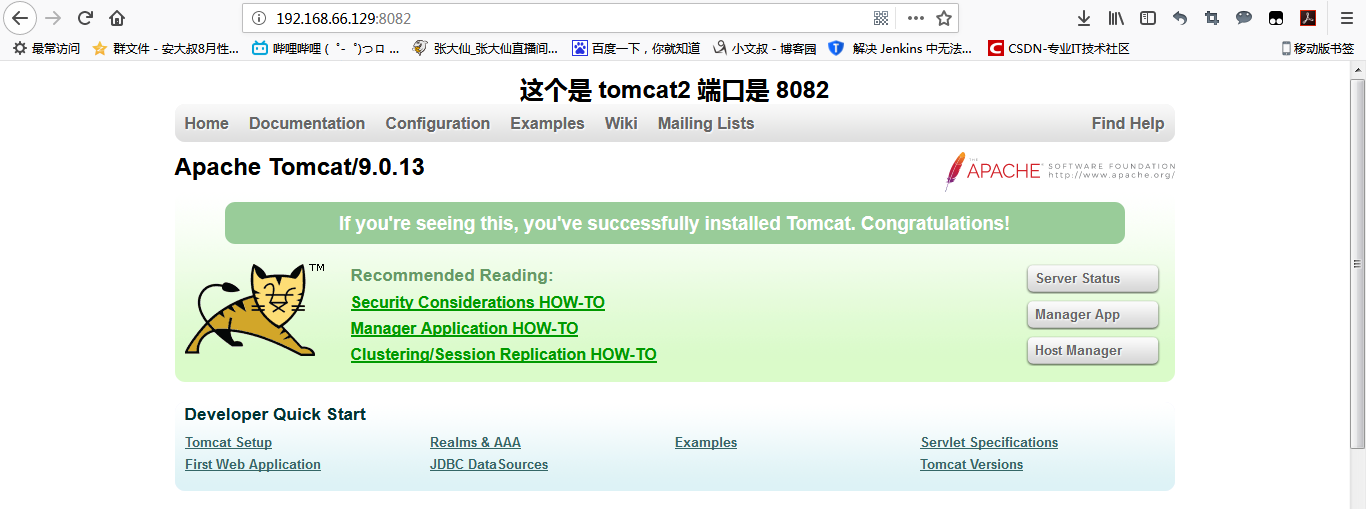
这样,就是安装成功啦!
三、Nginx配置Tomcat负载均衡
1、安装好nginx的情况下
2、修改配置文件
cd /usr/local/nginx/conf
vi nginx.conf
添加ngnix分配策略(权重策略)
upstream   dangdang.com {

  server 192.168.66.129:  weight=; //tomcat1 的ip和端口

  server 192.168.66.129:  weight=; //tomcat2 的ip和端口

}
整个文件的信息如下:
#user  nobody;

worker_processes  ;

#error_log  logs/error.log;

#error_log  logs/error.log  notice;

#error_log  logs/error.log  info;

#pid        logs/nginx.pid;

events {

    worker_connections  ;

}

http {

    include       mime.types;

    default_type  application/octet-stream;

    #log_format  main  '$remote_addr - $remote_user [$time_local] "$request" '

    #                  '$status $body_bytes_sent "$http_referer" '

    #                  '"$http_user_agent" "$http_x_forwarded_for"';

    #access_log  logs/access.log  main;

    sendfile        on;

    #tcp_nopush     on;

    #keepalive_timeout  ;

    keepalive_timeout  ;

    #gzip  on;

  upstream dangdang.com {
    server 192.168.66.129:8081 weight=1; //tomcat1 的ip和端口
    server 192.168.66.129:8082 weight=1; //tomcat2 的ip和端口
  }

    server {

        listen       ;

        server_name  localhost;

        #charset koi8-r;

        #access_log  logs/host.access.log  main;

        location / {

            root   html;

            index  index.html index.htm;
       proxy_pass   http://dangdang.com;

        }

        #error_page                /.html;

        # redirect server error pages to the static page /50x.html

        #

        error_page        /50x.html;

        location = /50x.html {

            root   html;

        }

        # proxy the PHP scripts to Apache listening on 127.0.0.1:

        #

        #location ~ \.php$ {

        #    proxy_pass   http://127.0.0.1;

        #}

        # pass the PHP scripts to FastCGI server listening on 127.0.0.1:

        #

        #location ~ \.php$ {

        #    root           html;

        #    fastcgi_pass   127.0.0.1:;

        #    fastcgi_index  index.php;

        #    fastcgi_param  SCRIPT_FILENAME  /scripts$fastcgi_script_name;

        #    include        fastcgi_params;

        #}

        # deny access to .htaccess files, if Apache's document root

        # concurs with nginx's one

        #

        #location ~ /\.ht {

        #    deny  all;

        #}

    }

    # another virtual host using mix of IP-, name-, and port-based configuration

    #

    #server {

    #    listen       ;

    #    listen       somename:;

    #    server_name  somename  alias  another.alias;

    #    location / {

    #        root   html;

    #        index  index.html index.htm;

    #    }

    #}

    # HTTPS server

    #

    #server {

    #    listen        ssl;

    #    server_name  localhost;

    #    ssl_certificate      cert.pem;

    #    ssl_certificate_key  cert.key;

    #    ssl_session_cache    shared:SSL:1m;

    #    ssl_session_timeout  5m;

    #    ssl_ciphers  HIGH:!aNULL:!MD5;

    #    ssl_prefer_server_ciphers  on;

    #    location / {

    #        root   html;

    #        index  index.html index.htm;

    #    }

    #}

}
结果:一直刷新
结果1:

结果2:
Linux配置Nginx+Tomcat负载均衡的更多相关文章
- Linux下Nginx+Tomcat负载均衡和动静分离配置要点
本文使用的Linux发行版:CentOS6.7 下载地址:https://wiki.centos.org/Download 一.安装Nginx 下载源:wget http://nginx.org/pa ...
- Linux记录-Nginx+Tomcat负载均衡配置
Nginx负载均衡配置及策略: 轮询(默认) 优点:实现简单缺点:不考虑每台服务器的处理能力配置示例如下:upstream www.xxx.com {# 需要负载的server列表server www ...
- linux+nginx+tomcat负载均衡,实现session同步
linux+nginx+tomcat负载均衡,实现session同步 花了一个上午的时间研究nginx+tomcat的负载均衡测试,集群环境搭建比较顺利,但是session同步的问题折腾了几个小时才搞 ...
- Nginx + Tomcat 负载均衡配置详解
Nginx常用操作指南一.Nginx 与 Tomcat 安装.配置及优化1. 检查和安装依赖项 yum -y install gcc pcre pcre-devel zlib zlib-devel o ...
- nginx+tomcat负载均衡
最近练习nginx+tomcat负载均衡.根据一些资料整理了大体思路,最终实现了1个nginx+2个tomcat负载均衡. 安装JDK 1>进入安装目录,给所有用户添加可执行的权限 #chmod ...
- windows配置nginx实现负载均衡集群
windows配置nginx实现负载均衡集群2014-08-20 09:44:40 来源:www.abcde.cn 评论:0 点击:617 网上大部分关于nginx负载均衡集群的教程都是lin ...
- 配置nginx的负载均衡
1.1 什么是负载均衡 负载均衡 建立在现有网络结构之上,它提供了一种廉价有效透明的方法扩展网络设备和服务器的带宽.增加吞吐量.加强网络数据处理能力.提高网络的灵活性和可用性. 负载均衡,英文名称 ...
- 【nginx】配置Nginx实现负载均衡
一文中已经提到,企业在解决高并发问题时,一般有两个方向的处理策略,软件.硬件,硬件上添加负载均衡器分发大量请求,软件上可在高并发瓶颈处:数据库+web服务器两处添加解决方案,其中web服务器前面一层最 ...
- 【高可用HA】Nginx (1) —— Mac下配置Nginx Http负载均衡(Load Balancer)之101实例
[高可用HA]Nginx (1) -- Mac下配置Nginx Http负载均衡(Load Balancer)之101实例 nginx版本: nginx-1.9.8 参考来源: nginx.org [ ...
- 配置Nginx实现负载均衡
在关于高并发负载均衡一文中已经提到,企业在解决高并发问题时,一般有两个方向的处理策略,软件.硬件,硬件上添加负载均衡器分发大量请求,软件上可在高并发瓶颈处:数据库+web服务器两处添加解决方案,其中w ...
随机推荐
- 什么是Java泛型?
①为什么要使用泛型? 引入例子 public class GenericTest { public static void main(String[] args) { List list = new ...
- Mist 转移默认区块存储位置方法
http://8btc.com/thread-35325-1-1.html 看了bunaifeiqq 发的帖子“Mist 转移区块存储位置方法”,综合帖子下面的发言,自己做了测试,可行.电脑系统win ...
- map.containsKey
该方法判断Map集合对象中是否包含指定的键名.如果Map集合中包含指定的键名,则返回true,否则返回false. 语法 containsKey(Object key) . e.g public s ...
- Centos75 firewalld防火墙
Centos75 防火墙iptables被firewalld取代 #启动firewalld systemctl start firewalld #查看firewalld systemctl statu ...
- Win7系统(台式机)设置系统的窗口背景色(豆沙绿色)
Win7系统(台式机)设置系统的窗口背景色(豆沙绿色) 1,桌面->右键->个性化->窗口颜色->高级外观设置->项目选择(窗口).颜色1(L)选择(其它)将色调改为:8 ...
- POJ 1122 FDNY to the Rescue!(最短路+路径输出)
http://poj.org/problem?id=1122 题意:给出地图并且给出终点和多个起点,输出从各个起点到终点的路径和时间. 思路: 因为有多个起点,所以这里反向建图,这样就相当于把终点变成 ...
- HDU 3435 A new Graph Game(最小费用流:有向环权值最小覆盖)
http://acm.hdu.edu.cn/showproblem.php?pid=3435 题意:有n个点和m条边,你可以删去任意条边,使得所有点在一个哈密顿路径上,路径的权值得最小. 思路: 费用 ...
- 在多节点上运行分布式Intel Caffe
一般有2种并行模式:数据并行(Data parallelism)和模型并行(model parallelism). 在模型并行化( model parallelism )方法里,分布式系统中的不同机器 ...
- FindBugs插件的安装与使用
转载:http://www.cnblogs.com/kayfans/archive/2012/06/18/2554022.html 1 什么是FindBugs FindBugs 是一个静态分析工具,它 ...
- hrbust 1621 迷宫问题II 广搜
题目链接:http://acm.hrbust.edu.cn/vj/index.php?/vj/index.php?c=&c=contest-contest&cid=134#proble ...