dsp6657的helloworld例程测试-第一篇
环境搭建可以参考http://blog.sina.com.cn/s/blog_ed2e19900102xi2j.html
1. 先从mcsdk导入工程,helloworld例程
2. 提示有错误,估计是库找不到的原因。

3. 打开CCS的配置页面,add加入需要的库,分别是NDK,PDK,其中NDK就是网络Network Developer's Kit开发包,如果CCS添加NDK失败的话,可能是NDK的版本太旧了,去下载个新的,下载地址:http://software-dl.ti.com/dsps/dsps_public_sw/sdo_sb/targetcontent/ndk/index.html,自己选个版本即可

4. 看下工程源码,其实想找个简单的入门例程研究,可惜找了个网络TCP/IP协议栈的,研究研究吧
/*

 * helloWorld_bios6.c

 * TCP/IP Stack 'Hello World!' Example ported to use BIOS6 OS.

*/

//--------------------------------------------------------------------------

// IP Stack 'Hello World!' Example

// To test it as is, use with helloWorld.exe from \winapps directory

//

#include <stdio.h>

#include <ti/ndk/inc/netmain.h>

/* BIOS6 include */

#include <ti/sysbios/BIOS.h>

/* Platform utilities include */

#include "ti/platform/platform.h"

#include "ti/platform/resource_mgr.h"

/* Platform Information - we will read it form the Platform Library */

platform_info  gPlatformInfo;

//---------------------------------------------------------------------------

// Title String

//

char *VerStr = "\nTCP/IP Stack 'Hello World!' Application\n\n";

// Our NETCTRL callback functions

static void   NetworkOpen();

static void   NetworkClose();

static void   NetworkIPAddr( IPN IPAddr, uint IfIdx, uint fAdd );

// Fun reporting function

static void   ServiceReport( uint Item, uint Status, uint Report, HANDLE hCfgEntry );

// External references

extern int dtask_udp_hello();

//---------------------------------------------------------------------------

// Configuration

//

char *HostName    = "tidsp";

char *LocalIPAddr = "192.168.2.100";

char *LocalIPMask = "255.255.255.0";    // Not used when using DHCP

char *GatewayIP   = "192.168.2.101";    // Not used when using DHCP

char *DomainName  = "demo.net";         // Not used when using DHCP

char *DNSServer   = "0.0.0.0";          // Used when set to anything but zero

/*************************************************************************

 *  @b EVM_init()

 *

 *  @n

 *

 *  Initializes the platform hardware. This routine is configured to start in

 *   the evm.cfg configuration file. It is the first routine that BIOS

 *   calls and is executed before Main is called. If you are debugging within

 *  CCS the default option in your target configuration file may be to execute

 *  all code up until Main as the image loads. To debug this you should disable

 *  that option.

 *

 *  @param[in]  None

 *

 *  @retval

 *      None

 ************************************************************************/

void EVM_init()

{

        int i;

        platform_init_flags  sFlags;

        platform_init_config sConfig;

    /* Status of the call to initialize the platform */

    Int32 pform_status;

    /* Platform Information - we will read it form the Platform Library */

    platform_info       sPlatformInfo;

        /*

         * You can choose what to initialize on the platform by setting the following

         * flags. We will initialize everything.

        */

        memset( (void *) &sFlags,  , sizeof(platform_init_flags));

        memset( (void *) &sConfig, , sizeof(platform_init_config));

        sFlags.pll = ;

        sFlags.ddr = ;

    sFlags.tcsl = ;    /* Time stamp counter   */

    sFlags.phy  = ;    /* Ethernet                     */

    sFlags.ecc = ;

    sConfig.pllm = ;

        pform_status = platform_init(&sFlags, &sConfig);

        /* If we initialized the platform okay */

        if (pform_status == Platform_EOK) {

                /* Get information about the platform so we can use it in various places */

                memset( (void *) &sPlatformInfo, , sizeof(platform_info));

                (void) platform_get_info(&sPlatformInfo);

        }

        else {

                /* Intiialization of the platform failed... die */

                printf("Platform failed to initialize. Error code %d \n", pform_status);

                printf("We will die in an infinite loop... \n");

                while () {

                        (void) platform_led(, PLATFORM_LED_ON, (LED_CLASS_E) PLATFORM_USER_LED_CLASS);

                        (void) platform_delay();

                        (void) platform_led(, PLATFORM_LED_OFF, (LED_CLASS_E) PLATFORM_USER_LED_CLASS);

                        (void) platform_delay();

                };

        }

        platform_write_configure(PLATFORM_WRITE_PRINTF);

        platform_uart_init();

        platform_uart_set_baudrate();

        /* Check to see that we are running on the Master Core */

        if (platform_get_coreid() != ) {

                /* We are not on the Master Core... die */

                printf("You must run this application on Core 0. \n");

                printf("We will die in an infinite loop... \n");

                while () {

                        (void) platform_led(, PLATFORM_LED_ON, (LED_CLASS_E) PLATFORM_USER_LED_CLASS);

                        (void) platform_delay();

                        (void) platform_led(, PLATFORM_LED_OFF, (LED_CLASS_E) PLATFORM_USER_LED_CLASS);

                        (void) platform_delay();

                };

        }

        /* Clear the state of the LEDs to OFF */

        for (i=; i < sPlatformInfo.led[].count; i++) {

                platform_led(i, PLATFORM_LED_OFF, (LED_CLASS_E) PLATFORM_USER_LED_CLASS);

        }

        return;

}

//---------------------------------------------------------------------

// Main Entry Point

//---------------------------------------------------------------------

int main()

{

 /* Start the BIOS 6 Scheduler */

 BIOS_start ();

}

//

// Main Thread

//

int StackTest()

{

    int             rc;

    int        i;

    HANDLE          hCfg;

     //

    // THIS MUST BE THE ABSOLUTE FIRST THING DONE IN AN APPLICATION before

    //  using the stack!!

    //

    rc = NC_SystemOpen( NC_PRIORITY_LOW, NC_OPMODE_INTERRUPT );

    if( rc )

    {

        platform_write("NC_SystemOpen Failed (%d)\n",rc);

        for(;;);

    }

    // Print out our banner

    platform_write(VerStr);

    //

    // Create and build the system configuration from scratch.

    //

    // Create a new configuration

    hCfg = CfgNew();

    if( !hCfg )

    {

        platform_write("Unable to create configuration\n");

        goto main_exit;

    }

    // We better validate the length of the supplied names

    if( strlen( DomainName ) >= CFG_DOMAIN_MAX ||

        strlen( HostName ) >= CFG_HOSTNAME_MAX )

    {

        printf("Names too long\n");

        goto main_exit;

    }

    // Add our global hostname to hCfg (to be claimed in all connected domains)

    CfgAddEntry( hCfg, CFGTAG_SYSINFO, CFGITEM_DHCP_HOSTNAME, ,

                 strlen(HostName), (UINT8 *)HostName,  );

    // If the IP address is specified, manually configure IP and Gateway

    if (!platform_get_switch_state())

    {

        CI_IPNET NA;

        CI_ROUTE RT;

        IPN      IPTmp;

        // Setup manual IP address

        bzero( &NA, sizeof(NA) );

        NA.IPAddr  = inet_addr(LocalIPAddr);

        NA.IPMask  = inet_addr(LocalIPMask);

        strcpy( NA.Domain, DomainName );

        NA.NetType = ;

        // Add the address to interface 1

        CfgAddEntry( hCfg, CFGTAG_IPNET, , ,

                           sizeof(CI_IPNET), (UINT8 *)&NA,  );

        // Add the default gateway. Since it is the default, the

        // destination address and mask are both zero (we go ahead

        // and show the assignment for clarity).

        bzero( &RT, sizeof(RT) );

        RT.IPDestAddr = ;

        RT.IPDestMask = ;

        RT.IPGateAddr = inet_addr(GatewayIP);

        // Add the route

        CfgAddEntry( hCfg, CFGTAG_ROUTE, , ,

                           sizeof(CI_ROUTE), (UINT8 *)&RT,  );

        // Manually add the DNS server when specified

        IPTmp = inet_addr(DNSServer);

        if( IPTmp )

            CfgAddEntry( hCfg, CFGTAG_SYSINFO, CFGITEM_DHCP_DOMAINNAMESERVER,

                         , sizeof(IPTmp), (UINT8 *)&IPTmp,  );

    }

    // Else we specify DHCP

    else

    {

        CI_SERVICE_DHCPC dhcpc;

        // Specify DHCP Service on IF-1

        bzero( &dhcpc, sizeof(dhcpc) );

        dhcpc.cisargs.Mode   = CIS_FLG_IFIDXVALID;

        dhcpc.cisargs.IfIdx  = ;

        dhcpc.cisargs.pCbSrv = &ServiceReport;

        CfgAddEntry( hCfg, CFGTAG_SERVICE, CFGITEM_SERVICE_DHCPCLIENT, ,

                     sizeof(dhcpc), (UINT8 *)&dhcpc,  );

    }

    //

    // Configure IPStack/OS Options

    //

    // We don't want to see debug messages less than WARNINGS

    rc = DBG_WARN;

    CfgAddEntry( hCfg, CFGTAG_OS, CFGITEM_OS_DBGPRINTLEVEL,

                 CFG_ADDMODE_UNIQUE, sizeof(uint), (UINT8 *)&rc,  );

    //

    // This code sets up the TCP and UDP buffer sizes

    // (Note 8192 is actually the default. This code is here to

    // illustrate how the buffer and limit sizes are configured.)

    //

    // UDP Receive limit

    rc = ;

    CfgAddEntry( hCfg, CFGTAG_IP, CFGITEM_IP_SOCKUDPRXLIMIT,

                 CFG_ADDMODE_UNIQUE, sizeof(uint), (UINT8 *)&rc,  );

    //

    // Boot the system using this configuration

    //

    // We keep booting until the function returns 0. This allows

    // us to have a "reboot" command.

    //

    do

    {

        rc = NC_NetStart( hCfg, NetworkOpen, NetworkClose, NetworkIPAddr );

    } while( rc >  );

    // Delete Configuration

    CfgFree( hCfg );

    // Close the OS

main_exit:

    NC_SystemClose();

    return();

}

//

// System Task Code [ Server Daemon Servers ]

//

static HANDLE hHello=;

//

// NetworkOpen

//

// This function is called after the configuration has booted

//

static void NetworkOpen()

{

    // Create our local server

    hHello = DaemonNew( SOCK_DGRAM, , , dtask_udp_hello,

                       OS_TASKPRINORM, OS_TASKSTKNORM, ,  );

}

//

// NetworkClose

//

// This function is called when the network is shutting down,

// or when it no longer has any IP addresses assigned to it.

//

static void NetworkClose()

{

    DaemonFree( hHello );

}

//

// NetworkIPAddr

//

// This function is called whenever an IP address binding is

// added or removed from the system.

//

static void NetworkIPAddr( IPN IPAddr, uint IfIdx, uint fAdd )

{

    IPN IPTmp;

    if( fAdd )

        printf("Network Added: ");

    else

        printf("Network Removed: ");

    // Print a message

    IPTmp = ntohl( IPAddr );

    printf("If-%d:%d.%d.%d.%d\n", IfIdx,

            (UINT8)(IPTmp>>)&0xFF, (UINT8)(IPTmp>>)&0xFF,

            (UINT8)(IPTmp>>)&0xFF, (UINT8)IPTmp&0xFF );

}

//

// Service Status Reports

//

// Here's a quick example of using service status updates

//

static char *TaskName[]  = { "Telnet","HTTP","NAT","DHCPS","DHCPC","DNS" };

static char *ReportStr[] = { "","Running","Updated","Complete","Fault" };

static char *StatusStr[] = { "Disabled","Waiting","IPTerm","Failed","Enabled" };

static void ServiceReport( uint Item, uint Status, uint Report, HANDLE h )

{

    printf( "Service Status: %-9s: %-9s: %-9s: %03d\n",

            TaskName[Item-], StatusStr[Status],

            ReportStr[Report/], Report&0xFF );

    //

    // Example of adding to the DHCP configuration space

    //

    // When using the DHCP client, the client has full control over access

    // to the first 256 entries in the CFGTAG_SYSINFO space.

    //

    // Note that the DHCP client will erase all CFGTAG_SYSINFO tags except

    // CFGITEM_DHCP_HOSTNAME. If the application needs to keep manual

    // entries in the DHCP tag range, then the code to maintain them should

    // be placed here.

    //

    // Here, we want to manually add a DNS server to the configuration, but

    // we can only do it once DHCP has finished its programming.

    //

    if( Item == CFGITEM_SERVICE_DHCPCLIENT &&

        Status == CIS_SRV_STATUS_ENABLED &&

        (Report == (NETTOOLS_STAT_RUNNING|DHCPCODE_IPADD) ||

         Report == (NETTOOLS_STAT_RUNNING|DHCPCODE_IPRENEW)) )

    {

        IPN IPTmp;

        // Manually add the DNS server when specified

        IPTmp = inet_addr(DNSServer);

        if( IPTmp )

            CfgAddEntry( , CFGTAG_SYSINFO, CFGITEM_DHCP_DOMAINNAMESERVER,

                         , sizeof(IPTmp), (UINT8 *)&IPTmp,  );

    }

}
5. 刚开始这些代码看的不是很明白。main函数里面为啥只有一个BIOS_start();函数?不是应该创建任务之类的?
 int main()

 {

  /* Start the BIOS 6 Scheduler */

  BIOS_start ();

 }
6. 下面函数怎么运行的?
int StackTest()
7. 是不是BIOS的图形配置界面搞定的?去看下图形配置界面。图形配置界面应该有个.tcf文件,但是工程没找到?
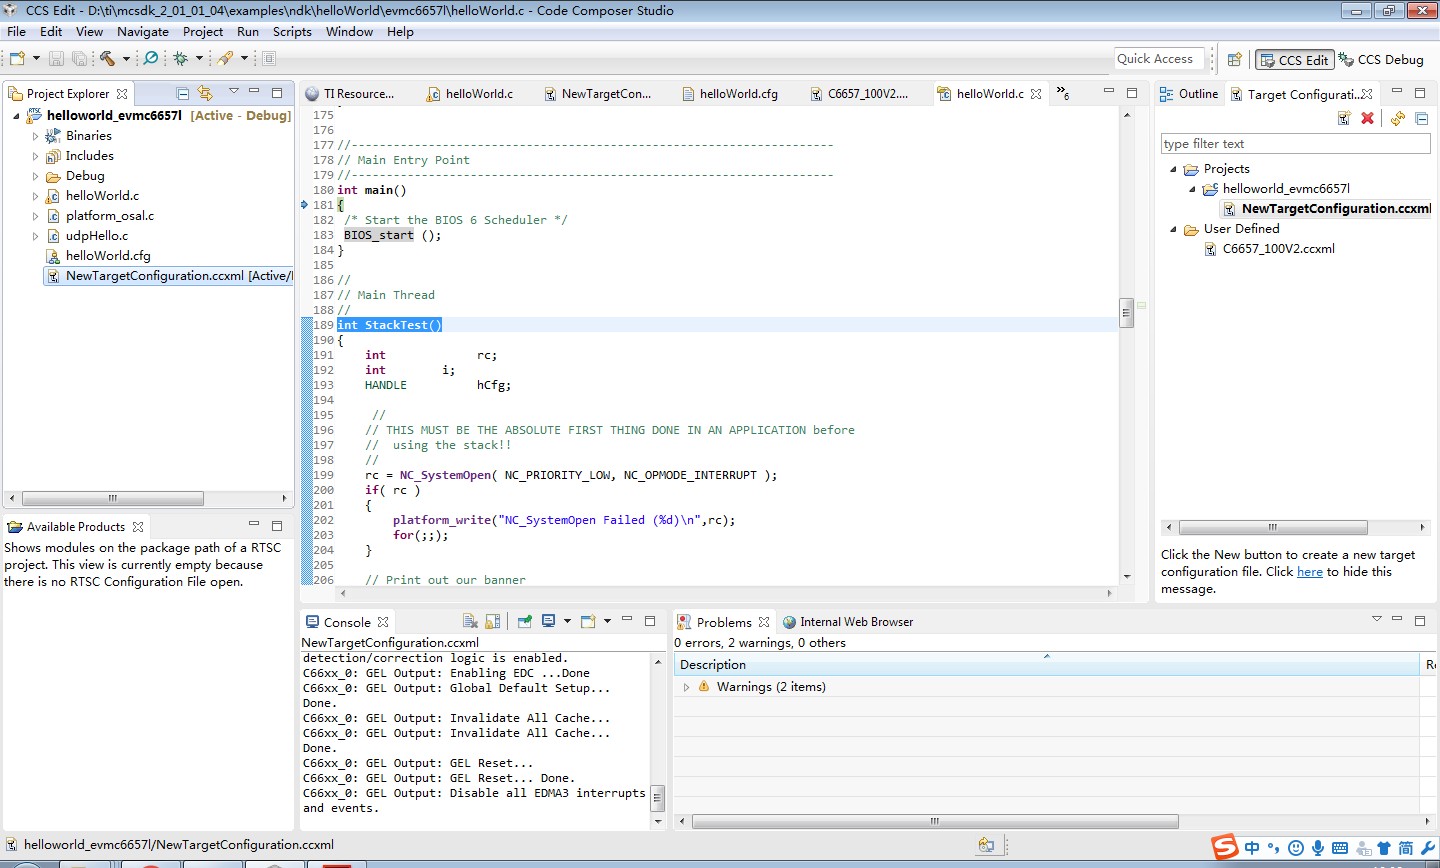
8. 下面的是使用协议栈必须首先调用的函数
rc = NC_SystemOpen( NC_PRIORITY_LOW, NC_OPMODE_INTERRUPT );
9. 接着是配置网络参数的函数
CfgAddEntry( hCfg, CFGTAG_SYSINFO, CFGITEM_DHCP_HOSTNAME, ,

                 strlen(HostName), (UINT8 *)HostName,  );
10. 这次疑问很多,RTSC是德州仪器提出的嵌入式组件,我理解就是把代码模块化,这个模块化的工作交给CCS去管理,比如需要一个ADC模块,在CCS里面配置就可以,CCS会把代码加入你的工程,XDCTools 是完成上面的工具,RTSC是一种理念。
dsp6657的helloworld例程测试-第一篇的更多相关文章
- dsp6657的helloworld例程测试-第二篇-CFG文件
1. 上一篇疑问,int StackTest()这个函数是怎么运行的,后来在.cfg文件找到了答案,.cfg包含丰富的信息,对于用惯C语言的,确实不太习惯 var Memory = xdc.useMo ...
- 创龙DSP6748开发板上电测试-第一篇
1. 创龙DSP6748开发板测试.2980元的售价很高,我估计新的1200元比较合适,当然创龙定价是按照供需关系的.仿真器XDS100V2卖598元,真是狮子大张口. 2. 上电是5V-2A的电源. ...
- 天嵌IMX6开发板测试-第一篇
1.看下开发板介绍 品牌: 天嵌 CPU型号: NXP i.MX6Q 架构: Cortex_A9 主频: *1GHz 内存: 2GB DDR3 存储: 8GB eMMC FLA(64GB可扩) 2. ...
- 使用cnblogs发布第一篇文章,HelloWorld
HelloWorld! 瞅瞅源码的样式,嗯,语法高亮还是可以的,辨识度还是挺高的. <!DOCTYPE html> <html> <head> <meta c ...
- LARK BOARD开发板试用第一篇-上电测试学习
1. 先看下板子外观,做工很不错 2. 主芯片的型号是,SoC 为 Cyclone V SX 系列的 5CSXFC6D6F31,不仅在芯片中包含传统的 FPGA 架构,还集成了基于 ARM Corte ...
- go [第一篇]初识
[第一篇] 简介 Go 是一个开源的编程语言,它能让构造简单.可靠且高效的软件变得容易. Go是从2007年末由Robert Griesemer, Rob Pike, Ken Thompson主持开发 ...
- 第一篇 入门必备 (Android学习笔记)
第一篇 入门必备 第1章 初识Android 第2章 搭建你的开发环境 第3章 创建第一个程序--HelloWorld 第4章 使用Android工具 ●Android之父 Android安迪·罗 ...
- 深入学习jQuery选择器系列第一篇——基础选择器和层级选择器
× 目录 [1]id选择器 [2]元素选择器 [3]类选择器[4]通配选择器[5]群组选择器[6]后代选择器[7]兄弟选择器 前面的话 选择器是jQuery的根基,在jQuery中,对事件处理.遍历D ...
- 前端工程师技能之photoshop巧用系列第一篇——准备篇
× 目录 [1]作用 [2]初始化 [3]常用工具[4]快捷键 前面的话 photoshop是前端工程师无法回避的一个软件,这个软件本身很强大,但我们仅仅需要通过这个工具来完成基本的切图工作即可.本文 ...
随机推荐
- nd.array.where
http://mxnet.apache.org/api/python/ndarray/ndarray.html#mxnet.ndarray.where Return the elements, eit ...
- spring中的default-lazy-init参数和lazy-init
在spring的配置中的根节点上有个 default-lazy-init="true"配置: 1.spring的default-lazy-init参数 此参数表示延时加载, ...
- HDU 1599 find the mincost route(floyd求最小环 无向图)
传送门: http://acm.hdu.edu.cn/showproblem.php?pid=1599 find the mincost route Time Limit: 1000/2000 MS ...
- ORACLE 中rownum和row_number()的使用区别(可指定取sql结果集的第几个数据)
这篇文章主要介绍了oracle中rownum和row_number()的使用方法以及区别和联系,十分的详细,有需要的小伙伴可以参考下. row_number()over(partition by ...
- 分布式架构学习-Consul集群配置
简介 之前公司用的是Consul进行服务发现以及服务管理,自己一直以来只是用一下,但是没有具体的深入,觉得学习不可以这样,所以稍微研究了一下. 网上有很多关于Consul的介绍和对比,我这里也不献丑了 ...
- 解决Windows下编辑脚本上传到Linux后遇到^M的方法
Windows下编辑脚本上传到Linux后遇到^M,导致脚本无法执行,原因是因为Linux与Windows对 "回车键" 编码不同 解决方法如下: 在使用UE->文件-> ...
- 仿手机iPhone QQ消息小红点动画1
前言 偶然发现iPhone QQ 显示消息条数的小红点可以响应动作事件,也有人问我这样的动画该怎么做,这里就把实现的思路简单的描述一下.在实现的过程中,同样发现该功能并没有看到的那么简单,要做一个完备 ...
- ztree案例笔记:用户不规范操作导致添加不了节点的问题
我使用ztree开发了简码"万能助手",经过一段时间的观察,发现有个别用户不看教程就开始操作,总能给我折腾出一些让人哭笑不得的问题. 比如,把某个根栏目里的节点全删除,然后发现添加 ...
- python 用户注册用户名
实现用户注册网站,编辑用户名时判断是否已经存在: 若存在则提示“The name you used have already existed,please change your name” 若不存在 ...
- previewImage.js图片预览缩放保存插件
previewImage.js好用的图片预览缩放保存插件