
(一)SpringBoot2.0基础篇- 介绍及HelloWorld初体验
1.SpringBoot介绍:
根据官方SpringBoot文档描述,BUILD ANYTHING WITH SPRING BOOT (用SPRING BOOT构建任何东西,很牛X呀!),下面是官方文档介绍(文档地址,感兴趣可以看看:https://docs.spring.io/spring-boot/docs/current-SNAPSHOT/reference/htmlsingle/#boot-documentation):
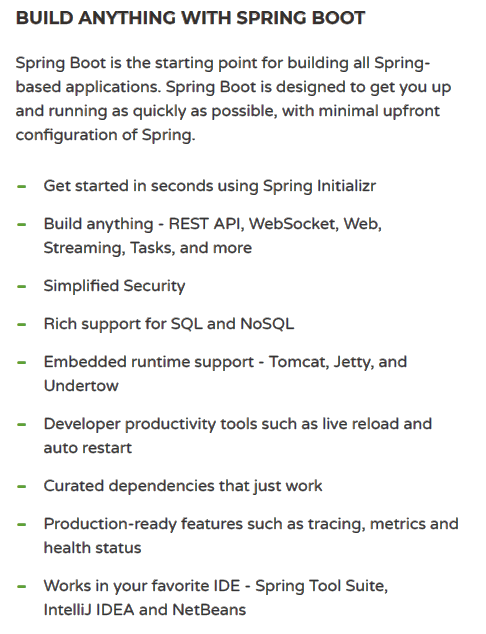
- 启动项目在秒范围内;
- 构建任何东西——REST API、WebSocket、Web、流媒体、任务等等;
- 简化的安全架构;
- 丰富的关系型数据库和非关系型数据库的支持;
- 嵌入式的运行环境支持,Tomcat,Jetty和Undertow;
- 开发人员的福利,热部署等;
- 仅仅是工作上的依赖;
- 可生产性,跟踪,监控等特性;
- 支持你常用的IDE工具;、
2.SpringBoot运行环境:
2.1 JDK环境:1.8+;
2.2 项目构建工具:maven:3.2+;
gradle:与4兼容;
2.3 Servlet容器:
| Name | Servlet Version |
|---|---|
|
Tomcat 8.5 |
3.1 |
|
Jetty 9.4 |
3.1 |
|
Undertow 1.4 |
3.1 |
3.SpringBoot初体验(HelloWorld):
3.1 引入Maven依赖库:
 <?xml version="1.0" encoding="UTF-8"?>

 <project xmlns="http://maven.apache.org/POM/4.0.0"

   xmlns:xsi="http://www.w3.org/2001/XMLSchema-instance"

   xsi:schemaLocation="http://maven.apache.org/POM/4.0.0 http://maven.apache.org/xsd/maven-4.0.0.xsd">

   <modelVersion>4.0.0</modelVersion>

   <groupId>com.cn</groupId>

   <artifactId>spring-boot-hello</artifactId>

   <version>1.0-SNAPSHOT</version>

   <properties>

     <project.build.sourceEncoding>UTF-8</project.build.sourceEncoding>

     <java.version>1.8</java.version>

   </properties>

   <parent>

     <groupId>org.springframework.boot</groupId>

     <artifactId>spring-boot-dependencies</artifactId>

     <version>2.0.1.RELEASE</version>

   </parent>

   <dependencies>

     <dependency>

       <groupId>org.springframework.boot</groupId>

       <artifactId>spring-boot-starter-web</artifactId>

     </dependency>

   </dependencies>

 </project>
pom.xml
3.2 创建启动类:
 package com.cn;

 import org.springframework.boot.SpringApplication;

 import org.springframework.boot.autoconfigure.SpringBootApplication;

 /**

  * @program: spring-boot-example

  * @description: 启动类

  * @author:

  * @create: 2018-04-28 10:42

  **/

 @SpringBootApplication

 public class HelloApplication {

     /**

      * @Description:

      * @Param: [Class]  配置类源类

      * @Param: [args]   应用启动参数

      * @return: void

      * @Author:

      * @Date: 2018/4/28

      */

     public static void main(String[] args) {

         SpringApplication.run(HelloApplication.class, args);

     }

 }
HelloApplication.java
3.3 创建Controller访问对接口:
 package com.cn.controller;

 import org.springframework.web.bind.annotation.RequestMapping;

 import org.springframework.web.bind.annotation.RestController;

 /**

  * @program: spring-boot-example

  * @description: 控制层:helllocontroller

  * @author:

  * @create: 2018-04-28 10:49

  **/

 @RestController

 public class HelloController {

     /**

      * @Description:

      * @Param:

      * @return:

      * @Author:

      * @Adress: http://localhost:8080/hello

      * @Date: 2018/4/28

      */

     @RequestMapping("hello")

     public String hello() {

         return "Hello World!";

     }

 }
HelloController.java
注意:HelloController.java文件要在启动类的本包或子包中,才可以被启动类扫描到,详情请看:http://www.cnblogs.com/lfalex0831/p/8922468.html,SpringBoot默认扫描的范围为本包及子包;
3.4 启动启动类,打开浏览器,输入 http://localhost:8080/hello 访问:
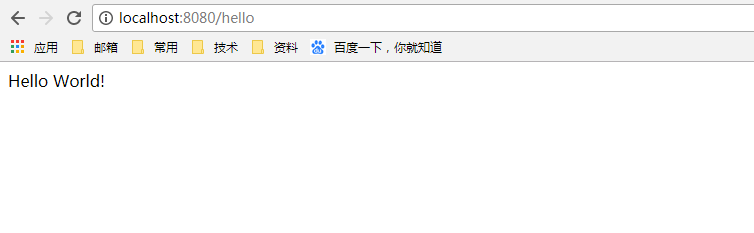
返回HelloWorld到页面;
注:
@SpringBootApplication:SpringBoot的启动类注解,查看源码发现它其实是@SpringBootConfiguration,@EnableAutoConfiguration,@ComponentScan三个的注解集(源码之后会有进阶篇,我认为学一个东西先学会它的应用然后再学习它的本质);
SpringApplication.run(HelloApplication.class, args); 真正的启动代码,会做一些初始化操作,启动内置的监听器,创键environment对象并加载配置项等;
@RestController:还是查看源码发现,它是@Controller,@ResponseBody的集合,它Spring4之后新加入的注解,原来返回json需要@ResponseBody和@Controller配合,现在一步搞定;
@RequestMapping("hello") 请求映射不多说了;
4.创建可执行JAR
我们也可以通过插件创建一个在生产环境中运行的可执行jar文件来完成我们的示例。
首先引入依赖:
<build>

    <plugins>

      <plugin>

        <groupId>org.springframework.boot</groupId>

        <artifactId>spring-boot-maven-plugin</artifactId>

        <executions>

          <execution>

            <goals>

              <goal>repackage</goal>

            </goals>

          </execution>

        </executions>

      </plugin>

    </plugins>

</build>
在项目目录下打开cmd命令,使用 mvn package 命令进行打包,如下:
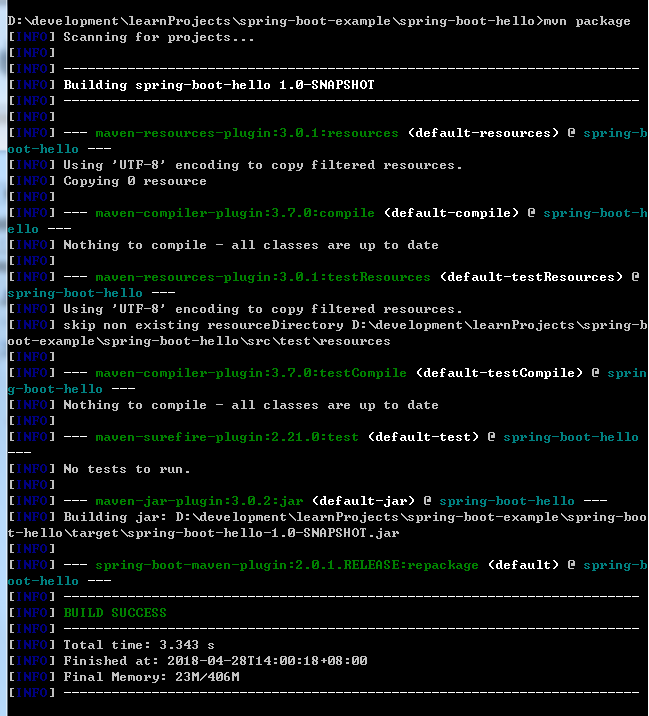
如果想查看打包后的jar文件内部目录,可用命令 jar tvf target/myproject-0.0.1-SNAPSHOT.jar 查看目录结构;
使用 java -jar target\spring-boot-hello-1.0-SNAPSHOT.jar 启动应用如下:
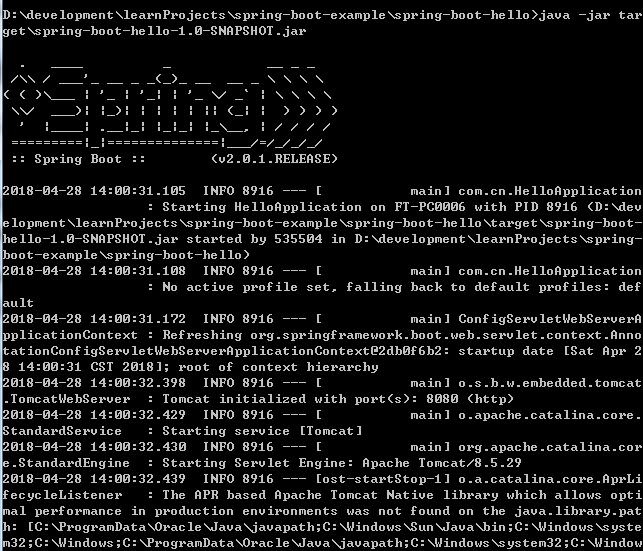
测试结果如3.4所演示的;
如果在启动时遇见没有主清单目录的错误的话,请看:http://www.cnblogs.com/lfalex0831/p/8967428.html
完整示例:https://gitee.com/lfalex/spring-boot-example
参考官方文档:https://docs.spring.io/spring-boot/docs/current-SNAPSHOT/reference/htmlsingle/#boot-documentation
(一)SpringBoot2.0基础篇- 介绍及HelloWorld初体验的更多相关文章
- (一)SpringBoot基础篇- 介绍及HelloWorld初体验
1.SpringBoot介绍: 根据官方SpringBoot文档描述,BUILD ANYTHING WITH SPRING BOOT (用SPRING BOOT构建任何东西,很牛X呀!),下面是官方文 ...
- (二)SpringBoot2.0基础篇- 静态资源的访问及Thymeleaf模板引擎的使用
一.描述 在应用系统开发的过程中,不可避免的需要使用静态资源(浏览器看的懂,他可以有变量,例:HTML页面,css样式文件,文本,属性文件,图片等): 并且SpringBoot内置了Thymeleaf ...
- (六)SpringBoot2.0基础篇- Redis整合(JedisCluster集群连接)
一.环境 Redis:4.0.9 SpringBoot:2.0.1 Redis安装:Linux(Redhat)安装Redis 二.SpringBoot整合Redis 1.项目基本搭建: 我们基于(五) ...
- (四)SpringBoot2.0基础篇- 多数据源,JdbcTemplate和JpaRepository
在日常开发中,经常会遇到多个数据源的问题,而SpringBoot也有相关API:Configure Two DataSources:https://docs.spring.io/spring-boot ...
- (五)SpringBoot2.0基础篇- Mybatis与插件生成代码
SpringBoot与Mybatis合并 一.创建SpringBoot项目,引入相关依赖包: <?xml version="1.0" encoding="UTF-8 ...
- (七)SpringBoot2.0基础篇- application.properties属性文件的解析及获取
默认访问的属性文件为application.properties文件,可在启动项目参数中指定spring.config.location的参数: java -jar myproject.jar --s ...
- (三)SpringBoot2.0基础篇- 持久层,jdbcTemplate和JpaRespository
一.介绍 SpringBoot框架为使用SQL数据库提供了广泛的支持,从使用JdbcTemplate的直接JDBC访问到完整的“对象关系映射”技术(如Hibernate).Spring-data-jp ...
- 【转】WF4.0 (基础篇)
转自:http://www.cnblogs.com/foundation/category/215023.html 作者:WXWinter —— 兰竹菊梅★春夏秋冬☆ —— wxwinter@16 ...
- iOS开发swift语法0基础篇—————(swift技术交流群:361513739)
iOS开发之swift语法0基础篇:点击打开链接 swift技术交流QQ群361513739
随机推荐
- 31、springboot与任务
异步任务 测试如下: 进行等待三秒在进行应答 @Service public class AsynService { public void hello(){ try { Thread.sleep() ...
- Graph I - Graph
Graph There are two standard ways to represent a graph G=(V,E)G=(V,E), where VV is a set of vertices ...
- Docker中配置字符集支持中文
在Dockerfile中加入以下内容: ENV LANG en_US.UTF-8ENV LANGUAGE en_US:enENV LC_ALL en_US.UTF-8
- Loadrunner手动关联详解
Loadrunner手动关联详解 一.关联的含义: 关联(correlation):在脚本回放过程中,客户端发出请求,通过关联函数所定义的左右边界值(也就是关联规则),在服务器所响应的内容中查找,得到 ...
- first-child伪类选择器
原文链接地址:https://www.cnblogs.com/wangmeijian/p/4562304.html :first-child 选择器用于选取属于其父元素的首个子元素的指定选择器.——w ...
- GitHub学生认证示范
打开网址:https://education.github.com/ 点击Get Your Pack 点击I am a Student 填写资料上传学生证照片,等待通过,如果没有GitHub账号就注 ...
- OpenID Connect Core 1.0(七)使用混合流验证
3.3 使用混合流验证(Authentication using the Hybrid Flow) 本节描述如何使用混合流执行验证.当使用混合流(Hybrid Flow)时一些令牌从授权端点返回,另一 ...
- LINUX升级PHP版本至5.4.26
参考网址:http://www.itbulu.com/wdcp-php54.html文件:链接:http://pan.baidu.com/s/1slbbNxr 密码:s0yb 1.运行下载PHP版本文 ...
- 使用XWAF框架(4)——LunarCalendar日历组件
XWAF提供了管理日历的com.xwaf.date.LunarCalendar静态类,可以直接使用,非常方便.该类包括六个主要静态方法: 4.1 isLeapYear(int year) 判断公历年 ...
- PLSQL Developer 12 注册码
PLSQL Developer 12 注册码product code: 4vkjwhfeh3ufnqnmpr9brvcuyujrx3n3le serial Number:226959 password ...