
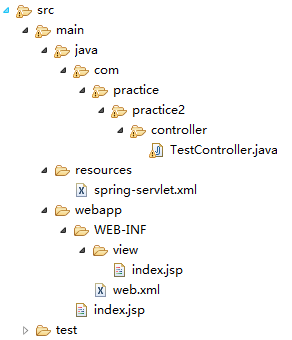
eclipse+maven springMVC搭建

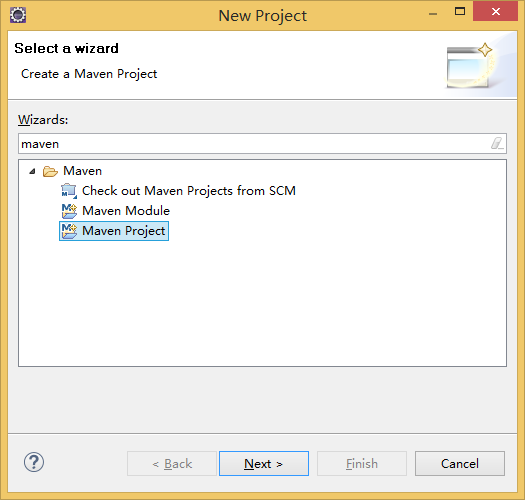
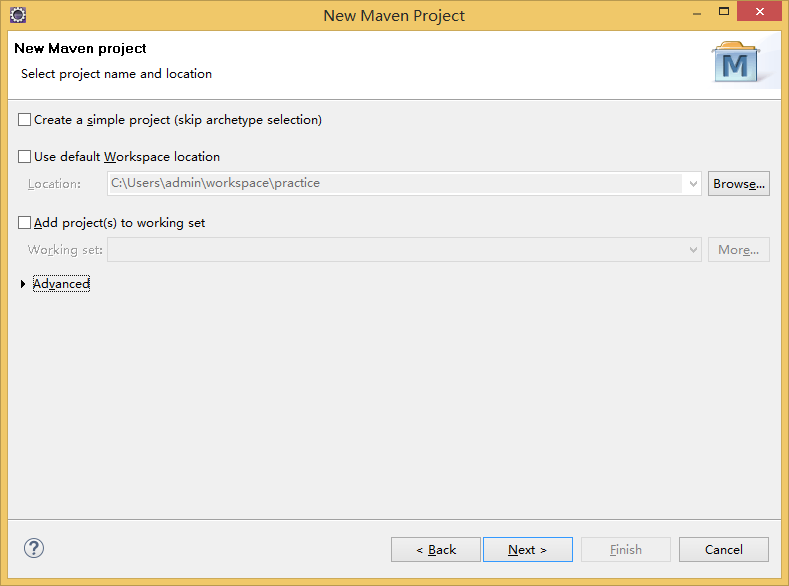


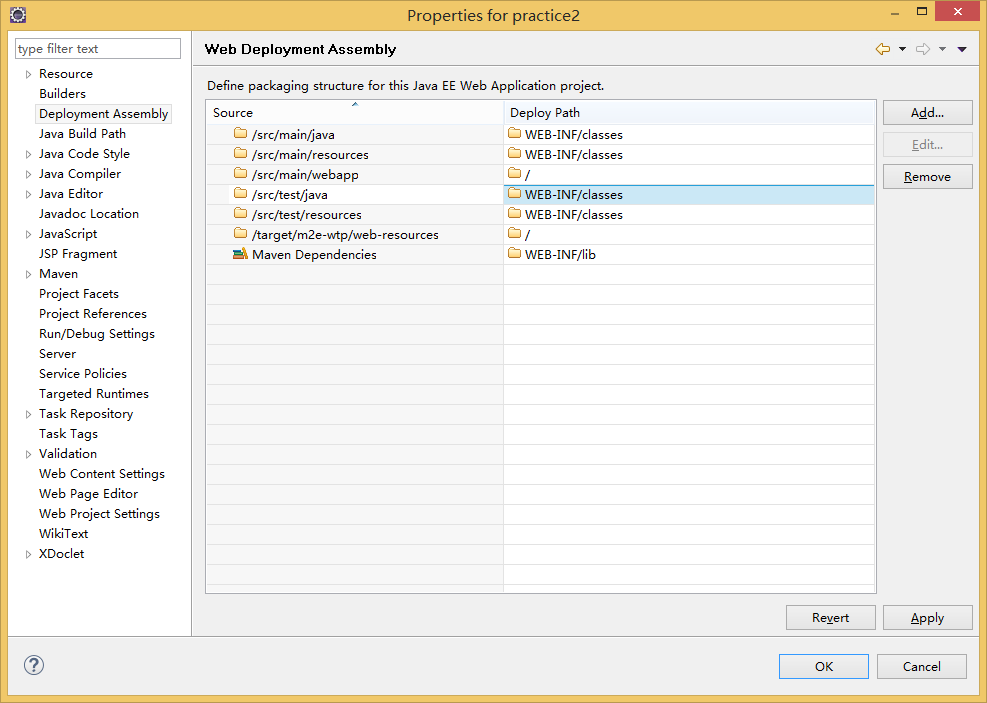
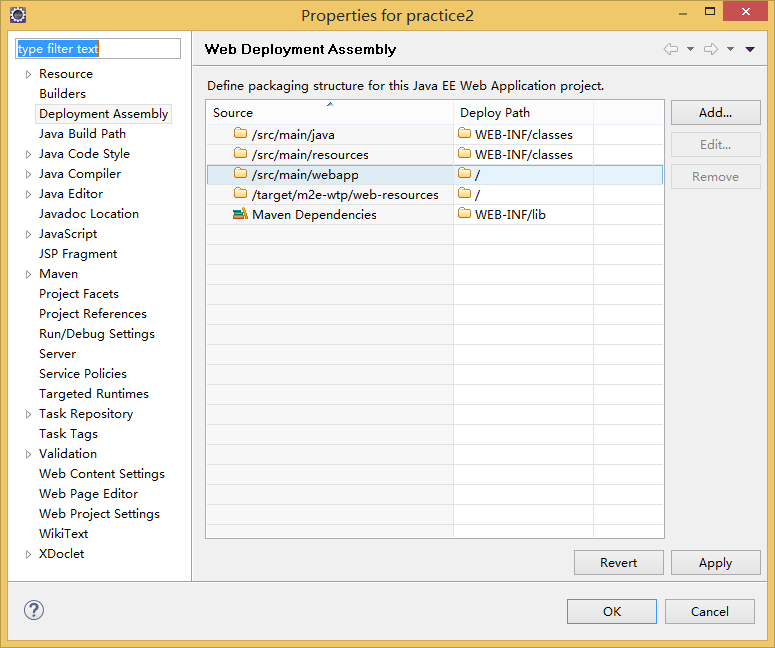
 <?xml version="1.0" encoding="UTF-8"?>

 <web-app xmlns:xsi="http://www.w3.org/2001/XMLSchema-instance" xmlns="http://xmlns.jcp.org/xml/ns/javaee"

         xsi:schemaLocation="http://xmlns.jcp.org/xml/ns/javaee http://xmlns.jcp.org/xml/ns/javaee/web-app_3_1.xsd" id="WebApp_ID" version="3.1">

   <display-name>practice2</display-name>

       <filter>

         <filter-name>CharacterEncodingFilter</filter-name>

         <filter-class>org.springframework.web.filter.CharacterEncodingFilter</filter-class>

         <init-param>

             <param-name>encoding</param-name>

             <param-value>utf-8</param-value>

         </init-param>

     </filter>

     <filter-mapping>

         <filter-name>CharacterEncodingFilter</filter-name>

         <url-pattern>/*</url-pattern>

     </filter-mapping>

     <servlet>

         <servlet-name>practice2</servlet-name>

         <servlet-class>org.springframework.web.servlet.DispatcherServlet</servlet-class>

         <init-param>

             <param-name>contextConfigLocation</param-name>

             <param-value>classpath:spring-servlet.xml</param-value>

         </init-param>

         <load-on-startup>1</load-on-startup>

     </servlet>

     <servlet-mapping>

         <servlet-name>practice2</servlet-name>

         <url-pattern>/</url-pattern>

     </servlet-mapping>

 </web-app>
web.xml
 <?xml version="1.0" encoding="UTF-8"?>

 <beans xmlns="http://www.springframework.org/schema/beans" xmlns:xsi="http://www.w3.org/2001/XMLSchema-instance" xmlns:context="http://www.springframework.org/schema/context" xmlns:tx="http://www.springframework.org/schema/tx" xmlns:aop="http://www.springframework.org/schema/aop" xmlns:mvc="http://www.springframework.org/schema/mvc" xmlns:p="http://www.springframework.org/schema/p"

     xsi:schemaLocation="

     http://www.springframework.org/schema/beans

     http://www.springframework.org/schema/beans/spring-beans.xsd

     http://www.springframework.org/schema/context

     http://www.springframework.org/schema/context/spring-context.xsd

     http://www.springframework.org/schema/tx

     http://www.springframework.org/schema/tx/spring-tx.xsd

     http://www.springframework.org/schema/aop

     http://www.springframework.org/schema/aop/spring-aop.xsd

     http://www.springframework.org/schema/mvc

     http://www.springframework.org/schema/mvc/spring-mvc.xsd">

     <mvc:annotation-driven />

     <!-- 该配置为自动扫描配置的包下所有使用@Controller注解的类 -->

     <context:component-scan base-package="" />(base-packge暂且留白)

     <!-- 跳转页面使用,如果不配置的话,那么我们springmvc返回页面的时候,会被认为是请求url处理,所以就无法到达想要跳转的页面。这是因为web.xml里面配置的访问路径为'/'也就是所有访问路径都被认为是请求url -->

     <bean class="org.springframework.web.servlet.view.InternalResourceViewResolver" p:prefix="/WEB-INF/view/" p:suffix=".jsp" p:order="5" />

     <mvc:resources mapping="/js/**" location="/WEB-INF/js/" />

     <mvc:resources mapping="/css/**" location="/WEB-INF/css/" />

     <mvc:resources mapping="/images/**" location="/WEB-INF/images/" />

     <mvc:resources mapping="/assets/js/**" location="/WEB-INF/assets/js/" />

     <mvc:resources mapping="/assets/css/**" location="/WEB-INF/assets/css/" />

     <mvc:resources mapping="/assets/fonts/**" location="/WEB-INF/assets/fonts/" />

     <mvc:resources mapping="/view/**" location="/WEB-INF/view/" />

 </beans>
spring-servlet.xml


   <dependencies>

     <dependency>

       <groupId>junit</groupId>

       <artifactId>junit</artifactId>

       <version>3.8.1</version>

       <scope>test</scope>

     </dependency>

     <dependency>

         <groupId>org.springframework</groupId>

         <artifactId>spring-web</artifactId>

         <version>4.2.4.RELEASE</version>

     </dependency>

     <dependency>

         <groupId>org.springframework</groupId>

         <artifactId>spring-webmvc</artifactId>

         <version>4.2.4.RELEASE</version>

     </dependency>

     <dependency>

         <groupId>org.springframework</groupId>

         <artifactId>spring-core</artifactId>

         <version>4.2.4.RELEASE</version>

     </dependency>

     <dependency>

         <groupId>org.apache.geronimo.specs</groupId>

         <artifactId>geronimo-servlet_2.5_spec</artifactId>

         <version>1.2</version>

     </dependency>

   </dependencies>
pom.xml
 package com.practice.practice2.controller;

 import javax.servlet.http.HttpServletRequest;

 import javax.servlet.http.HttpServletResponse;

 import org.springframework.stereotype.Controller;

 import org.springframework.ui.ModelMap;

 import org.springframework.web.bind.annotation.RequestMapping;

 import org.springframework.web.servlet.ModelAndView;

 @Controller

 @RequestMapping(value = "practice/")

 public class TestController {

     @RequestMapping(value = "index")

     public ModelAndView showIndex(HttpServletRequest request,HttpServletResponse response){

         ModelMap map = new ModelMap();

         String string = "Welcome to my page!";

         map.put("string", string);

         return new ModelAndView("/index",map);

     }

 }
TestController.java
<%@ page language="java" contentType="text/html; charset=ISO-8859-1"

    pageEncoding="ISO-8859-1"%>

<!DOCTYPE html PUBLIC "-//W3C//DTD HTML 4.01 Transitional//EN" "http://www.w3.org/TR/html4/loose.dtd">

<html>

<head>

<meta http-equiv="Content-Type" content="text/html; charset=ISO-8859-1">

<title>Insert title here</title>

</head>

<body>

    ${string}

</body>

</html>
index.jsp


eclipse+maven springMVC搭建的更多相关文章
- eclipse +maven+ssm搭建矿建
记录一下搭建框架的过程1.下载最新的eclipse https://www.eclipse.org/downloads/download.php?file=/oomph/epp/neon/R/ec ...
- 【Web】Eclipse + Maven + Struts搭建服务器
一.环境 系统:Windows7 IDE:Eclipse-Kepler Service Release 2 使用插件:Maven(请预先在电脑上安装Maven) 二.搭建 在Eclipse中新建一个M ...
- Log4j2 配置笔记(Eclipse+maven+SpringMVC)
Log4j2相关介绍可以百度看下,这里只注重配置Log4j2 能够马上跑起来: 1.pom.xml文件中添加Log4j2的相关Maven配置信息 <!-- log4j2 --> <d ...
- windows 环境下 eclipse + maven + tomcat 的 hello world 创建和部署
主要记录自己一个新手用 eclipse + maven + tomcat 搭建 hello world 的过程,以及遇到的问题.讲真都是自己通过百度和谷歌一步步搭建的项目,没问过高手,也没高手可问,由 ...
- eclipse下maven插件搭建springmvc之helloworld
这几天学习了怎样使用maven,最终还是要回归web项目嘛,所以主要还是使用eclipse插件. 1 下载eclipse maven插件. 其实新版的eclipse已经集成了maven:lunar.m ...
- Eclipse利用Maven2搭建SpringMVC框架的Web工程
一.准备工作: 下载apache-maven--> 配置Maven_home -->下载Eclipse Maven插件 二.新建工程: 选择新建Maven Project arche ...
- 使用intellij idea搭建MAVEN+springmvc+mybatis框架
原文:使用intellij idea搭建MAVEN+springmvc+mybatis框架 1.首先使用idea创建一个maven项目 2.接着配置pom.xml,以下为我的配置 <projec ...
- Spring MVC 环境搭建(maven+SpringMVC+mybatis+Freemarker)
Spring MVC 环境搭建(maven+SpringMVC+mybatis+Freemarker) 一.准备工作 1.Eclipse Java EE IDE(4.4.1) 2.JDK 3.Tomc ...
- JavaEE开发基于Eclipse的环境搭建以及Maven Web App的创建
本篇博客就完整的来聊一下如何在Eclipse中创建的Maven Project.本篇博客是JavaEE开发的开篇,也是基础.本篇博客的内容干货还是比较多的,而且比较实用,并且都是采用目前最新版本的工具 ...
随机推荐
- UVa 10294 项链和手镯(polya)
https://vjudge.net/problem/UVA-10294 题意: 手镯可以翻转,但项链不可以.输入n和t,输出用t种颜色的n颗珠子能制作成的项链和手镯的个数. 思路: 经典等价类计数问 ...
- python之urllib2简单解析HTML页面之篇一
一.urllib2简单获取html页面 #!/usr/bin/env python # -*- coding:utf-8 -*- import urllib2 response = urllib2.u ...
- Codeforces Round #404 (Div. 2) A,B,C,D,E 暴力,暴力,二分,范德蒙恒等式,树状数组+分块
题目链接:http://codeforces.com/contest/785 A. Anton and Polyhedrons time limit per test 2 seconds memory ...
- spark streaming 使用geoIP解析IP
1.首先将GEOIP放到服务器上,如,/opt/db/geo/GeoLite2-City.mmdb 2.新建scala sbt工程,测试是否可以顺利解析 import java.io.Fileimpo ...
- Java IO流-合并流
2017-11-05 20:15:28 SequenceinputStream SequenceinputStream:SequenceInputStream 表示其他输入流的逻辑串联.它从输入流的有 ...
- thinkphp5的auth权限认证(转自thinkphp官方文档+自己总结)
thinkphp5的auth权限认证(转自thinkphp官方文档+自己总结) 一.总结 一句话总结:相当于就是用其它thinkphp的扩展一样,都是引入扩展,配置扩展,然后使用 引入 配置 使用 基 ...
- [转]PowerDesigner 把Comment写到name中 和把name写到Comment中 pd7以后版本可用
http://www.cnblogs.com/cxd4321/archive/2009/03/07/1405475.html 在使用PowerDesigner对数据库进行概念模型和物理模型设计时,一般 ...
- 牛客网——C列一列
链接:https://www.nowcoder.net/acm/contest/71/C来源:牛客网 题目描述 小W在计算一个数列{An},其中A1=1,A2=2,An+2=An+1+An.尽管他计算 ...
- 改变Vim保存文件路径
1. vim 有个cd命令.用来更改当前文件夹.:cd sth进入sth文件夹.这样新文件保存之后就在当前文件夹.不过如果你打开一个已经保存的文件后然后更改当前文件夹是不会改变保存路径的.你必须为:w ...
- 在JavaScript中进行文件处理,第四部分:对象URLs
译注:原文是<JavaScript高级程序设计>的作者Nicholas Zakas写的,本翻译纯属为自己学习而做,仅供参考.原文链接:这里 学习到这里,你已经了解在传统方式中如何使用文件, ...