
Spring Boot (21) 使用Swagger2构建restful API
使用swagger可以与spring mvc程序配合组织出强大的restful api文档。它既可以减少我们创建文档的工作量,同时说明内容又整合入现实代码中,让维护文档和修改代码整合为一体,可以让我们在修改代码逻辑的同时方便的修改文档说明。另外swagger2也提供了强大的也卖弄测试功能来调试每个restful API。
首先搭建一个简单的restful api:
User.java
package com.example.bean;

public class User {

    private Integer id;

    private String name;

    private Integer age;

    public User() {

    }

    public User(Integer id, String name, Integer age) {

        this.id = id;

        this.name = name;

        this.age = age;

    }

    public Integer getId() {

        return id;

    }

    public void setId(Integer id) {

        this.id = id;

    }

    public String getName() {

        return name;

    }

    public void setName(String name) {

        this.name = name;

    }

    public Integer getAge() {

        return age;

    }

    public void setAge(Integer age) {

        this.age = age;

    }

}
UserController.java
package com.example.controller;

import com.example.bean.User;

import com.example.dao.UserDao;

import org.springframework.web.bind.annotation.*;

import javax.annotation.Resource;

import java.util.*;

@RequestMapping("/users")

@RestController

public class UserController {

    @Resource

    private UserDao dao;

    @GetMapping("/")

    public List<User> getUserList() {

        return dao.getAll();

    }

    @PostMapping("/")

    public String postUser(@RequestBody User user) {

        dao.addUser(user);

        return "success";

    }

    @GetMapping("/{id}")

    public User getUser(@PathVariable("id") Integer id) {

        return dao.getUserById(id);

    }

    @PutMapping("/{id}")

    public String putUser(@PathVariable("id") Integer id, @RequestBody User user) {

        user.setId(id);

        dao.updateUser(user);

        return "success";

    }

    @DeleteMapping("/{id}")

    public String deleteUser(@PathVariable("id") Integer id) {

        dao.deleteUser(id);

        return "success";

    }

}
UserDao.java
package com.example.dao;

import com.example.bean.User;

import org.apache.ibatis.annotations.*;

import java.util.List;

@Mapper

public interface UserDao {

    @Select("select * from user")

    List<User> getAll();

    @Select("select * from user where id = #{id}")

    User getUserById(Integer id);

    @Insert("insert into user (name,age) values (#{name},#{age})")

    int addUser(User user);

    @Delete("delete from user where id = #{id}")

    int deleteUser(Integer id);

    @Update("update user set name=#{name},age=#{age} where id = #{id}")

    int updateUser(User user);

}
pom.xml
<?xml version="1.0" encoding="UTF-8"?>

<project xmlns="http://maven.apache.org/POM/4.0.0" xmlns:xsi="http://www.w3.org/2001/XMLSchema-instance"

    xsi:schemaLocation="http://maven.apache.org/POM/4.0.0 http://maven.apache.org/xsd/maven-4.0.0.xsd">

    <modelVersion>4.0.0</modelVersion>

    <groupId>com.example</groupId>

    <artifactId>demo</artifactId>

    <version>0.0.1-SNAPSHOT</version>

    <packaging>jar</packaging>

    <name>demo</name>

    <description>Demo project for Spring Boot</description>

    <parent>

        <groupId>org.springframework.boot</groupId>

        <artifactId>spring-boot-starter-parent</artifactId>

        <version>2.0.2.RELEASE</version>

        <relativePath/> <!-- lookup parent from repository -->

    </parent>

    <properties>

        <project.build.sourceEncoding>UTF-8</project.build.sourceEncoding>

        <project.reporting.outputEncoding>UTF-8</project.reporting.outputEncoding>

        <java.version>1.8</java.version>

    </properties>

    <dependencies>

        <dependency>

            <groupId>org.springframework.boot</groupId>

            <artifactId>spring-boot-starter-web</artifactId>

        </dependency>

        <dependency>

            <groupId>org.springframework.boot</groupId>

            <artifactId>spring-boot-starter-test</artifactId>

            <scope>test</scope>

        </dependency>

        <!-- 引入mybatis -->

        <dependency>

            <groupId>org.mybatis.spring.boot</groupId>

            <artifactId>mybatis-spring-boot-starter</artifactId>

            <version>1.3.0</version>

        </dependency>

        <!--mysql数据库驱动 -->

        <dependency>

            <groupId>mysql</groupId>

            <artifactId>mysql-connector-java</artifactId>

        </dependency>

    </dependencies>

    <build>

        <plugins>

            <plugin>

                <groupId>org.springframework.boot</groupId>

                <artifactId>spring-boot-maven-plugin</artifactId>

            </plugin>

        </plugins>

    </build>

</project>
application.yml
spring:

  datasource:

    url: jdbc:mysql://localhost:3306/david2018_db?characterEncoding=utf8

    username: root

    password: 1234
测试页面:
<html>

<head>

    <title>Title</title>

    <script  src="http://libs.baidu.com/jquery/1.7.2/jquery.min.js"></script>

    <script>

        $(function(){

            $("#btnAdd").click(function(){

                var data = {

                    name:'david',

                    age:24

                };

                $.ajax({

                    url:'/users/',

                    type:"post",

                    data:JSON.stringify(data),

                    contentType:'application/json;charset=UTF-8',

                    dataType:"json",

                    success:function(data){

                        console.log(data)

                    }

                });

            });

            $("#btnSearchAll").click(function () {

                $.ajax({

                    url:'/users/',

                    type:'get',

                    contentType:'application/json;charset=UTF-8',

                    dataType:"json",

                    success:function(data){

                        console.log(data)

                    }

                })

            })

        });

    </script>

</head>

<body>

<button id="btnAdd">添加</button>

<button id="btnSearchAll">查询</button>

</body>

</html>
功能如下:
| 请求类型 | URL | 功能说明 |
|---|---|---|
| GET | /users | 查询用户列表 |
| POST | /users | 创建一个用户 |
| GET | /users/id | 根据id查询一个用户 |
| PUT | /users/id | 根据id更新一个用户 |
| DELETE | /users/id | 根据id删除一个用户 |
下面来添加Swagger2依赖
<dependency>

    <groupId>io.springfox</groupId>

    <artifactId>springfox-swagger2</artifactId>

    <version>2.2.2</version>

</dependency>

<dependency>

    <groupId>io.springfox</groupId>

    <artifactId>springfox-swagger-ui</artifactId>

    <version>2.2.2</version>

</dependency>
创建Swagger2配置类
在application.java同级创建Swagger2的配置类Swagger2.java
@Configuration

@EnableSwagger2

public class Swagger2 {

    @Bean

    public Docket createRestApi(){

        return new Docket(DocumentationType.SWAGGER_2)

                .apiInfo(apiInfo())

                .select()

                .apis(RequestHandlerSelectors.basePackage("com.example.controller"))

                .paths(PathSelectors.any())

                .build();

    }

    private ApiInfo apiInfo(){

        return new ApiInfoBuilder()

                .title("标题")

                .description("详细描述")

                .termsOfServiceUrl("http://www.david.com")

                .contact("david")

                .version("1.0")

                .build();

    }

}
@Configuration注解:让spring来加载该类配置。
@EnableSwagger2注解:启用Swagger2.
createRestApi函数创建Docket的Bean滞后,apiInfo()用来创建该Api的基本信息(这些基本信息会展示在文档页面中)。
select()函数返回一个ApiSelectorBuilder实例用来控制哪些接口暴露给Swagger来展现,本例扫描指定的Controller,会扫描所有Controller定义的API,并产生文档(除了被@ApiIgnore指定的请求)。
在controller中填写文档的详细描述: UserController.java
package com.example.controller;

import com.example.bean.User;

import com.example.dao.UserDao;

import io.swagger.annotations.Api;

import io.swagger.annotations.ApiImplicitParam;

import io.swagger.annotations.ApiImplicitParams;

import io.swagger.annotations.ApiOperation;

import org.springframework.web.bind.annotation.*;

import javax.annotation.Resource;

import java.util.*;

@RequestMapping("/users")

@RestController

public class UserController {

    @Resource

    private UserDao dao;

    @GetMapping("/")

    @ApiOperation(value="获取用户列表",notes = "")

    public List<User> getUserList() {

        return dao.getAll();

    }

    @PostMapping("/")

    @ApiOperation(value = "创建用户",notes = "根据user对象创建用户")

    @ApiImplicitParam(name="user",value="用户详细实体",required = true,dataType = "User")

    public String postUser(@RequestBody User user) {

        dao.addUser(user);

        return "success";

    }

    @GetMapping("/{id}")

    @ApiOperation(value = "获取用户详细信息",notes = "根据url中的id来获取用户信息")

    @ApiImplicitParam(name = "id", value = "用户ID", required = true, dataType = "Integer")

    public User getUser(@PathVariable("id") Integer id) {

        return dao.getUserById(id);

    }

    @PutMapping("/{id}")

    @ApiOperation(value="更新用户信息",notes = "根据url的id来查找信息,并根据传入的user修改信息")

    @ApiImplicitParams({

            @ApiImplicitParam(name = "id", value = "用户ID", required = true, dataType = "Long"),

            @ApiImplicitParam(name = "user", value = "用户详细实体user", required = true, dataType = "User")

    })

    public String putUser(@PathVariable("id") Integer id, @RequestBody User user) {

        user.setId(id);

        dao.updateUser(user);

        return "success";

    }

    @DeleteMapping("/{id}")

    @ApiOperation(value="删除用户信息",notes = "根据url中的id来删除用户信息")

    @ApiImplicitParam(name = "id", value = "用户ID", required = true, dataType = "Integer")

    public String deleteUser(@PathVariable("id") Integer id) {

        dao.deleteUser(id);

        return "success";

    }

}
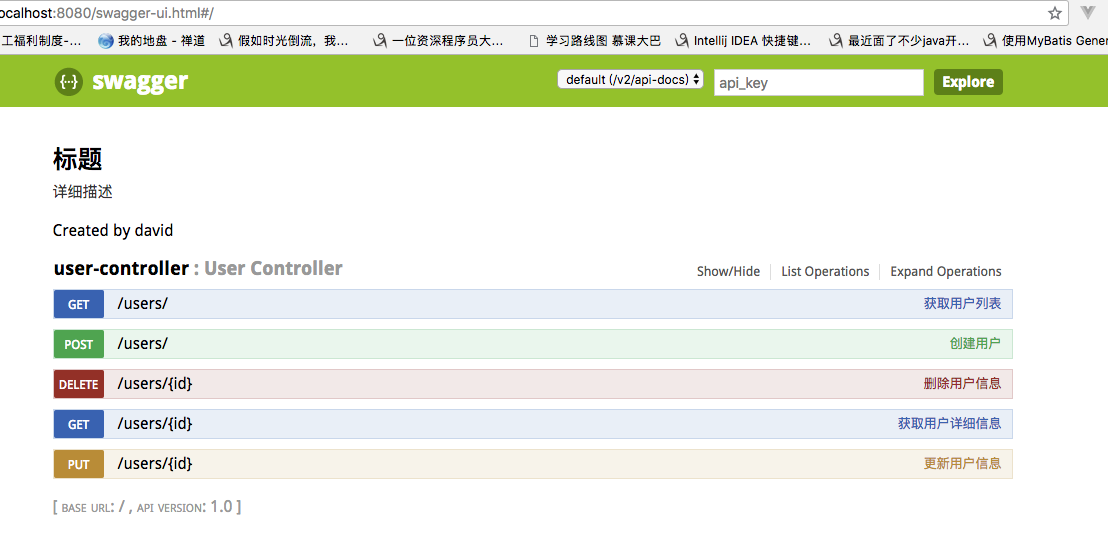
启动spring boot程序,在浏览器输入:http://localhost:8080/swager-ui.html 就能看到restful API的页面,可以点开具体的API请求进行操作。
Spring Boot (21) 使用Swagger2构建restful API的更多相关文章
- Spring Boot中使用Swagger2构建RESTful API文档
在开发rest api的时候,为了减少与其他团队平时开发期间的频繁沟通成本,传统做法我们会创建一份RESTful API文档来记录所有接口细节,然而这样的做法有以下几个问题: 1.由于接口众多,并且细 ...
- Spring Boot中使用Swagger2构建RESTful APIs
关于 Swagger Swagger能成为最受欢迎的REST APIs文档生成工具之一,有以下几个原因: Swagger 可以生成一个具有互动性的API控制台,开发者可以用来快速学习和尝试API. S ...
- Spring Boot中使用Swagger2构建RESTful APIs介绍
1.添加相关依赖 <!-- https://mvnrepository.com/artifact/io.springfox/springfox-swagger2 --> <depen ...
- Spring Boot中使用Swagger2生成RESTful API文档(转)
效果如下图所示: 添加Swagger2依赖 在pom.xml中加入Swagger2的依赖 <!-- https://mvnrepository.com/artifact/io.springfox ...
- Spring MVC中使用 Swagger2 构建Restful API
1.Spring MVC配置文件中的配置 [java] view plain copy <!-- 设置使用注解的类所在的jar包,只加载controller类 --> <contex ...
- springboot集成swagger2构建RESTful API文档
在开发过程中,有时候我们需要不停的测试接口,自测,或者交由测试测试接口,我们需要构建一个文档,都是单独写,太麻烦了,现在使用springboot集成swagger2来构建RESTful API文档,可 ...
- Spring Boot中使用Swagger2构建强大的RESTful API文档
由于Spring Boot能够快速开发.便捷部署等特性,相信有很大一部分Spring Boot的用户会用来构建RESTful API.而我们构建RESTful API的目的通常都是由于多终端的原因,这 ...
- Spring Boot 中使用 Swagger2 构建强大的 RESTful API 文档
项目现状:由于前后端分离,没有很好的前后端合作工具. 由于接口众多,并且细节复杂(需要考虑不同的HTTP请求类型.HTTP头部信息.HTTP请求内容等),高质量地创建这份文档本身就是件非常吃力的事,下 ...
- Spring Boot 入门系列(二十二)使用Swagger2构建 RESTful API文档
前面介绍了如何Spring Boot 快速打造Restful API 接口,也介绍了如何优雅的实现 Api 版本控制,不清楚的可以看我之前的文章:https://www.cnblogs.com/zha ...
随机推荐
- 最基础的rpm命令
rpm -ivh package.rpm 安装一个rpm包 rpm -ivh --nodeeps package.rpm 安装一个rpm包而忽略依赖关系警告 rpm -U package.rpm 更新 ...
- Luogu P1892 [BOI2003]团伙
P1892 [BOI2003]团伙 题目描述 1920年的芝加哥,出现了一群强盗.如果两个强盗遇上了,那么他们要么是朋友,要么是敌人.而且有一点是肯定的,就是: 我朋友的朋友是我的朋友: 我敌人的敌人 ...
- pyhon中的内存优化机制
一.变量的内存地址 python中变量的内存地址可以用id()来查看 >>> a = " >>> id(a) 2502558915696 二.pyhon中 ...
- 腾讯云:ubuntu搭建 FTP 文件服务
搭建 FTP 文件服务 安装并启动 FTP 服务 任务时间:5min ~ 10min 安装 VSFTPD 使用 apt-get 安装 vsftpd: sudo apt-get install vsft ...
- 【模板】Tarjan缩点
洛谷3387 #include<cstdio> #include<algorithm> #include<cstring> using namespace std; ...
- [加强版] Codeforces 835D Palindromic characteristics (回文自动机、DP)
题目链接: https://codeforces.com/contest/835/problem/D 题意: 一个回文串是\(1\)-回文的,如果一个回文串的左半部分和右半部分一样且都是\(k\)-回 ...
- 【LeetCode Weekly Contest 26 Q3】Friend Circles
[题目链接]:https://leetcode.com/contest/leetcode-weekly-contest-26/problems/friend-circles/ [题意] 告诉你任意两个 ...
- web开发如何使用百度地图API(一)判断点是否在范围内
准备工作 注册开发者 创建应用 拿到百度地图ak 前端实现方案 引入百度地图API和工具类库 <script type="text/javascript" src=" ...
- [TS-A1487][2013中国国家集训队第二次作业]分配游戏[二分]
根据题意,设$3n$次比较中胜了$w$次,负了$l$次,平了$d$次,所有场次中胜了$W$次,负了$L$次,平了$D$次.如果一场赢了,那么$w-l$就会$+1$,相同地,$W-L$也会$+1$:如果 ...
- Android自己定义Toast
一.引言 在开发的过程中你会发现Android自身的Toast提示有很多限制,比方我想自己定义Toast的动画.自己定义一个美观的View显示在Toast中.很多其它的是让Toast显示指定的时长等等 ...