
input type=file实现图片上传,预览以及图片删除
背景
前两天在做一个PC网站的意见反馈,其中涉及到了图片上传功能,要求可以上传多张图片,并且支持图片上传预览及图片删除,
图片上传这一块以前没怎么搞过,而且一般也很少会碰到这样的需求,所以在做这个功能的时候,参考了很多网上的代码 ,
现在就单独写一篇博客来记录下实现的整个过程,以及在做的过程中遇到的一些坑。
先来看下实现的最后效果:
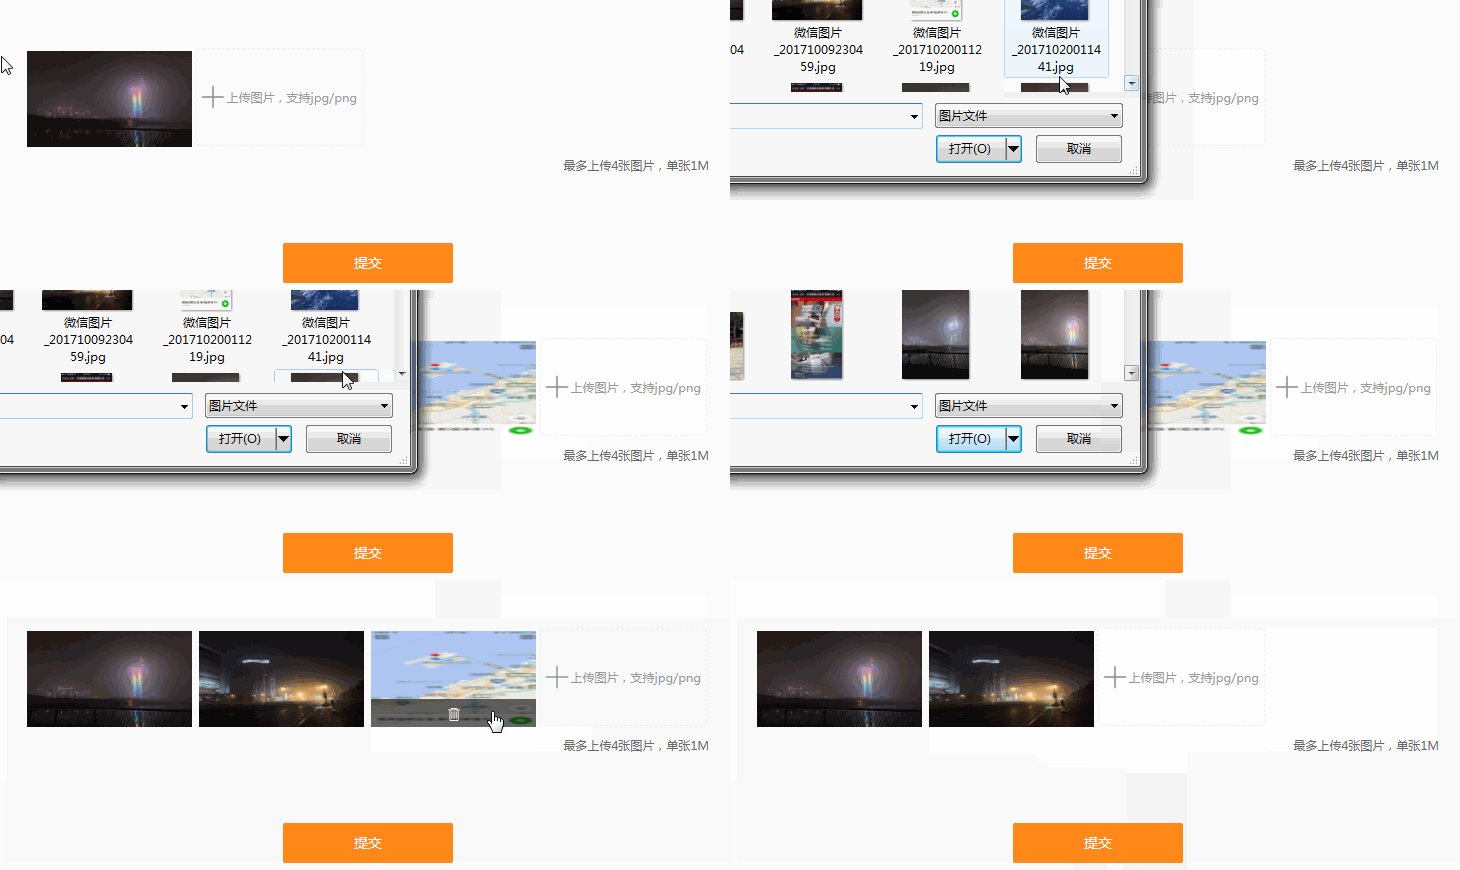
首先先创建好一个用于展示预览图片及上传按钮的div,content-img-list用于动态展示预览图片,file用于显示上传按钮
<div class="content-img">

        	<ul class="content-img-list">

        		<!-- <li class="content-img-list-item"><img src="https://www.baidu.com/img/bd_logo1.png" alt=""><a class="delete-btn"><i class="ico-delete"></i></a></li> -->

        	</ul>

        	<div class="file">

        		<i class="ico-plus"></i>上传图片,支持jpg/png<input type="file" name="file" accept="image/*" id="upload" >

        	</div>

        </div>
上传按钮美化
默认input type=file的上传按钮非常的丑陋,实现自定义上传按钮样式,这里主要通过设置input的透明度将它设置为opacity: 0;
图片上传实现步骤
图片上传
通过jquery监听input change事件,这样我们可以获取到上传的图片流信息,从而可以获取到图片的地址、大小、格式以及名称等信息
这里创建3个数组,imgName、imgSrc、imgFile分别用于存放上传图片的名称、url地址以及图片流信息
var fileList = this.files;

		for(var i = 0; i < fileList.length; i++) {

			var imgSrcI = getObjectURL(fileList[i]);

			imgName.push(fileList[i].name);

			imgSrc.push(imgSrcI);

			imgFile.push(fileList[i]);

		}
getObjectURL方法是一个用于获取本地图片的地址,使用该url可以显示图片
function getObjectURL(file) {

	var url = null ;

	if (window.createObjectURL!=undefined) { // basic

		url = window.createObjectURL(file) ;

	} else if (window.URL!=undefined) { // mozilla(firefox)

		url = window.URL.createObjectURL(file) ;

	} else if (window.webkitURL!=undefined) { // webkit or chrome

		url = window.webkitURL.createObjectURL(file) ;

	}

	return url ;

}
控制上传图片大小、格式以及上传数量
	$('#upload').on('change',function(){

		  if(imgSrc.length==4){

			return alert("最多只能上传4张图片");

		}

		var imgSize = this.files[0].size;  //b

		if(imgSize>1024*1024*1){//1M

			return alert("上传图片不能超过1M");

		}

		if(this.files[0].type != 'image/png' && this.files[0].type != 'image/jpeg' && this.files[0].type != 'image/gif'){

			return alert("图片上传格式不正确");

		}

	})
图片预览
创建一个addNewContent方法用于动态展示添加的图片实现图片预览,在每次上传图片的时候调用该方法
function addNewContent(obj) {

	$(obj).html("");

	for(var a = 0; a < imgSrc.length; a++) {

		var oldBox = $(obj).html();

		$(obj).html(oldBox + '<li class="content-img-list-item"><img src="'+imgSrc[a]+'" alt=""><a index="'+a+'" class="hide delete-btn"><i class="ico-delete"></i></a></li>');

	}

}
图片删除
1.通过监听鼠标的mouseover事件,显示图片删除按钮
$('.content-img-list').on('mouseover','.content-img-list-item',function(){

		$(this).children('a').removeClass('hide');

	});
2.监听鼠标的mouseleave事件,隐藏图片删除按钮
$('.content-img-list').on('mouseleave','.content-img-list-item',function(){

		$(this).children('a').addClass('hide');

	});
3.获取图片index下标属性,通过js的splice方法删除数组元素,重新调用addNewContent方法遍历图片数组显示预览图片
$(".content-img-list").on("click",'.content-img-list-item a',function(){

	    	var index = $(this).attr("index");

			imgSrc.splice(index, 1);

			imgFile.splice(index, 1);

			imgName.splice(index, 1);

			var boxId = ".content-img-list";

			addNewContent(boxId);

			if(imgSrc.length<4){//显示上传按钮

				$('.content-img .file').show();

			}

	  });
图片上传提交
这里主要使用FormData来拼装好数据参数,提交到后台
var formFile = new FormData();
遍历imgFile图片流数组拼装到FormData中
 $.each(imgFile, function(i, file){

            formFile.append('myFile[]', file);

        });
添加其他参数
    formFile.append("type", type);

        formFile.append("content", content);

        formFile.append("mobile", mobile);
最后使用ajax提交内容
 $.ajax({

            url: 'http://zhangykwww.yind123.com/webapi/feedback',

            type: 'POST',

            data: formFile,

            async: true,

            cache: false,

            contentType: false,

            processData: false,

            // traditional:true,

            dataType:'json',

            success: function(res) {

                console.log(res);

            }

        })
以上就实现了图片上传、图片预览和图片删除的功能
实现过程中遇到的坑
1.解决input file上传图片无法上传相同的图片 如果是相同图片onChange事件只会触发一次
onChange里面清除元素的value
document.querySelector('#uploader-get-file').value = null
也可以这样this.value = null;
$('#upload').on('change',function(){//图片上传

        this.value = null;//解决无法上传相同图片的问题

})
2.使用formData上传file数组 3种方式(参考https://segmentfault.com/q/1010000009622562)
方式1:

$.each(getImgFiles(), function(i, file){

    formData.append('files', file);

});

方式2:

$.each(getImgFiles(), function(i, file){

    formData.append('files[]', file);

});

方式3:

$.each(getImgFiles(), function(i, file){

    formData.append('files_' + i, file);

});
3.jquery设置 ajax属性
processData : false, // 告诉jQuery不要去处理发送的数据

contentType : false,// 告诉jQuery不要去设置Content-Type请求头
完整的代码我已经上传到了https://github.com/fozero/frontcode,可以点击查看,如果觉得还不错的话,记得star一下哦!
相关链接
http://www.17sucai.com/pins/26463.html
https://blog.csdn.net/take_dream_as_horse/article/details/53197697
https://blog.csdn.net/qq_35556474/article/details/54575779
http://www.jb51.net/article/83894.htm
http://www.haorooms.com/post/css_input_uploadmh
https://www.cnblogs.com/LoveTX/p/7081515.html
http://www.haorooms.com/post/input_file_leixing
作者:fozero
声明:原创文章,转载请注明出处,谢谢!http://www.cnblogs.com/fozero/p/8835628.html
标签:input,file,图片上传
input type=file实现图片上传,预览以及图片删除的更多相关文章
- html,图片上传预览,input file获取文件等相关操作
input file常用方法: var obj=document.getElementById("upimage"); var file=obj.files[0];//获取文件数据 ...
- 兼容好的JS图片上传预览代码
转 : http://www.codefans.net/articles/1395.shtml 兼容好的JS图片上传预览代码 (谷歌,IE11) <html xmlns="http:/ ...
- Jquery图片上传预览效果
uploadPreview.js jQuery.fn.extend({ uploadPreview: function (opts) { var _self = this, _this = $(thi ...
- [前端 4] 使用Js实现图片上传预览
导读:今天做图片上传预览,刚开始的做法是,先将图片上传到Nginx,然后重新加载页面才能看到这个图片.在这个过程中,用户一直都看不到自己上传的文件是什么样子.Ps:我发现我真的有强迫症了,都告诉我说不 ...
- Javascript之图片上传预览
使用Javascript之图片上传预览,我们无需上传到服务器中,兼容所有浏览器. 关键方法是使用微软库filter:progid:DXImageTransform.Microsoft.AlphaIma ...
- HTML5 图片上传预览
<!DOCTYPE html> <html lang="zh-cn"> <head> <meta charset="utf-8& ...
- ASP.NET工作笔记之一:图片上传预览及无刷新上传
转自:http://www.cnblogs.com/sibiyellow/archive/2012/04/27/jqueryformjs.html 最近项目里面涉及到无刷新上传图片的功能,其实也就是上 ...
- php 图片上传预览(转)
网上找的图片上传预览: <!DOCTYPE html PUBLIC "-//W3C//DTD XHTML 1.0 Transitional//EN" "http:/ ...
- js实现图片上传预览及进度条
原文js实现图片上传预览及进度条 最近在做图片上传的时候,由于产品设计的比较fashion,上网找了比较久还没有现成的,因此自己做了一个,实现的功能如下: 1:去除浏览器<input type= ...
- html 图片上传预览
Html5 upload img 2012年12月27日 20:36 <!DOCTYPE HTML> <html> <head> <meta http-equ ...
随机推荐
- 安装配置python环境,并跑一个推荐系统的例子
1.官网下载python2.7,安装完后,在环境变量Path中加上这个路径 在控制台输入python,出现版本信息,就成功了. 2.我使用的是 pycharm,注册后,在 把自己的python.exe ...
- django网页分页
blog/views.py from django.core.paginator import Paginator, EmptyPage, PageNotAnInteger #导入分页插件包 def ...
- margin和padding的用法与区别--以及bug处理方式
margin和padding的用法: (1)padding (margin) -left:10px; 左内 (外) 边距(2)padding (margin) -right:10px; 右内 (外 ...
- Python Day 3
阅读目录: 内容回顾: 变量(标识符)的命名规范: 常量: 格式化输入\输出: 注释: 基本数据类型: 运算符: ##内容回顾 1.语言的分类: -- 机器语言:直接编写0,1指令,直接能被硬件执行. ...
- nigx
1.反向代理 2.负载均衡(weight:设置权重) 3.高可用(场景:当主服务器死掉后 拥有备用服务器承接后续的访问) 安装 Keepalived实现
- 解决刚刚安装完mysql 远程连接不上问题
解决远程连接mysql错误1130 远程连接Mysql服务器的数据库,错误代码是1130,ERROR 1130: Host xxx.xxx.xxx.xxx is not allowed to con ...
- sql pivot(行转列) 和unpivot(列转行)的用法
1.PIVOT用法(行转列) select * from Table_Score as a pivot (sum(score) for a.name in ([语文],[数学],[外语],[文综],[ ...
- 【repost】JavaScript 运行机制详解:再谈Event Loop
一年前,我写了一篇<什么是 Event Loop?>,谈了我对Event Loop的理解. 上个月,我偶然看到了Philip Roberts的演讲<Help, I'm stuck i ...
- 卷积在深度学习中的作用(转自http://timdettmers.com/2015/03/26/convolution-deep-learning/)
卷积可能是现在深入学习中最重要的概念.卷积网络和卷积网络将深度学习推向了几乎所有机器学习任务的最前沿.但是,卷积如此强大呢?它是如何工作的?在这篇博客文章中,我将解释卷积并将其与其他概念联系起来,以帮 ...
- html 基本用法
html表单表格基本用法,直接贴代码. <html> <head> <title>html基础</title> </head> </b ...