SSh结合Easyui实现Datagrid的分页显示
近日学习Easyui,发现非常好用,界面很美观。将学习的心得在此写下,这篇博客写SSh结合Easyui实现Datagrid的分页显示,其他的例如添加、修改、删除、批量删除等功能将在后面的博客一一写来。
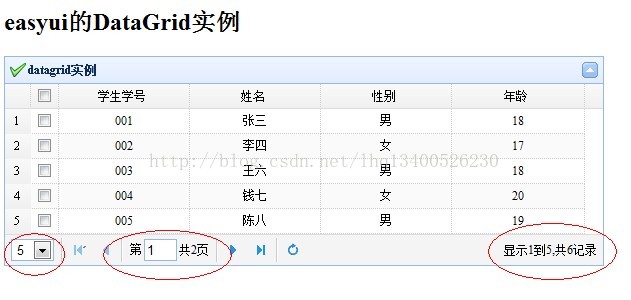
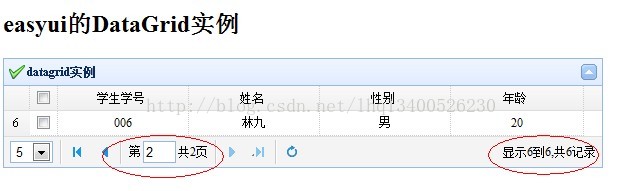
首先看一下要实现的效果:当每页显示5行数据:
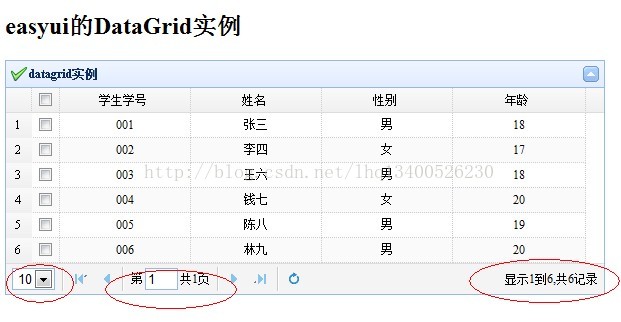
当每页显示10行数据,效果如下:
具体步骤:
1、下载Easyui,并搭建环境。可参照博客http://blog.csdn.net/lhq13400526230/article/details/9148299
2、搭建SSH工程,整个工程的目录结构如图所示:

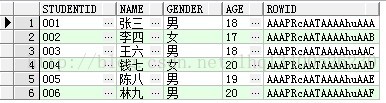
3、在Oracle数据库中创建表Student。并且输入下面6行数据,因为添加操作还没有实现,所以先在数据库表中添加数据。默认设定的值是每行5个数据,所以请至少输入6行数据,便于分页的测试。
4、web.xml的配置
<?xml version="1.0" encoding="UTF-8"?>

<web-app version="2.5" xmlns="http://java.sun.com/xml/ns/javaee"

    xmlns:xsi="http://www.w3.org/2001/XMLSchema-instance"

    xsi:schemaLocation="http://java.sun.com/xml/ns/javaee

    http://java.sun.com/xml/ns/javaee/web-app_2_5.xsd">

    <!-- Sttuts2过滤器 -->

    <filter>

        <filter-name>struts2</filter-name>

        <filter-class>org.apache.struts2.dispatcher.ng.filter.StrutsPrepareAndExecuteFilter</filter-class>

    </filter>

    <filter-mapping>

        <filter-name>struts2</filter-name>

        <url-pattern>/*</url-pattern>

    </filter-mapping>

    <!-- 监听器Spring -->

    <listener>

        <listener-class>org.springframework.web.context.ContextLoaderListener</listener-class>

    </listener>

    <!-- 定位applicationContext.xml的物理位置 -->

    <context-param>

        <param-name>contextConfigLocation</param-name>

        <param-value>classpath:applicationContext.xml</param-value>

    </context-param>

</web-app>
5、applicationContext.xml的配置
<?xml version="1.0" encoding="UTF-8"?>

<beans xmlns="http://www.springframework.org/schema/beans"

    xmlns:xsi="http://www.w3.org/2001/XMLSchema-instance" xmlns:context="http://www.springframework.org/schema/context"

    xmlns:aop="http://www.springframework.org/schema/aop" xmlns:tx="http://www.springframework.org/schema/tx"

    xsi:schemaLocation="http://www.springframework.org/schema/beans

           http://www.springframework.org/schema/beans/spring-beans-2.5.xsd

           http://www.springframework.org/schema/context

           http://www.springframework.org/schema/context/spring-context-2.5.xsd

           http://www.springframework.org/schema/aop http://www.springframework.org/schema/aop/spring-aop-2.5.xsd

           http://www.springframework.org/schema/tx http://www.springframework.org/schema/tx/spring-tx-2.5.xsd">

<import resource="applicationContext_bean.xml"/>

<import resource="applicationContext_db.xml"/>

</beans>
6、在com.model中创建模型类Student.java
package com.model;

public class Student {

    String studentid;// 主键

    String name;// 姓名

    String gender;// 性别

    String age;// 年龄

    public String getStudentid() {

        return studentid;

    }

    public void setStudentid(String studentid) {

        this.studentid = studentid;

    }

    public String getName() {

        return name;

    }

    public void setName(String name) {

        this.name = name;

    }

    public String getGender() {

        return gender;

    }

    public void setGender(String gender) {

        this.gender = gender;

    }

    public String getAge() {

        return age;

    }

    public void setAge(String age) {

        this.age = age;

    }

}
7、根据Student.java生成对应的映射文件Student.hbm.xml
<?xml version="1.0"?>

<!DOCTYPE hibernate-mapping PUBLIC "-//Hibernate/Hibernate Mapping DTD 3.0//EN"

"http://hibernate.sourceforge.net/hibernate-mapping-3.0.dtd">

<!-- Generated 2013-6-23 23:31:47 by Hibernate Tools 3.4.0.CR1 -->

<hibernate-mapping>

    <class name="com.model.Student" table="STUDENT">

        <id name="studentid" type="java.lang.String">

            <column name="STUDENTID" />

            <generator class="assigned" />

        </id>

        <property name="name" type="java.lang.String">

            <column name="NAME" />

        </property>

        <property name="gender" type="java.lang.String">

            <column name="GENDER" />

        </property>

        <property name="age" type="java.lang.String">

            <column name="AGE" />

        </property>

    </class>

</hibernate-mapping>
8、编写接口StudentService.java
package com.service;

import java.util.List;

public interface StudentService {

     public List getStudentList(String page,String rows) throws Exception;//根据第几页获取,每页几行获取数据

     public int getStudentTotal() throws Exception;//统计一共有多少数据

}
9、编写接口的实现类StudentServiceImpl.java
package com.serviceImpl;

import java.util.List;

import org.hibernate.SessionFactory;

import com.service.StudentService;

public class StudentServiceImpl implements StudentService {

    private SessionFactory sessionFactory;

    // 根据第几页获取,每页几行获取数据

    public List getStudentList(String page, String rows) {

        //当为缺省值的时候进行赋值

        int currentpage = Integer.parseInt((page == null || page == "0") ? "1": page);//第几页

        int pagesize = Integer.parseInt((rows == null || rows == "0") ? "10": rows);//每页多少行

        List list = this.sessionFactory.getCurrentSession().createQuery("from Student")

                       .setFirstResult((currentpage - 1) * pagesize).setMaxResults(pagesize).list();

        return list;

    }

    // 统计一共有多少数据

    public int getStudentTotal() throws Exception {

        return this.sessionFactory.getCurrentSession().find("from Student").size();

    }

    public SessionFactory getSessionFactory() {

        return sessionFactory;

    }

    public void setSessionFactory(SessionFactory sessionFactory) {

        this.sessionFactory = sessionFactory;

    }

}
10、配置连接数据库的配置文件applicationContext_db.xml
<?xml version="1.0" encoding="UTF-8"?>

<beans xmlns="http://www.springframework.org/schema/beans"

    xmlns:xsi="http://www.w3.org/2001/XMLSchema-instance" xmlns:context="http://www.springframework.org/schema/context"

    xmlns:aop="http://www.springframework.org/schema/aop" xmlns:tx="http://www.springframework.org/schema/tx"

    xsi:schemaLocation="http://www.springframework.org/schema/beans

           http://www.springframework.org/schema/beans/spring-beans-2.5.xsd

           http://www.springframework.org/schema/context

           http://www.springframework.org/schema/context/spring-context-2.5.xsd

           http://www.springframework.org/schema/aop http://www.springframework.org/schema/aop/spring-aop-2.5.xsd

           http://www.springframework.org/schema/tx http://www.springframework.org/schema/tx/spring-tx-2.5.xsd">

    <!-- 用Bean定义数据源 -->

    <bean id="dataSource" class="com.mchange.v2.c3p0.ComboPooledDataSource"

        destroy-method="close">

        <!-- 定义数据库驱动 -->

        <property name="driverClass">

            <value>oracle.jdbc.driver.OracleDriver</value>

        </property>

        <!-- 定义数据库URL -->

        <property name="jdbcUrl">

            <value>jdbc:oracle:thin:@localhost:1521:orcl</value>

        </property>

        <!-- 定义数据库的用户名 -->

        <property name="user">

            <value>lhq</value>

        </property>

        <!-- 定义数据库的密码 -->

        <property name="password">

            <value>lhq</value>

        </property>

        <property name="minPoolSize">

            <value>1</value>

        </property>

        <property name="maxPoolSize">

            <value>40</value>

        </property>

        <property name="maxIdleTime">

            <value>1800</value>

        </property>

        <property name="acquireIncrement">

            <value>2</value>

        </property>

        <property name="maxStatements">

            <value>0</value>

        </property>

        <property name="initialPoolSize">

            <value>2</value>

        </property>

        <property name="idleConnectionTestPeriod">

            <value>1800</value>

        </property>

        <property name="acquireRetryAttempts">

            <value>30</value>

        </property>

        <property name="breakAfterAcquireFailure">

            <value>true</value>

        </property>

        <property name="testConnectionOnCheckout">

            <value>false</value>

        </property>

    </bean>

    <!--定义Hibernate的SessionFactory -->

    <bean id="sessionFactory"

        class="org.springframework.orm.hibernate3.LocalSessionFactoryBean">

        <!-- 定义SessionFactory必须注入dataSource -->

        <property name="dataSource">

            <ref bean="dataSource" />

        </property>

        <!-- 定义Hibernate的SessionFactory属性 -->

        <property name="hibernateProperties">

            <props>

                <prop key="hibernate.dialect">

                    org.hibernate.dialect.Oracle10gDialect

                </prop>

            </props>

        </property>

        <!-- 定义POJO的映射文件 -->

        <property name="mappingResources">

            <list>

                <value>com/model/Student.hbm.xml</value>

            </list>

        </property>

    </bean>

    <!-- 配置事务拦截器 -->

    <bean id="transactionManager"

        class="org.springframework.orm.hibernate3.HibernateTransactionManager">

        <property name="sessionFactory" ref="sessionFactory" />

    </bean>

    <tx:advice id="txAdvice" transaction-manager="transactionManager">

        <tx:attributes>

            <tx:method name="save*" propagation="REQUIRED" /><!-- 只有一save、delete、update开头的方法才能执行增删改操作 -->

            <tx:method name="delete*" propagation="REQUIRED" />

            <tx:method name="update*" propagation="REQUIRED" />

            <tx:method name="*" propagation="SUPPORTS" read-only="true" /><!-- 其他方法为只读方法 -->

        </tx:attributes>

    </tx:advice>

    <aop:config>

        <aop:pointcut id="interceptorPointCuts"  expression="execution(* com.serviceImpl..*.*(..))" />  <!-- 对应实现类接口的包的位置 -->

        <aop:advisor advice-ref="txAdvice" pointcut-ref="interceptorPointCuts" />

    </aop:config>

</beans>
11、在控制层编写StudentAction.java类型
package com.action;

import java.util.List;

import javax.servlet.http.HttpServletRequest;

import javax.servlet.http.HttpServletResponse;

import net.sf.json.JSONObject;

import org.apache.log4j.Logger;

import org.apache.struts2.ServletActionContext;

import com.service.StudentService;

public class StudentAction {

    static Logger log = Logger.getLogger(StudentAction.class);

    private JSONObject jsonObj;

    private String rows;// 每页显示的记录数

    private String page;// 当前第几页

    private StudentService student_services;//String依赖注入

    //查询出所有学生信息

    public String getAllStudent() throws Exception {

        log.info("查询出所有学生信息");

        List list = student_services.getStudentList(page, rows);

        this.toBeJson(list,student_services.getStudentTotal());

        return null;

    }

    //转化为Json格式

       public void toBeJson(List list,int total) throws Exception{

            HttpServletResponse response = ServletActionContext.getResponse();

            HttpServletRequest request = ServletActionContext.getRequest();

            JSONObject jobj = new JSONObject();//new一个JSON

            jobj.accumulate("total",total );//total代表一共有多少数据

            jobj.accumulate("rows", list);//row是代表显示的页的数据

            response.setCharacterEncoding("utf-8");//指定为utf-8

            response.getWriter().write(jobj.toString());//转化为JSOn格式

            log.info(jobj.toString());

       }

    public StudentService getStudent_services() {

        return student_services;

    }

    public void setStudent_services(StudentService student_services) {

        this.student_services = student_services;

    }

    public void setJsonObj(JSONObject jsonObj) {

        this.jsonObj = jsonObj;

    }

    public void setRows(String rows) {

        this.rows = rows;

    }

    public void setPage(String page) {

        this.page = page;

    }

}
12、编写Spring的依赖注入applicationContext_bean.xml配置文件
<?xml version="1.0" encoding="UTF-8"?>

<beans xmlns="http://www.springframework.org/schema/beans"

    xmlns:xsi="http://www.w3.org/2001/XMLSchema-instance" xmlns:context="http://www.springframework.org/schema/context"

    xmlns:aop="http://www.springframework.org/schema/aop" xmlns:tx="http://www.springframework.org/schema/tx"

    xsi:schemaLocation="http://www.springframework.org/schema/beans

           http://www.springframework.org/schema/beans/spring-beans-2.5.xsd

           http://www.springframework.org/schema/context

           http://www.springframework.org/schema/context/spring-context-2.5.xsd

           http://www.springframework.org/schema/aop http://www.springframework.org/schema/aop/spring-aop-2.5.xsd

           http://www.springframework.org/schema/tx http://www.springframework.org/schema/tx/spring-tx-2.5.xsd">

    <!-- 业务层Service -->

    <bean id="student_service" class="com.serviceImpl.StudentServiceImpl">

        <property name="sessionFactory">

             <ref bean="sessionFactory"></ref>

        </property>

    </bean>

    <!-- 控制层Action -->

    <bean id="student_action" class="com.action.StudentAction">

        <property name="student_services">

             <ref bean="student_service" />

        </property>

    </bean>

</beans>
13、编写struts.xml配置文件
<?xml version="1.0" encoding="UTF-8"?>

<!DOCTYPE struts PUBLIC

"-//Apache Software Foundation//DTD Struts Configuration 2.0//EN"

"http://struts.apache.org/dtds/struts-2.0.dtd">

<struts>

    <package name="Easyui" extends="json-default">

        <!-- 学生信息 -->

        <action name="getAllStudentAction" class="student_action" method="getAllStudent">

            <result type="json"> </result>

        </action>

    </package>

</struts>
14、编写JSP----index.jsp
<%@ page language="java" pageEncoding="utf-8" isELIgnored="false"%>

<%

    String path = request.getContextPath();

%>

<%@ taglib prefix="s" uri="/struts-tags"%>

<!DOCTYPE html PUBLIC "-//W3C//DTD HTML 4.01 Transitional//EN" "http://www.w3.org/TR/html4/loose.dtd">

<html>

<head>

<meta http-equiv="Content-Type" content="text/html; charset=utf-8">

<title>数字框</title>

<!-- 引入Jquery -->

<script type="text/javascript"   src="<%=path%>/js/easyui/jquery-1.8.0.min.js" charset="utf-8"></script>

<!-- 引入Jquery_easyui -->

<script type="text/javascript"   src="<%=path%>/js/easyui/jquery.easyui.min.js" charset="utf-8"></script>

<!-- 引入easyUi国际化--中文 -->

<script type="text/javascript"   src="<%=path%>/js/easyui/locale/easyui-lang-zh_CN.js" charset="utf-8"></script>

<!-- 引入easyUi默认的CSS格式--蓝色 -->

<link rel="stylesheet" type="text/css"   href="<%=path%>/js/easyui/themes/default/easyui.css" />

<!-- 引入easyUi小图标 -->

<link rel="stylesheet" type="text/css"   href="<%=path%>/js/easyui/themes/icon.css" />

<script type="text/javascript">

    $(function() {

        $('#mydatagrid').datagrid({

            title : 'datagrid实例',

            iconCls : 'icon-ok',

            width : 600,

            pageSize : 5,//默认选择的分页是每页5行数据

            pageList : [ 5, 10, 15, 20 ],//可以选择的分页集合

            nowrap : true,//设置为true,当数据长度超出列宽时将会自动截取

            striped : true,//设置为true将交替显示行背景。

            collapsible : true,//显示可折叠按钮

            toolbar:"#tb",//在添加 增添、删除、修改操作的按钮要用到这个

            url:'getAllStudentAction.action',//url调用Action方法

            loadMsg : '数据装载中......',

            singleSelect:true,//为true时只能选择单行

            fitColumns:true,//允许表格自动缩放,以适应父容器

            //sortName : 'xh',//当数据表格初始化时以哪一列来排序

            //sortOrder : 'desc',//定义排序顺序,可以是'asc'或者'desc'(正序或者倒序)。

            remoteSort : false,

             frozenColumns : [ [ {

                field : 'ck',

                checkbox : true

            } ] ],

            pagination : true,//分页

            rownumbers : true//行数

        });

    });

</script>

</head>

<body>

    <h2>

        <b>easyui的DataGrid实例</b>

    </h2>

    <table id="mydatagrid">

       <thead>

            <tr>

                <th data-options="field:'studentid',width:100,align:'center'">学生学号</th>

                <th data-options="field:'name',width:100,align:'center'">姓名</th>

                <th data-options="field:'gender',width:100,align:'center'">性别</th>

                <th data-options="field:'age',width:100,align:'center'">年龄</th>

            </tr>

        </thead>

    </table>

</body>

</html>
15、启动程序,输入http://localhost:8080/easyui/index.jsp进行测试
来自:http://blog.csdn.net/lhq13400526230/article/details/9158111
参考文章:http://www.open-open.com/lib/view/open1380637261182.html
SSh结合Easyui实现Datagrid的分页显示的更多相关文章
- 实例:SSh结合Easyui实现Datagrid的分页显示
近日学习Easyui,发现非常好用,界面很美观.将学习的心得在此写下,这篇博客写SSh结合Easyui实现Datagrid的分页显示,其他的例如添加.修改.删除.批量删除等功能将在后面的博客一一写来. ...
- schemaeasyui实例:SSh结合Easyui实现Datagrid的分页显示
查了好多资料,发现还是不全,干脆自己整理吧,最少保证在我的做法正确的,以免误导读者,也是给自己做个记载吧! 克日学习Easyui,发现非常好用,界面很雅观.将学习的心得在此写下,这篇博客写SSh结合E ...
- 实例:SSH结合Easyui实现Datagrid的新增功能和Validatebox的验证功能
在我前面一篇分页的基础上,新增了添加功能和添加过程中的Ajax与Validate的验证功能.其他的功能在后面的博客写来,如果对您有帮助,敬请关注. 先看一下实现的效果: (1)点击添加学生信息按键后跳 ...
- 实例:SSH结合Easyui实现Datagrid的批量删除功能
在我先前的基础上面添加批量删除功能.实现的效果如下 删除成功 通常情况下删除不应该真正删除,而是应该有一个标志flag,但flag=true表示状态可见,但flag=false表示状态不可见,为删除状 ...
- easyui的datagrid为何无法显示json数据
因为easyui的datagrid要求数据JSON必须是如下格式:{"total":0,"rows":[]}其中total表示总的数据行数,rows是当前页的数 ...
- EasyUI表格DataGrid前端分页和后端分页的总结
Demo简介 Demo使用Java.Servlet为后台代码(数据库已添加数据),前端使用EasyUI框架,后台直接返回JSON数据给页面 1.配置Web.xml文件 <?xml version ...
- WPF DataGrid实现分页显示
主要代码如下 /// <summary> /// 读取指定页面的数据 /// </summary> /// <param name="pagePerCount& ...
- Struts2 + easyui的DataGrid 分页
jsp页面 js代码: $(function() { $('#ff').hide(); $('#tt').datagrid({ title : '信息显示', iconCls : 'icon-save ...
- EasyUI的Datagrid鼠标悬停显示单元格内容
功能描述:table鼠标悬停显示单元格内容 1.js函数 function hoveringShow(value) { return "<span title='" + va ...
随机推荐
- 《转》Visual Studio 2010 终极定制安装精简方法
打开VS2010安装目录下的 Setup 文件夹,找到 baseline.dat 文件和 vs_setup.pdi 文件还有一个 locdata.ini 文件,是对应的. 这些都是文本文件,用记事本就 ...
- 【转】Linux中如何安装.rpm、.tar、.tar.gz和tar.bz2
我以下面三个包为例:(三个包都在/etc/opt下)A.example-1.2.3-1.rpmB.example-1.2.3-1.tarC.example-1.2.3-1.tar.gz 1.对于rpm ...
- Android开发之模拟器的选择
在做Android app开发的时候由于机器配置不是特别高,而Android自带的模拟器非常耗资源,性能极其差.所以常常由于模拟器性能差而抓狂,相信不少开发者都会面临和我一样的问题.于是换了一台平常很 ...
- Java集合框架中List接口的简单使用
Java集合框架可以简单的理解为一种放置对象的容器,和数学中的集合概念类似,Java中的集合可以存放一系列对象的引用,也可以看做是数组的提升,Java集合类是一种工具类,只有相同类型的对象引用才可以放 ...
- javascript的onbeforeunload函数在IOS上运行
今天在做项目的时候,组长让我用iPad测试一下前面写的离线缓存,后退不刷新页面,发现在iPad上onbeforeunload函数在iPad上一带而过,不运行??? 无奈之下,发现原来在IOS上,有自己 ...
- [Android Pro] android Flag介绍
一些Flag的介绍 窗口之后的内容变暗. public static final int FLAG_DIM_BEHIND = 0x00000002; 窗口之后的内容变模糊. public ...
- Androidi性能优化之高效使用内存
应用生存期的绝大多数时间都在用于处理内存中的数据 性能主要取决于以下三个因素: a:CPU如何操作特定的数据类型 b: 数据和指令需要占用多少存储空间 c: 数据在内存中的布局 访问内存: 因为访问内 ...
- MVC准备前基础知识
一.自动属性C#自动属性可以避免原来这样我们手工声明一个私有成员变量以及编写get/set逻辑public class Product{ public int Id { get; set; } pub ...
- QML入门教程
QML是Qt推出的Qt Quick技术的一部分,是一种新增的简便易学的语言.QML是一种陈述性语言,用来描述一个程序的用户界面:无论是什么样子,以及它如何表现.在QML,一个用户界面被指定为具有属性的 ...
- mysqlroot passwd
grant all on *.* to 'root'@'192.168.0.%' identified by 'bloablabar'; 更改用户密码: update user set passwor ...